


3D printing an electric guitar has always been a dream of mine, but it seemed like such a daunting task. Would the body snap under the tension of the strings? Would it bend over time? Would I need to use special active pickups? Would the plastic body produce an awful sound compared to traditional hardwood? There were so many questions and surprisingly few answers to be found online.
I’m not the first one attempting this, of course. There are several articles and models available online, with some of the designs turning out very well. However, many of these printed guitars were not actually very playable, and some projects that looked nice either didn’t share the 3D model, lacked instructions, were overly complicated or were too expensive.
And so it was decided – I’m going to design my own 3D printable electric guitar from scratch.
Design priorities
To understand the thought process – I was designing the guitar with the 3D printing community in mind. I want others to be able to easily follow this build and create their own awesome guitar. So before I started designing anything, I put down a list of priorities:
- The project should be simple
- No complicated assemblies of tens of parts, easy to put together
- No metal rods for reinforcement or other non-essential hardware
- It should be cheap, if I’m spending a lot of money on a guitar, I’m buying a genuine Fender or Gibson
- The hardware should be easy to source with worldwide shipping
- All of the pieces must fit on the Original Prusa i3 MK3S+ (25×21×21 cm)
- This seems like a really tough limitation, but if it’s not printable on a MK3 sized printer, most people won’t be able to print it
- It should actually play well and be in tune across the whole range, I don’t want to create an unplayable plastic gimmick
- It should look incredibly cool!
Keeping it simple
From the beginning, the biggest concern was the force the strings apply to the guitar’s body and neck. While the sources slightly differ with the information on this, the consensus seems to be that it’s about 50 kg of load, depending on the string gauge (thickness). These 50 kg are trying to fold the guitar in half, trying to rip the bridge from the body, and trying to severely bend the neck.
Solving the neck problem was honestly a no-brain decision – I’m going to use a real wooden neck. While you might argue that the guitar will no longer be “fully 3d printed”, the neck is such a key and delicate part of the instrument, it would compromise the entire project if I wanted to print it (even though it is possible). Wooden necks are perfectly smooth and straight, have wear-resistant metal frets, and have a truss rod inside, which is used to adjust the relief (concave or convex bow).
Solving the bridge problem though required more thought. The bridge on an electric guitar is a small metal part that holds the bottom end of the strings. It’s usually secured to the body with a couple of screws. If we take a look at the most common guitar designs, one of the bridges might stand out to you as exceptionally suitable for a 3D printed guitar. Can you guess which one it is?
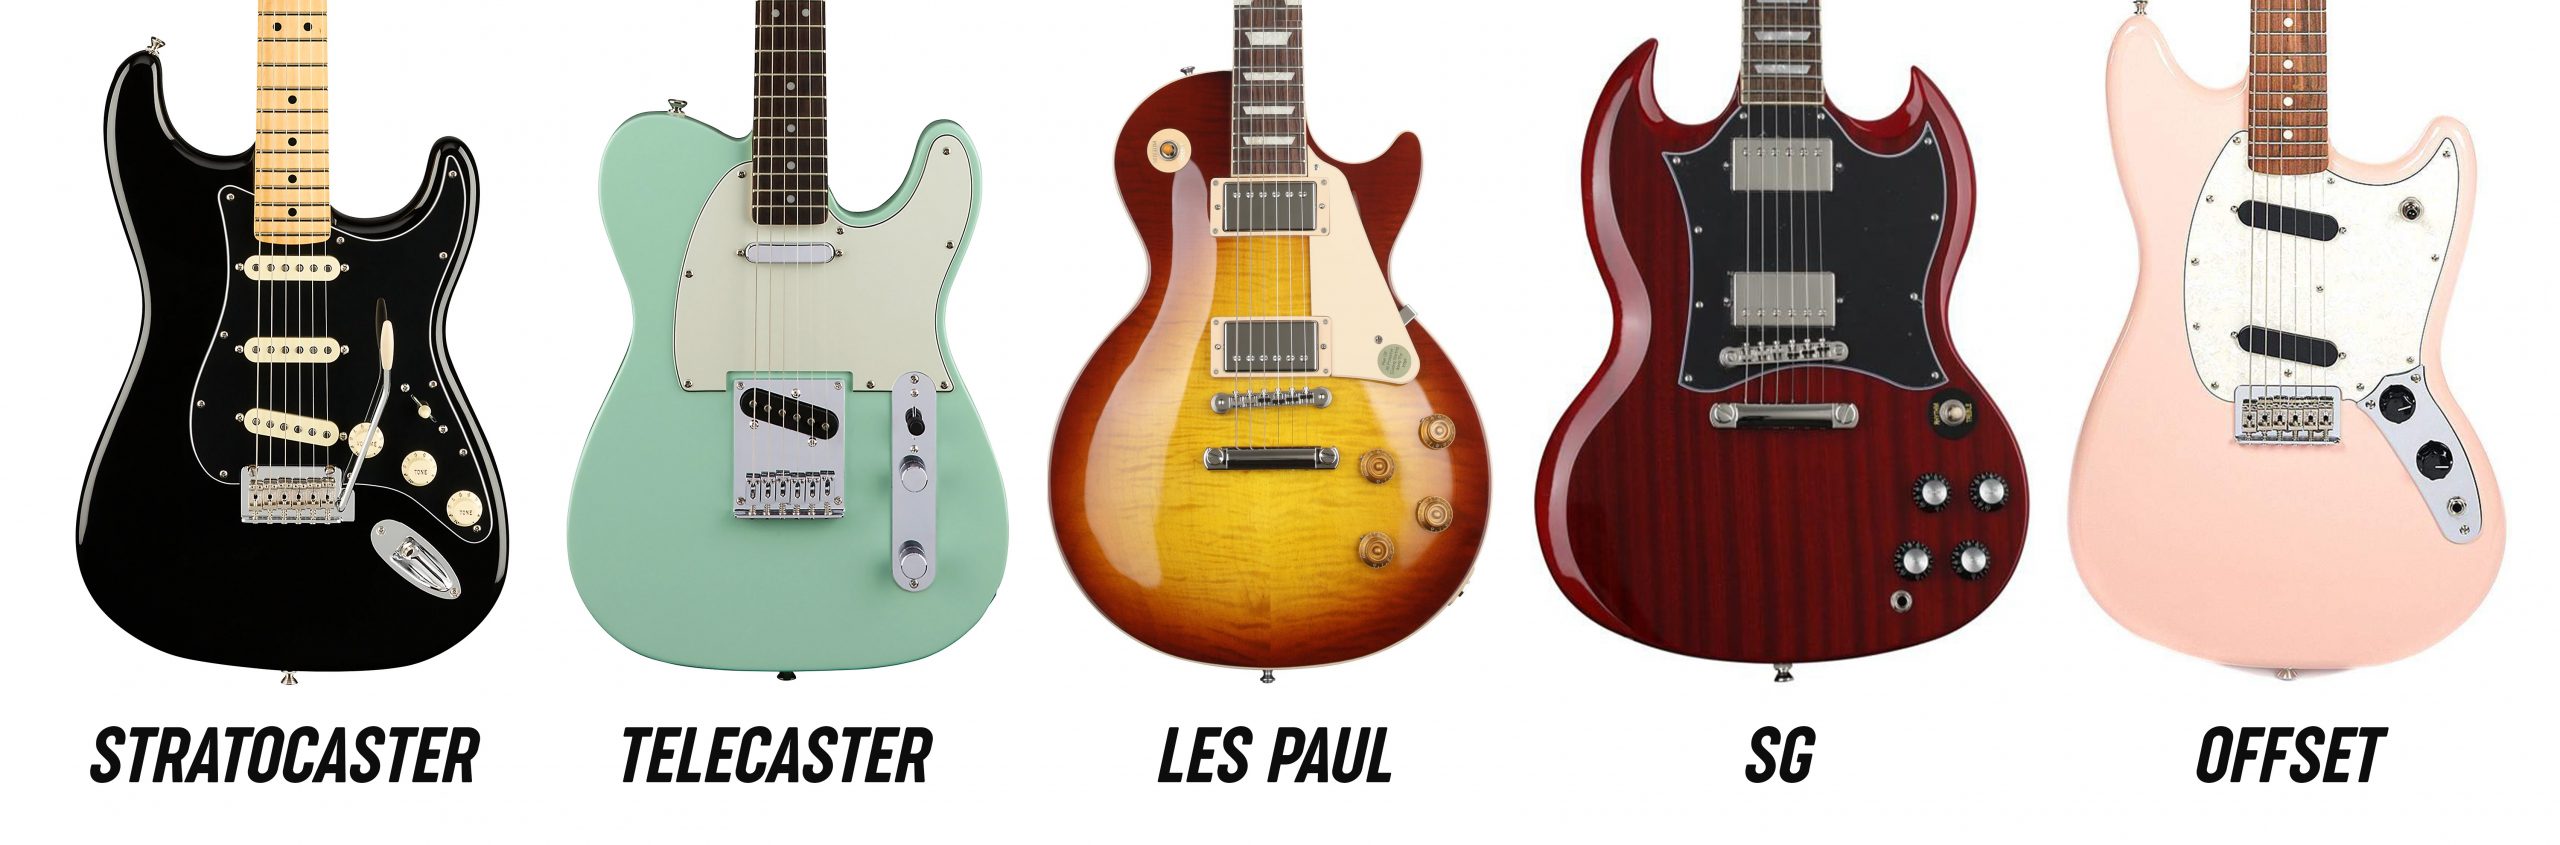
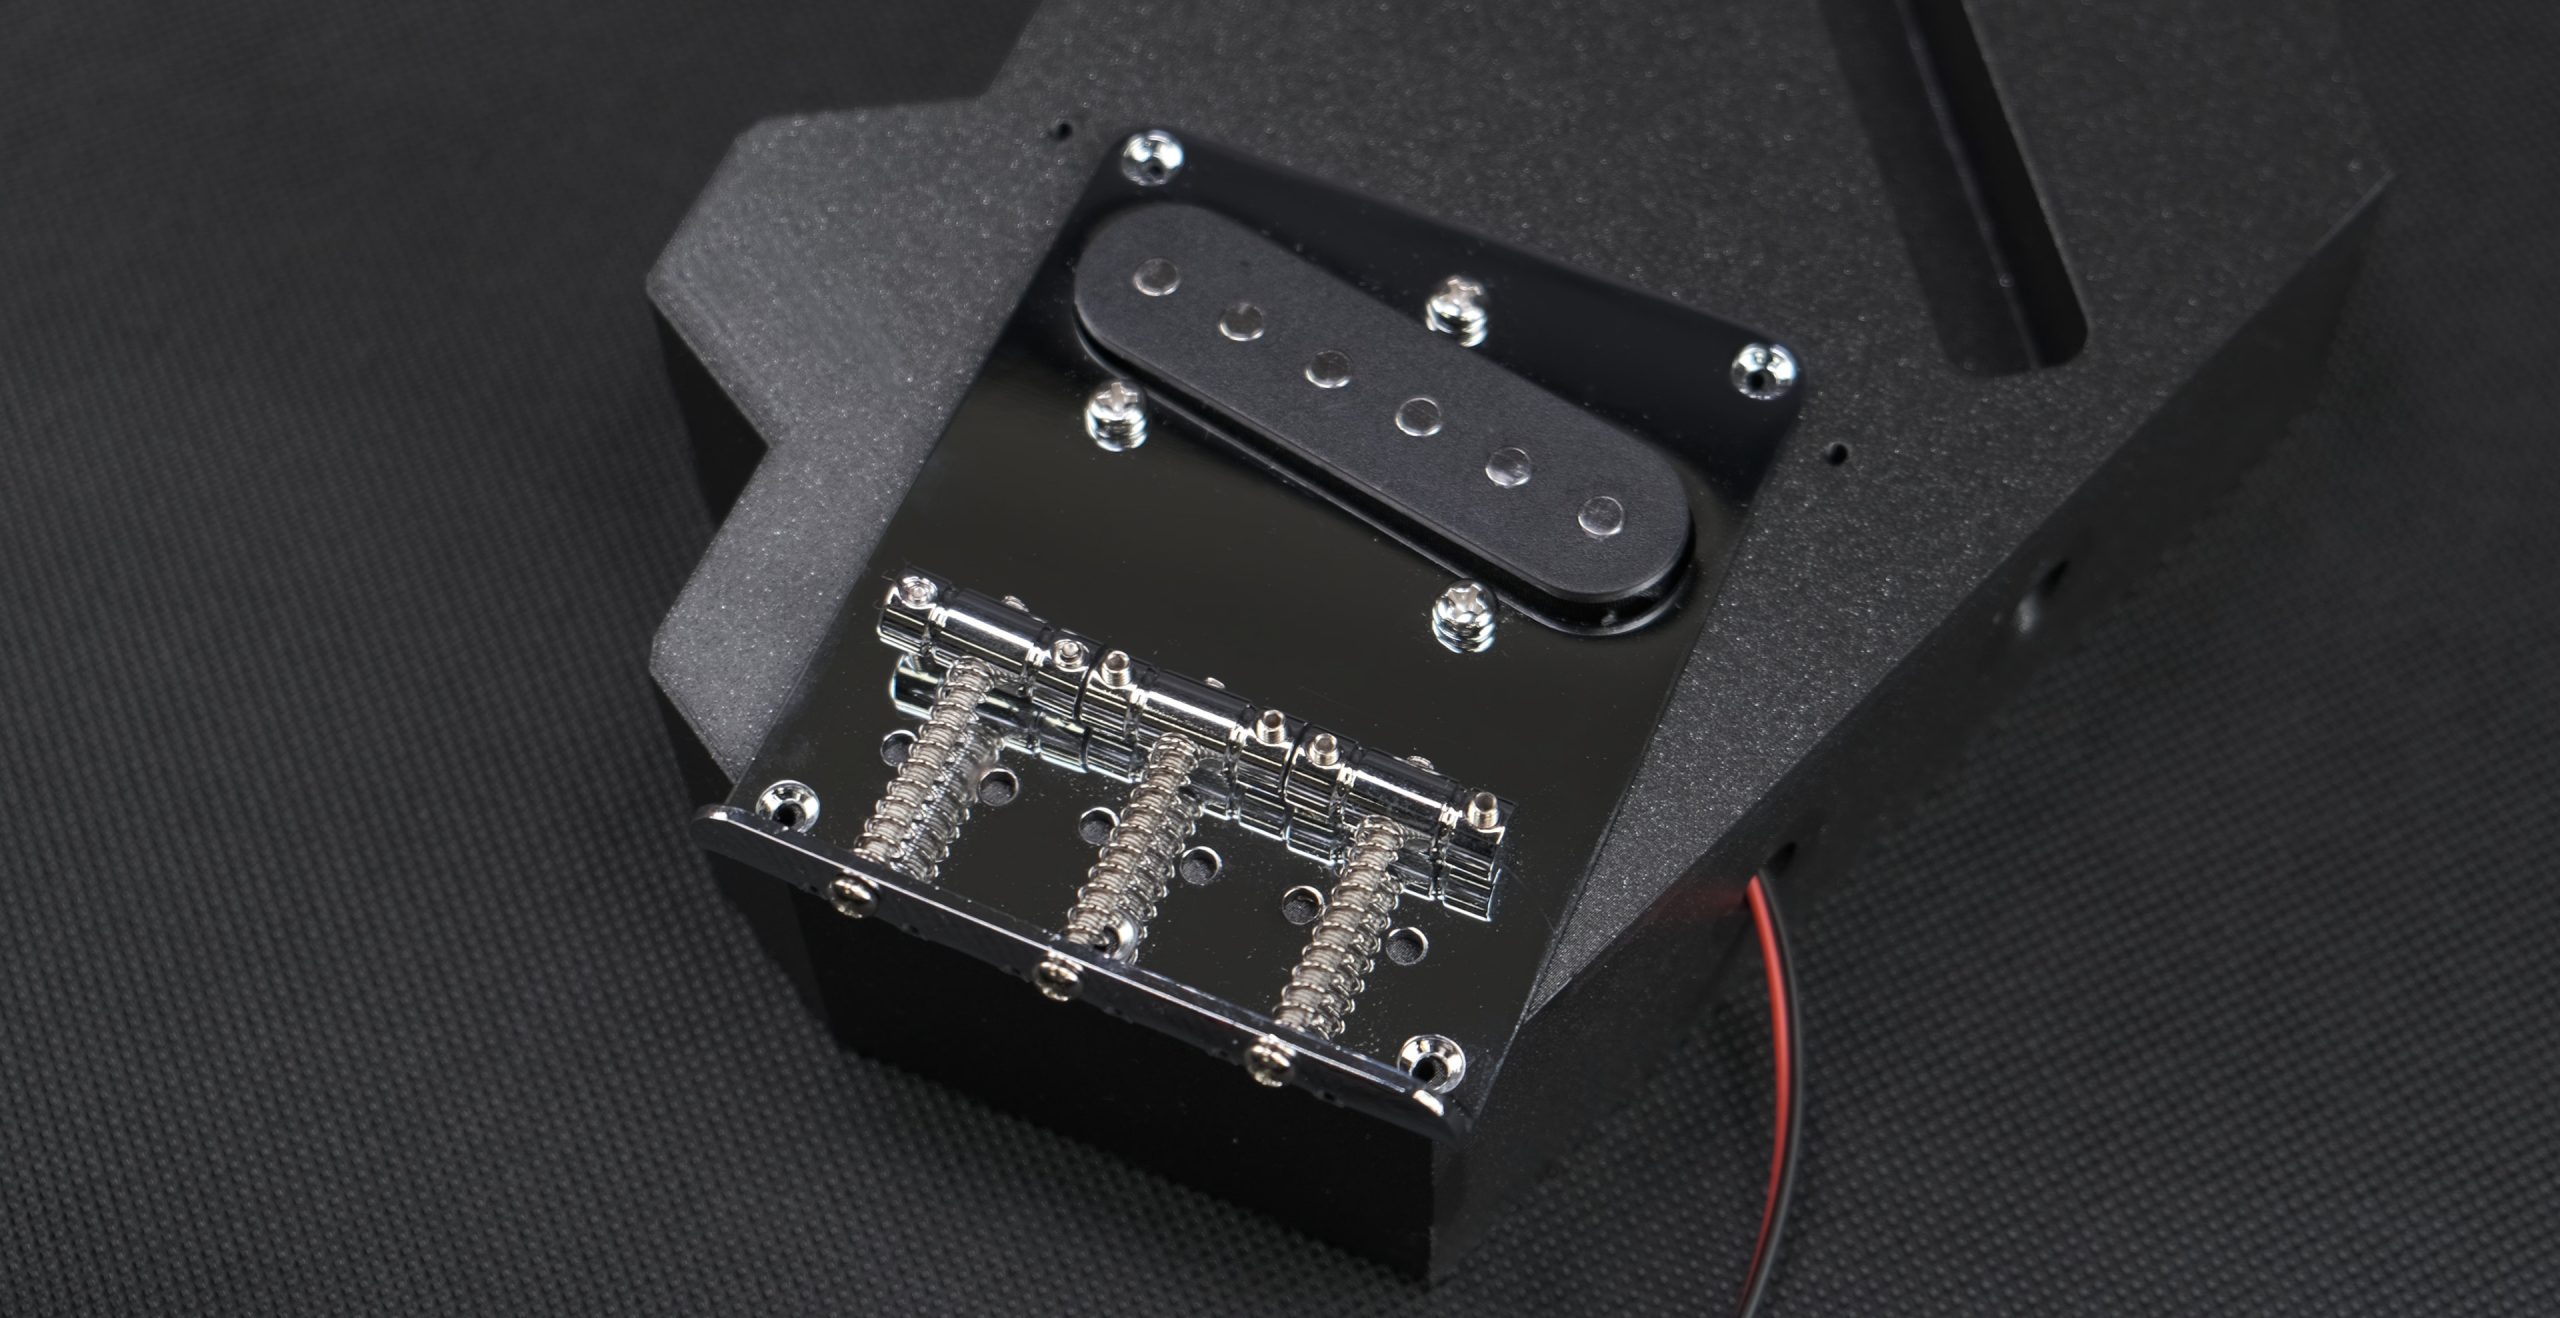
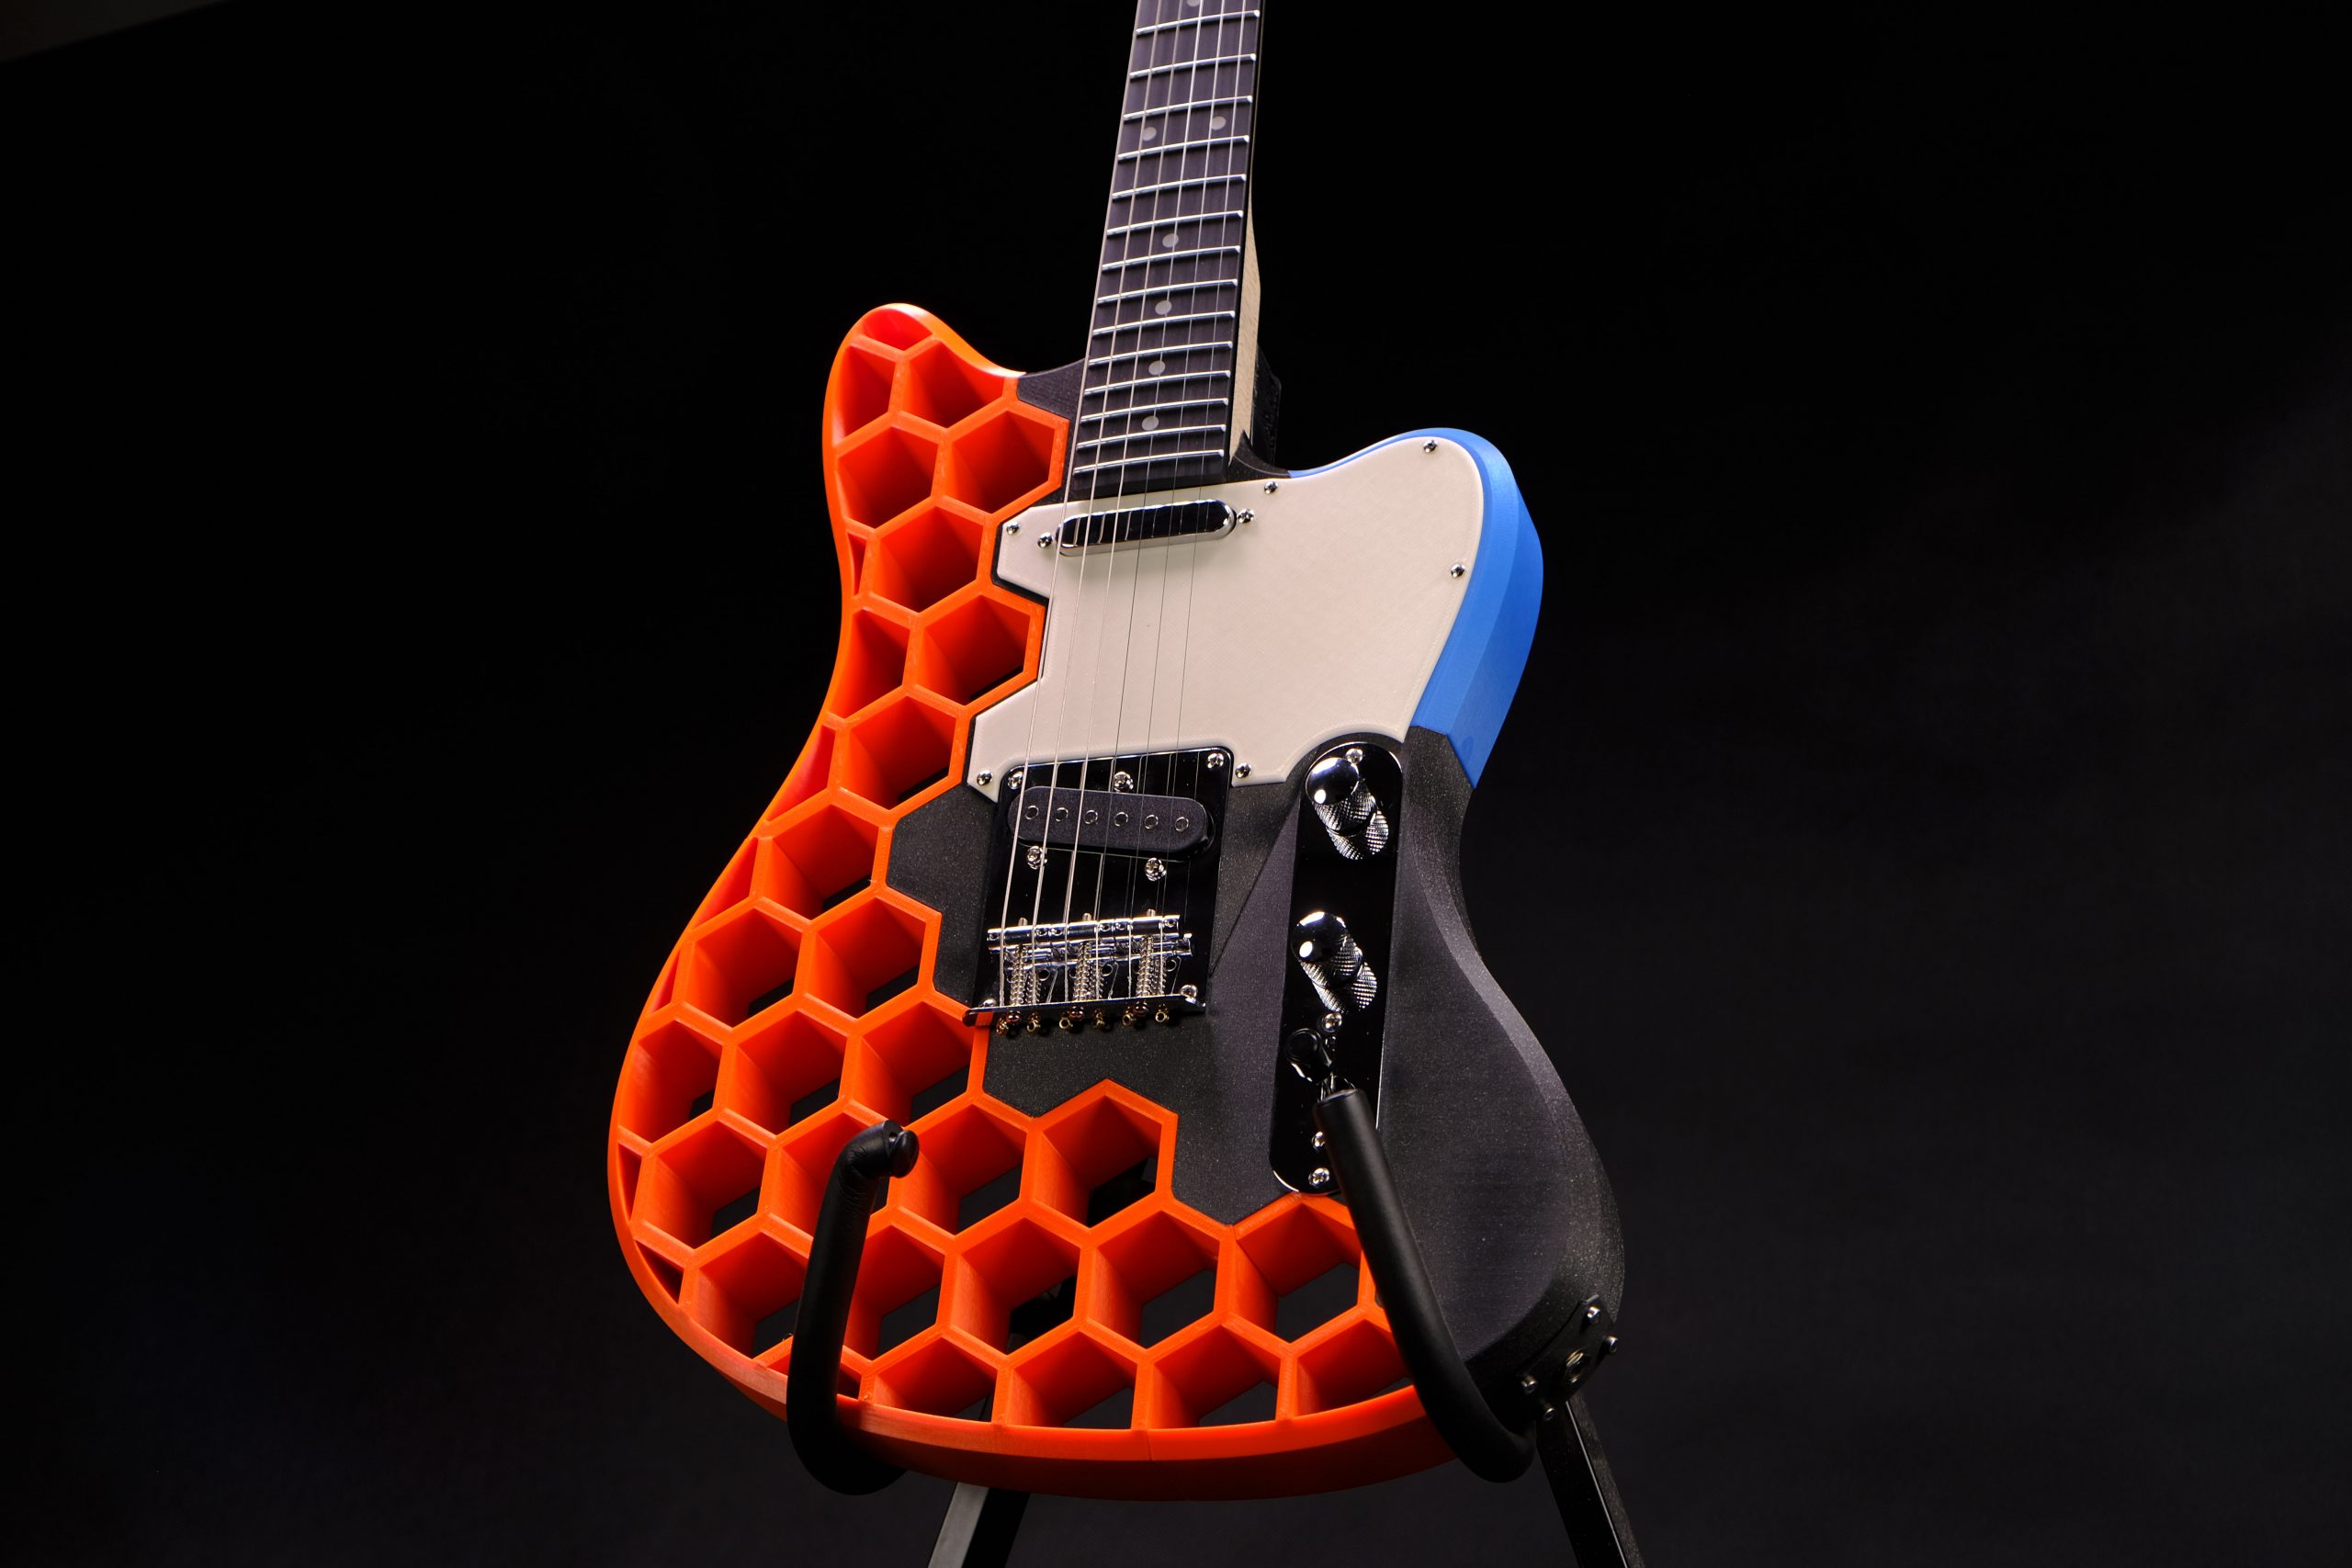
All but one of the common guitar designs have a very small bridge, sometimes only held in place with 2 screws. However, the Telecaster bridge, that’s a different story! This large metal plate not only holds the bottom strings in place, but also integrates the bottom pickup and has up to 5 mounting holes with widely spaced screw holes, allowing for better distribution of the leverage on the bridge across the entire metal plate and the underlying printed part.
Furthermore, the Telecaster has only one additional pickup, which makes the wiring and designing easier. And lastly, the volume and tune nobs, as well as the pickup selector switch, are all mounted on another metal plate and secured to the body with just 2 screws. This massively simplifies the project, as we won’t have to integrate several knobs and switches to the guitar individually.

The hardware
With the choice being made of going forward with the Telecaster hardware, we have to source all of the parts. In general, there are 3 ways to go about this:
- Buy a cheap Telecaster guitar and dismantle it for parts
- Buy all the parts individually
- Buy a Telecaster hardware kit
Buying a whole functional guitar just to take it apart right away seems like such a wrong and wasteful way to go about this. The only time this would seem a good solution would be if you find a severely damaged guitar, with the hardware and neck still in decent shape.
Buying all the parts individually is definitely a feasible option. You’d need:
- The guitar neck with tuners
- 1 standalone single-coil pickup
- The bridge with an integrated single-coil pickup
- Telecaster control plate with a 3-way switch and two knobs
- The output jack
The problem is that buying the components individually will be expensive. Even if you go with the absolute cheapest options, you will likely spend several hundred dollars.
Prepare for the kicker of this build – The Harley Benton Electric Guitar Kit T-Style! This kit costs just $79! And it includes all the hardware you’ll need, all pre-wired with simple connectors that simply snap together. It’s sold by the German-based Musikhaus Thomann, one of the largest music instrument retailers in the world. Which adds a checkmark to one of the requirements from the list – worldwide shipping.

It is so cheap and convenient, I just had to order it. This whole build just turned into an “order this kit and print the parts” level of simplicity. The Harley Benton telecaster kit comes with a rudimentary unpainted wooden body. For the price, it’s amazing it comes with a body at all. But I won’t feel bad leaving that body behind and using a printed one.
The basic design
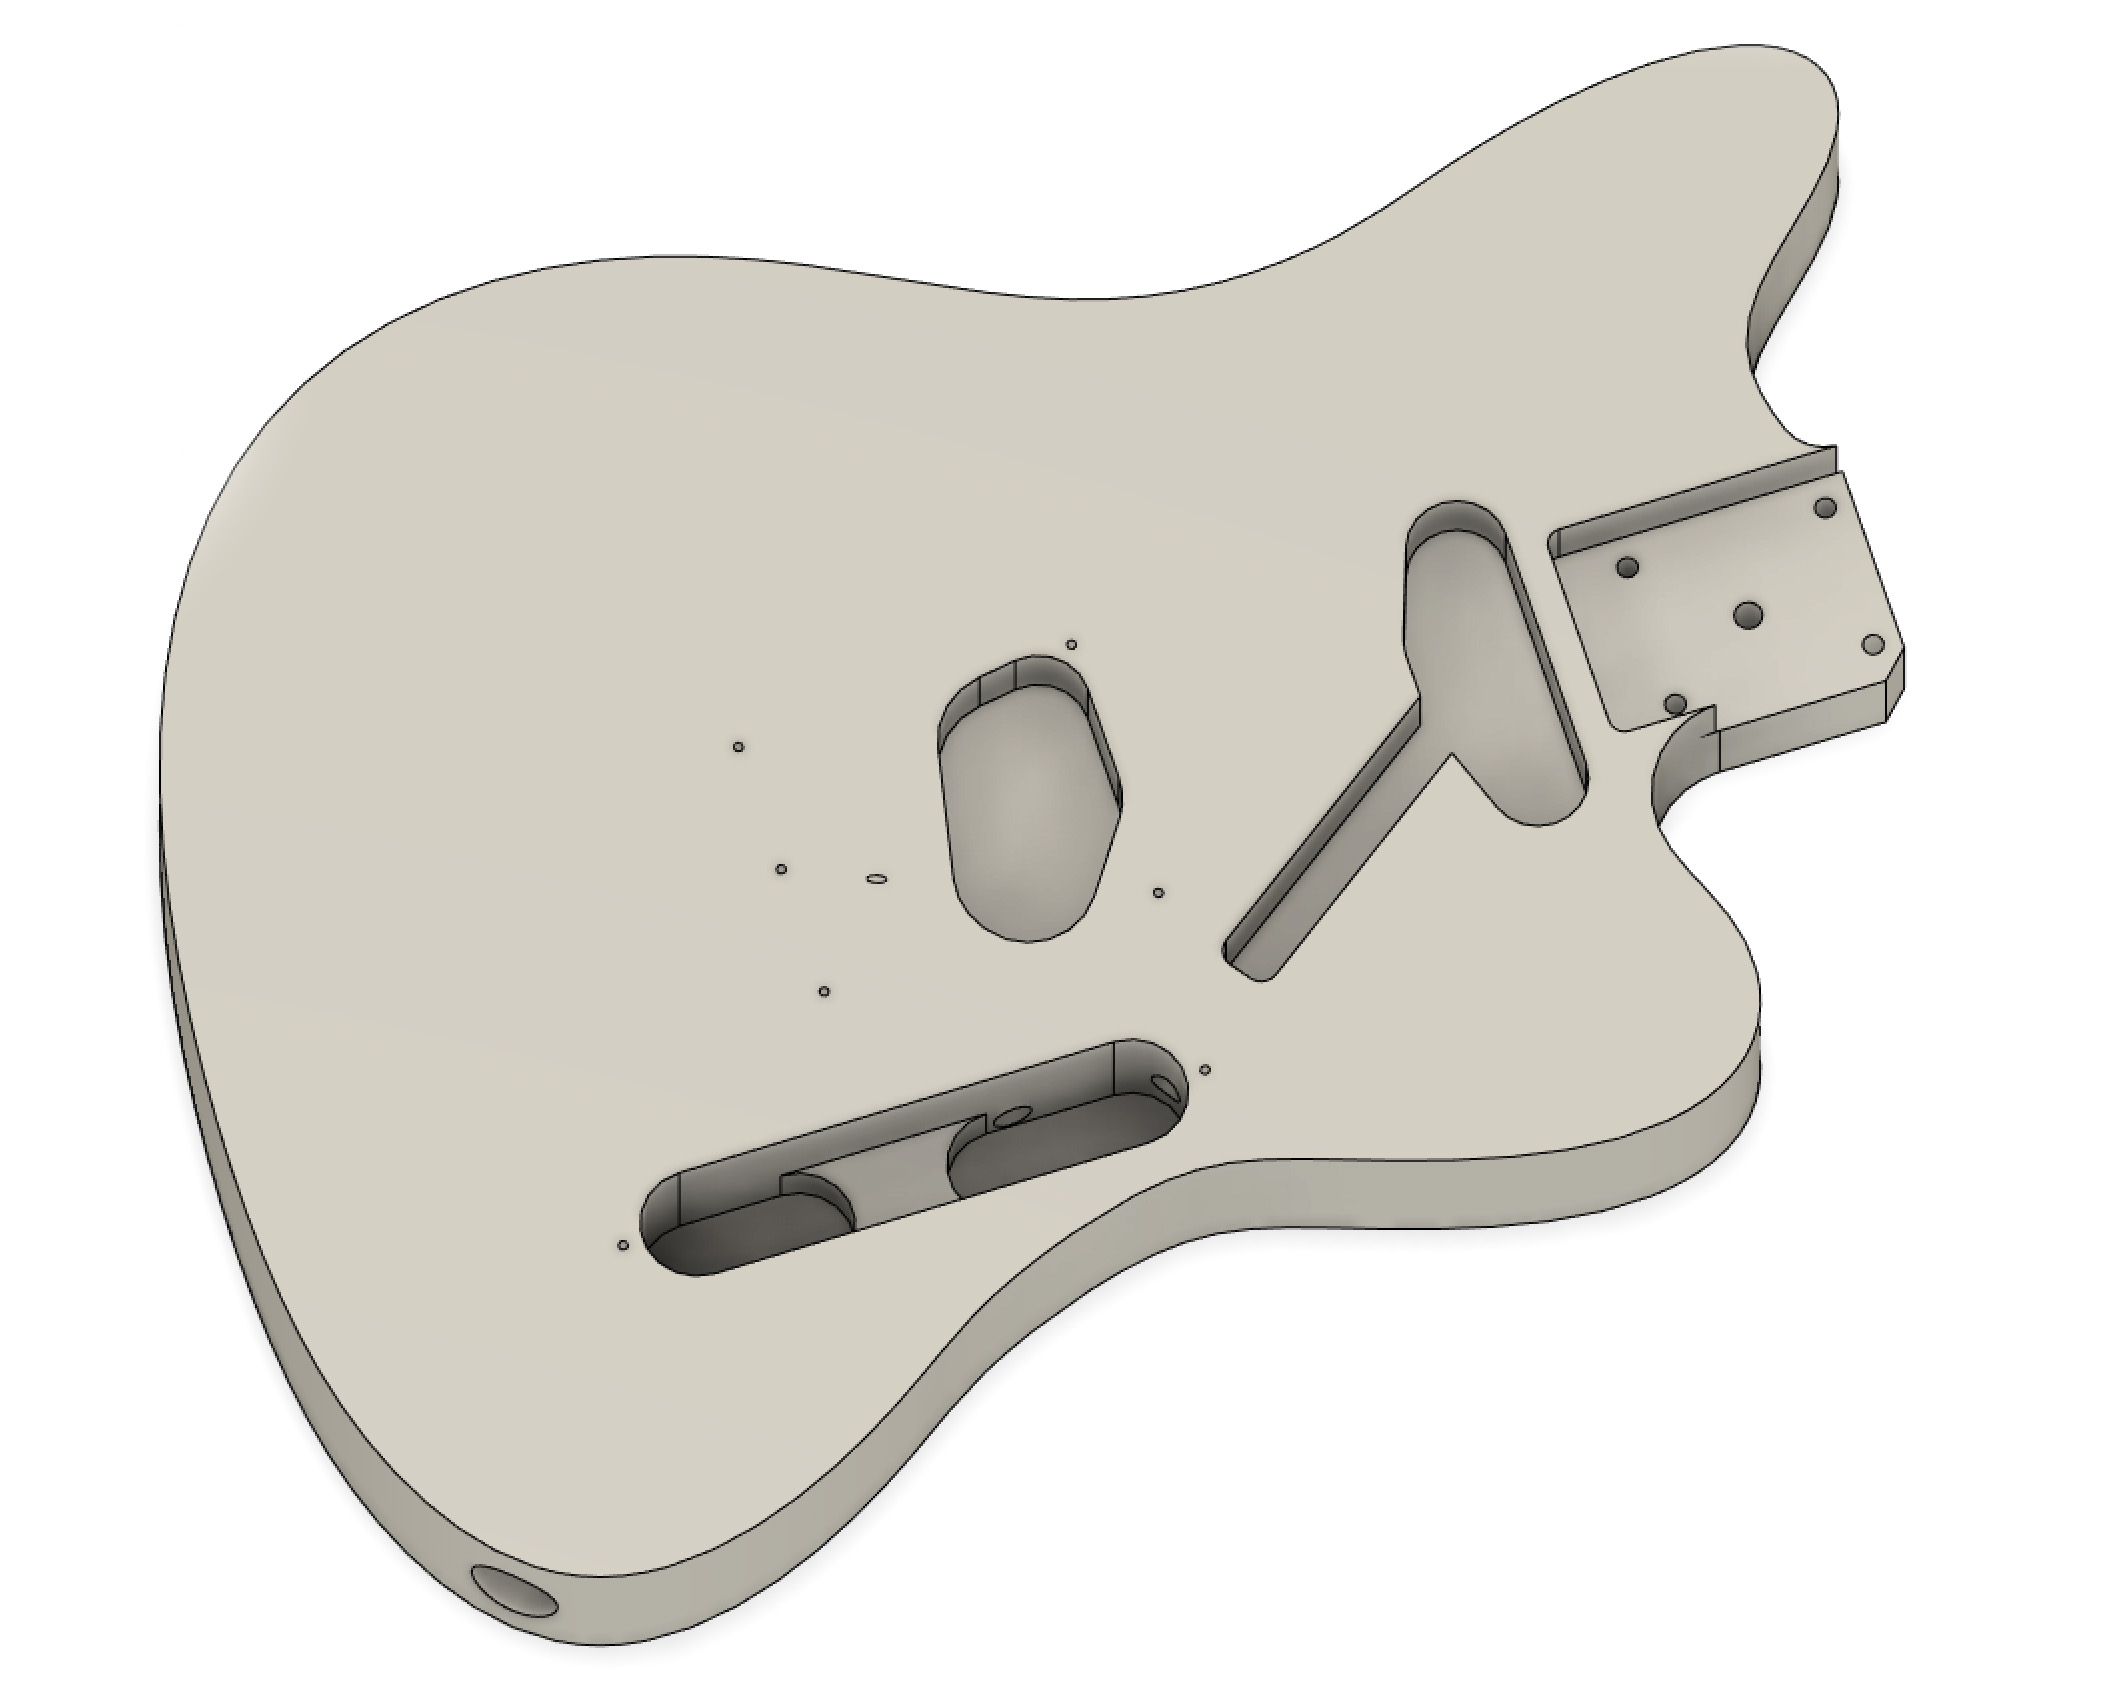
I’ve used Fusion 360 to design the body of the guitar. The important starting point was to get all the screw holes, neck mounting interface, and electronics slots right.
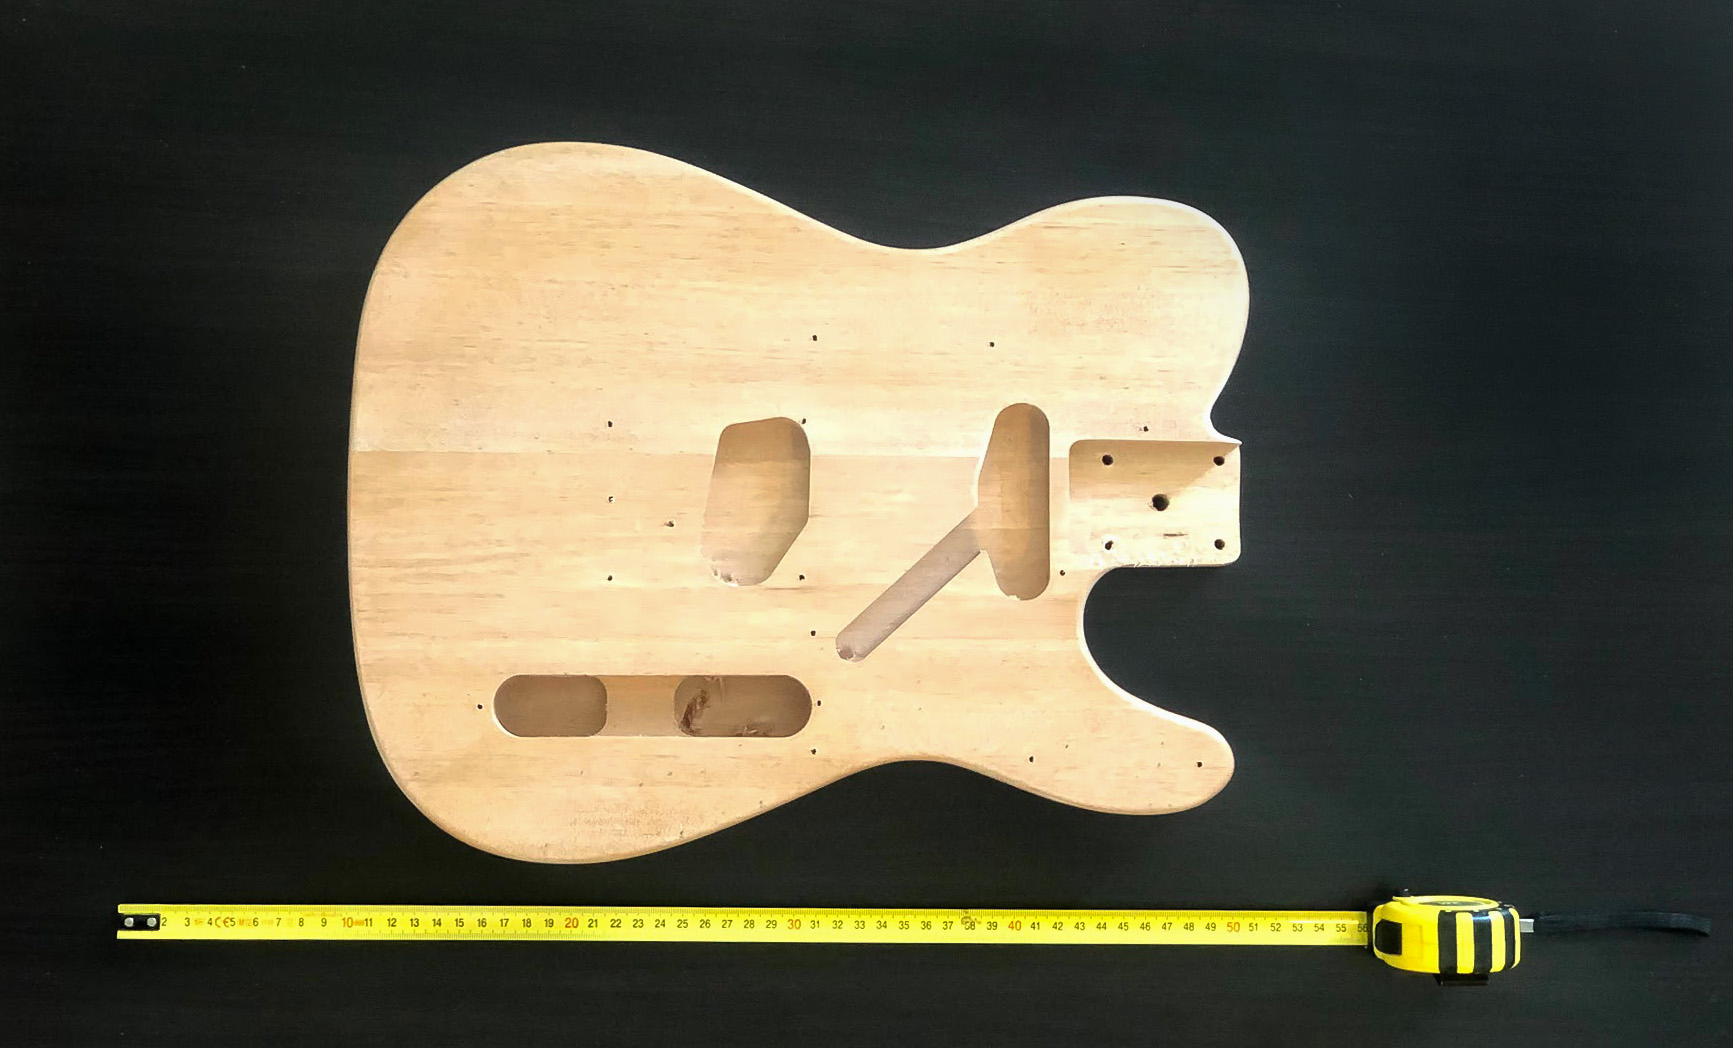
This was made quite a bit easier by the fact, that the kit includes the basic wooden body. By placing a meter next to the body and taking a picture of it from as far as possible, ideally with a zoom lens, we get a great template with only small perspective distortion. Using Fusion’s “Calibrate” feature, you can set the scale of the image. The longer the calibration distance, the lower the error will be. So here I set the whole 50 cm on the meter as my calibration range.
I’ve traced the positions of all holes in a 2D drawing. Using digital calipers, I measured the distance between the features and checked in the drawing if I get the same value. Especially with holes that are far apart, the small perspective distortion will create some inaccuracies. All of the dimensions are obviously important, but the one I especially focused on is the bridge position. The bridge needs to be perfectly aligned with the guitar’s neck so that the strings are nicely centered along its whole length. And secondly, the bridge must be the right distance from the neck, in order for the guitar to be tunable. Specifically, the 12th fret should be exactly in the middle of the string. This is something called guitar intonation and luckily the Telecaster bridge has a fairly wide adjustment range for this. Still, the bridge needs to be in a good position for the adjustment to work, so this is something worth double-checking.
With the mounting holes in place, it was time to get creative. Even though I’m using Telecaster hardware, I didn’t plan to simply copy the good old Telecaster shape. With 3D printing, any shape is possible, so it would be a shame to not take advantage of it.
I’ve always liked the Fender Jazzmaster and Mustang guitar shapes. So I’ve used the Spline tool in Fusion 360 to create a general shape inspired by those guitars.
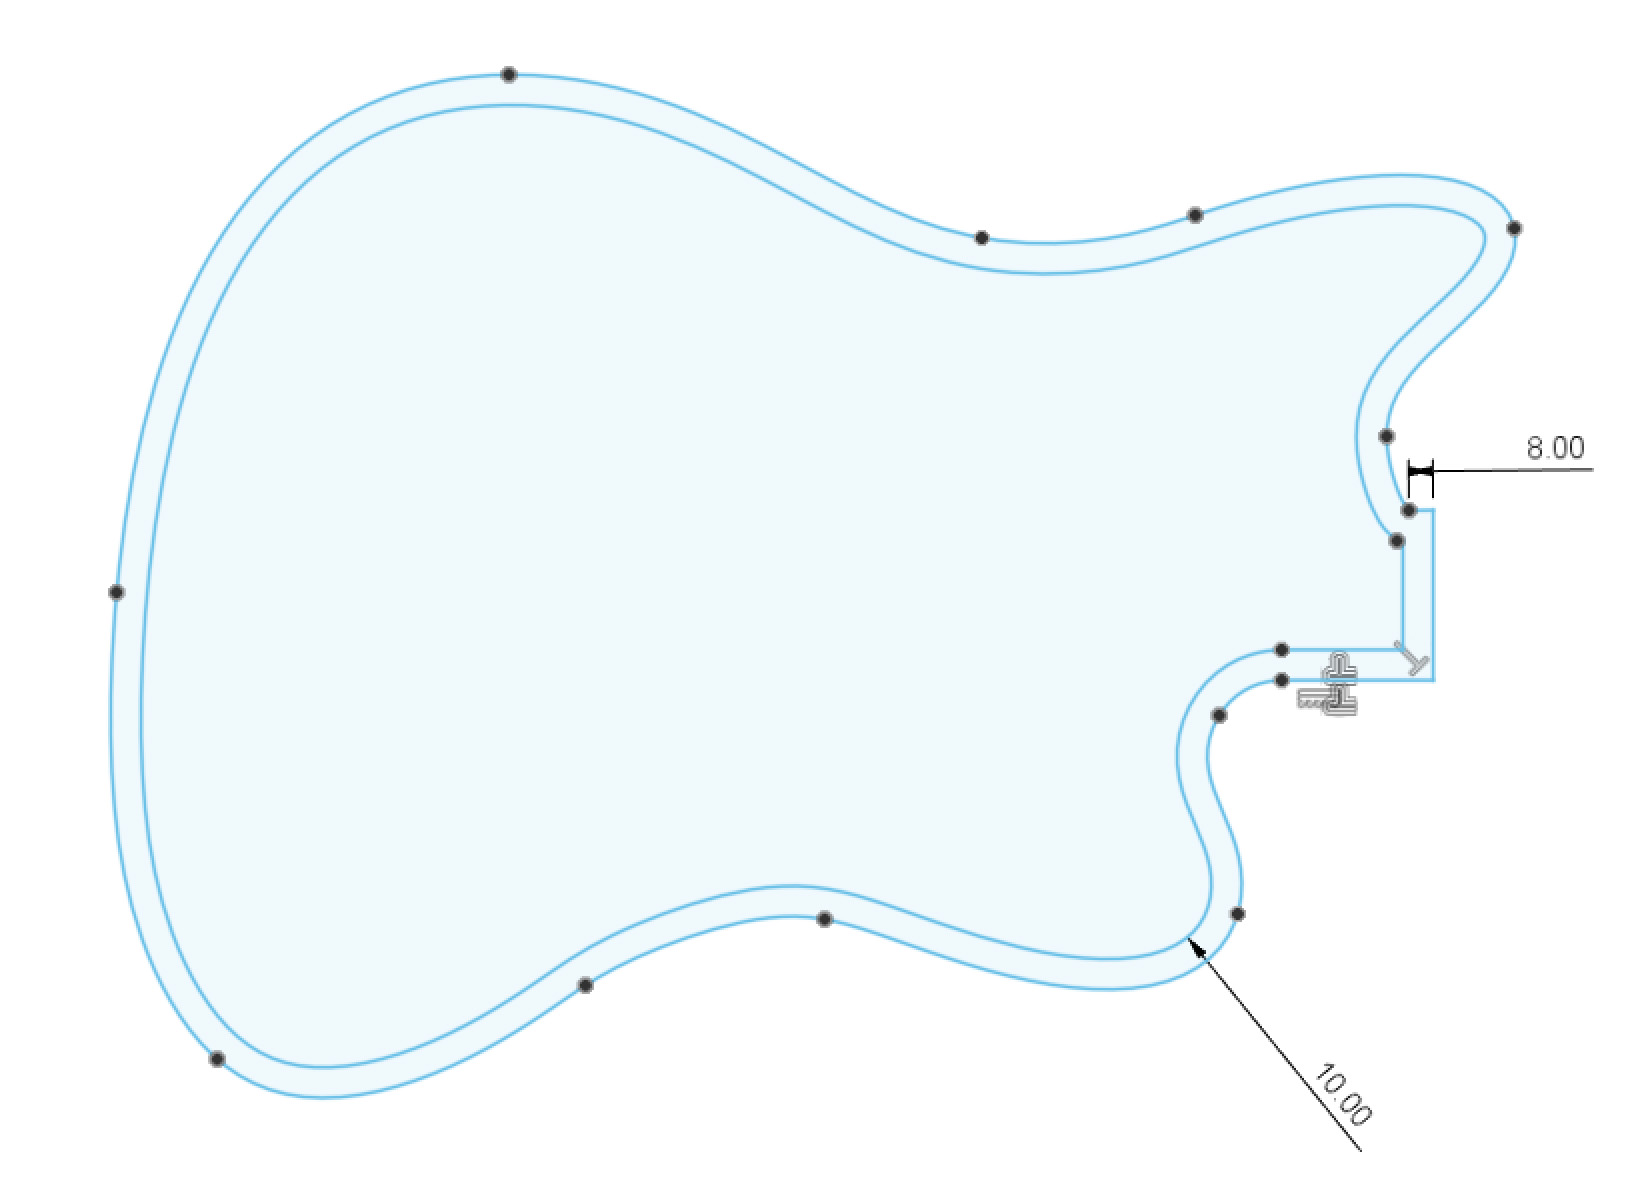
The typical thickness of a guitar body is 45 mm, this value was used to extrude the sketch. I’ve then extruded all the holes and slots for the electronics using the template created before. Keeping in mind that all the electronics will have to be connected together, I’ve subtracted a few cylinders from the body to create “tunnels” between the cavities. The bottom pickup slot will be covered by the metal bridge and the top one by a pickguard, so the slots can be a bit bigger than is strictly necessary. Lastly, a bigger hole on the bottom edge connects to the control plate slot. The output jack will be located there. With that, the basic guitar model was done!
Of course, there’s a small problem. The model is way too big to fit on most desktop 3D printers. Hell, it doesn’t even fit on the Original Prusa XL. So it was time to cut it into smaller pieces.
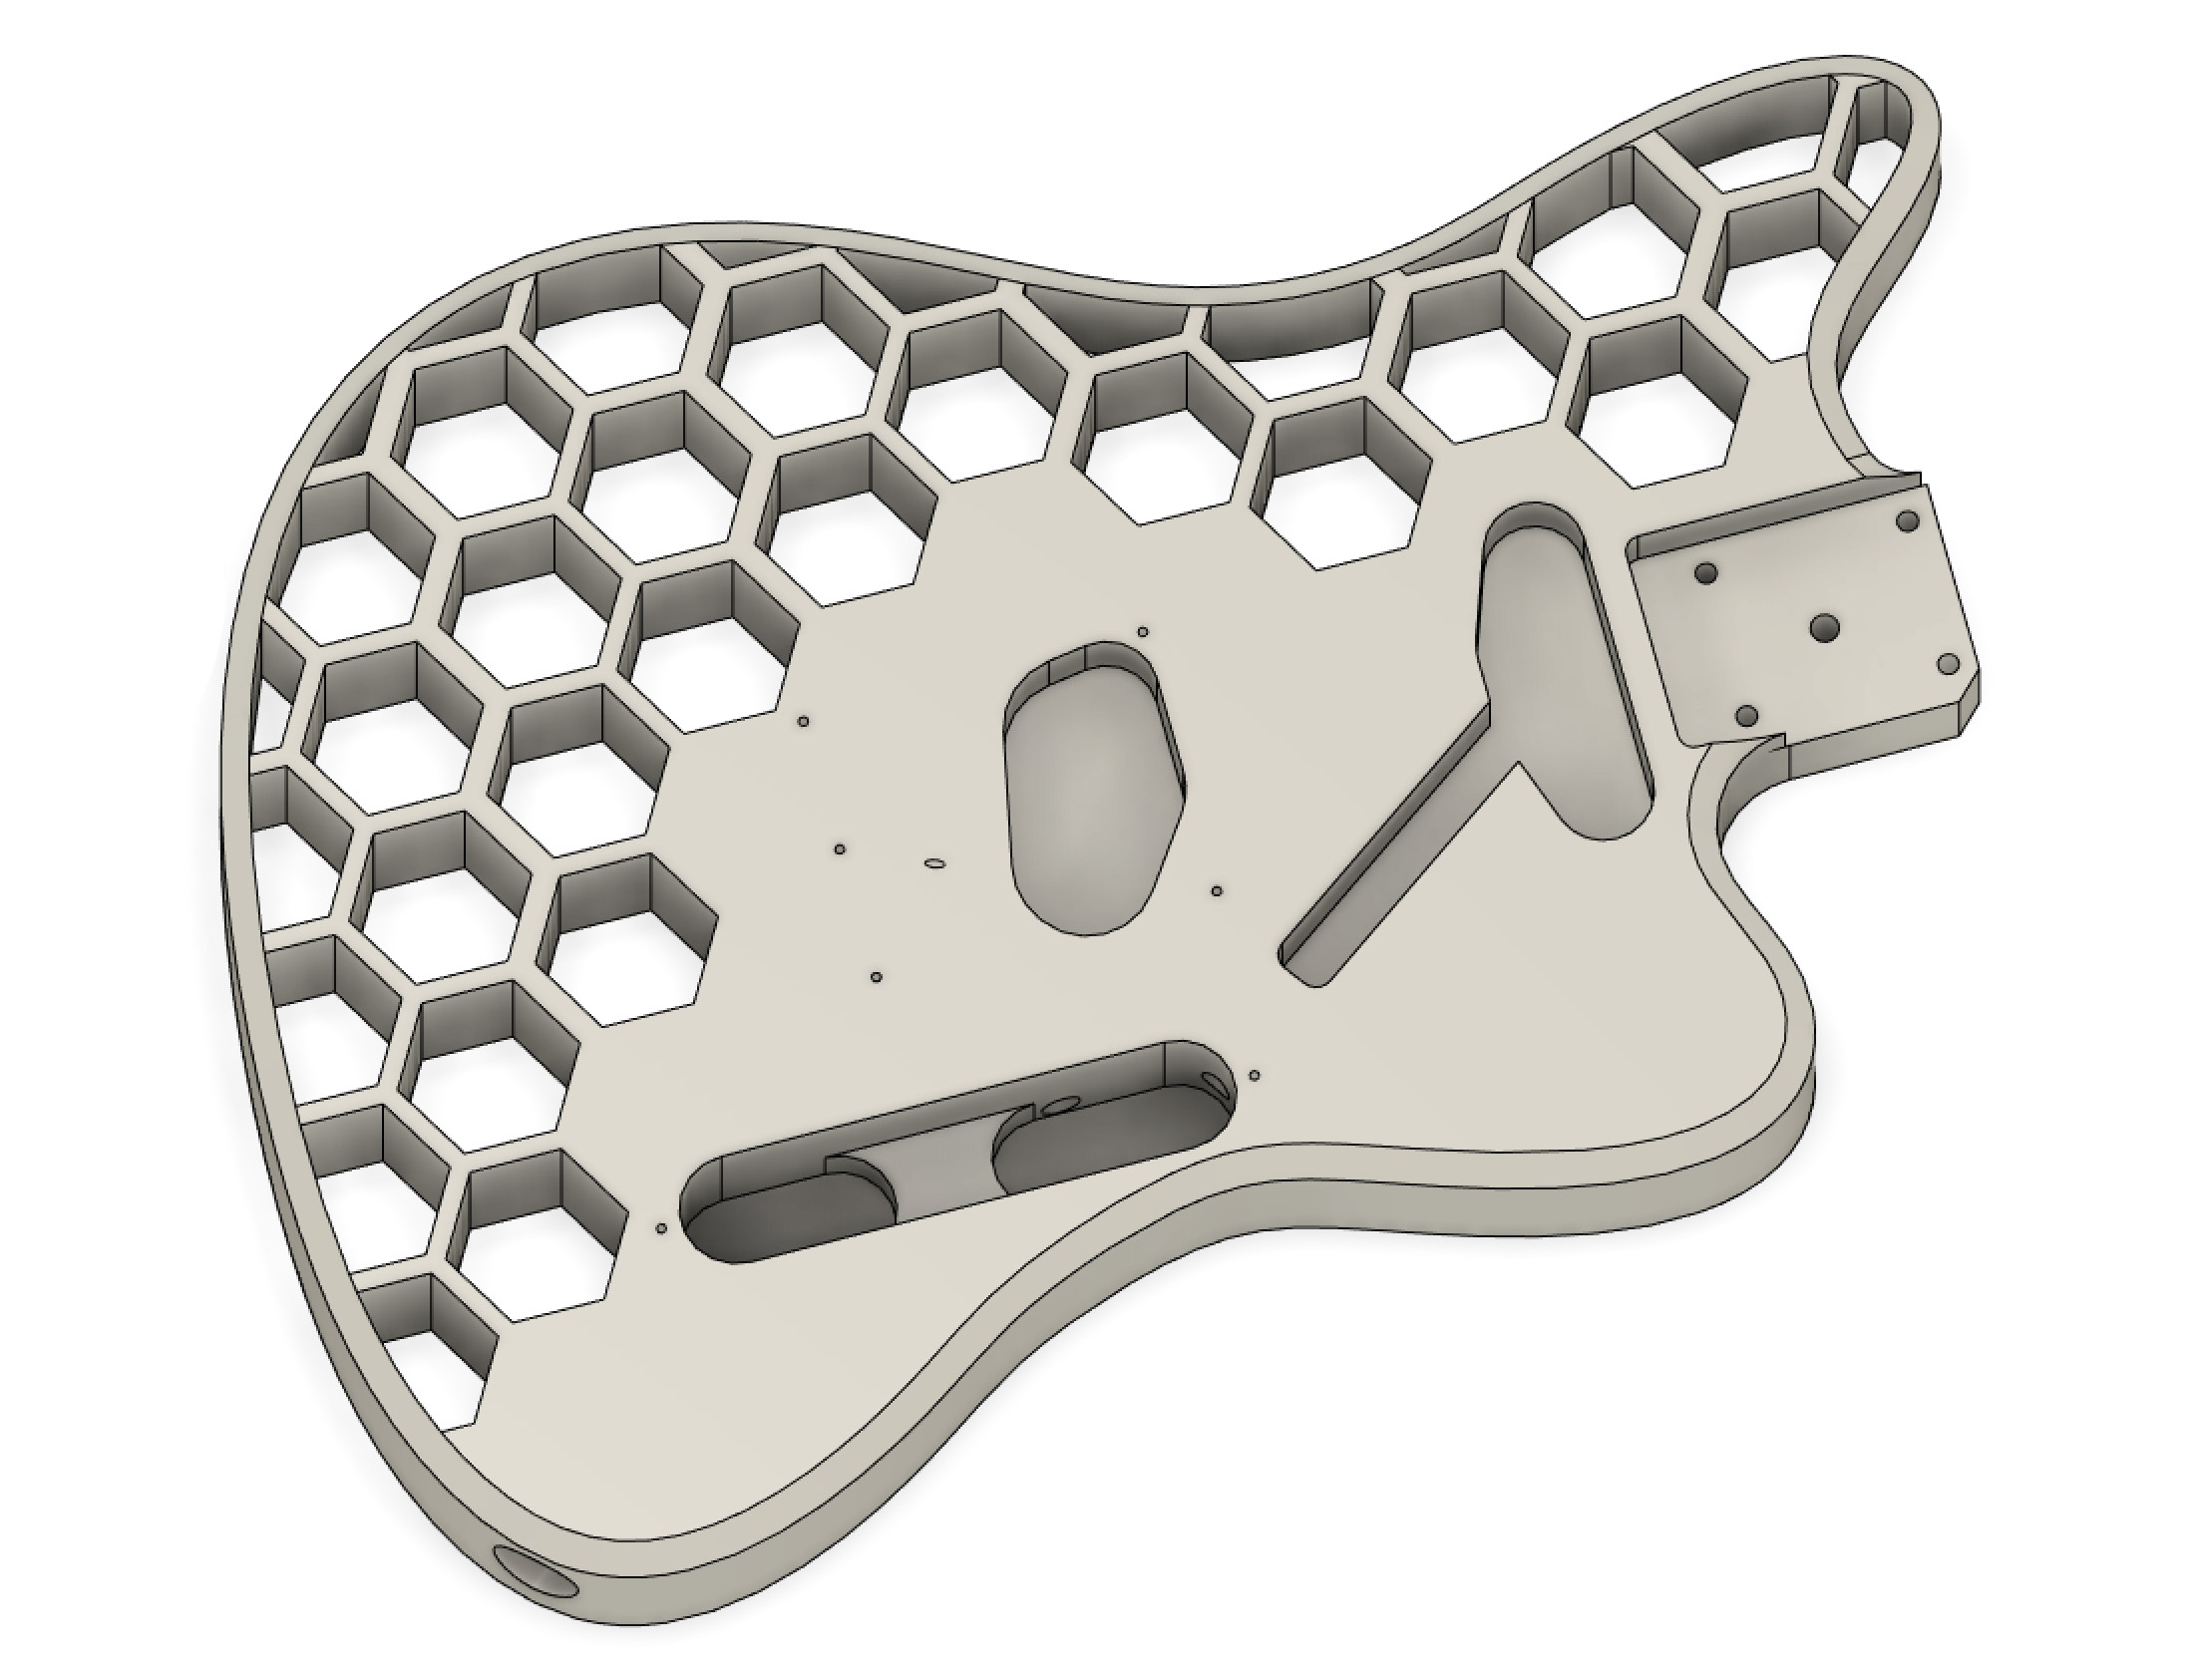
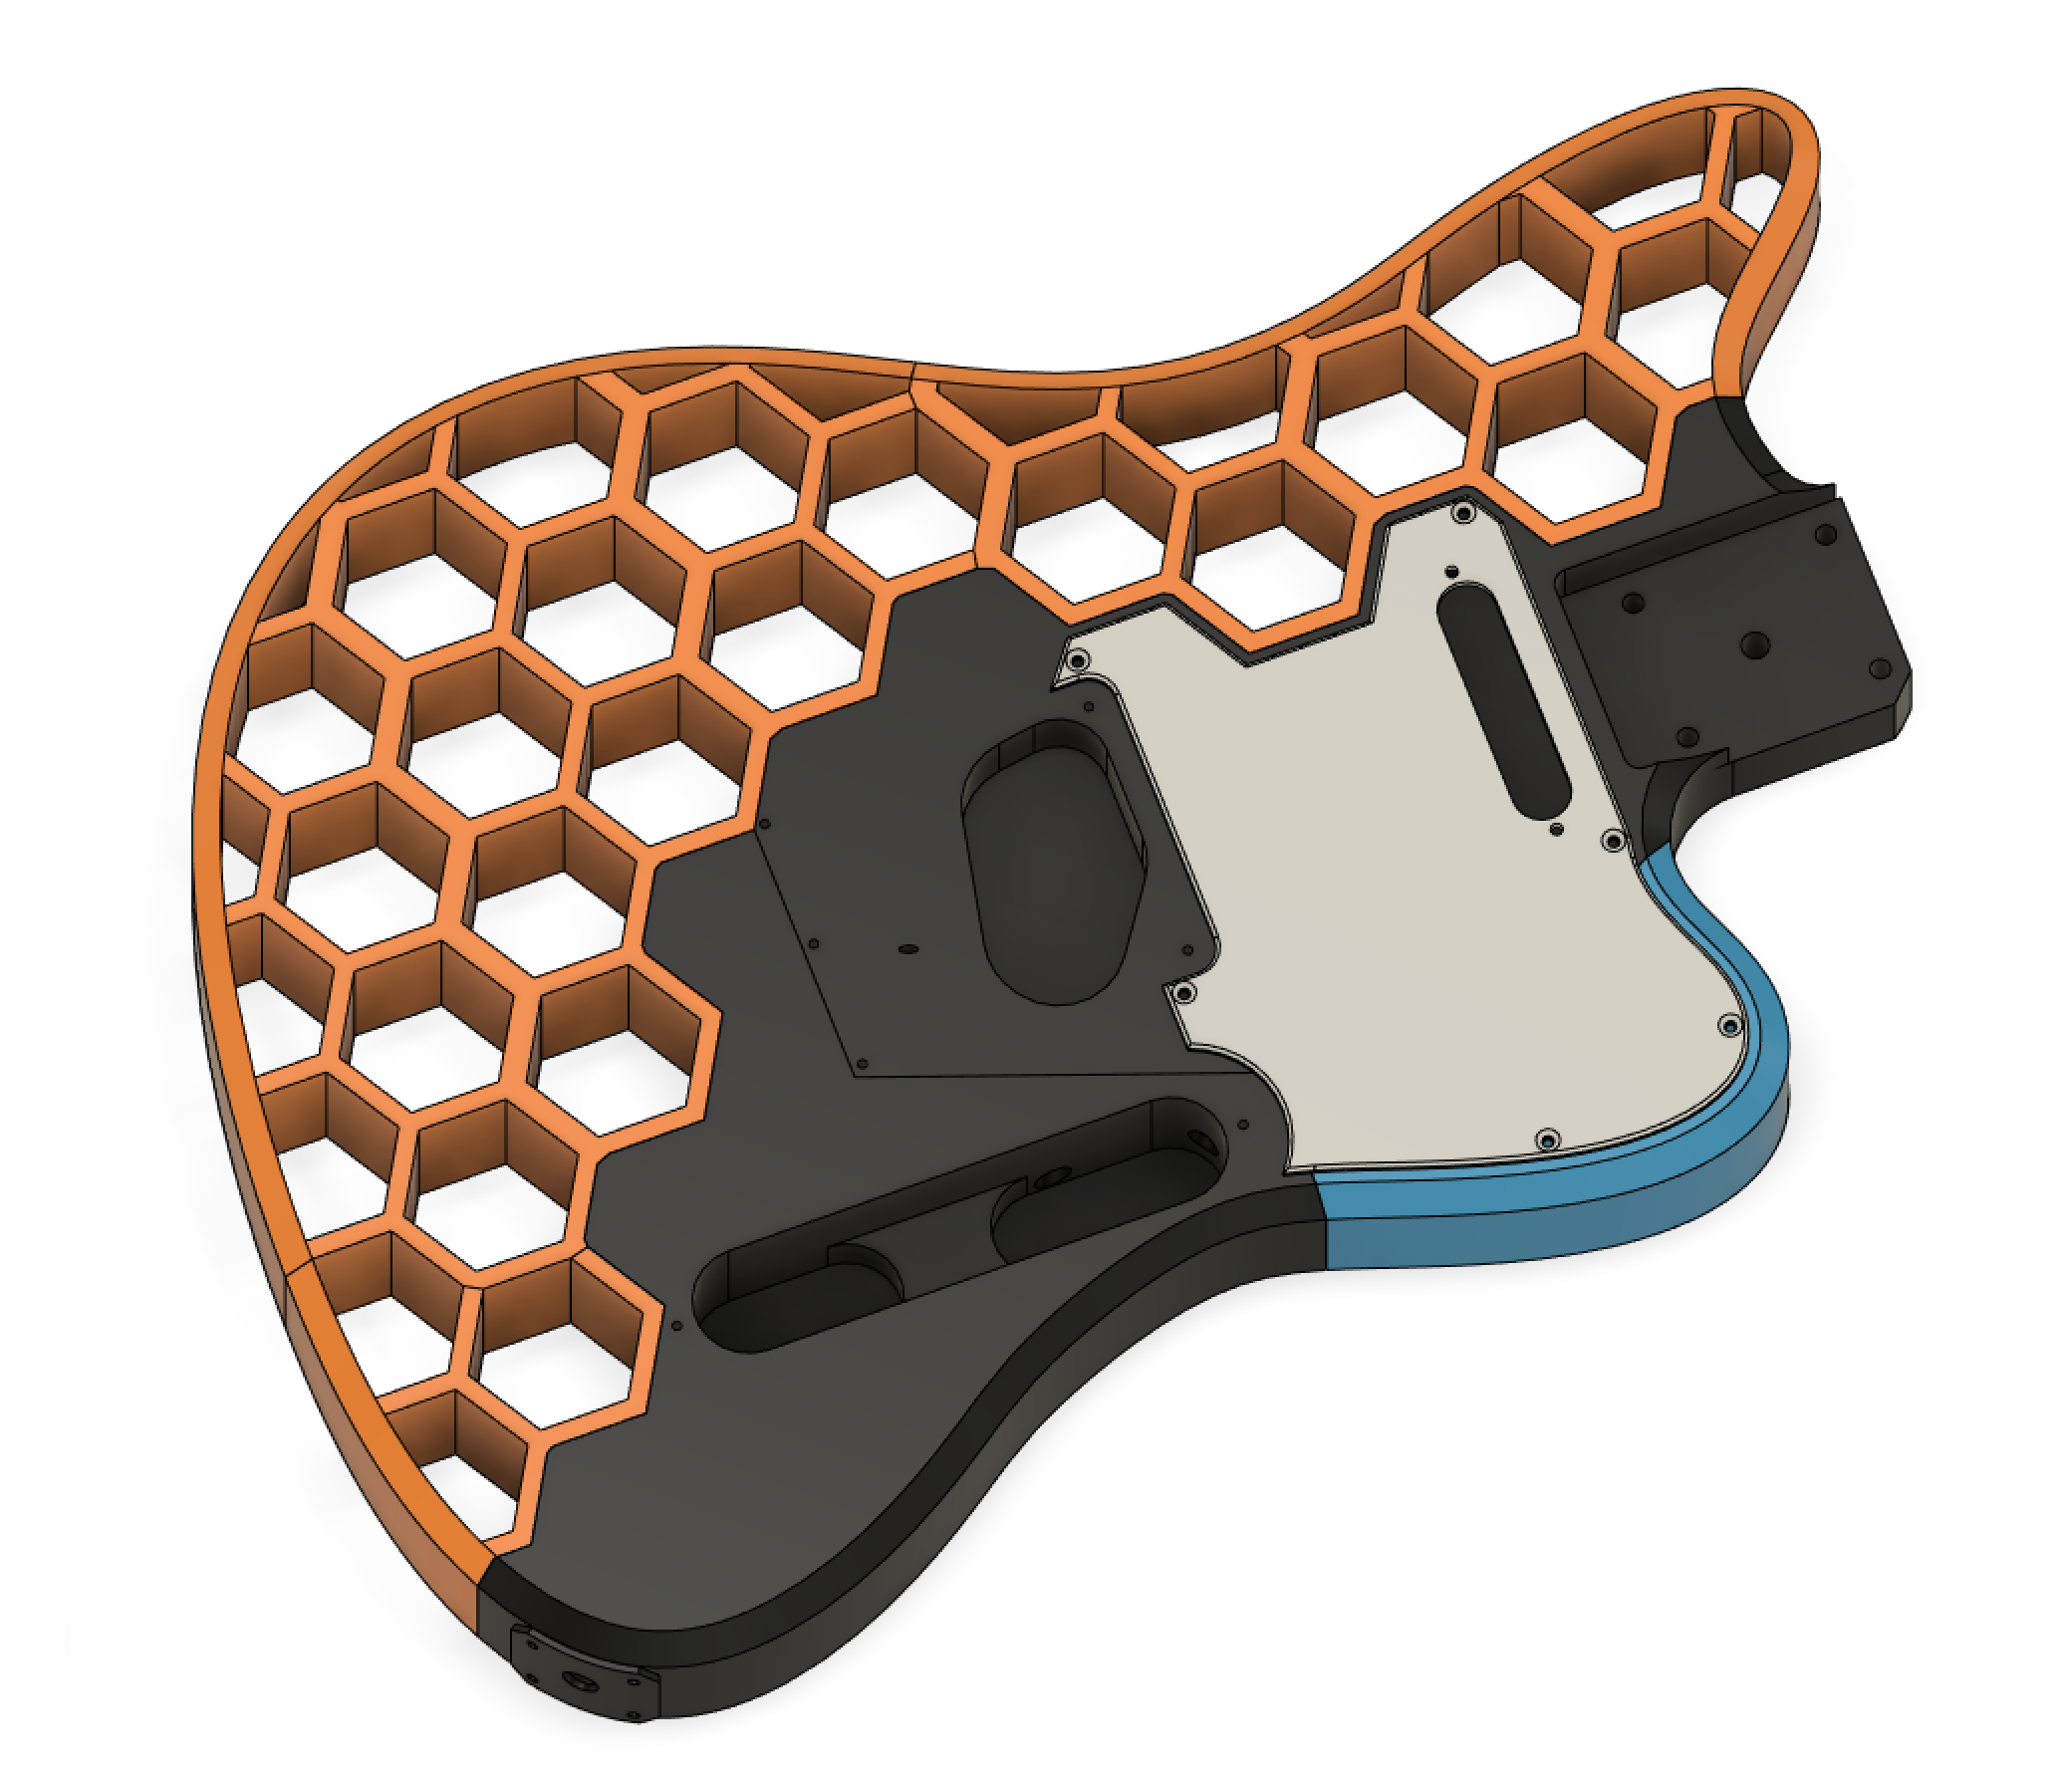
Apart from being too big, the model still lacked some elegance or a fun design twist. With 3D printing being unbound from traditional design limitations, I experimented with adding various cutouts. I ended up with, you guessed it, hexagons! There’s a functional motivation behind this choice. The hexagons will create a ton of edges, along which it will be easy to split the model into multiple parts. And the seam will be basically invisible, as it will look like the intended part of the design. I’ve also added a big chamfer along the whole top edge. This will make it much more comfortable to play and rest the arm on.
Splitting it into parts
Remember when I talked about the 50 kg of force the strings apply on the neck and the body? It creates one critical requirement for the splitting process. If at all possible, the section of the guitar between the neck and the bridge should be made from just one piece. It would be needlessly complicated to make the connection between two parts in this section strong enough.
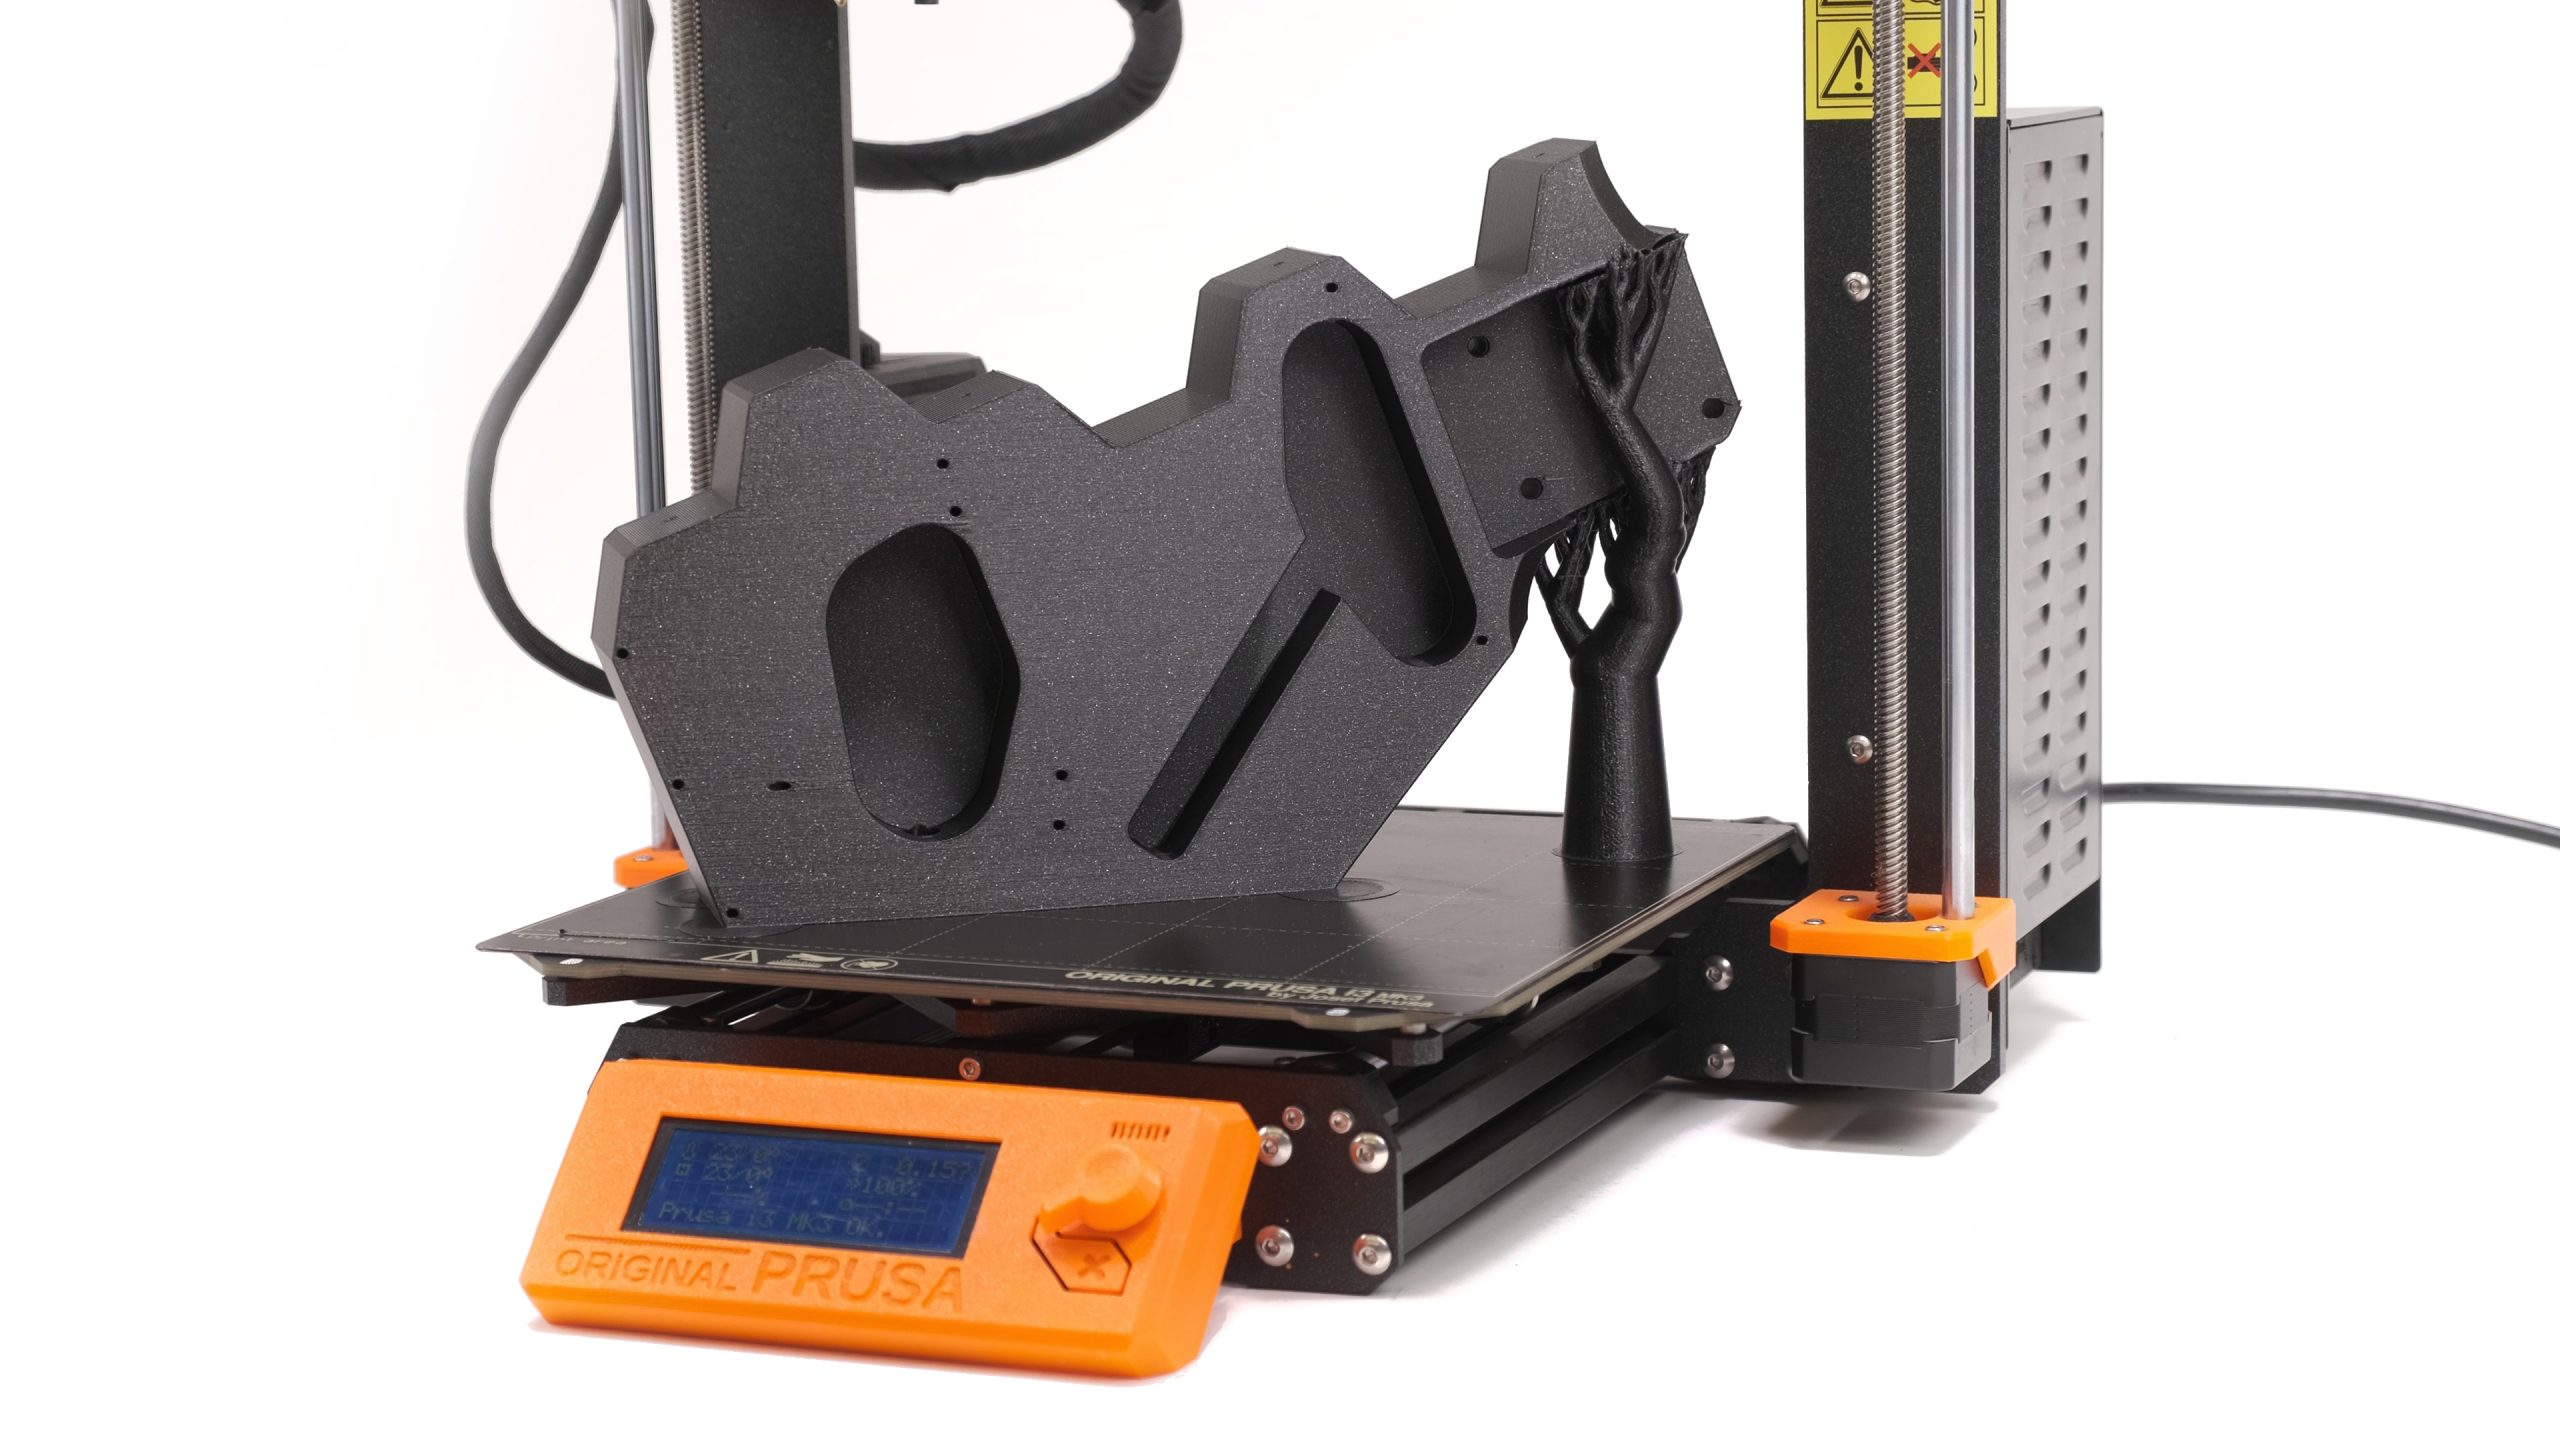
Luckily, with some imagination, this turned out to be possible. The top edge is defined by the hexagon pattern. Another obvious cut has to be made right beneath the holes for mounting the bridge. This keeps the part as short as possible. And a clever cut on the bottom left enables orientation, in which the longest side of the model aligns with the print volume diagonal. It even results in this part being printable without supports. However, we decided to use the Organic supports from PrusaSlicer for a nicer finish on the overhanging surfaces.
Placing the rest of the cuts is fairly straightforward. The leftover bottom piece without hegaxons gets split into two so that each part fits on the 25×21 cm build plate. And the top part ends up split into 3 sections for the same reason.
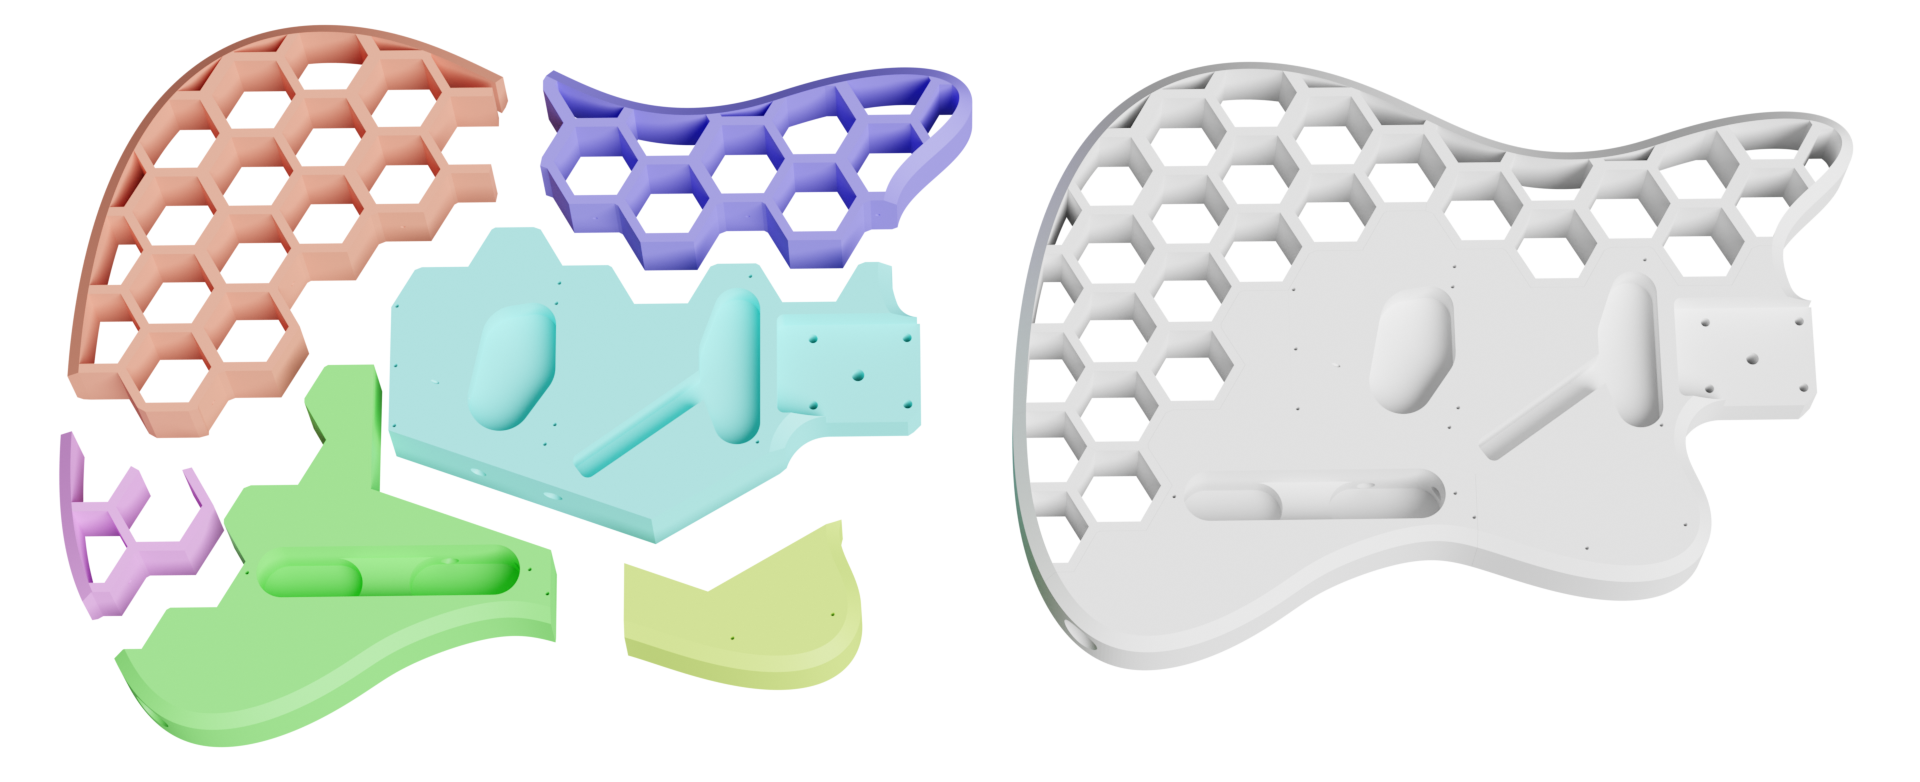
The last big piece we’re missing is the pickguard, which also serves as a mounting point for the top pickup. Its shape is pretty well defined by the surrounding edges, which are simply inset by 3 mm.
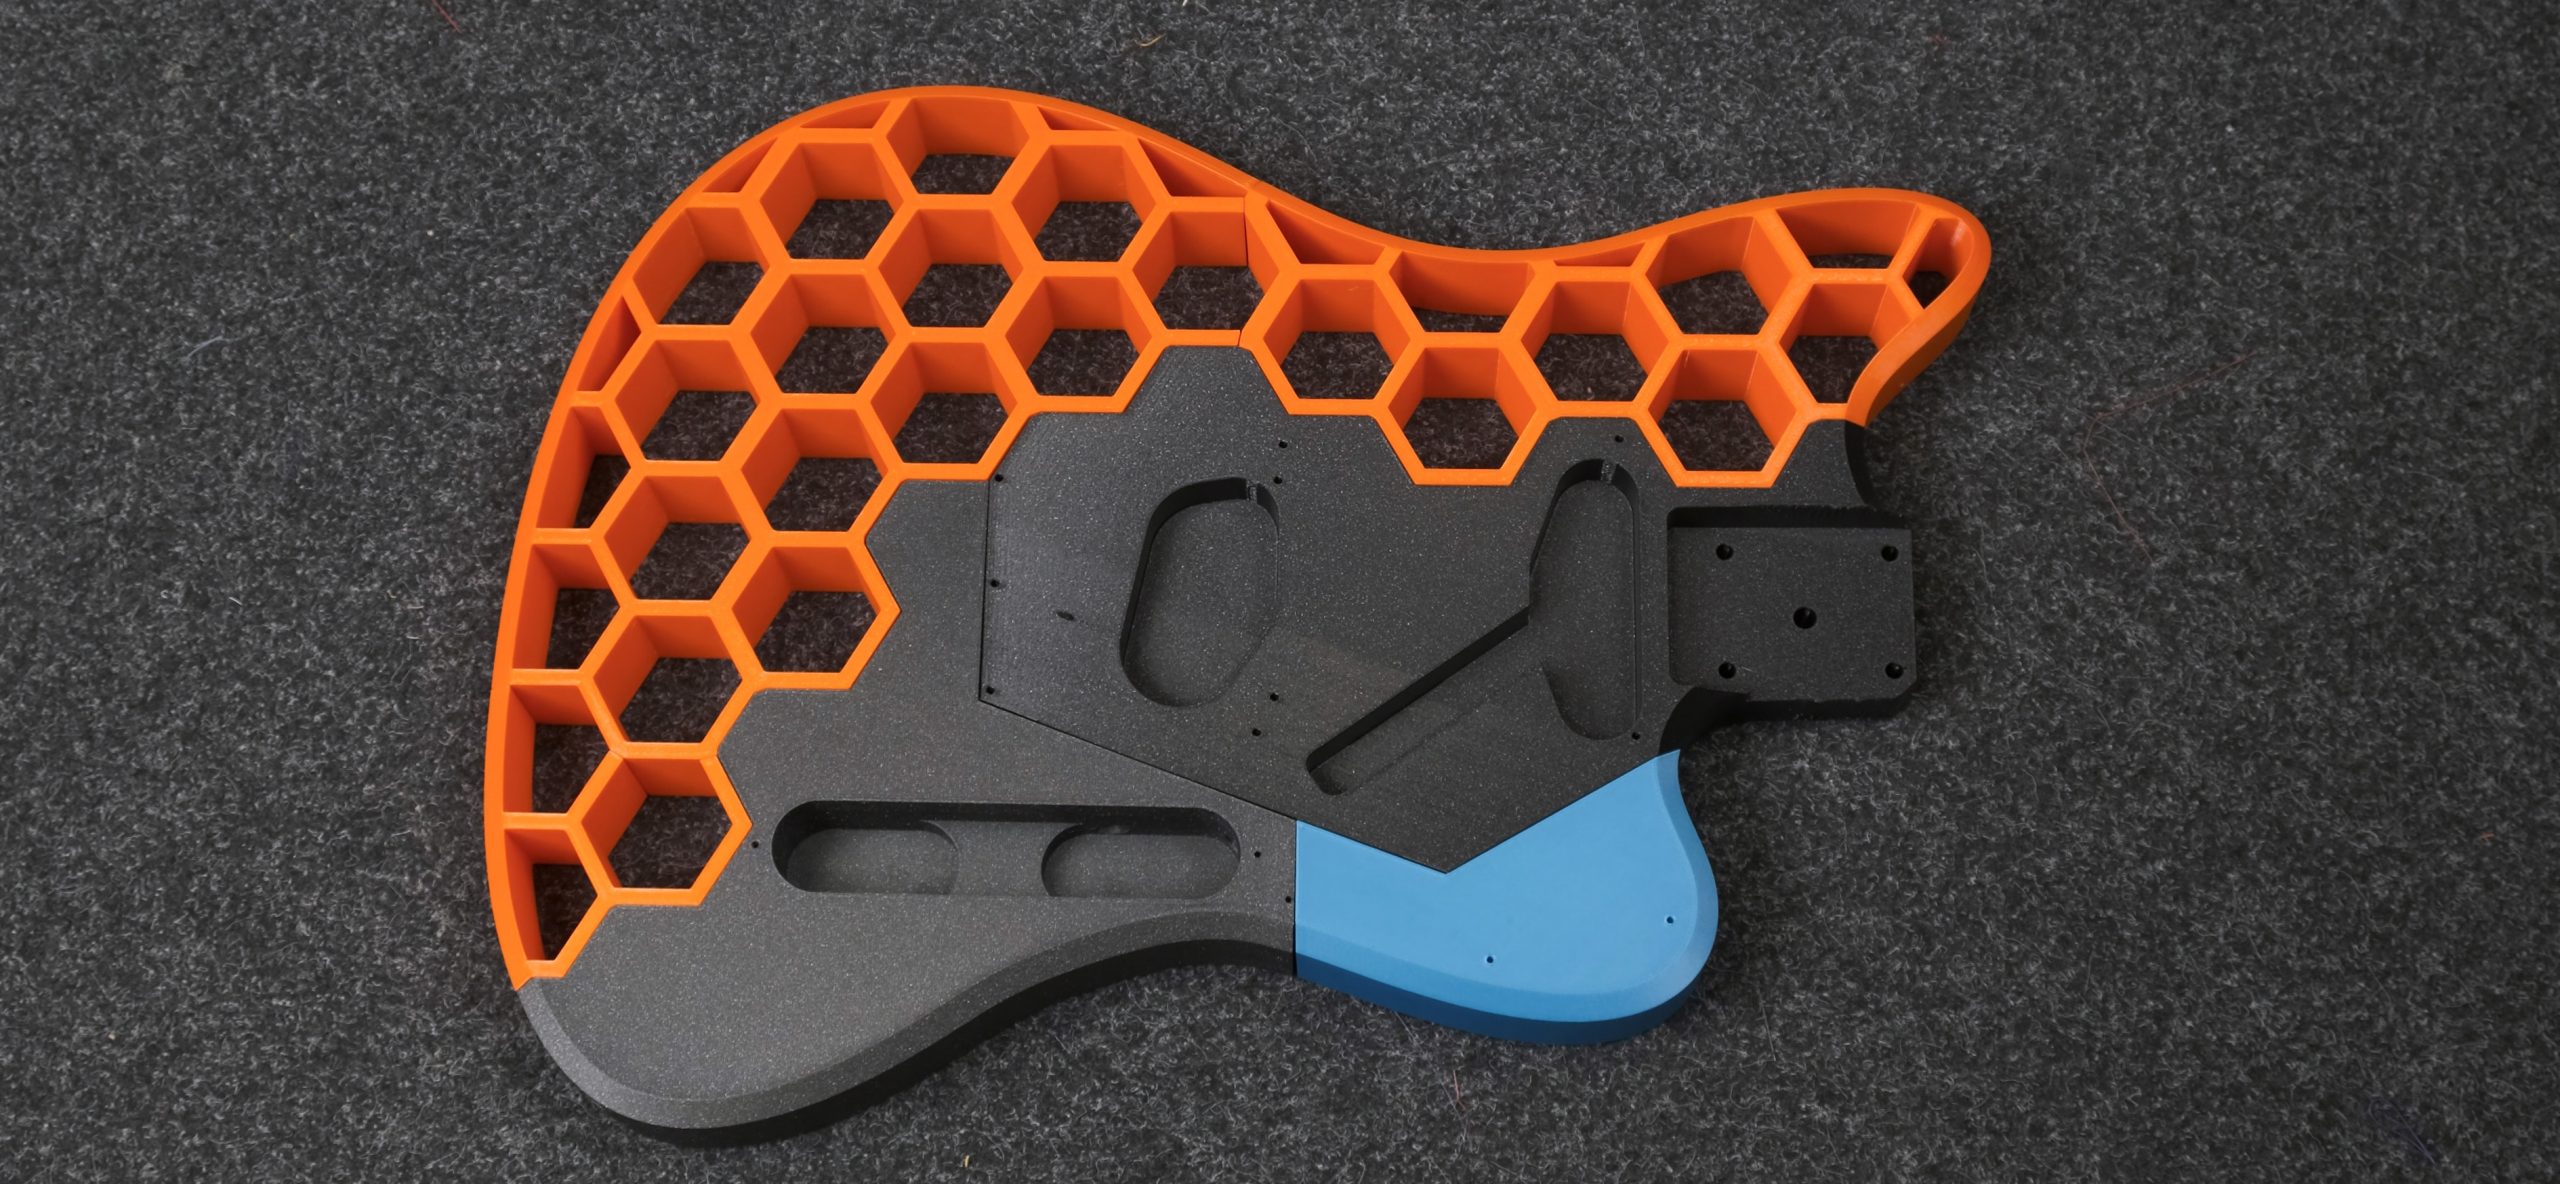
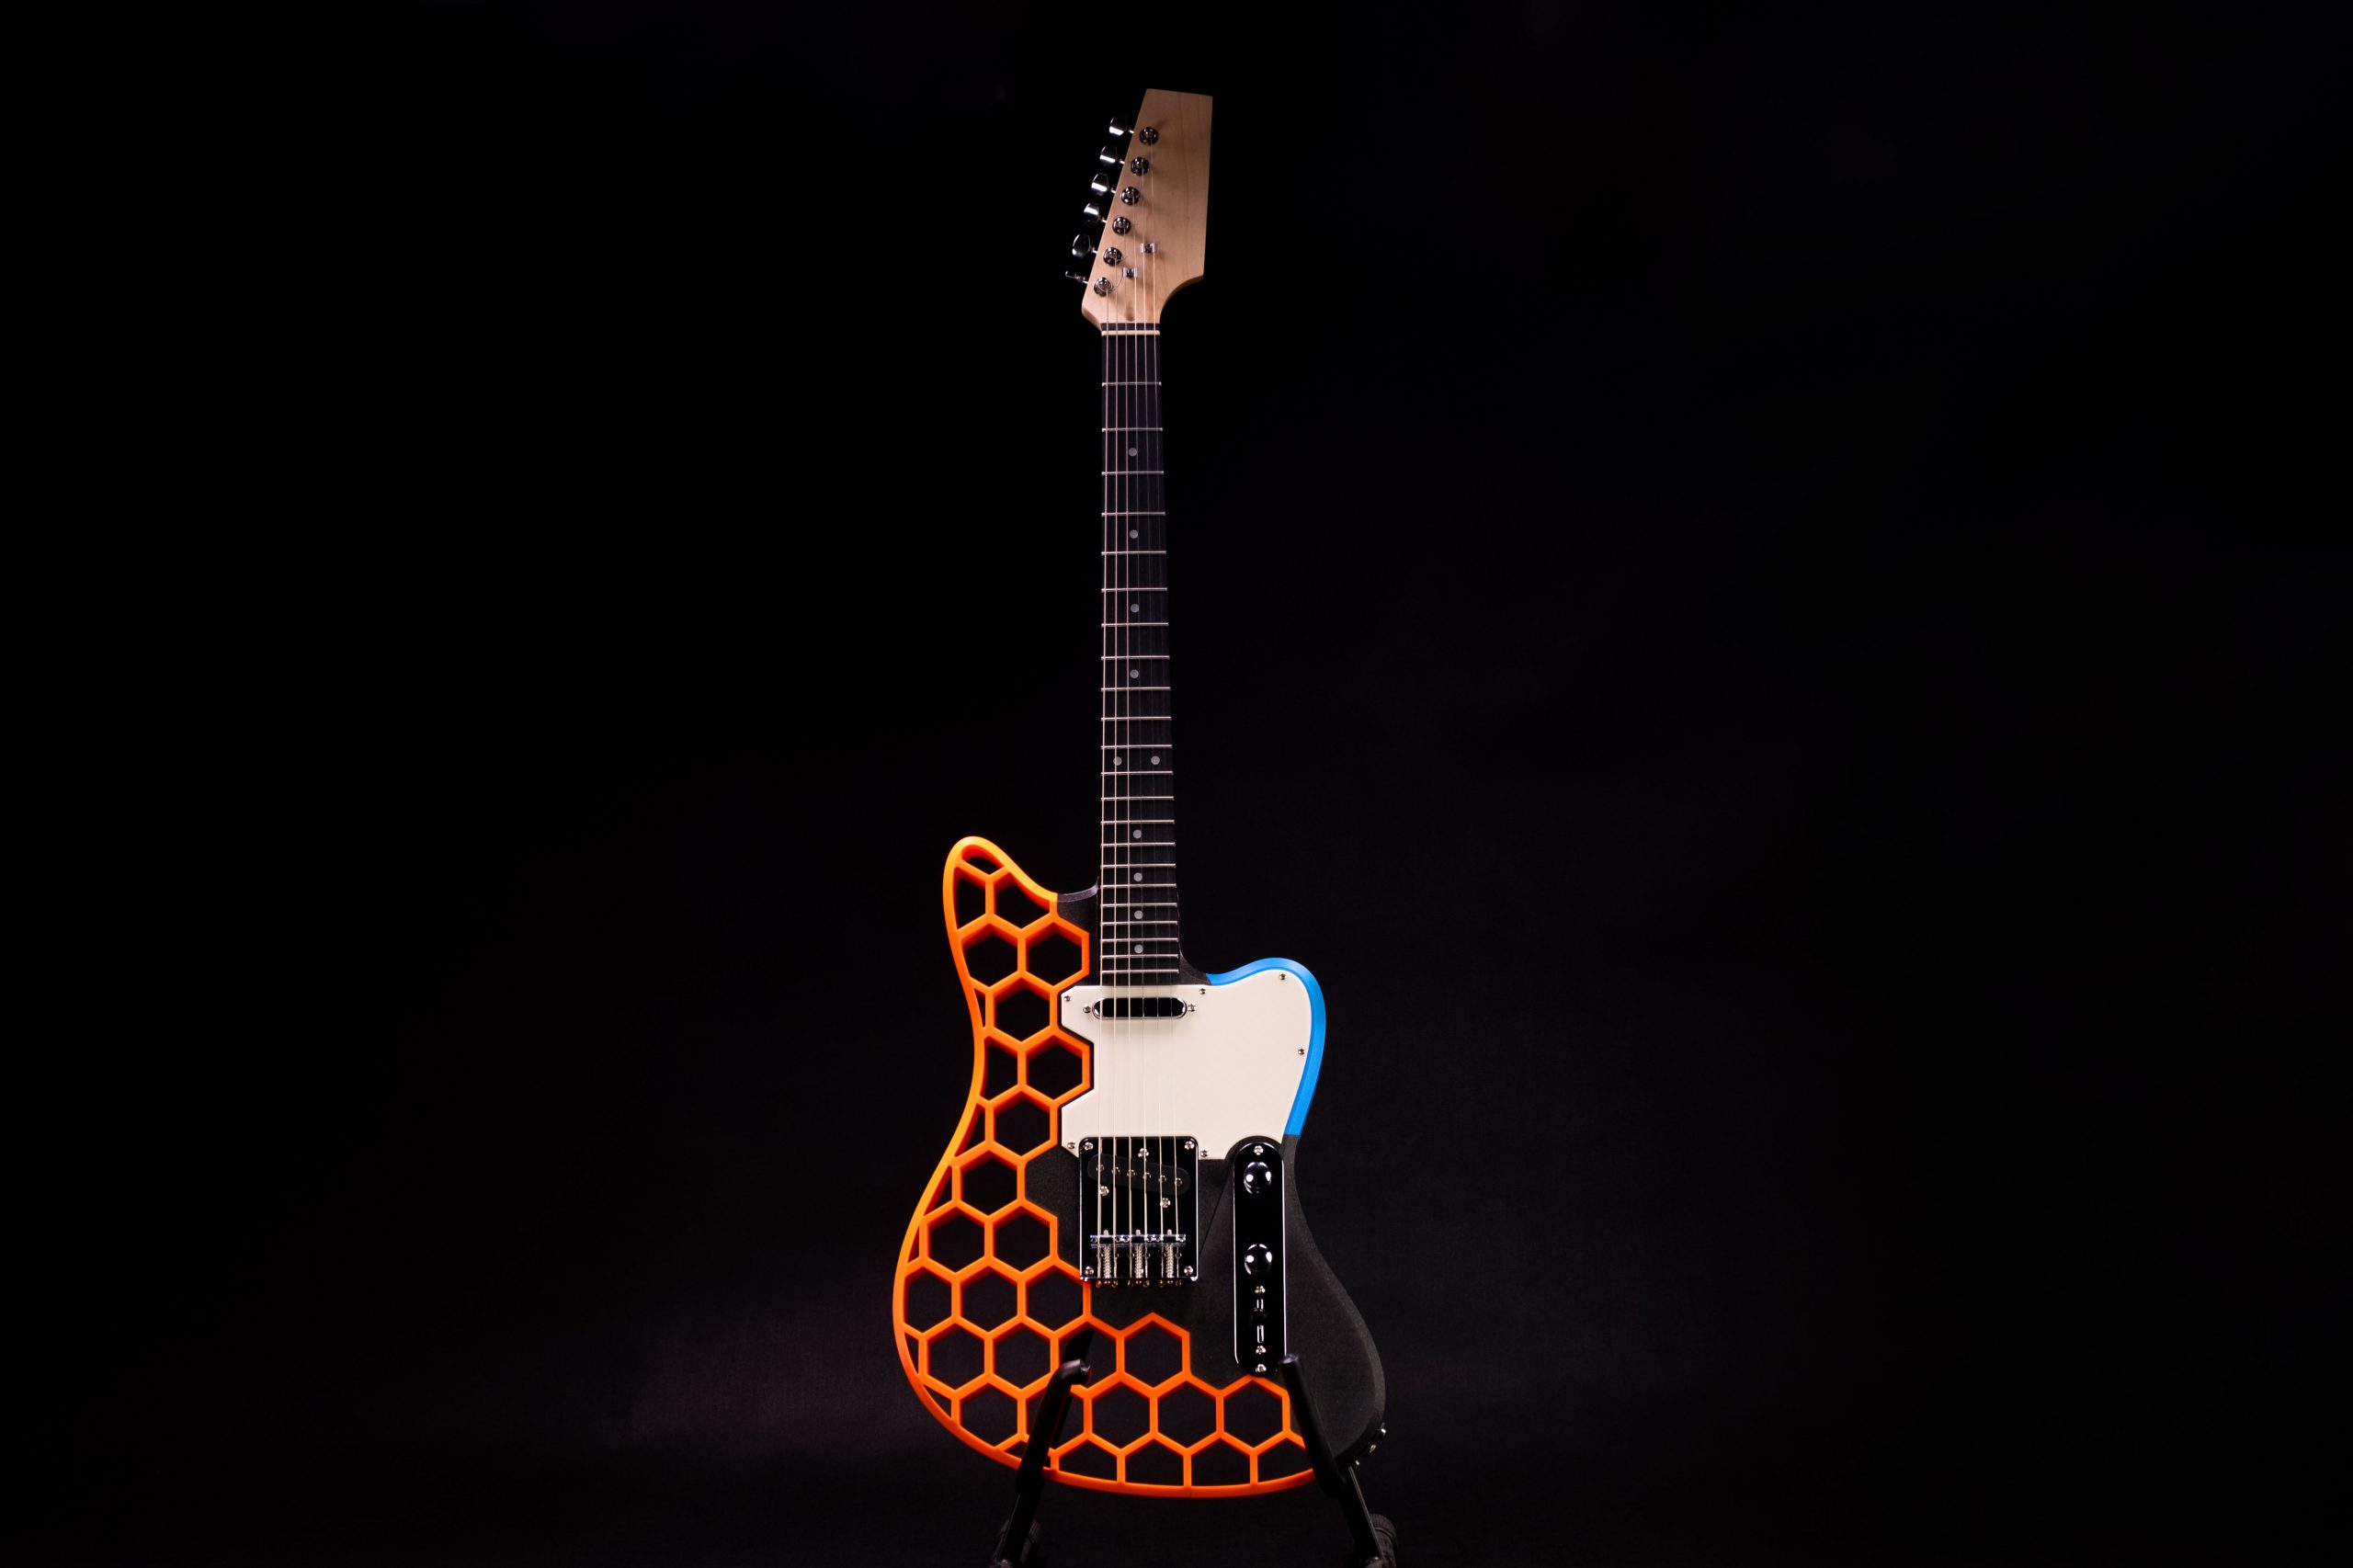
Having the body split into several pieces has one additional advantage – each part can be printed with a different color. The color theme here at Prusa Research is pretty obvious, you can’t go wrong with black and orange. One extra color that I love using with the Prusa Orange is the complementary blue/teal. Coloring the small bottom-right piece with this color really brings the model alive.
And with that, the Prusacaster model is finished!
Printing and assembly
The material choice for the center piece
The only part which will be under significant mechanical load is the big middle piece. It might be tempting to print it from a material like PETG for the added “strength”. However, in our case, we’re specifically looking for a very stiff material (high bending modulus). And maybe surprisingly, good old PLA is fantastic in this regard. Using PLA also fits the theme of this build of keeping it cheap and simple.
Using PLA has one downside – low-temperature resistance. With the centerpiece being quite hefty, it will still be able to withstand the direct sun for reasonably long periods of time. But if one were to leave the guitar in a case on a very hot summer day, that would be a problem. If you want to remove this limitation, pick a stiff material with higher temperature resistance – such as Prusament PC Blend Carbon Fiber, Prusament PA11 Carbon Fiber, or similar. Those are a bit more difficult to print with and a fair bit more expensive though. Since Prague has mostly a moderate climate, I printed this part from PLA. And after a year (that’s how long this article took to finish), it’s still holding strong.
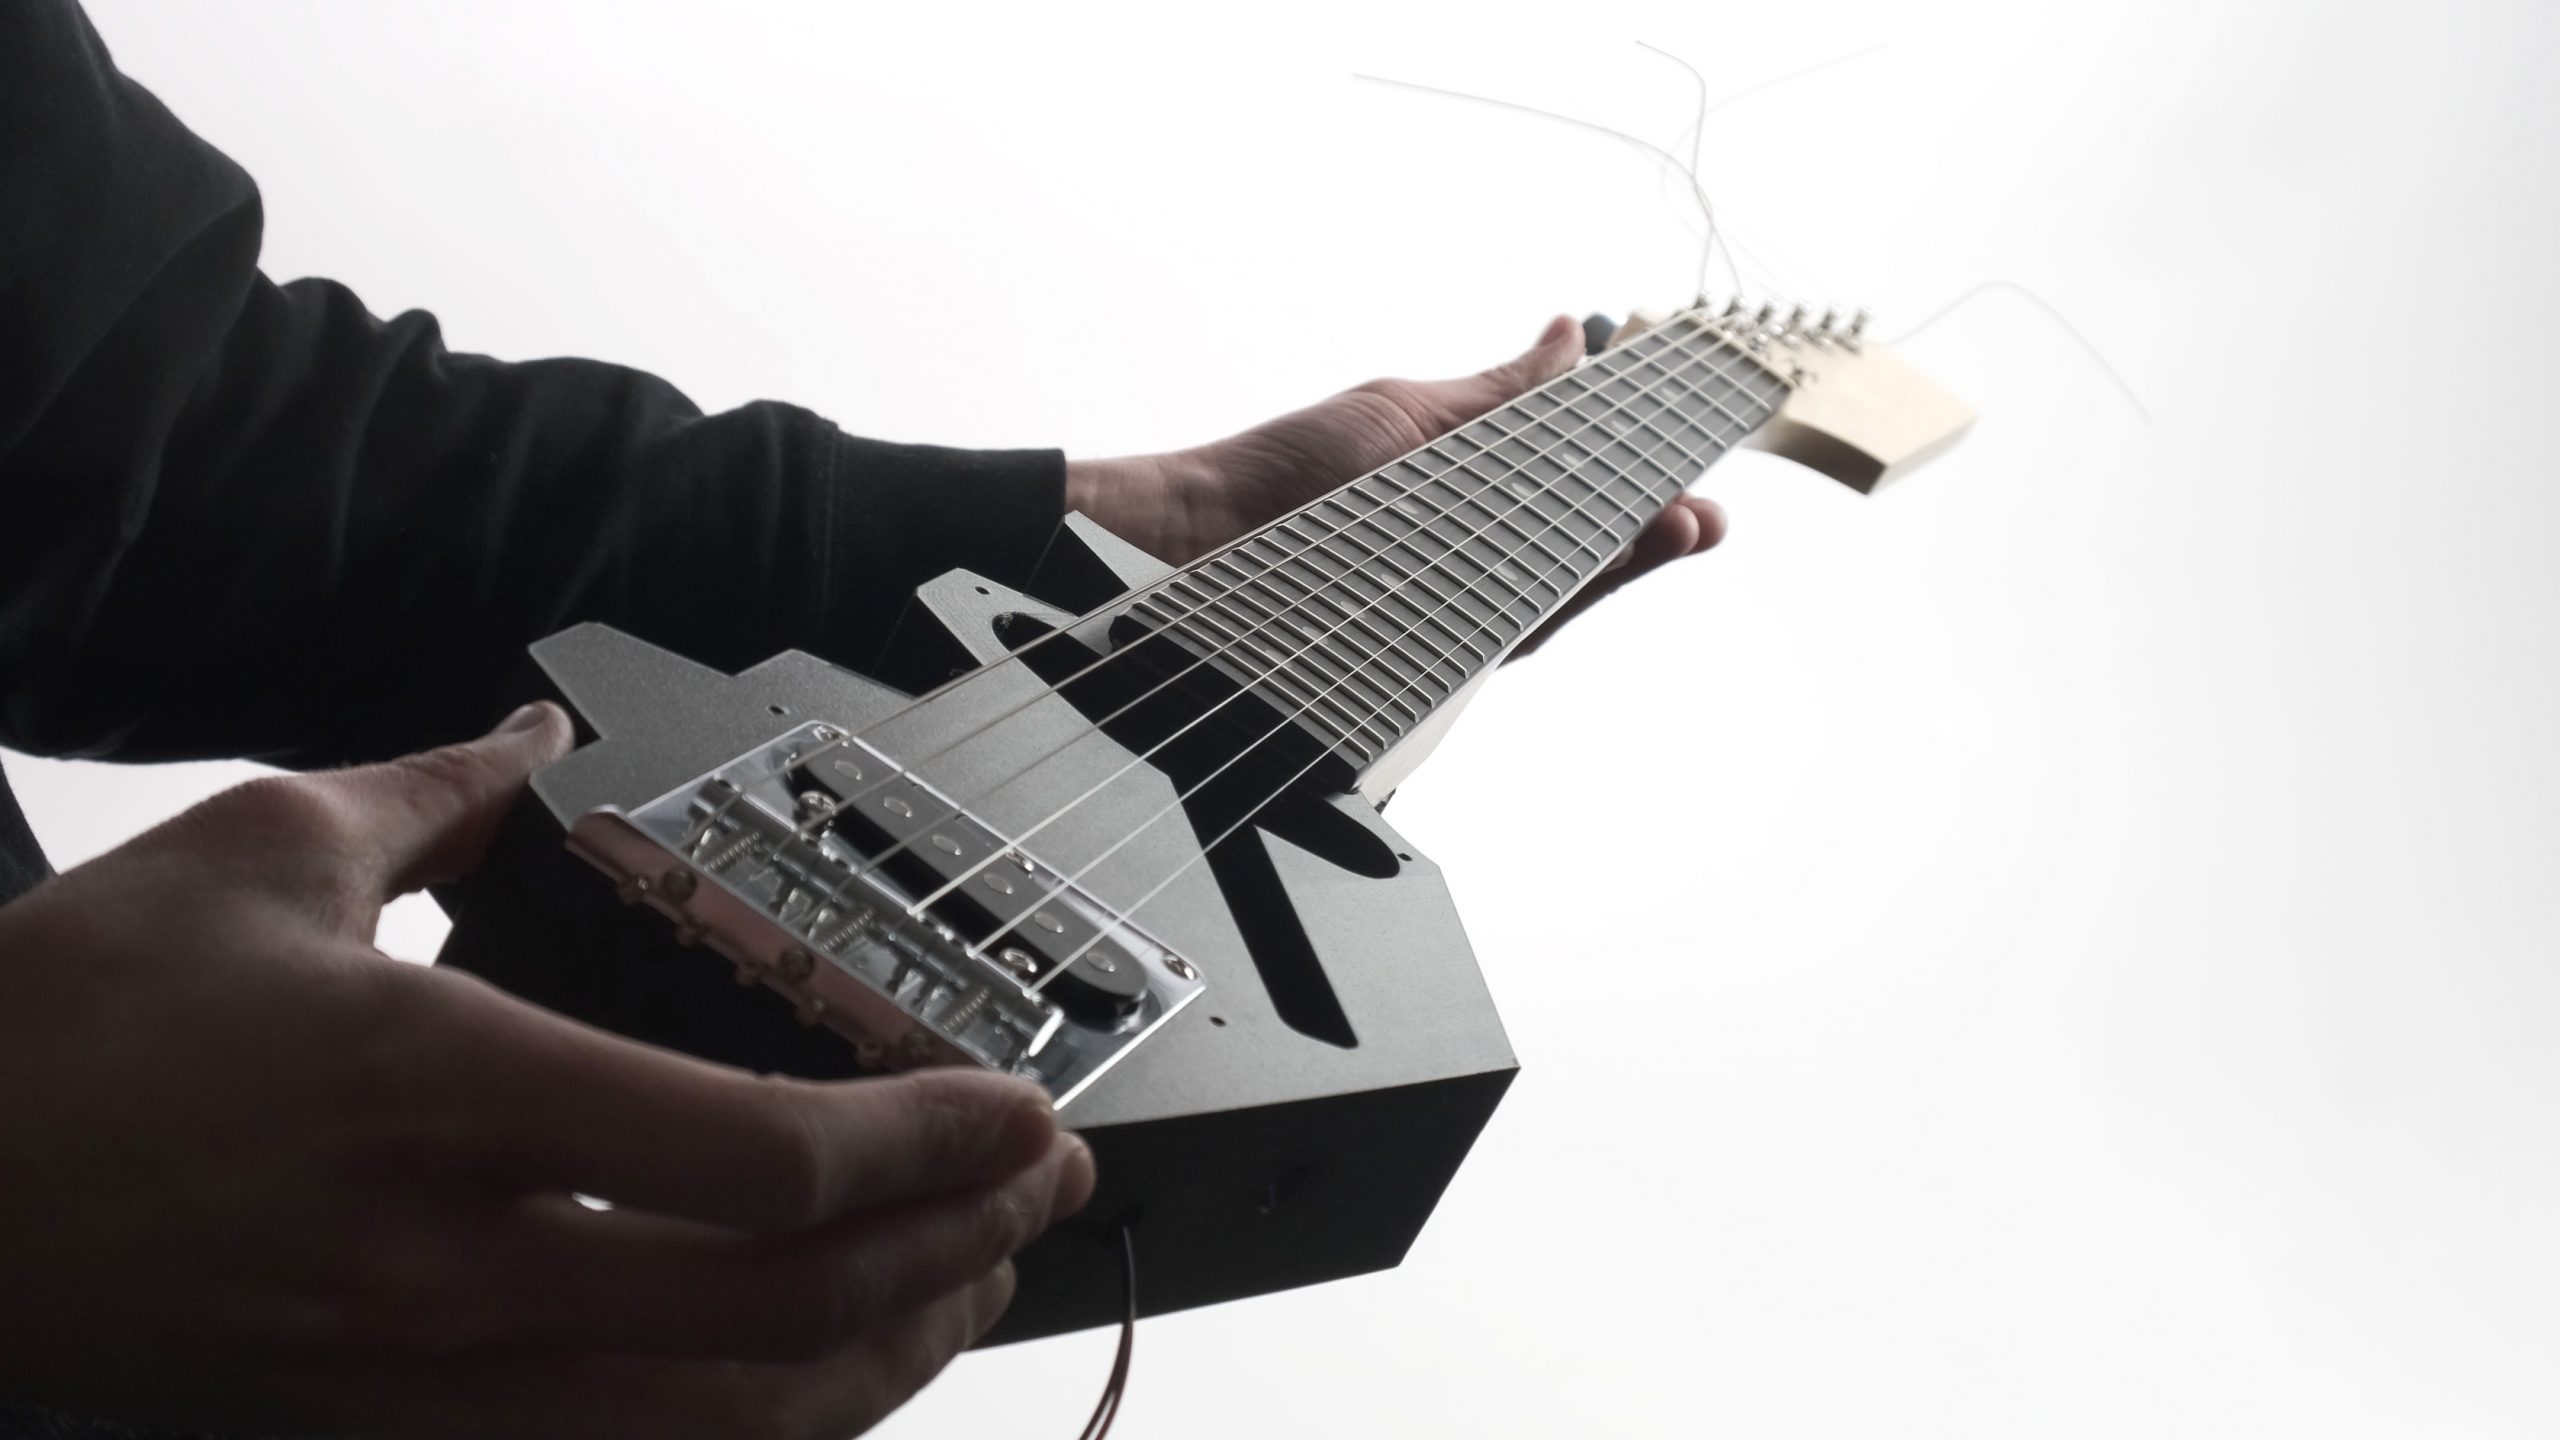
To test if everything fits, I’ve printed one copy of the middle piece with the default PrusaSlicer settings. And since everything did fit, I attached the guitar neck and the bridge to it, and then attached the strings to the “guitar”. And Voilà! The guitar is functional! It looks rather strange with just the centerpiece and it is missing all of the electronics. But it plays!
Material cold flow (creep)
There was another concern though – material creep. In materials science, creep is the tendency of a solid material to slowly deform under the influence of persistent mechanical stress. Even if this stress is below the yield strength of the material. And this concern turned out to be true. After a month of the printed part being under the tension of strings, the part was mildly bent. This wasn’t a huge surprise, as the default profile in PrusaSlicer uses just 2 perimeters, which is good for most use cases, but a bit too few for a part under such mechanical load. Reprinting the part with 7 perimeters and 25% cubic infill solved the issue completely.
String selection
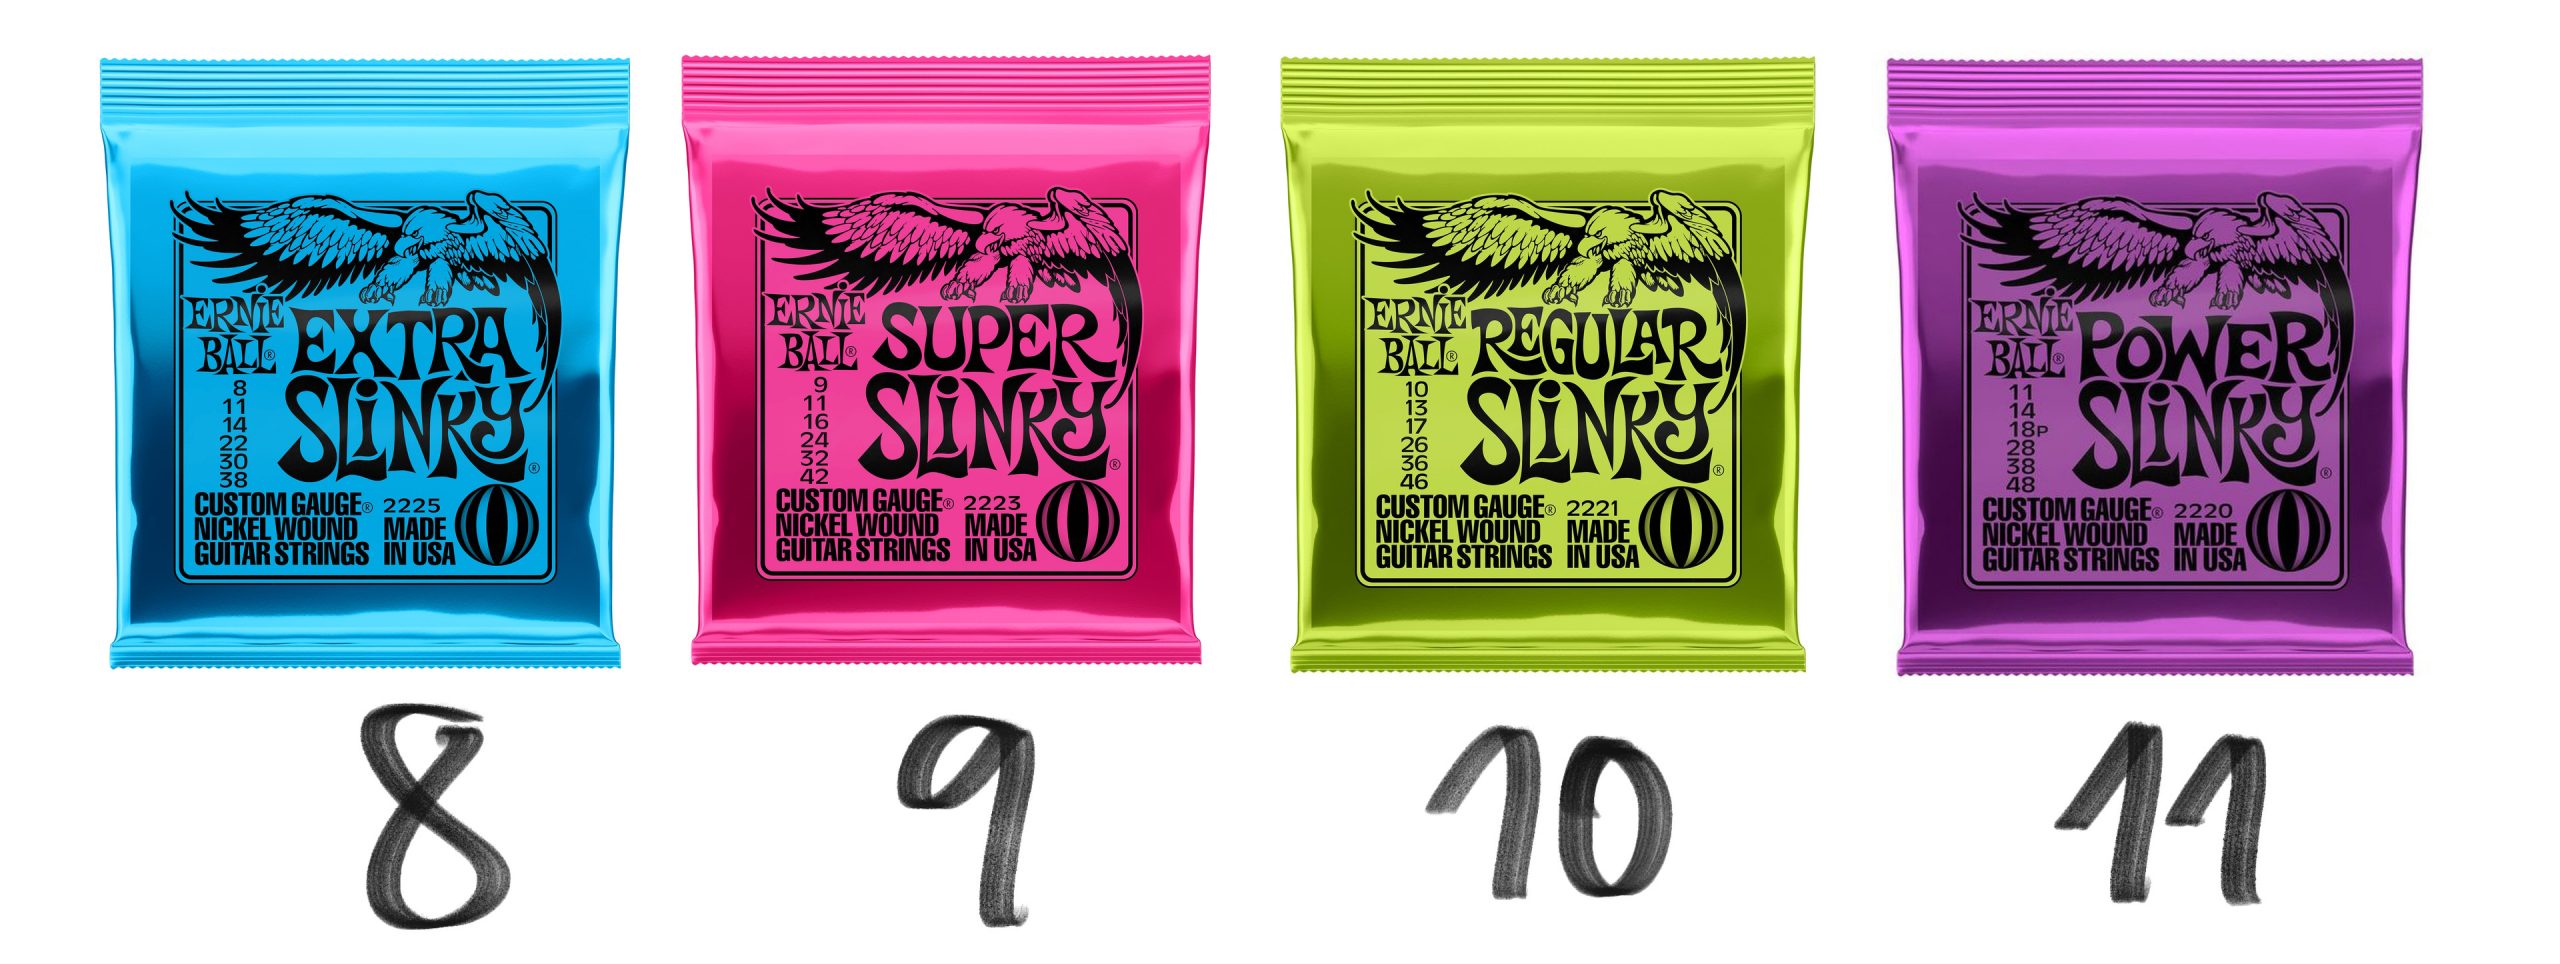
Guitar strings come in a variety of gauges (thicknesses). Lighter guitar strings are typically easier to play and allow for easier bending of notes. They do break easier though and produce a bit less volume. Heavy guitar strings on the other hand produce more volume and sustain, but need more finger pressure to play and bend notes. More importantly, heavier strings apply more tension to the guitar neck! By selecting very thin strings, such as 9 gauge, we can lower the stress applied to the center piece.
Printing the rest of the parts
The rest of the parts will not really be under any significant stress, other than holding the guitar on a strap or having to hold the cable. So the material choice here doesn’t really matter. I’ve printed the top 3 hexagon parts from Prusament PETG Prusa Orange, the bottom piece that holds the switches from Prusament PLA Galaxy Black, and lastly the small piece at the bottom from Prusament PLA Azure Blue. I’ve used the default profiles for all these parts.
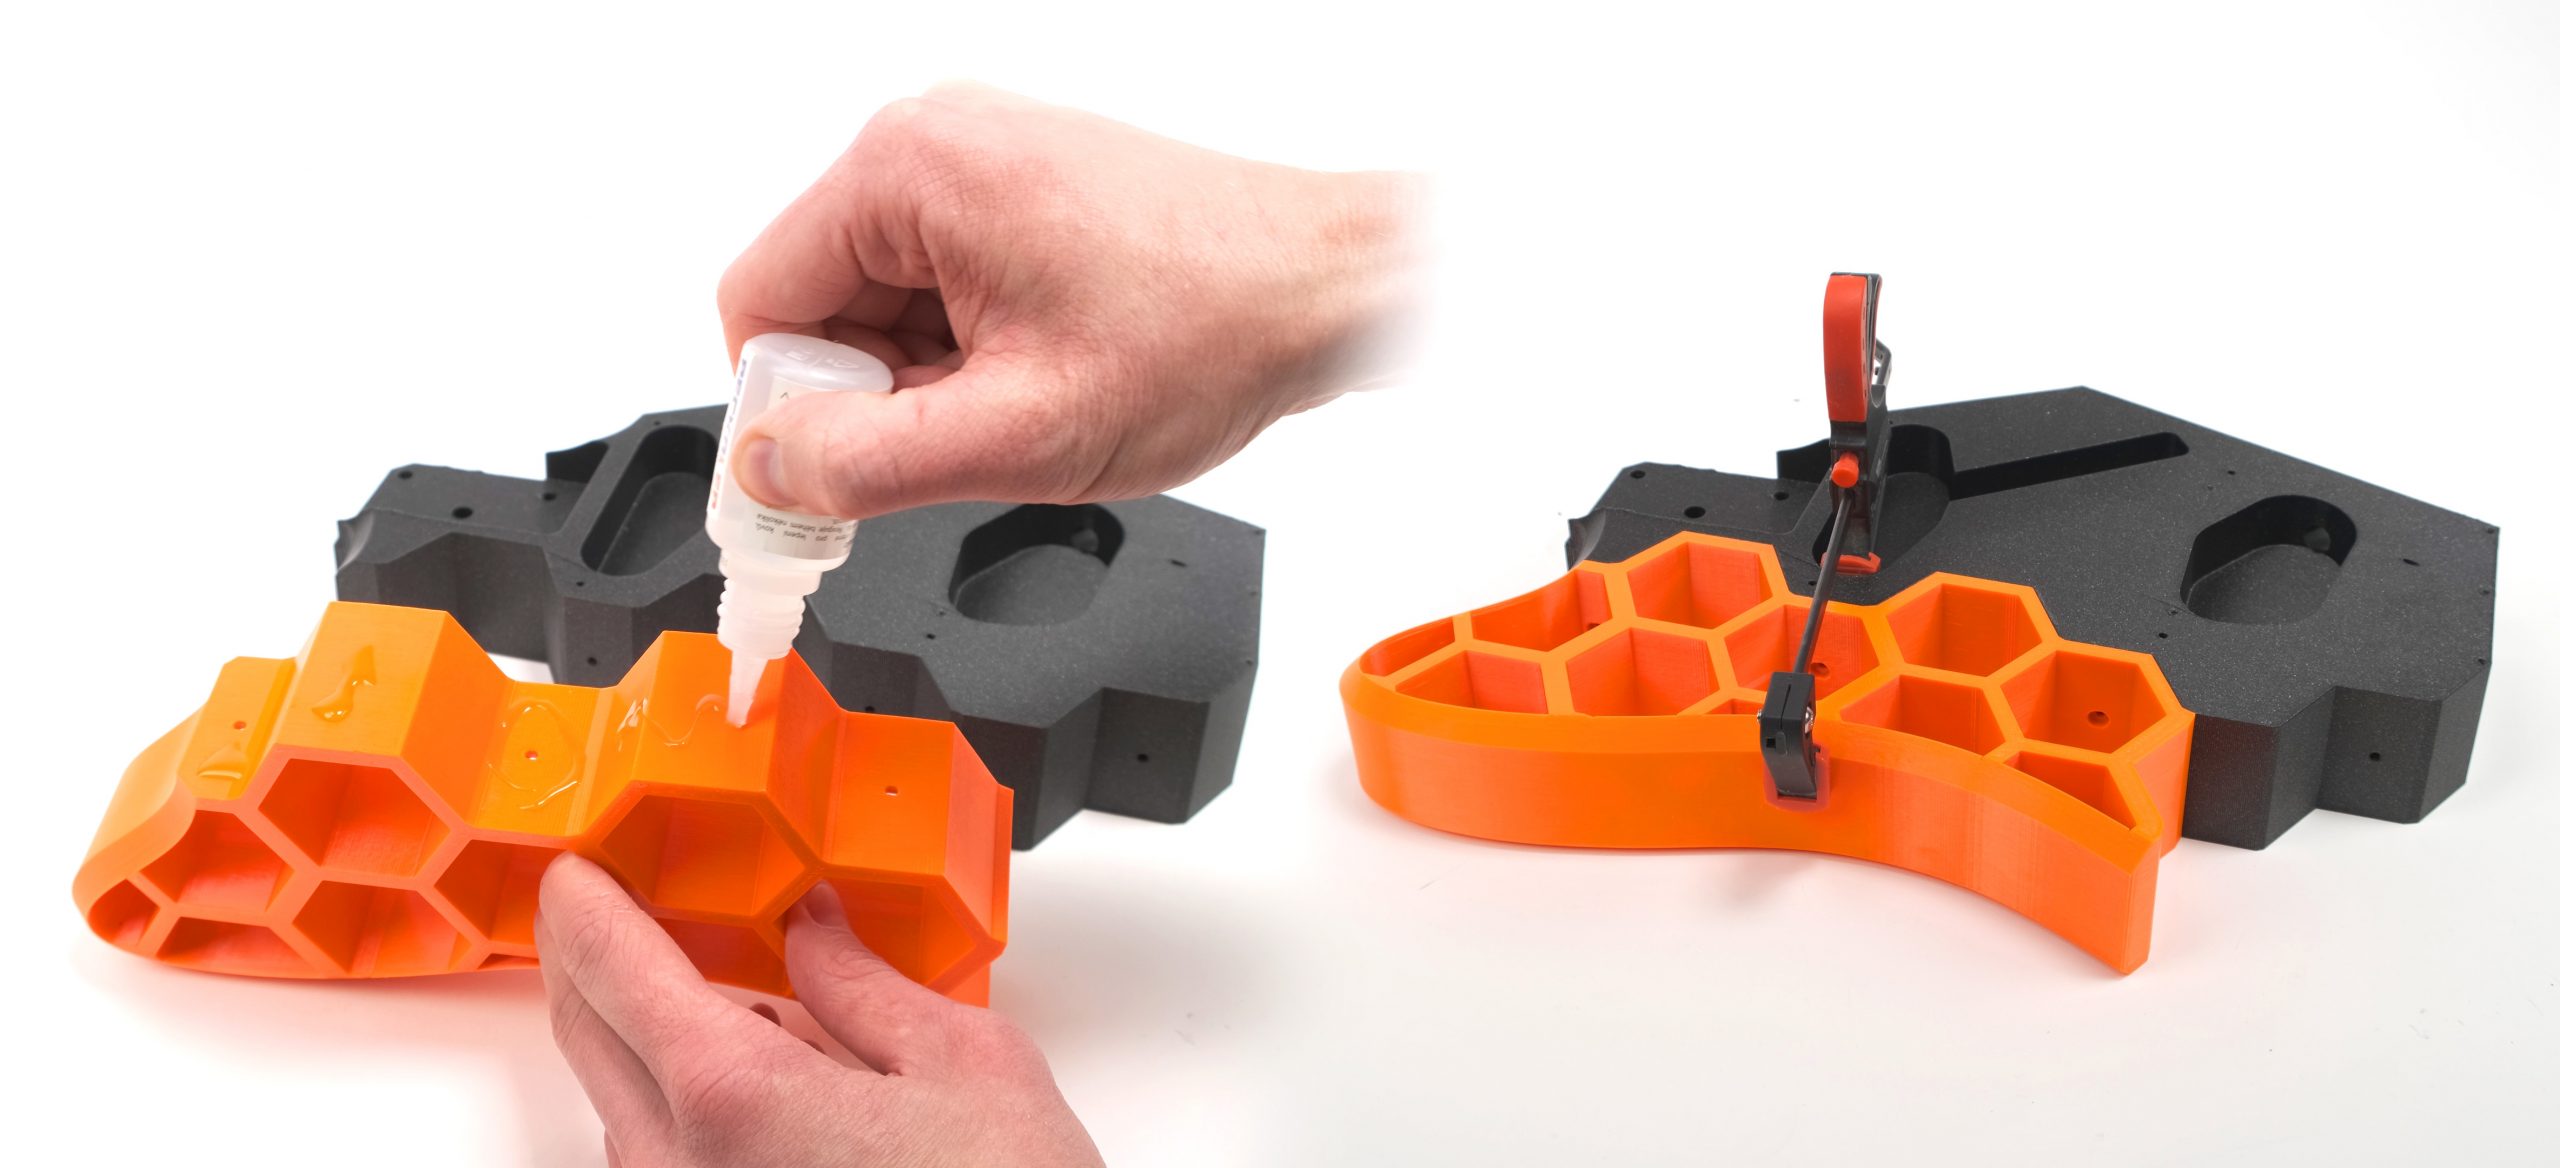
Connecting the parts
All the parts have large contact areas with the center piece. Use a generous amount of superglue to glue everything together. There are even M3 screw holes in the hexagon pieces to make the connection stronger, as the whole guitar will be hanging on those if you use a strap. However, the screws are pretty hard to access and I would consider their use optional.
Wiring the electronics
The cables in the Harley Benton T-style kit all come with JST connectors, so it’s really easy to connect everything together. Just make sure you connect the cables from the top pickup to the cables coming from the top of the selector switch. Otherwise, the switch would work in the opposite way – the top position would select the bottom pickup.
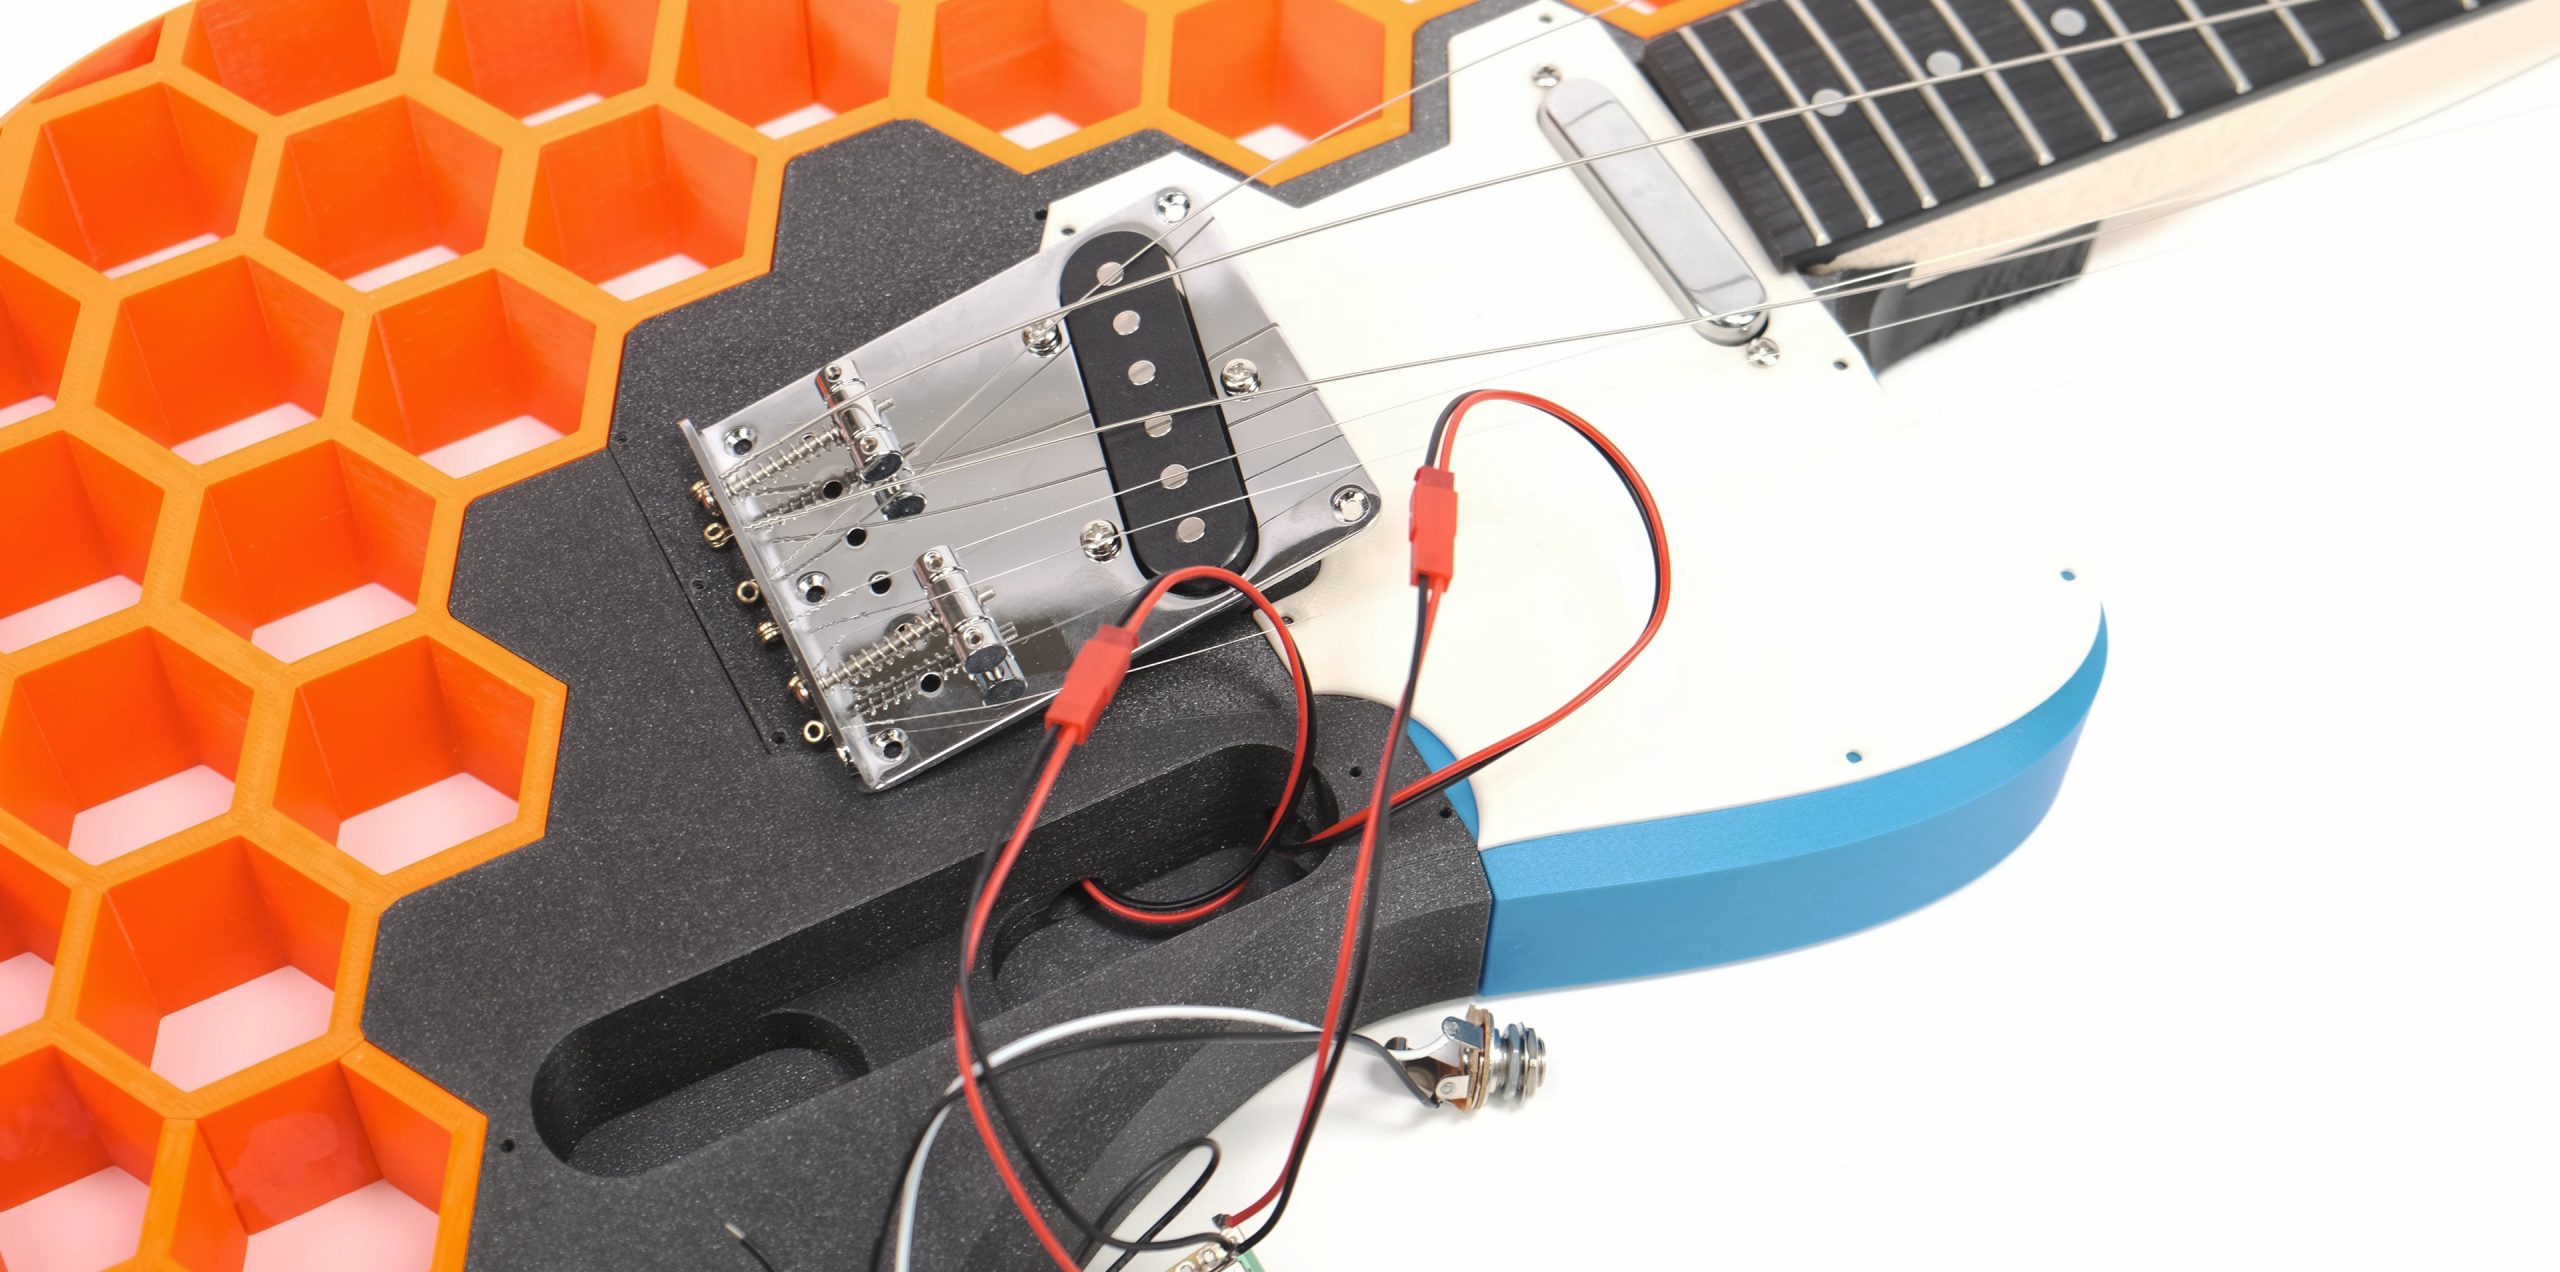
One interesting thing about the wiring is the one standalone black wire that seemingly doesn’t connect to anything. It’s used to ground the strings. You’ll find a channel in the center printed part that goes under the bridge. Strip some insulation from the cable, loosen the bridge a little bit, route the black cable through it, and crimp it by tightening the bridge again. Without this grounding, the guitar would be buzzing annoyingly a lot. Even on fairly expensive guitars, there will always be some buzzing (and we’re using budget components), but this will significantly help to mitigate it.
![]()
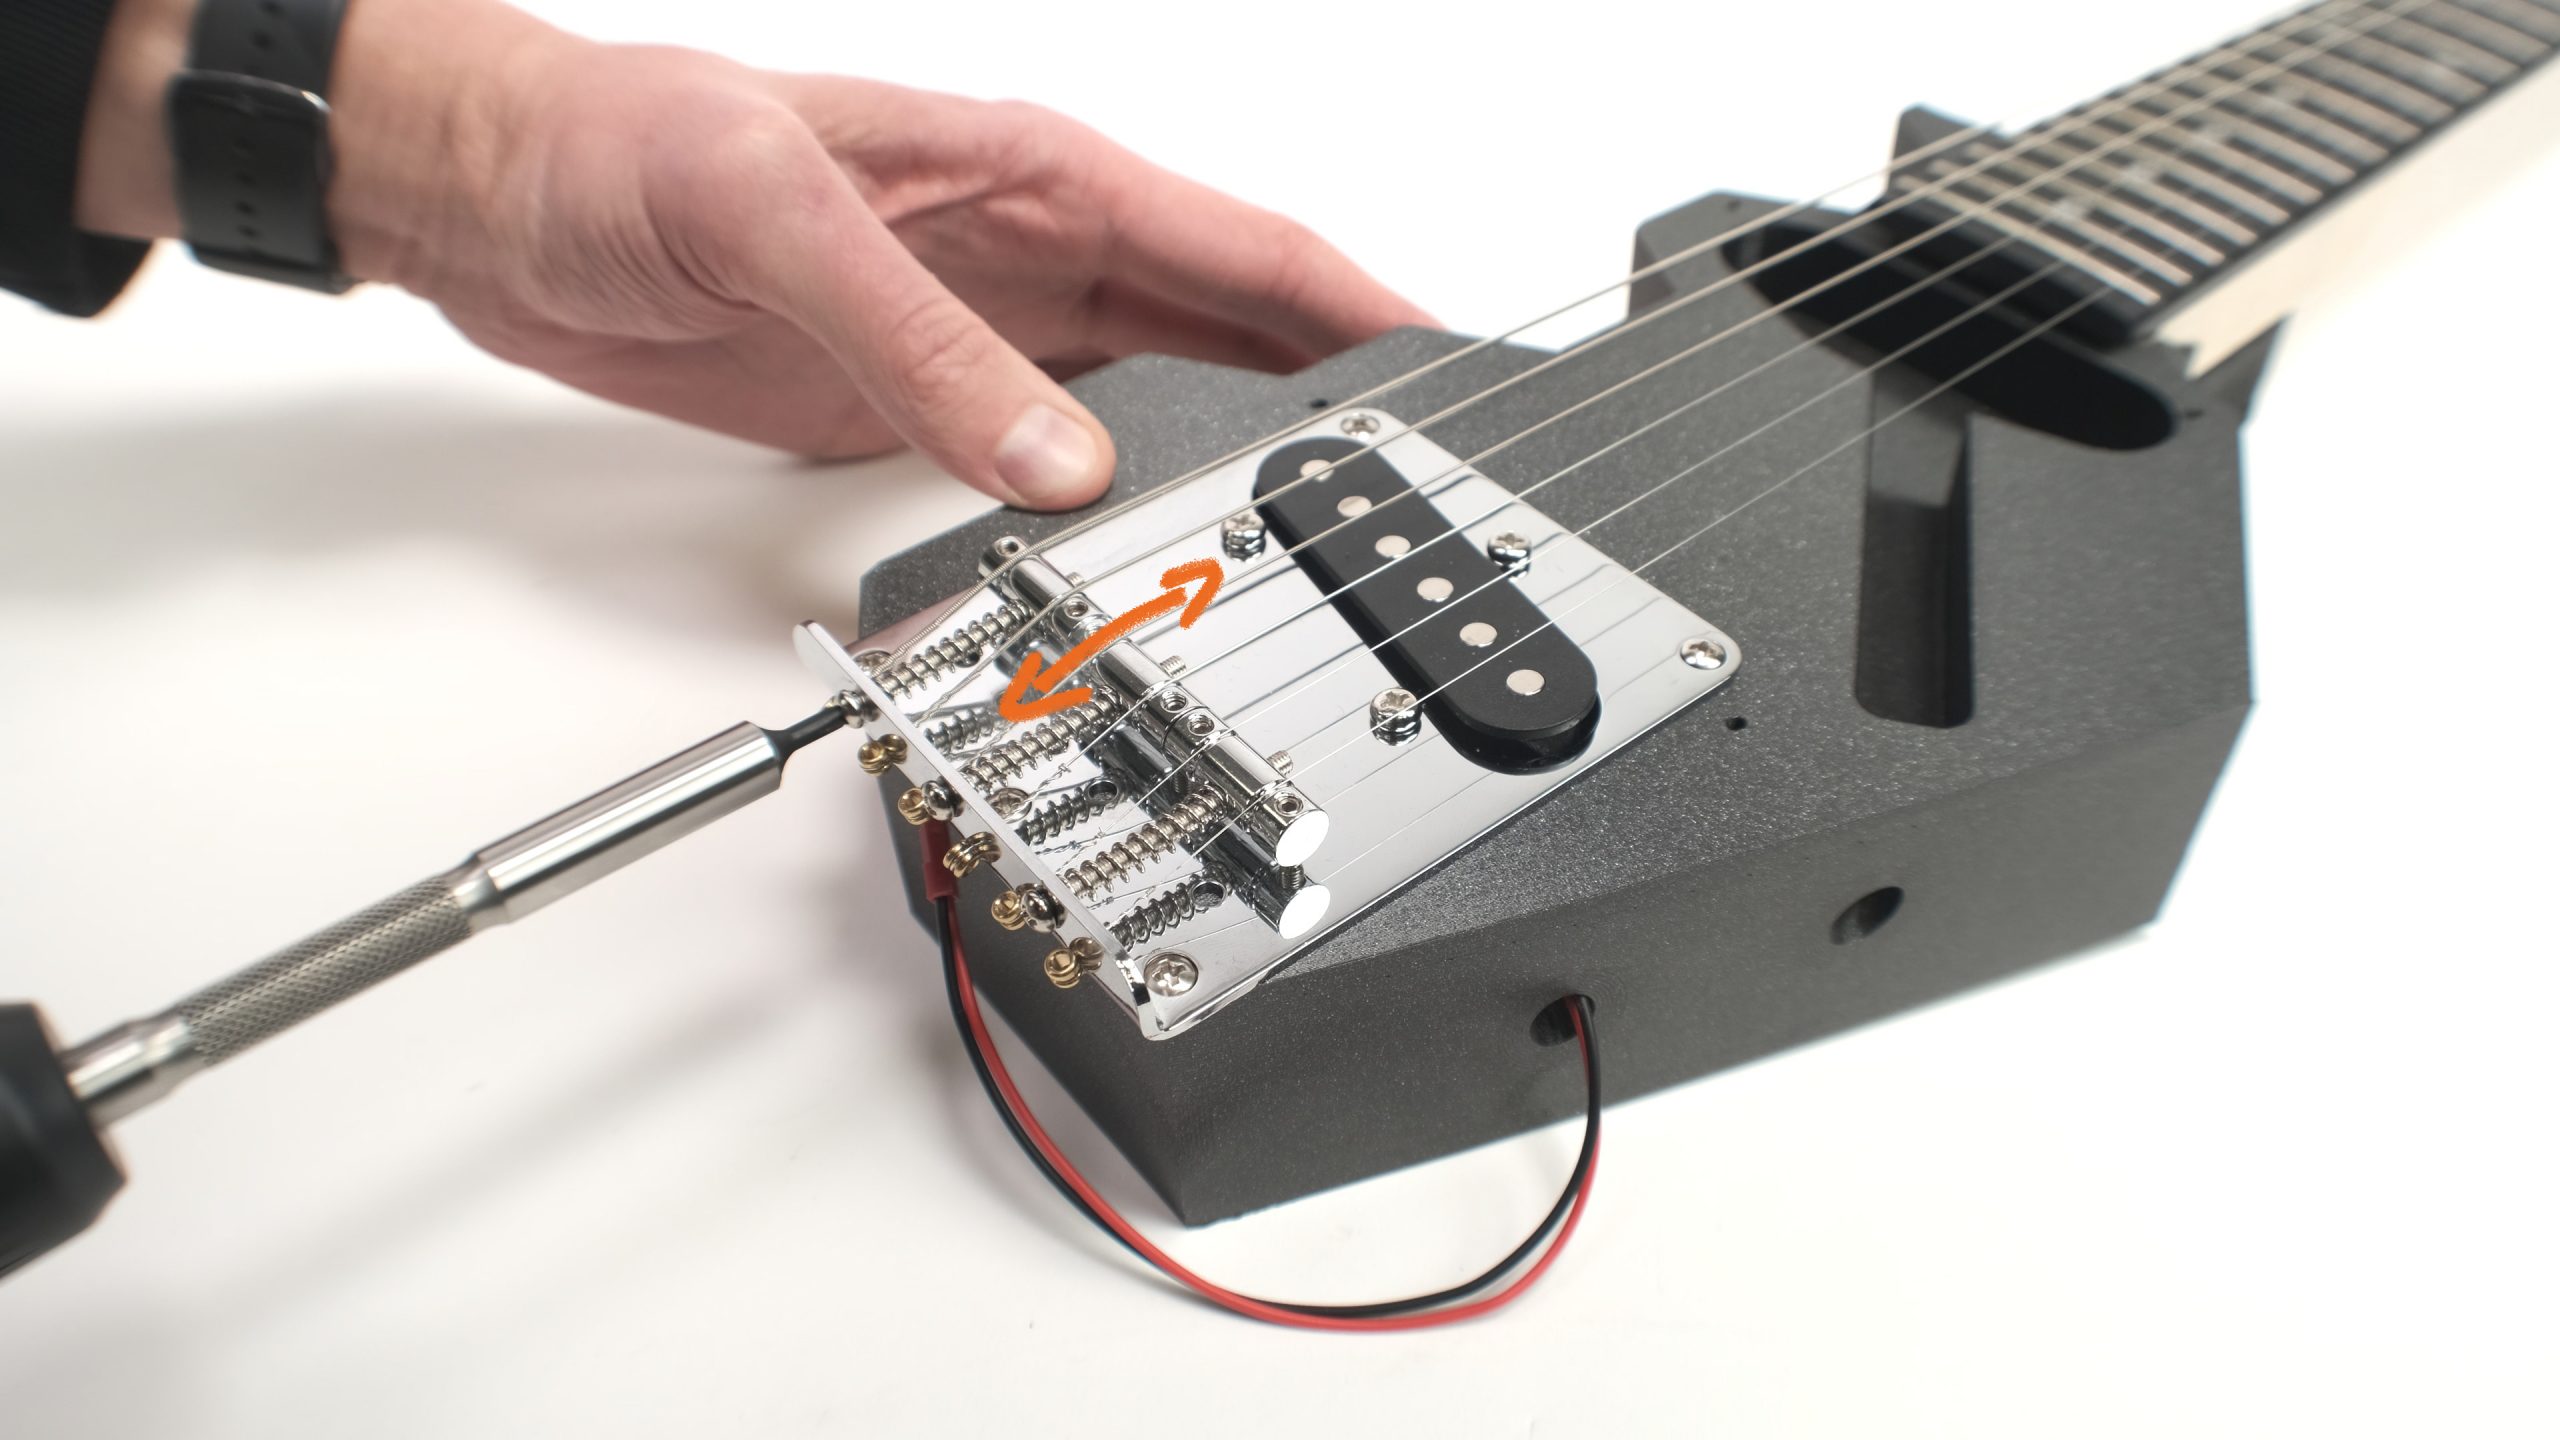
Final adjustment – setting guitar intonation
With the guitar fully assembled, you can string the guitar and tune it. After you tune the strings, you can adjust the guitar’s intonation, so that it will be perfectly in tune across the whole fretboard. Once the strings are tuned, play the same string both open and at the 12th fret. If the note at the 12th fret is out of tune (more than just slightly) compared to the open note, you’ll need to adjust the intonation. On the telecaster hardware, this is actually extremely easy to do. You can move the part of the bridge that pushes the strings up (it’s called the saddle), by turning the screw that goes through it. If the fretted note is flat (lower in pitch), move the saddle towards the neck. If the fretted note is sharp (higher in pitch), first loosen the string slightly and then move the saddle towards the bridge. Keep in mind that the saddle sliders on a Telecaster are shared by two strings, so try to find a good middle ground where both strings are in tune.
The fully assembled guitar
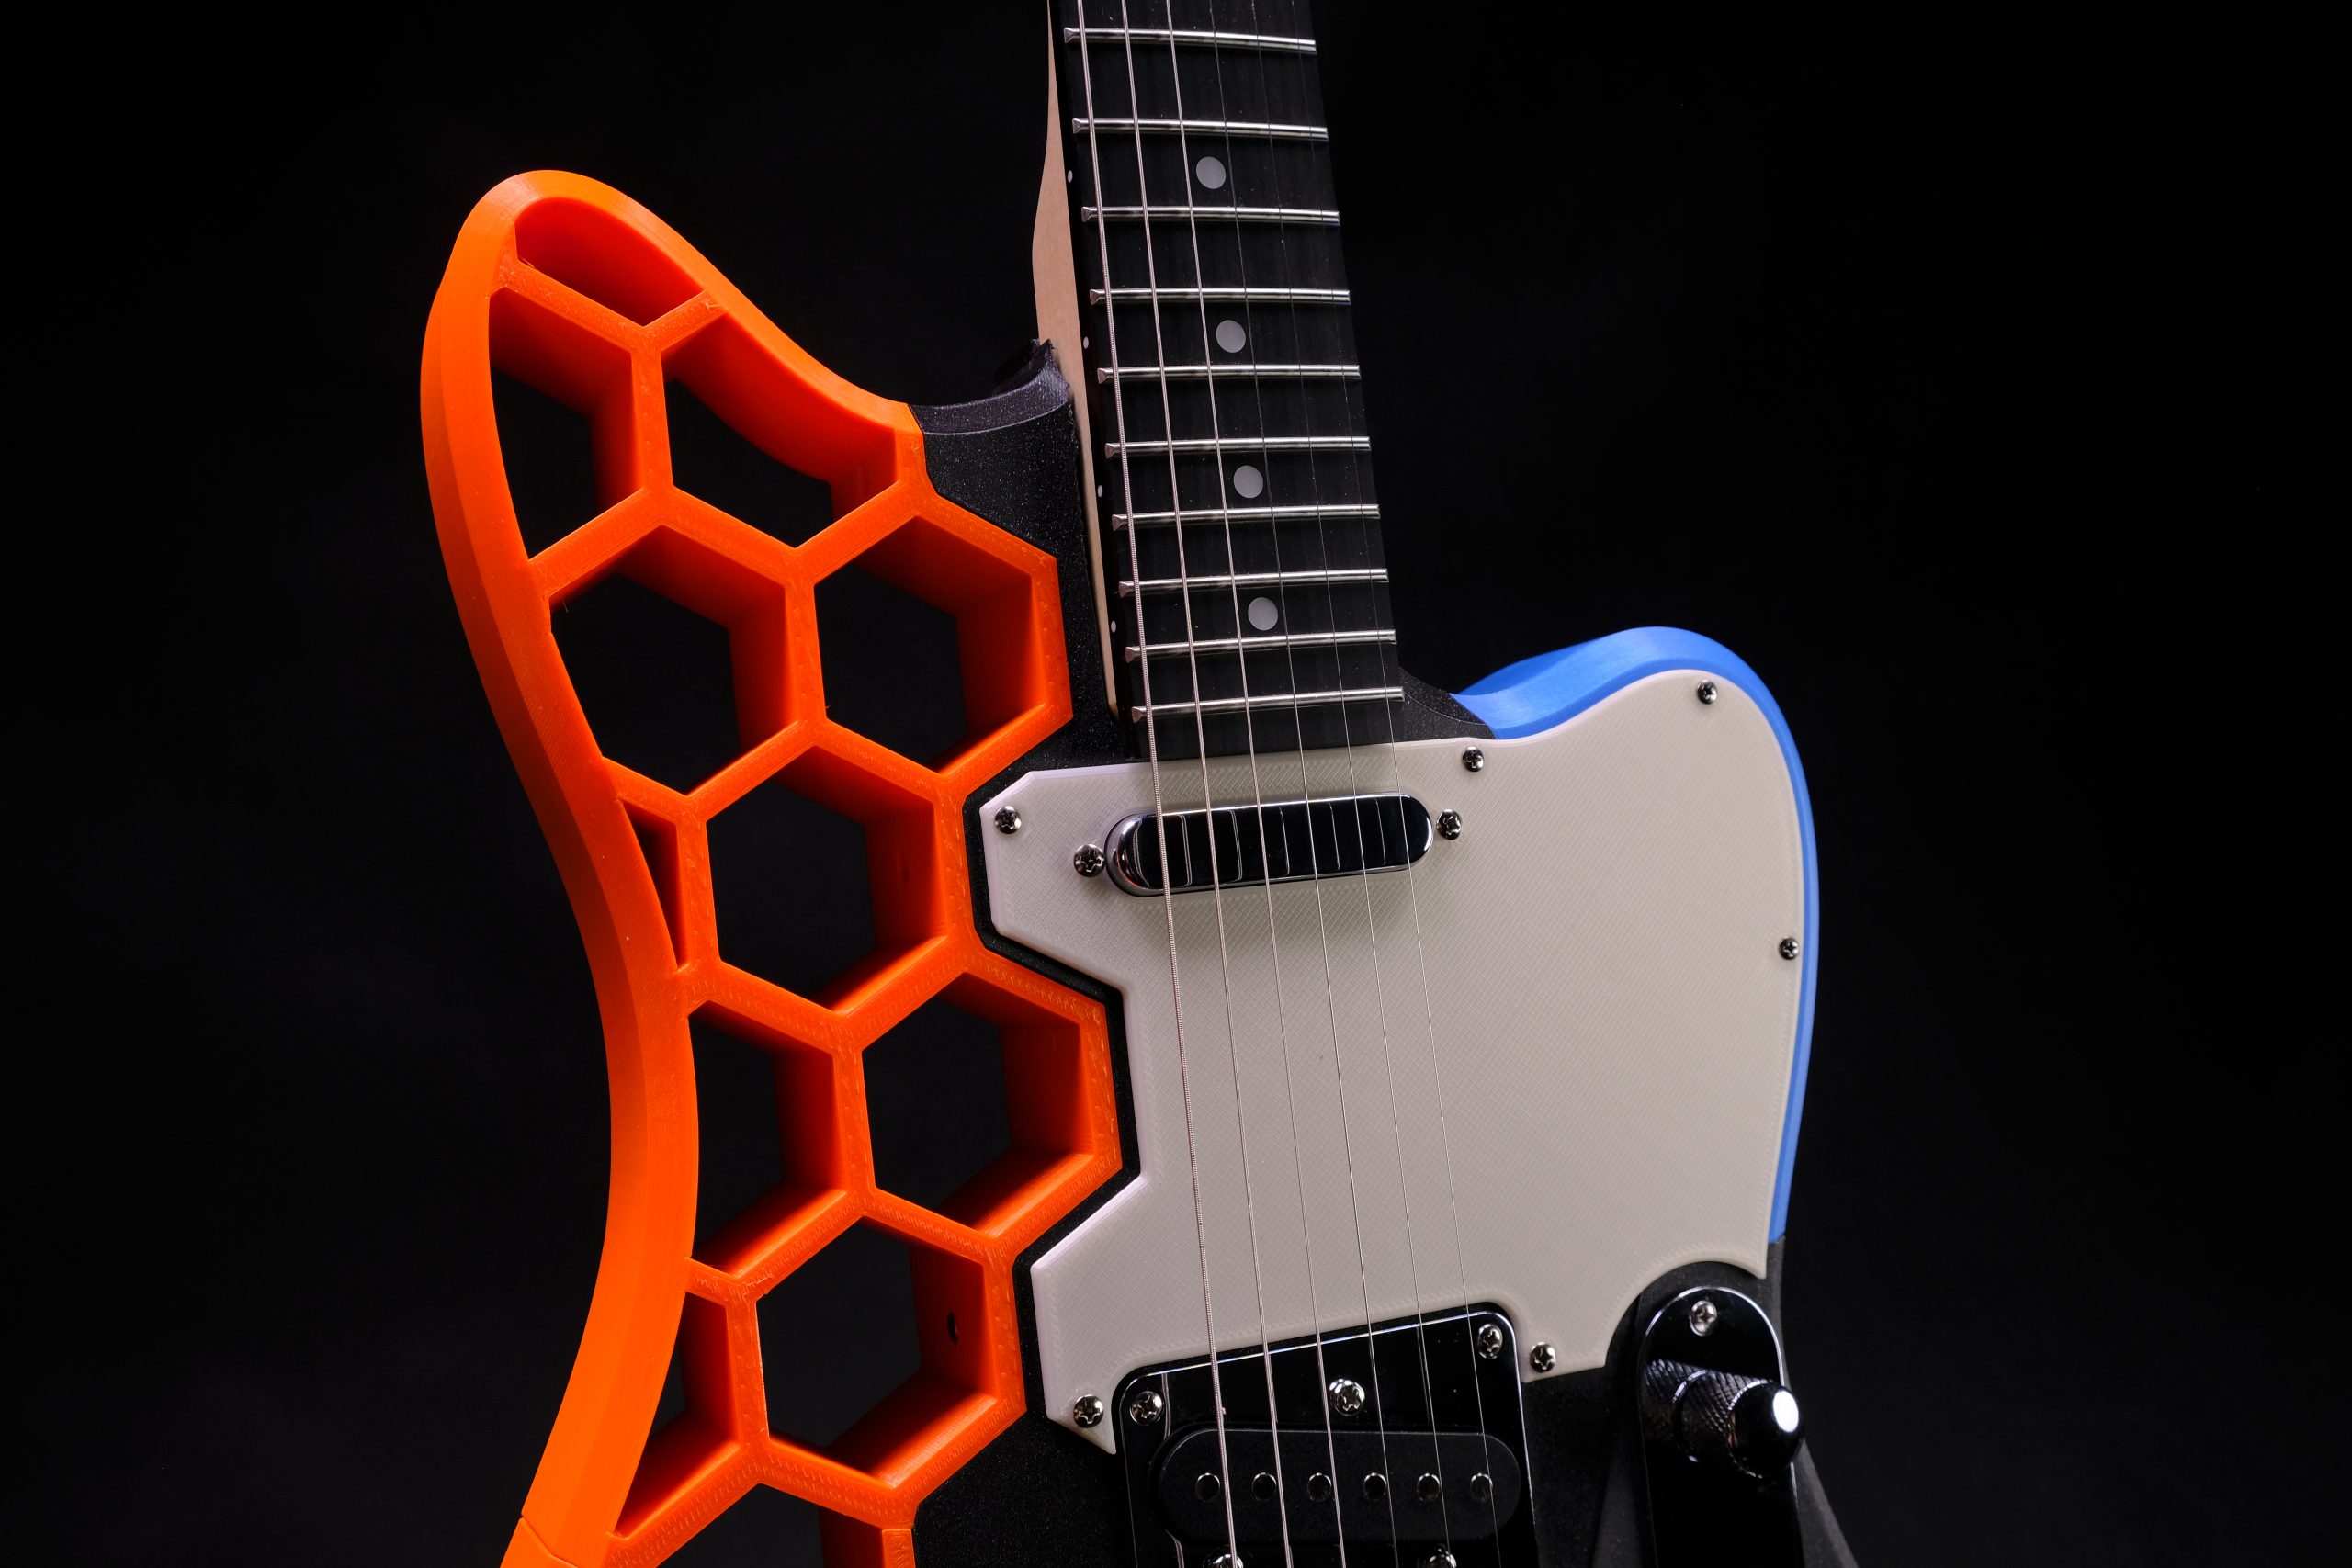
How does it play?
The guitar plays really surprisingly well. If I had my eyes closed and someone handed it to me, I might not be able to tell it’s even 3D printed. The strings stay in tune well, and the guitar intonation is nearly perfect. Of course, since the components were quite cheap, it can’t be expected to play better than a high-end telecaster, but for the price, it’s a great result.
Download the design and make your own!
Overall, I am extremely happy with how the guitar turned out. If you want to make your own Prusacaster, you can download the 3D model from Printables.com. I’ve also included STEP files for all the parts and the basic guitar design in one piece, as well as a DXF drawing of all the hole positions.
 Download the model from Printables.com
As always, it’s a free download, so go ahead and give it a try! I hope you’ll have as much fun building your own Prusacaster as I did.
Thanks for all this work, I’ve been contemplating doing the same for ages. But I think I’m gonna try to mod it for dual humbuckers, always wanted a tele with dual humbuckers. Thanks for sharing.
This is cool! Good to see something easily-accessible like this posted on Printables.
I wanna throw a shoutout to Filatone here doing the same thing albeit for a premium. However, their designs are sick and a unique inspiration for anyone else looking to take a crack at the same thing. Throwing their main site link here if that’s okay:
https://www.filatoneinstruments.com/
It’s funny you say that! Was literally reading the article thinking Filatone has done exactly the same thing before this article was released.
Here are a few that have been around a while:
https://all3dp.com/2/3d-printed-guitar-10-best-curated-models-to-3d-print/
In my Family all except I are guitar players. Only I am a printer 🙂
I know it is a big ask but can anyone point me toward a kit or list of parts that would be higher end than the suggested kit. I can solder and tinker so plug and play is not necessary. I just don’t know guitar brands/parts and there quality levels.
Thanks…..Turtle
_____ ____
/ \ | o |
| |/ ___\|
|_________/
|_|_| |_|_|
Shipping to the USA from Thomann is very expensive, more than the cost of the kit. Is there an electric guitar kit available through Amazon, or another US based company, that would work with this design?
Just query T-style guitar kit on Amazon. There are several that are comparable and have identical cut-outs, such as this one:
https://www.amazon.com/Electric-Guitar-Kits-Okoume-wood/dp/B082ZG8FS7/ref=sr_1_5?crid=6NZBZN6ATQSG&keywords=t-style+guitar+kit&qid=1676686168&sprefix=t-style+guitar+kit%2Caps%2C148&sr=8-5
McQ….Thank you. I don’t know guitars so your comment sheds new light.
I purchased this kit and the holes don’t line up for the neck.
Unfortunately it appears the version of T-Style guitar used for this model is wildly different from either of the two main options listed on Amazon in the USA. Neck opening is too small, pickup hole is nearly 1cm too shallow, none of the screw holes line up. Sadly I learned after printing a full kg of PLA carbon fiber. Still cheaper than than the $200 to buy this specific kit and have it shipped from Germany.
I just learned the same thing you did, the kit from Amazon does not line up anywhere. Anyone have another US option for this kit without the expensive shipping?
Expensive shipping makes this a much less viable project. If the STL files are designed around a specific components then using alternatives becomes that much more difficult. Additionally I feel these components are lack luster. I would buy them just to try the project but I refuse to pay a premium price for something I know i would want to replace in the near future. I know one could redesign the STLs to fit other components but at that point……you may as well save yourself time/money/effort and just buy a cheap guitar. It would essentially yield the same end product.
Yep. I'm not a guitar player, but this looked like a fun project to make and maybe learn some guitar. I was all ready to spend $80-100 for the kit, but when the total came to $160, it turned a fun project into a hard nope.
Be careful! I tried the Amazon route and thought I was getting an identical kit, but when the kit arrived the holes in their pickups were all wrong! I ended up buying the correct one and gritting my teeth for the shipping cost. It arrived today and everything lines up perfectly. Now I have to RETURN the Amazon kit!
The guitar turned out really well!
THANKS FOR THE GREAT ARTICLE AND PRINTS MIKOLAS!!!
Hello Mikola,
I know it cost more but I’d like to have a neck pickup, also. Could you purchase the TE-52 and use those parts on this build? It would provide the neck pickup and also the selector switch to select between the neck and bridge pickups.
Thanks for all the hard work you did working out the details for this 3d guitar print.
Gary
I love this and I’m going to get printing on this immediately. I was wondering you have any possibility of doing a Stratocaster or a Les Paul in the future body? Thank you that is absolutely amazing the you’re able to do that!!
No holes for strap pins?
I’ve created a remix that adds holes for M3 threaded heat set inserts at the recommended locations: https://www.printables.com/model/407098-prusacaster-with-guitar-strap-mounting-holes
I finished reading your blog post, which was incredibly insightful and thought-provoking. Your writing style is engaging, and the way you presented your ideas was straightforward to understand.
Best wishes from skip hire near me service. Keep it up
Thank you for taking the time to share your knowledge and insights with your readers. Your hard work and dedication to your craft are evident in every word you write. Keep up the excellent work, and I look forward to reading more from you in the future.
Best regards,
[Roger]
Any chance of doing a neck, even if it’s in parts, that could be reinforced with a couple long threaded rods?
perfect Mikolas, did you share any info or tips about the printer configuration ? Printer settings etc
Can you share this ?
Thanks
Ricardo
This looks great, I mainly play bass and suspect the tension on a set of flatwounds or ordinary bass strings would be too much for the printed parts, Flatwounds are around 100Kg of tension.
However if I can find a broken and cheap Telecaster clone with a decent neck and trashed body, I’ll give this a go.
Two questions:
1. Whats the weight in comparison to the HB kit?
2. Whatst he sustain like on it? We hear about exotic woods being so much better, I;m not good enough to know so would be interested in your thoughts.
Best wishes
Rob
what kind of varnish do you guys use for the neck?
Super design! However, as someone who has a Mini+: do you think it would be feasible to cut the pieces up in even smaller parts to make it fit on the 18×18 base?
Has anyone tried this print?
How did you fit the orange middle file on the print bed? I have the MK3s
I got it to fit. Sorry
I’m also having trouble printing the middle orange sectioned you have any advice on what worked for you?
Thanks
I have the same issue. Did you find out what was up?
how did you get it to fit?
How do I get the middle piece to fit on the Bambu P1S plate?
Had the same issue, managed to fix it by lower the "Print Settings" > "Skirt and brim" > "Distance from brim/object" from 3 to 1 and rotating the orange middle part until the object turned green. Took some fiddling but it sliced correctly, I'll leave an edit when it's finished printing.
thank you!!!!
I received the Harley Benton kit linked above. They have changed the bridge without identifying that they have done so on their web site. It now has only two screw holes at the bottom and does not have the three attachment points at the top. It no longer lines up with the printed parts. This negates the whole purpose of using this design as it will put too much stress on the plastic part.
I plan to contact Thomann and request the part that they advertise in all their photos of the kit. Hopefully they have the parts.
Very disappointed given I printed all the parts prior to receiving the kit expecting the parts to be what was indicated.
Wow thank you for saying so!
I was just about to pay the shipping cost to Tokyo, which is more expensive than the kit itself. Their only shipping option is UPS Express. Can anyone else verify that the vendor did indeed change a part which makes the kit unusable with the STL files our OP has generously provided? Has anyone found the same kit available on any other online shop? I can’t find it anywhere else.
What a dissapointment.
They confirmed this when I chatted with customer support. I purchased the bridge part from amazon to replace the part that was sent. https://www.amazon.ca/dp/B098D8874H?psc=1&ref=ppx_yo2ov_dt_b_product_details
Customer support was unhelpful and would not provide the proper part.
Thank you for sharing the link! Though it seems to be using slightly different saddles. I’d imagine you can swap them out with the 3 that the kit came with, but the other issue is that apparently the pickup included in the version Thomann sends out is deeper and will not fit the original print. Look into the remixes, where several kind talented individuals have provided adjustments to fit the different bridge properly. Thomann customer support was not helpful for me either, and still claimed that what you see in the photo is what you get – and “it works the same”. I found a similar plate to the one you’ve linked from amazon.ca, on the amazon.jp site, but hesitant to buy it because of the pickup depth, so if you are successfull please follow up!
Any good (available in the US and cheaper than PC) material options for printing the core in an environment where it does get very hot (Southern California), but I still don’t want it deform?
What size screws were used to attach the input jack piece? I can’t seem to find that information anywhere.
how many rolls of filament did it take in total?
Can someone please help me with fitting the items on a MK4-buildplate? Most of the pieces fit fine but the big hexagonal doesn´t fit. How to do it? Please help me!
Check out the full database of 3d printable guitars (featuring the Prusacaster of course) 💯
https://tyler-hilbert.github.io/3D-Printed-Guitars/all.html
I think the opportunity was missed to design a more ergonomic body shape. You should not set the intonation based on the open string and 12th fret instead use the 12th fret harmonic and the 12th fret for better intonation.
Jednodušší verze je použít kytaru Steiberger. Stačí k ní přidat tištěnou část.
This is absolutely epic mate. I build a few electric guitars from scratch and I will totaly build a Prusacaster, or actually 2. I want to build one for my nephews, with a custom built 3/4 neck, but I need to alter the guitar outer design to make it smaller.
I'm new to Fusion 360, I just didn't have the time to follow tutorials yet cos I have a 1 year old at home, and I was thinking to try and find someone on Fiverr that could show me how to alter the outer design. I guess it's a pretty easy job for someone who is used to Fusion 360, like a one to two hours job (like doing it while sharing screen), and I was wondering if I could talk to you about this, and maybe ask you to show me. I couldn't find a way to reach to you in private so I'll try my luck and contact you from the comments.
Again, epic design, thanks for sharing it
Take care
Anthony
The Prusacaster has been added to the largest online database of 3D printable guitars !!!
tyler-hilbert.github (dot) io/3D-Printed-Guitars/
Strange request for you if you are bored and have time… how could this be tweaked for the likes of Jimmy Hendrix stylee of left handed players playing a standard guitar upside down? Could you tweak the pieces nearer the neck to sort of reverse their profile? That is one downside of flipping it upside down, you lose that longer section to put a neck strap button on and lose the cutaway area to get to the frets near turn body. Just a curious thought. 😉
I'm also interested for a left handed version of this guitar/project.
@Mikolas Zuza – is there too much trouble to do such version?
Hey, so i have a really specific situation and I want to do as much research as i physically can but have gotten almost no help from reddit. So I own a Prusa MK4, have had it for about 9 months and this is my first printer so i dont have a ton of knowledge on 3d printing. I've been wanting to do this project for a while, i made almost all the parts except for 2 because every time I've tried, it has failed. I am referring to the "core" and "knob holder". Both were printed in PolyMax PC. Now to be fair, first 2 times, I didnt have a filament dryer nor dry box and it is very humid upstairs. I recently invested in one and have my rolls drying in there right now. Before I retry and waste another $40 of filament, can someone PLEASE help with settings you recommend me using? Thank you for your time.