


*okay let me explain 😉
The stable release of Input Shaper firmware for the Original Prusa MK4 is out now! All our new MK4 3D printers will be shipped with it by default and you can safely flash it right away to turn your 3D printing workhorse into a racehorse! 😉 The response from the community during the development was amazing and we got a ton of valuable feedback that helped us shape this release.
And the MINI just got several times faster too! Our team has done the impossible and ported the MK4 firmware to the MINI’s modest CPU and smaller RAM. With the new alpha firmware, it will feel like a brand-new printer.
So now comes the question, exactly how fast are our printers? And how do they compare to the competition?
10x Faster! 600 mm/s! 20,000 mm/s^2!
Comparing the product specifications is one of the few ways to pick between several products on the market, without getting to try them all out. Unfortunately, comparing some arbitrary number doesn’t tell you much about how fast the printer actually is.
In fact, the overall speed of a 3D printer is determined by a number of factors: print speed, accelerations, jerk speeds, volumetric flow, nozzle size, object shape and more. For marketing purposes, this is all way too complicated. So, instead, companies pick one or two numbers. Typically the travel speed, the print speed of infill, or the acceleration for printing infill.
During most prints, the printer will spend less than 10% of the time on travel moves. This means that even ridiculously fast travel moves have little impact on the overall print time. Having high acceleration for infill is certainly helpful, but the perimeters (the outside wall) are typically where all the shape complexity and changes of direction actually are. And that’s not even mentioning the fact that often these printer speeds are the “up to” values with real values in the supplied print profiles being significantly lower.
And to clear things up right away, I am not opening this topic, because our printers would perform badly in these tests. Let’s take a look at an article that was published in the New York Times which compared the print times and print quality in several different objects with four different printers – the MK4 was used with the alpha version of the Input Shaper.
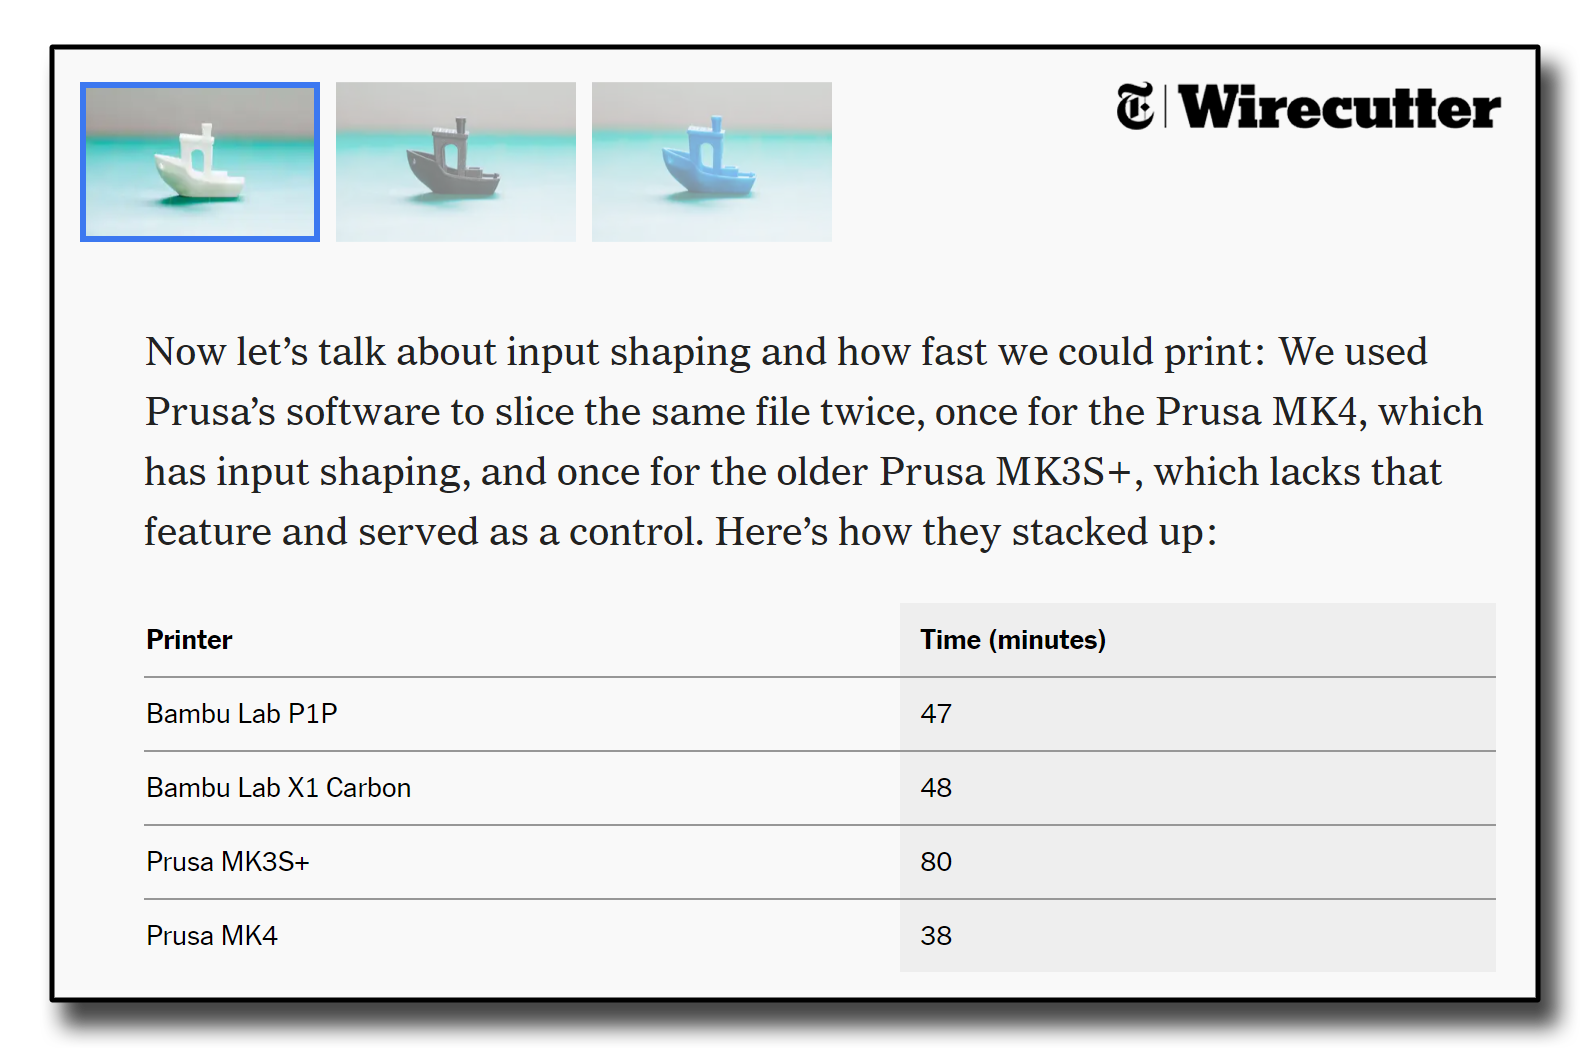
In the 3 tests that the New York Times performed, the MK4 always had the shortest print time. All of the tests were performed on fairly small prints, so the length of the calibration process played a significant role in the overall print time. Had the test been performed on a different set of models, the results would have been different.
Impact of raising print speed and acceleration
The rule of diminishing returns applies even to 3D printing parameters. Raising the acceleration of print moves from 800 to 4000 will result in significantly shorter print times. Raising the acceleration from 4000 to 10,000? Not so much.
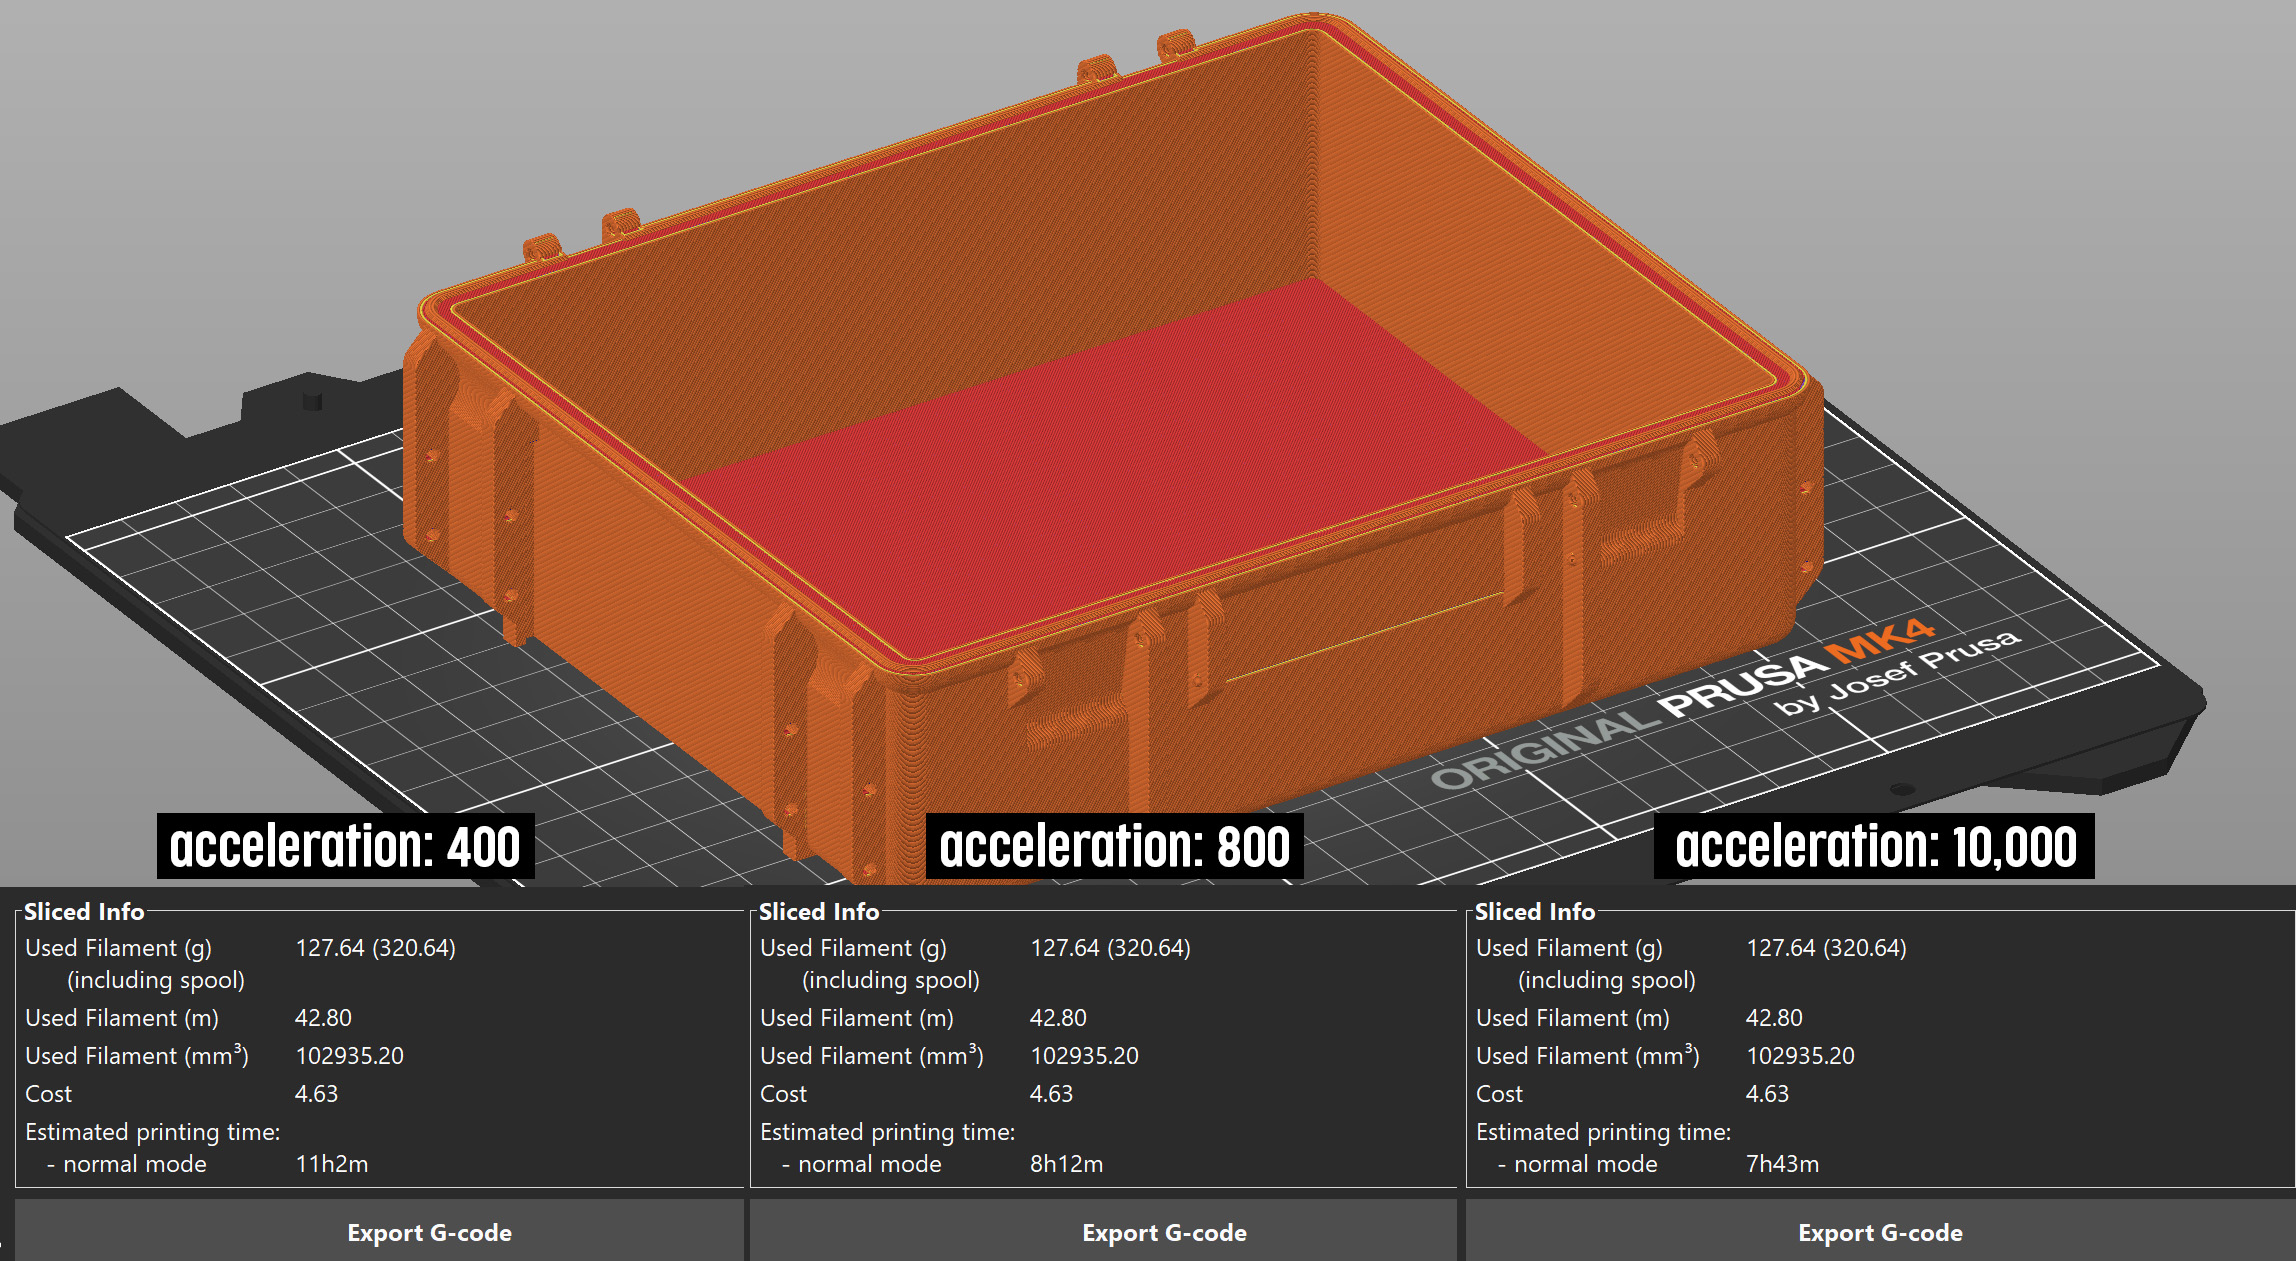
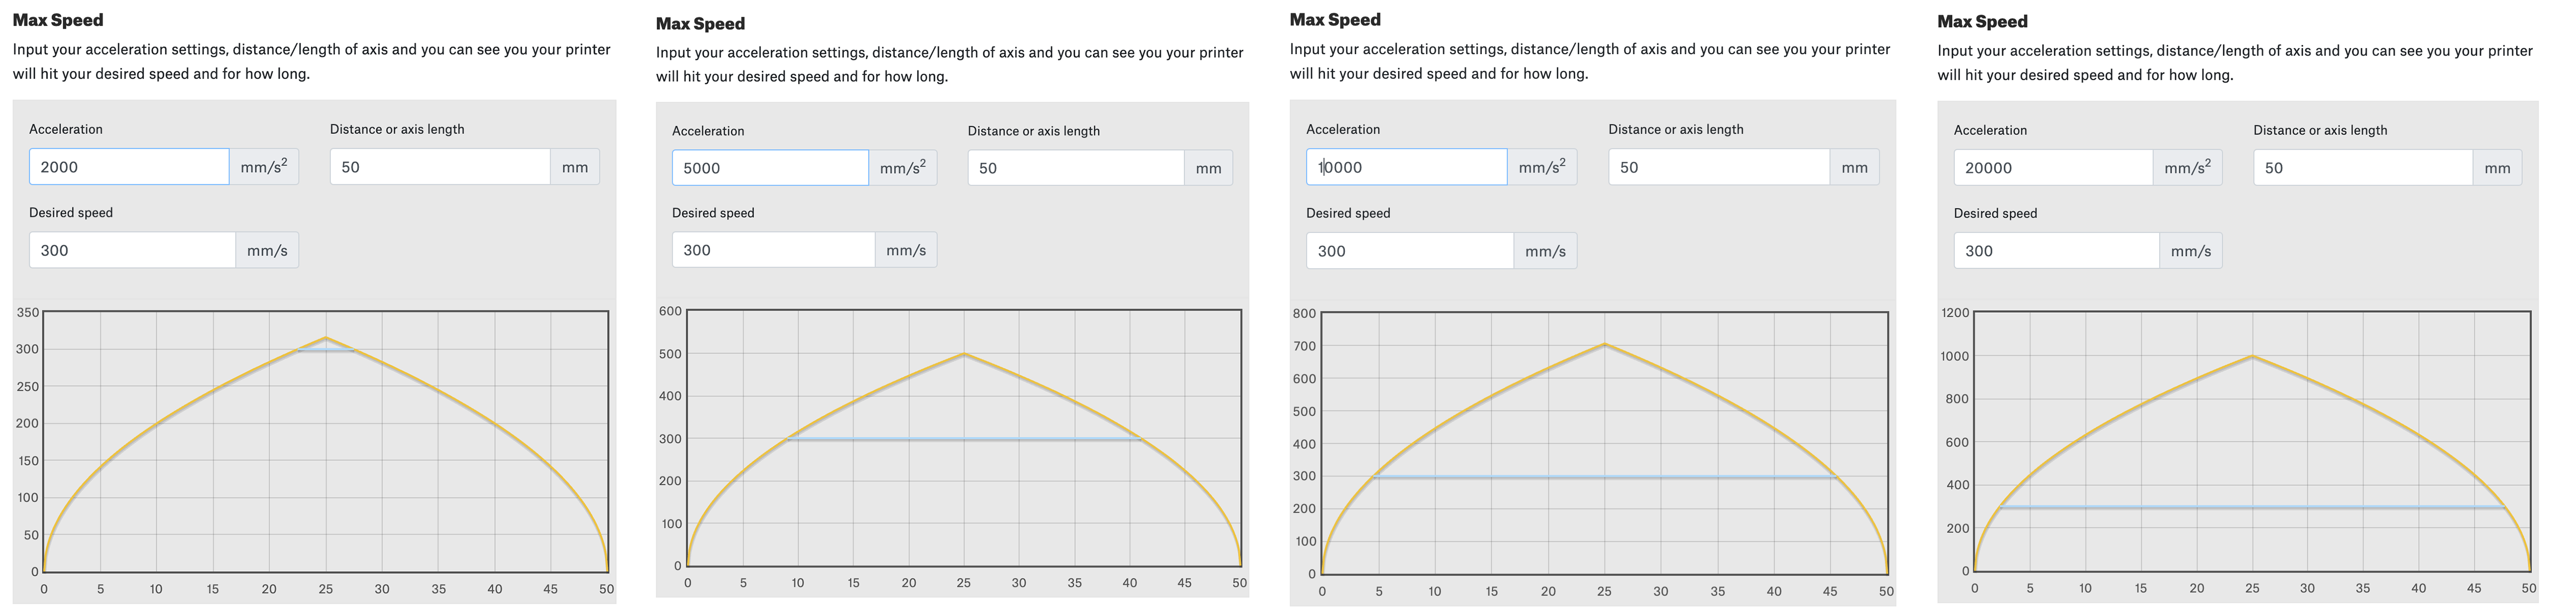
Of course, this is just one example and the difference acceleration makes is closely tied to the set print speeds. But I hope you get my point, a number being 2x bigger doesn’t mean 50% shorter print times. A decade ago I created a simple calculator to see the relationship between speed and acceleration – you can play with it here. A good starting point would be to set the distance as the size of the models you typically print – in the examples 50mm, then the speed you would like to achieve and try different accelerations.
It’s a bit like comparing two cars, one with a maximum speed of 250 km/h and the other with 350 km/h. If they are about to travel to another destination, which one will arrive first? Theoretically, it’s gonna be the one with higher top speed. But in reality? You have to take into account such variables as acceleration, traffic, fuel consumption, route taken… it’s pretty much impossible to travel at a constant max speed.
Even more things to consider – flow rates and temperature management
However, printing at high speeds requires more than just moving the extruder as fast as possible. It involves careful temperature management too.
For functional prints, where strength matters, the plastic needs to be properly melted first and then cooled after it’s extruded. Pushing the volumetric speeds too close to the limit of the hotend will result in poorly melted filament (e.g., the core will have a different temperature) which in turn affects both mechanical and visual properties.
This is rather easy to spot: if you’re using a semi-glossy filament, the printed object will be partially matte and partially glossy, with a clear horizontal border between these sections. If the volumetric flow is pushed to the absolute limit, the surface will also feature a noticeably different finish – something we call “a denim effect.” Push it a bit further and you will start seeing holes in the print. Insufficient heating or extensive cooling also results in weaker prints and worse inter-layer adhesion. Yes, even excessive cooling may compromise the quality of the print. As the extruded plastic cools down, it needs enough time for the polymer chains to orient themselves into a more ordered structure. So there’s a sort of a Goldilocks effect: not too hot, not too cool, just right. 🙂
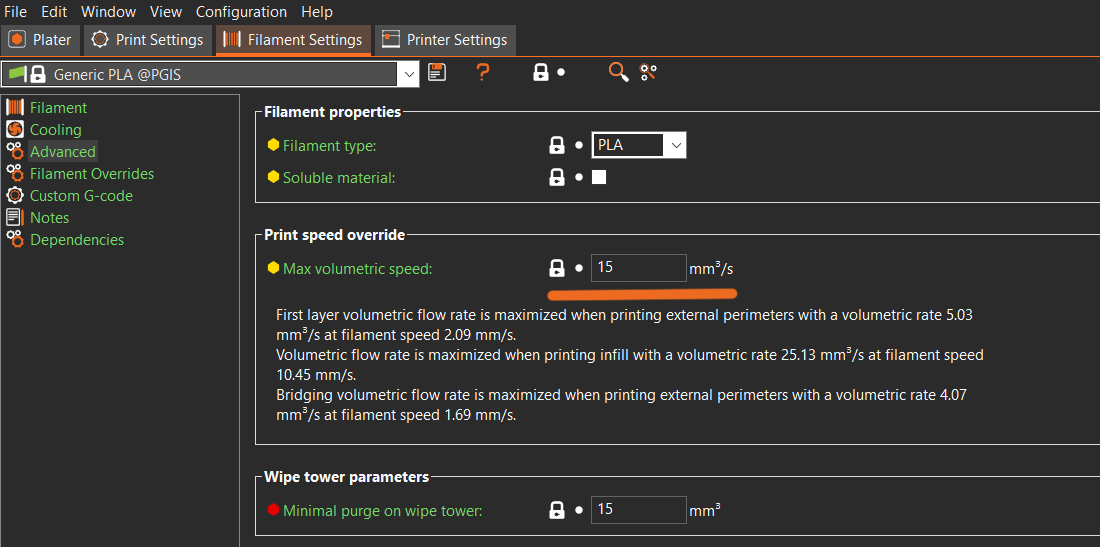
Volumetric flow is another popular “up to” value and you can in fact check the real values in PrusaSlicer and other slicers by slicing the object and opening the Volumetric flow rate in the Legend window.
Speaking of PrusaSlicer: Our print profiles have been, for many years, tweaked for maximum quality and reliability, rather than chasing speed at all costs. And they are not just synthetic profiles. We have developed the new SPEED and STRUCTURAL print profiles with the assistance of the Prusament (Prusa Polymers) team – people with a great understanding of thermoplastics.
So how to compare the speeds of different printers?
When you’re deciding between several different 3D printers and you want to compare their print speeds, there’s nothing easier than downloading their respective slicers and checking the speeds yourself. PrusaSlicer has an exceptionally accurate print time estimation, so all other slicers based on PrusaSlicer (SuperSlicer, Bambu Studio, AnycubicSlicer, OrcaSlicer, etc.) will also have an accurate print time estimation. For slicers based on Cura (e.g. Creality Slicer), the estimates should also be fairly accurate, as long as the acceleration and jerk settings match the values in the firmware of the printer.
You can slice the typical object that you plan to create with your 3D printer in all slicers and compare the estimated print times. Plus, you can also check whether the number in the print profile actually matches the number claimed by the manufacturer. This way, you can see whether there might be a catch or two – like to achieve the advertised speed. If you read the small print, you may realize that, e.g., the print speed for PETG is less than half of the claimed theoretical speed.
Needless to say, even the slicer estimates are not the perfect way to compare 3D printer speed. The shape of the 3D model, the used filament, the nozzle, and the environment… they all play important roles and as a result, the relative print times of each specific print will be different.
With all of that said: the print speed is just one of the important aspects of a 3D printer to consider when comparing various models. There are other things to consider, such as print quality, reliability, ease of maintenance, tech support, community, (open-source) software, sustainability, or filament waste during multi-colored printing. But also things like upgradability and continuous support even years after release. Which brings me to this:
MINI Input Shaper is here!
Call us old-fashioned, but we’re not gonna make you buy a new printer every two years. In fact, we’re doing everything we can to let you keep your existing printer and make it better and better.
This is why we have just released a new firmware for the Original Prusa MINI/MINI+ which essentially turns this printer into a compact speed demon. 🙂 Our devs managed something that seemed almost impossible – they ported the MK4 firmware to the less powerful platform of the MINI and brought all the amazing features like Input Shaping, Pressure Advance and networking to MK4’s sibling.
The alpha version is out now and if you feel a bit adventurous, give it a try! Many users already did and they are excited about the massive speed increase – it just feels like an almost new printer. Plus, you can easily connect the MINI to Prusa Connect and send files directly to the printer without the need to run around with a USB drive. The stable version should be available within approximately one month.
Below is a video in which I tried to pull the fastest possible Benchy on the MINI – not following the rules of speedboat race, but a nice visual demo of how fast can the printer go. With SpeedBenchy rules, the Benchy currently takes 26 minutes to print.
And we’re not done yet! We have more exciting updates in the pipeline – we’ll share the details in a few weeks.
XL Input Shaper is almost ready
Now, the obvious question is: what about the XL? First: a different dev team manages the XL firmware in a dedicated code branch, so it’s not the same as the MINI. This is due to the completely different CoreXY kinematics and the presence of a toolchanger which brings additional challenges. While the CoreXY system usually allows for higher speeds, the larger the printer is, the longer the belts are – and longer belts stretch and flex more than shorter ones which may negatively affect the print quality. So that’s another thing we’re taking into account.
We’re getting ready for the first release of the Input Shaper firmware and testing is fully underway. We expect to have the alpha version ready in October (initially just for the single-tool).
Happy (and fast!) Printing!
The other favorite thing is companies advertising really high print speeds where reviewers try the high advertised speed, get horrible results, then have to turn the speed way down so that they print decently. (Not saying this is everyone, but certainly some of the budget priced bed slingers seem to be doing this).
Nice article. Will Input shaping also come to the mk3s models?
IS on MK3S*. That's not going to happen as 8bit hardware struggles to handle current tasks.
MK3.5 upgrade kit was a solution but it is unavailable in store (not sure if temporarily or permanently; also handling IS on MK3.5 is more challenging as there is much more variety of MK3* printers with custom hotends etc).
MK3.9 upgrade kit is too pricey IMO (it probably would be better to sell MK3S+ and just buy full new MK4).
Can you please show me the lines in the article where Prusa attacks other companies / printers and so on – I read it (but I am not a native speaker) and could not find it). And a speed benchy is just a very specific test situation which is in my opinion not an objetive test for that. But anyway – there are lots of other printers – feel free.
Best regards, Clemens
Sorry – I postet on the wrong comment – it was a reply to:
ma-unique (September 20, 2023 at 08:44)
I agreed with the comment about claimed figures not being a good indication of actual speed. I did not claim there was a direct attack on any specific company/printer.
I did however identify specific cases where Prusa (company not the person) have provided misleading information. The Benchy as the name infers is a benchmark and the speed Benchy is well defined. It may be a very specific test, but the fact is that the Prusa model did not meet the criteria and was therefore misleading at best.
"And that’s not even mentioning the fact that often these printer speeds are the “up to” values with real values in the supplied print profiles being significantly lower."
"Plus, you can also check whether the number in the print profile actually matches the number claimed by the manufacturer. This way, you can see whether there might be a catch or two – like to achieve the advertised speed. If you read the small print, you may realize that, e.g., the print speed for PETG is less than half of the claimed theoretical speed."
Those are the phrases that could be interpreted as attacking other companies, although the criticism is valid. It is just odd to mention when MK4 was sold and advertised with capabilities that it simply didn't have, which is worse than exaggerating speeds.
As for the "not Speed Benchy", I think it's reasonable to just show it as an example of fast printing, since Prusa gave a time for a standard Speed Benchy at the end of the same paragraph.
So you think it is reasonable to make it appear that a printer can print faster by changing the slicer settings.
Make any printer 20% faster with this new blue textured printbed (disclaimer – you will have to slice models differently). LOL
It already there for a while but by means of a raspberry, so one has to add yet another computer to the process. Seems quite simple, but I have not yet tried that. Google Klipper to get the idea.
IDK why, but Prusa hardware doesn't work well with Klipper. I've tried several times and despite trying different setups, ready, hand-written from Prusa Marlin itd. there are several issues – bed is clicking loud during heat up (something with PWM signal), same goes for print cooling fan (can't find appropriate cycle_time), motors are loud AF and are really hot despite low current… I've fiddled some with TMC numbers but it didn't do much, atm I don't see myself using Klipper long time. Can't really trust it.
Firstly, I had a Mk3 for many years and was very happy with it, its a great printer.
I have no reason to think the Mk4 is anything less.
Fully agree about the over stated speeds for marketing and could be misleading.
However selling a printer claiming it has fast speeds and input shaping when it does not is probably as bad if not worse (yes now after many weeks Mk4 does have input shaping). Imagine if Creality or Bambu had done that trick.
But on the topic of speed and how to compare, there is a bench mark and a set of criteria for that benchmark (Speed Benchy). Faking results by claiming fast print of Benchy that does not meet the defined criteria is worse in my view than stating theoretical max movement speeds.
When your house is messy, I dont think you can criticise others for having a messy house.
Perhaps focus on what you do well, your printers are good, rather than attacking others.
Good points. My thoughts exactly but applied mostly to the XL. Still waiting for mine to ship after 2 years of delays and NO IS. The least they could do is not trying to justify their lack of it by attacking other approaches. Some companies may actually give misleading information but others offer what prusa is until now gives as a future feature to 4k one year delayed printer.
And for the record , as not to sound as an antiPRusa troll i have an mk3s+mmu2s and an sls1.
How will this affect the famous longterm Prusa reliability of the printers?
Good question. Surely my MINI+ wasn't designed for the new fast speed input shaper mode.
Great article!
On that topic: How is the status for input shaping for Mk3.9? Is it the same as the Mk4 firmware?
yes its the same, https://github.com/prusa3d/Prusa-Firmware-Buddy/releases/tag/v5.0.0
This article is missing two factors that are important to me and I am sure many other home users. Sound and reliability. My MK3S on it's concrete slab running Misumi is remarkably quiet. The other high speed printers I have seen demonstrated on Youtube are to noisy for me to live with. Reliability and wear has to be effected when you start pushing speed limits and should be taken into consideration. I am keen to upgrade to MK4 now that it has input shaping as there are times when the extra speed would be great.
Interesting diversion/distraction ploy.
The relates to speed and the exaggerated claims and dodgey practice by some manufacturers, Prusa are on very thin ice here and I am sure they will welcome your distraction ploy :-).
I concur with your perspective regarding the speed aspect. When it comes to evaluating printers, factors such as print quality, reliability, and noise level take precedence for me. I found the post to be enlightening; I had always assumed that numerous factors were at play, and marketing often emphasized the largest number without delving into the specifics.
MK4 w/IS is quieter than the 4.x firmware and is much, much, quieter than the MK3S+. Its spooky how quiet it is for the speeds it operates at.
In my testing, I found the extrusion flow to max out at around 21mm³/s for pla at 225C. That means that the print speed is capped by extrusion flow at around 170mm/s for prints using a 0.3mm layer height, and 250mm/s for a 0.2mm layer height. I assume the primary benefit of the input shaping is that these movement speeds will be more easily attainable, resulting in higher quality at similar speeds rather than a massive speed increase.
Hi, are you sure that you meant to write 20 000 mm/s in the thumbnail and title? It is very misleading! Shouldn't it be 20 000 mm/s² ?
Great news anyways, and thanks for the great work!
And you continue the manipulative marketing by showing a benchy printing on prusa mini with what, 1% infill? lets try with more see how that compares to print time.
Also lets see how you stack against Bambu A1. I was a huge prusa fan but right now you are playing catch up.
Have you considered adding sort of feature in Prusaslicer to aid users trying to optimize all the parameters for shortest print time? Something like a filter for coloring the movements in the slicer view based on what, if any, "up-to" parameters are causing a bottleneck in terms of speed on that section of the print? I haven't thought this through deeply and it was decades since I did this sort of math, but it feels like you could compute some sort of gradient of the print time given as a function of these parameters. Dunno.
Will the Input Shaper work correctly with the custom printed base? (https://blog.prusa3d.com/enter-the-mini-base_50290)
I don't see why not. My MINI has the Input Shaper alpha on it, and the vibration is extremely minimal. It's surprisingly stable for the speed it is running at.
Warum nicht für den MK3S? Die Hardware wird doch nicht schlechter sein als beim Mini?
Ist schade, da ich die limitierte Version habe….
Die Hardware für den Mini ist doch leistungsfähiger als die in dem MK3S. Der Mikrocontroller in dem Mini ist 32-bit, und viel neuer, gegenüber 8-bit für die MK3* Drucker.
I wonder when will MK4 be compatible with octoprint.
Something I took for granted when ordering the MK4 and I was very disappointed because great feature of MK3 is not available on MK4.
From the Release notes for the latest Alpha:
Known Bugs
Due to the major changes to the code, the Octoprint is currently not working, however, we are already working on the fix.
After installing the 5.0 IS firmware on my MK4, I've found that both the STRUCTURAL and SPEED profile produce poorer looking prints that the previous firmware. Yes, it prints faster, but I don't want to loose quality. As I understand it, you don't use the previous slicer settings once you go to the IS firmware. So do you plan to continue to offer the non-IS firmware? If not, how do I get my high quality print results again?
In the slicer, add the MK4 printer profile without IS. Anyway, the problem could be somewhere else, because I have better quality prints with IS at high speeds than at low speeds without IS.
I checked the commit history on GitHub but the new release is apparently one single commit out of nowhere , no pull request nor any description. Where does those improvements suddenly comes from? I didn’t find the code responsible for this « input shaper ». Can someone share a link of the commits history, PRs or any documentation about how that works?
This whole article feels like an excuse. The reality is that speed and acceleration *do* matter. The problem is that all of the Prusa products are woefully underequipped with anemic hotends. 40W heaters are not enough.
Your very own demo….
https://storage.googleapis.com/prusa3d-content-prod-14e8-wordpress-blog-prod/2023/09/3644d984-srovnani_rychlosti-copy-2048×1125.jpg
…illustrates that it's not that the accel and velocity which are the issue – it's the fact that the Prusa lineup uses a derivative of the obsolete V6 hotend. You need larger heaters and a longer melt zone.
This link to the referenced demo is broken. Here is a working one
https://storage.googleapis.com/prusa3d-content-prod-14e8-wordpress-blog-prod/2023/09/3644d984-srovnani_rychlosti-copy.jpg
Did the article literally say acceleration doesn't matter at *all*? I took it to mean it was a smaller portion of the overall speed than it appears. One can easily see this by slicing and printing a model with a MK4 vs. a settings-matched one on one of the BL machines. The speed difference is nowhere near what the posted acceleration numbers would suggest.
I have been in manufacturing for 40 years. I understand the machine capability rhetoric well. Prusa has stated the problem fairly well, excluding the (s2) typo. I am pleased with the MK4 printing improvements with the input shaper.
The 3D printing industry still has a long way to go. Filament, machine and process development are an ongoing process.
Hopefully once the IS firmware upgrades settle down, there will be firmwares released that have the routines user accessible to take IS measurements. (Along with hardware specs for accelerometers that work with the communication protocol, hopefully something conveniently available on the market as a breakout board like AdaFruit and SparkFun release. A quick search for 3D printer IS accelerometer boards come up with many that use an RP4020 to provide a USB-C interface, but the accelerometer input connector on the xBuddy appears to be a 4-pin header. Hopefully compatible with STEMMA QT / Qwiic cables.) This would allow users to do all sorts of mods to their hotends and retune the IS parameters w/o Prusa having to release IS parameters for configurations that they aren't even thinking of…
That, and I want a Ni plated Cu heater block so I can use my WC nozzles. I understand that the heavier heater block would need new IS parameters, but I don't expect Prusa to evaluate the new configuration for me.
Hopefully once the IS firmware upgrades settle down, there will be firmwares released that have the routines user accessible to take IS measurements. (Along with hardware specs for accelerometers that work with the communication protocol, hopefully something conveniently available on the market as a breakout board like AdaFruit and SparkFun release.