


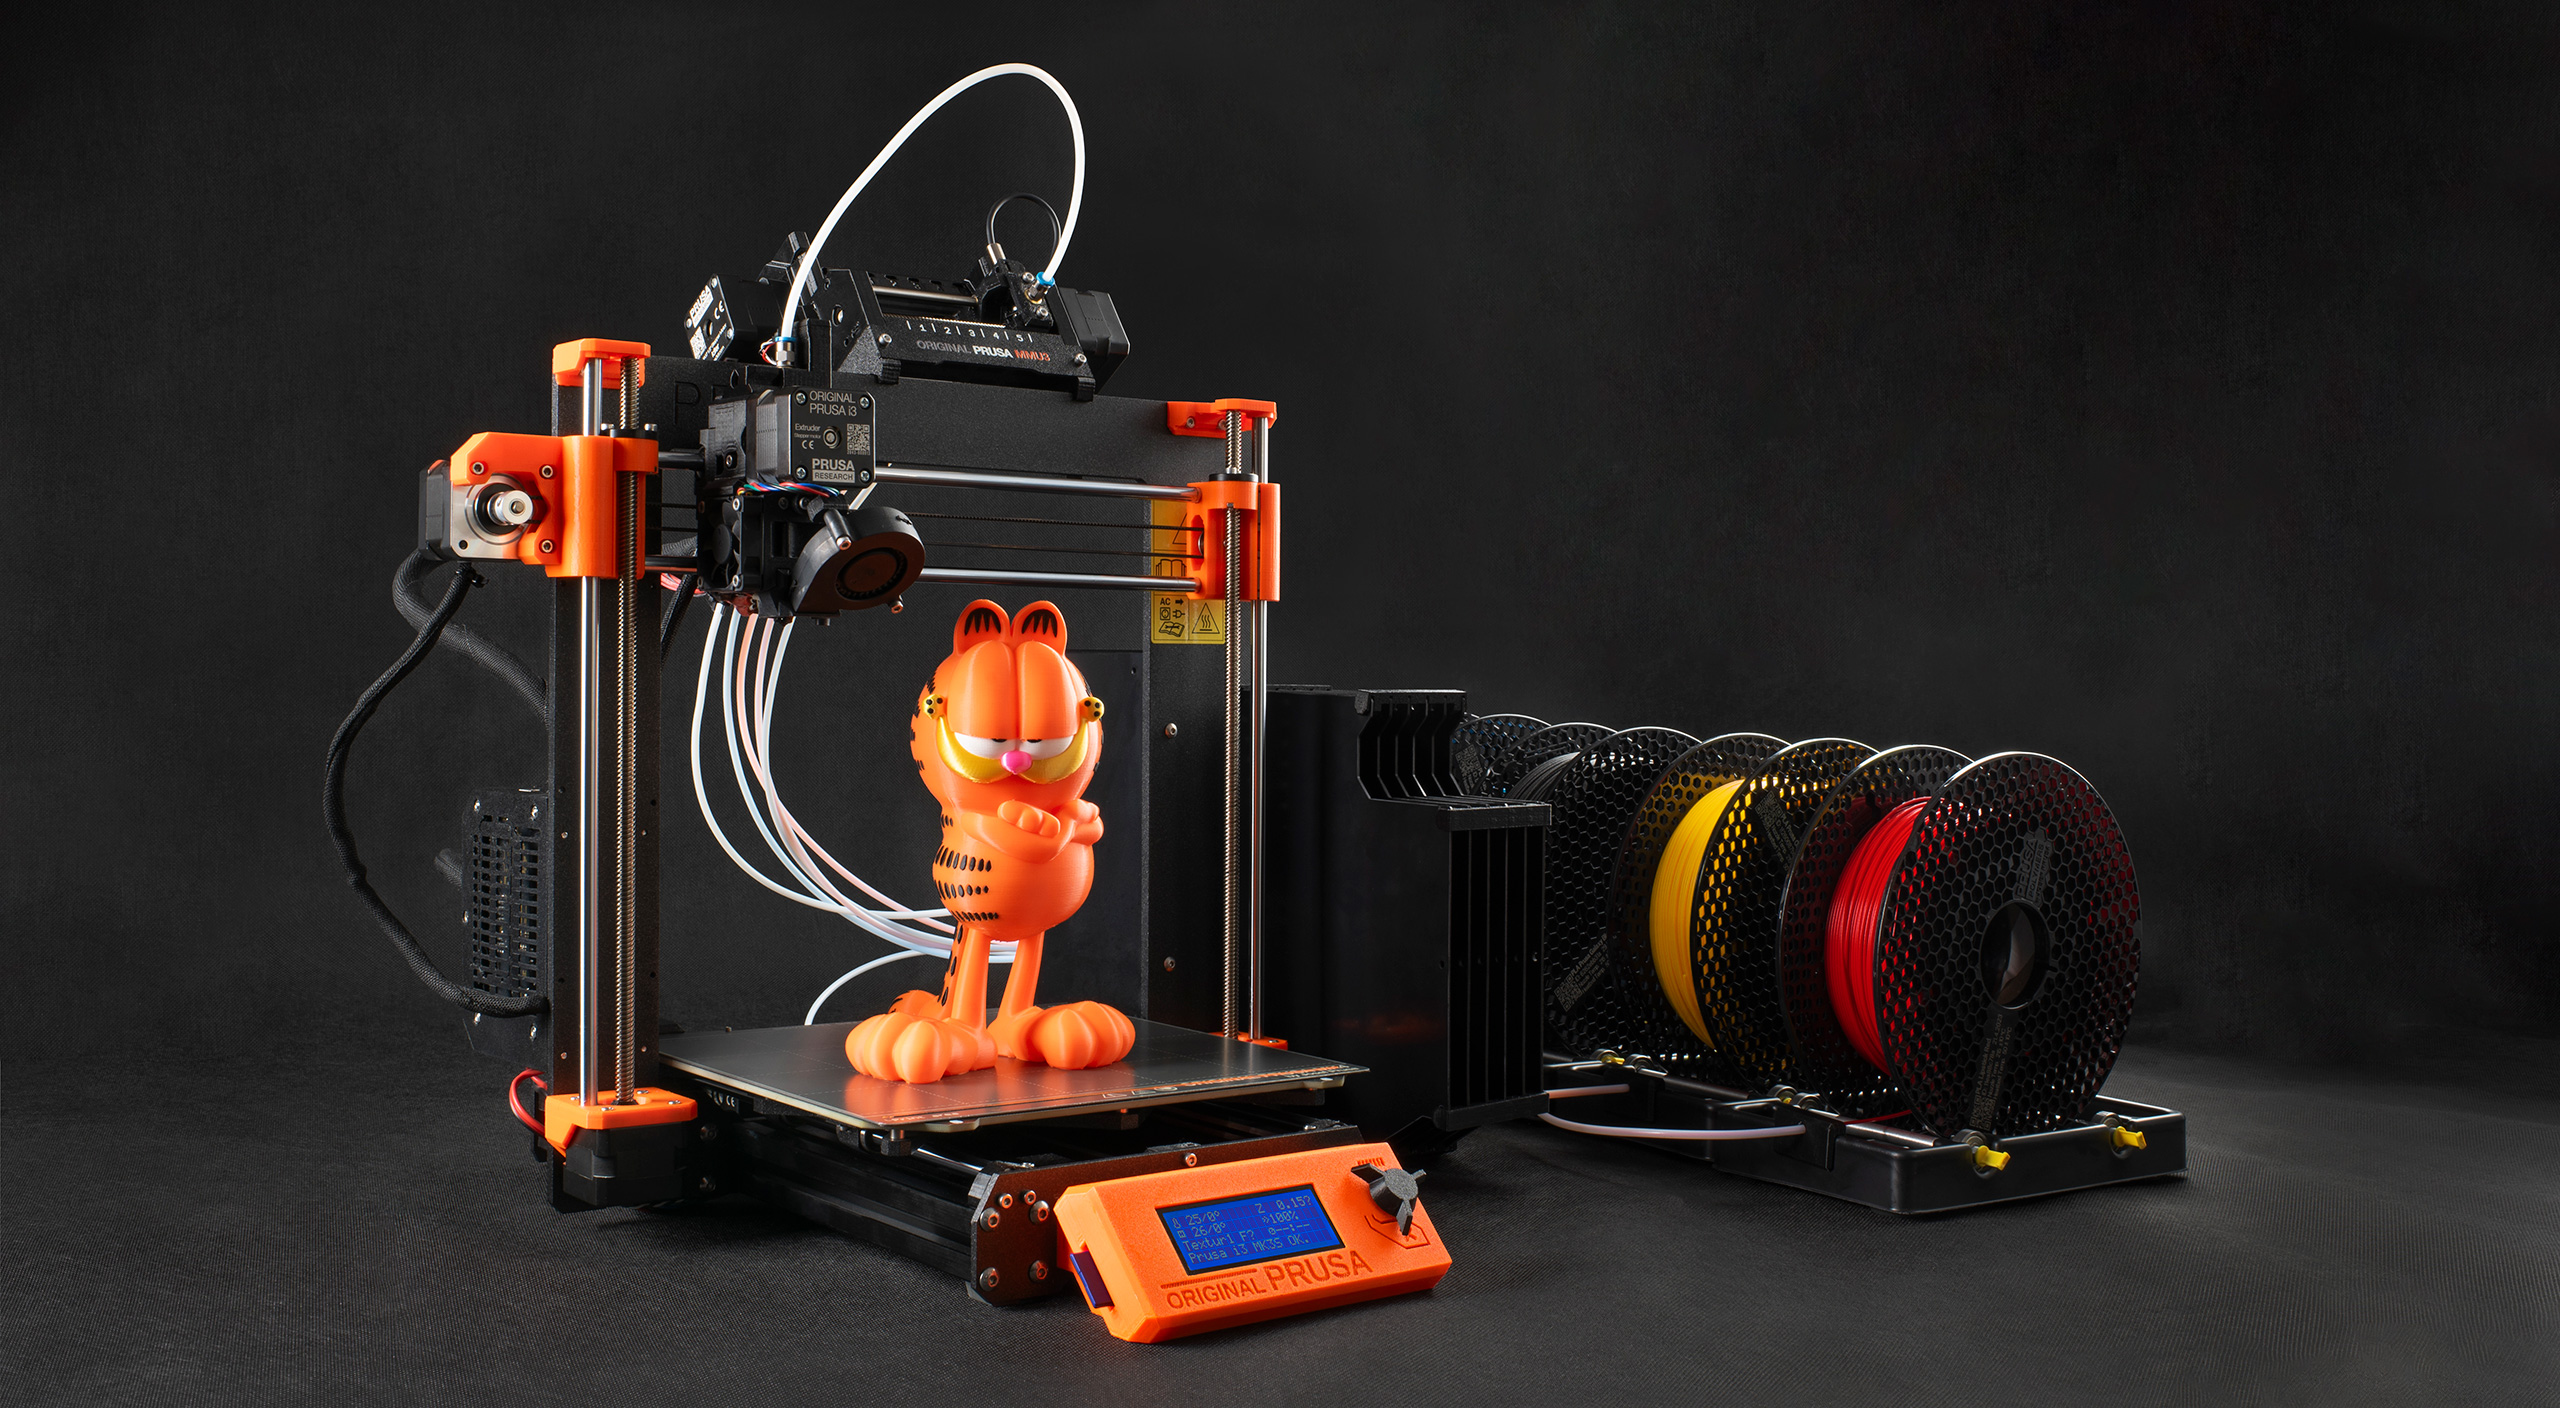
We’re ready to send the first Original Prusa MMU3 units for the MK3S+ right now and the Original Prusa MK4 version will follow in a couple of weeks – keep on reading for more details. In case you are not familiar with the previous versions, here’s a quick recap: The Original Prusa MMU3 is our solution for printing with up to five filaments at the same time. It’s an expansion module for the Original Prusa i3 MK3S+ and Original Prusa MK4 that has five filament slots and a moving selector for automatic switching between loaded materials. When you slice a colored model in PrusaSlicer, the color changes are then automatically performed by the Original Prusa MMU3 – you don’t have to rely on by-layer color changes like with normal 3D printers and you can bring truly colorful objects to life.
The Original Prusa MMU3 is the third iteration of this expansion module and it comes with dozens of major changes, even though the unit may seem similar to the Original Prusa MMU2. We have made a ton of changes under the hood: the firmware has been rewritten from scratch, the plastic parts are completely different, and all moving parts have been reworked, improved and fine-tuned. And our awesome community played a major role in this! We took all of the community’s feedback, suggestions and ideas for improvements to take the multi-material unit to the next level. I’ll get into more details a bit later, but I just wanted to put this up front: thank you, everyone, who helped us shape the new version. The new unit is more robust, more reliable and much easier to use. Multi-color prints can take many hours to finish and there’s nothing more frustrating than getting stuck mid-print and having to start from scratch.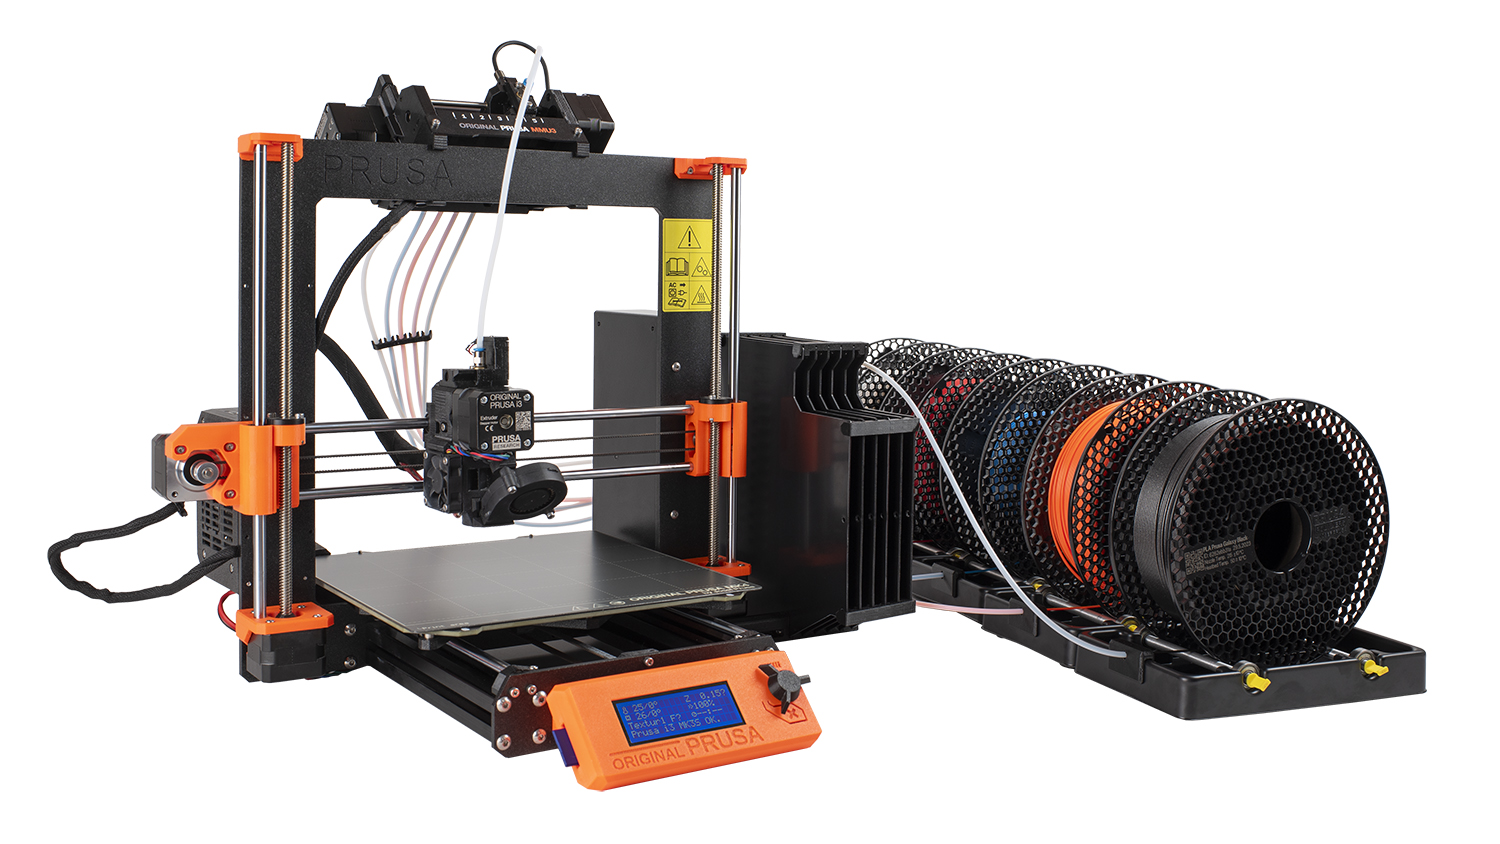
We decided to stick with a design close to the previous generation and keep the more expensive parts (like the motors), so it’s easy and cheap to upgrade your Original Prusa MMU2 / Original Prusa MMU2S to the new version (the upgrade kit is coming in August).
 |
 |
 |
 |
How does it work?
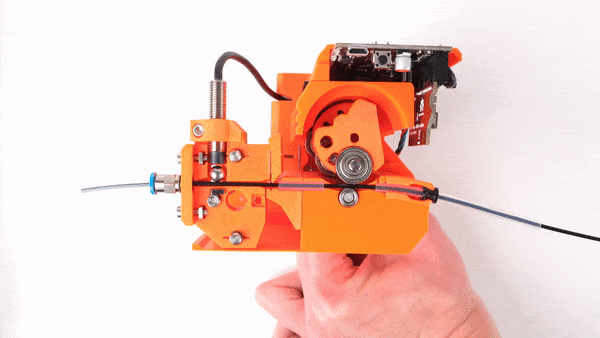
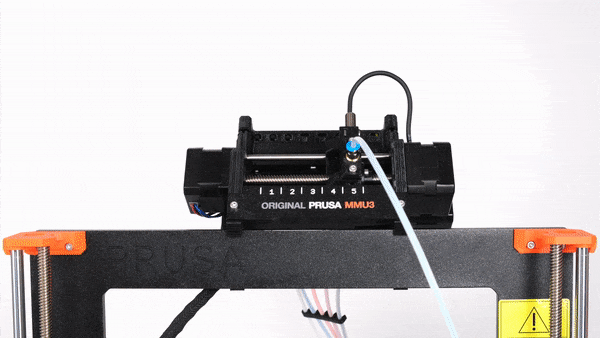
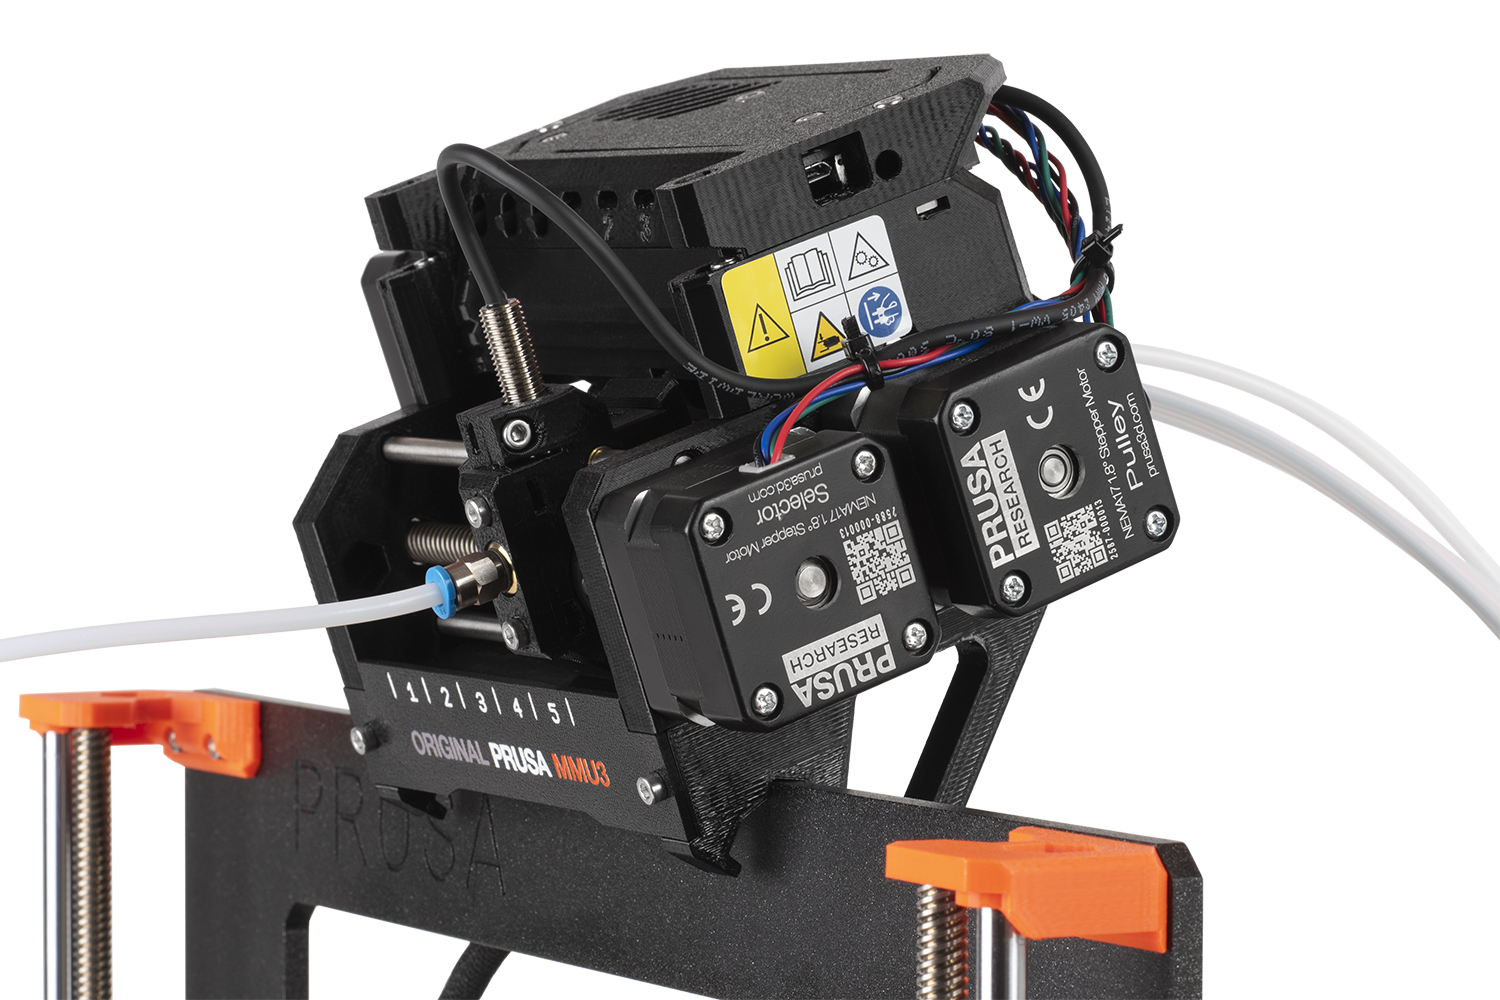
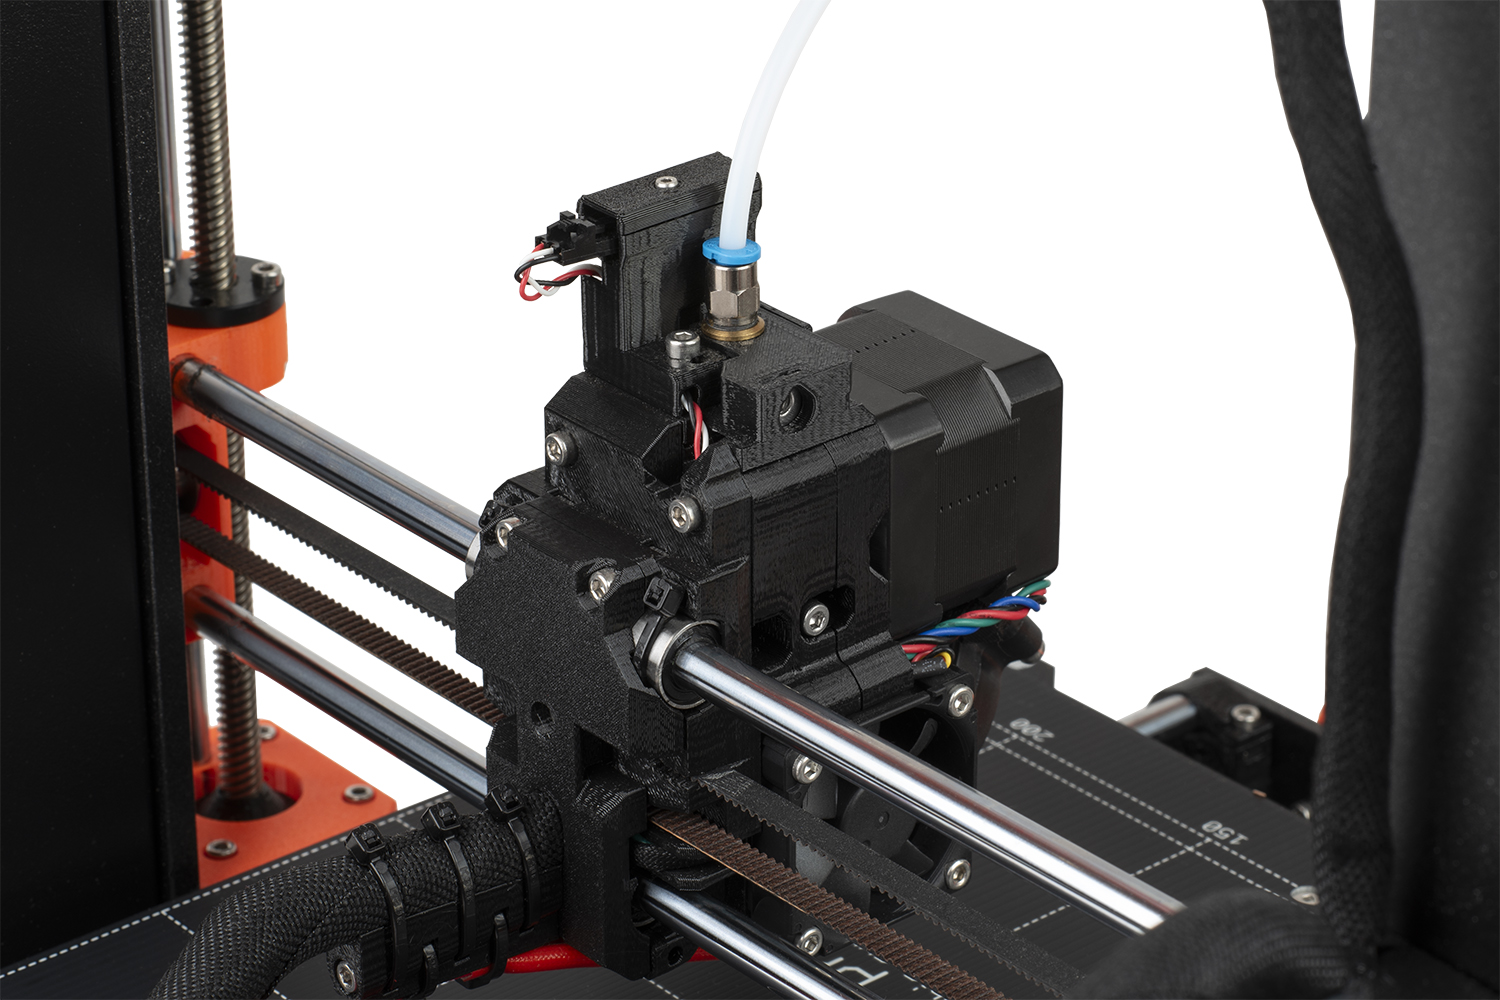
The Original Prusa MMU3 is a compact add-on that sits on top of the printer’s frame. It features five filament feeding tubes and it is accompanied by a buffer that prevents filaments from tangling up. Prepare up to five filament spools into five holders, lead the strands through the new easy-to-use cassettes in the buffer and preload them to the Original Prusa MMU3.
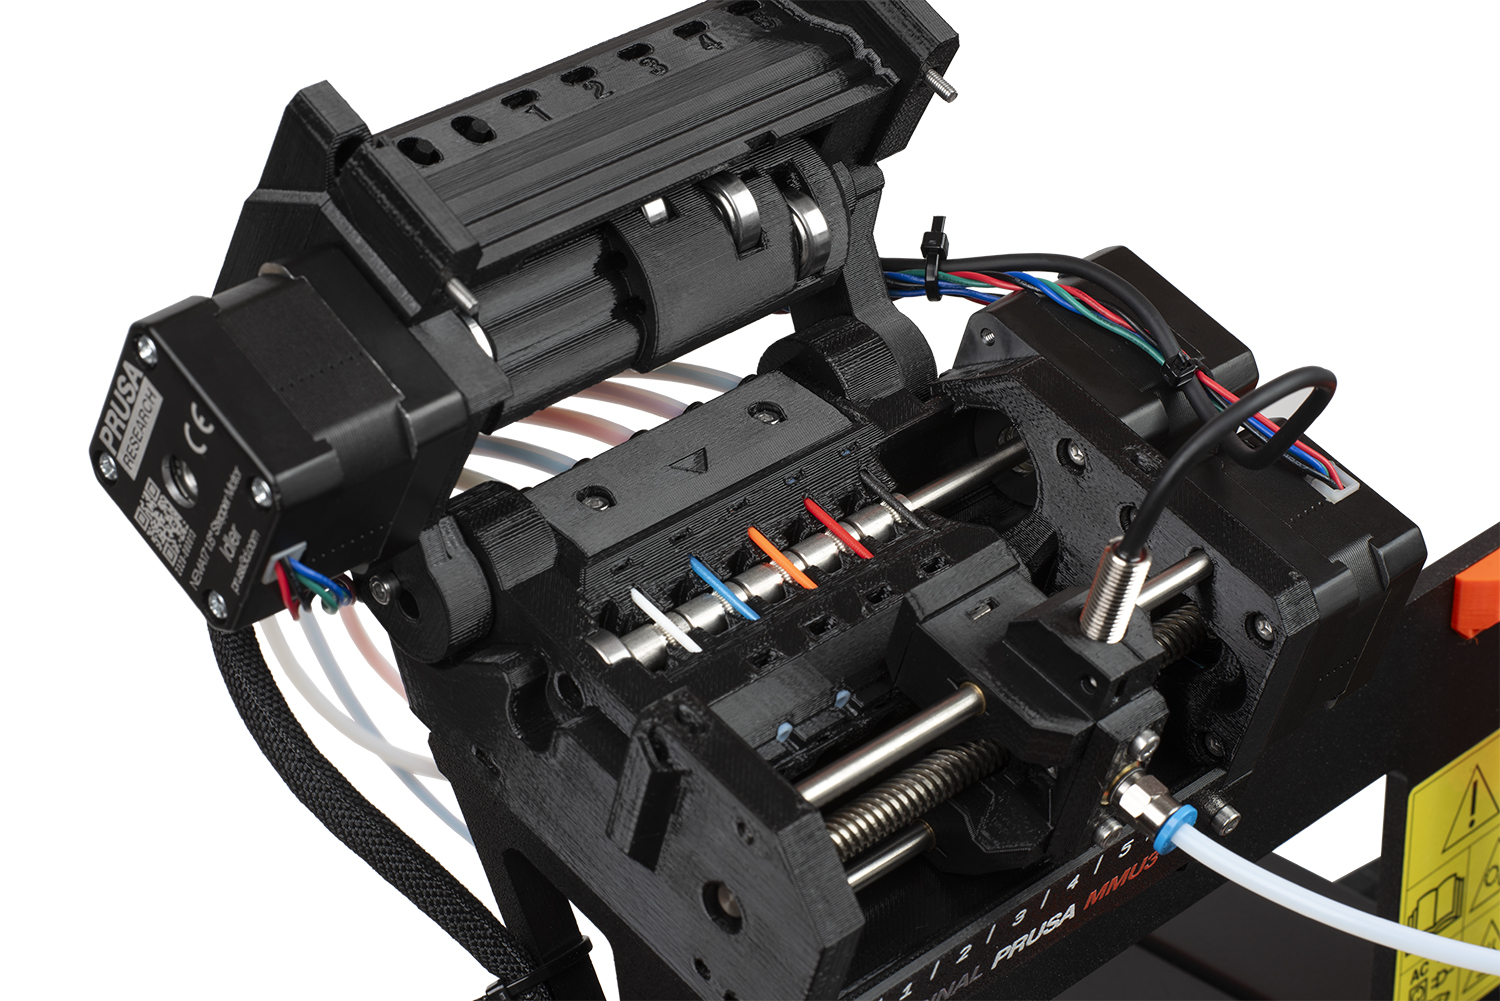
The Original Prusa MMU3 contains a rotating idler barrel that applies pressure onto the selected filament and the drive gear then pushes the filament through the Selector into the printer’s extruder. Once a color change is necessary, the filament is unloaded and the Original Prusa MMU3 switches to another filament slot.
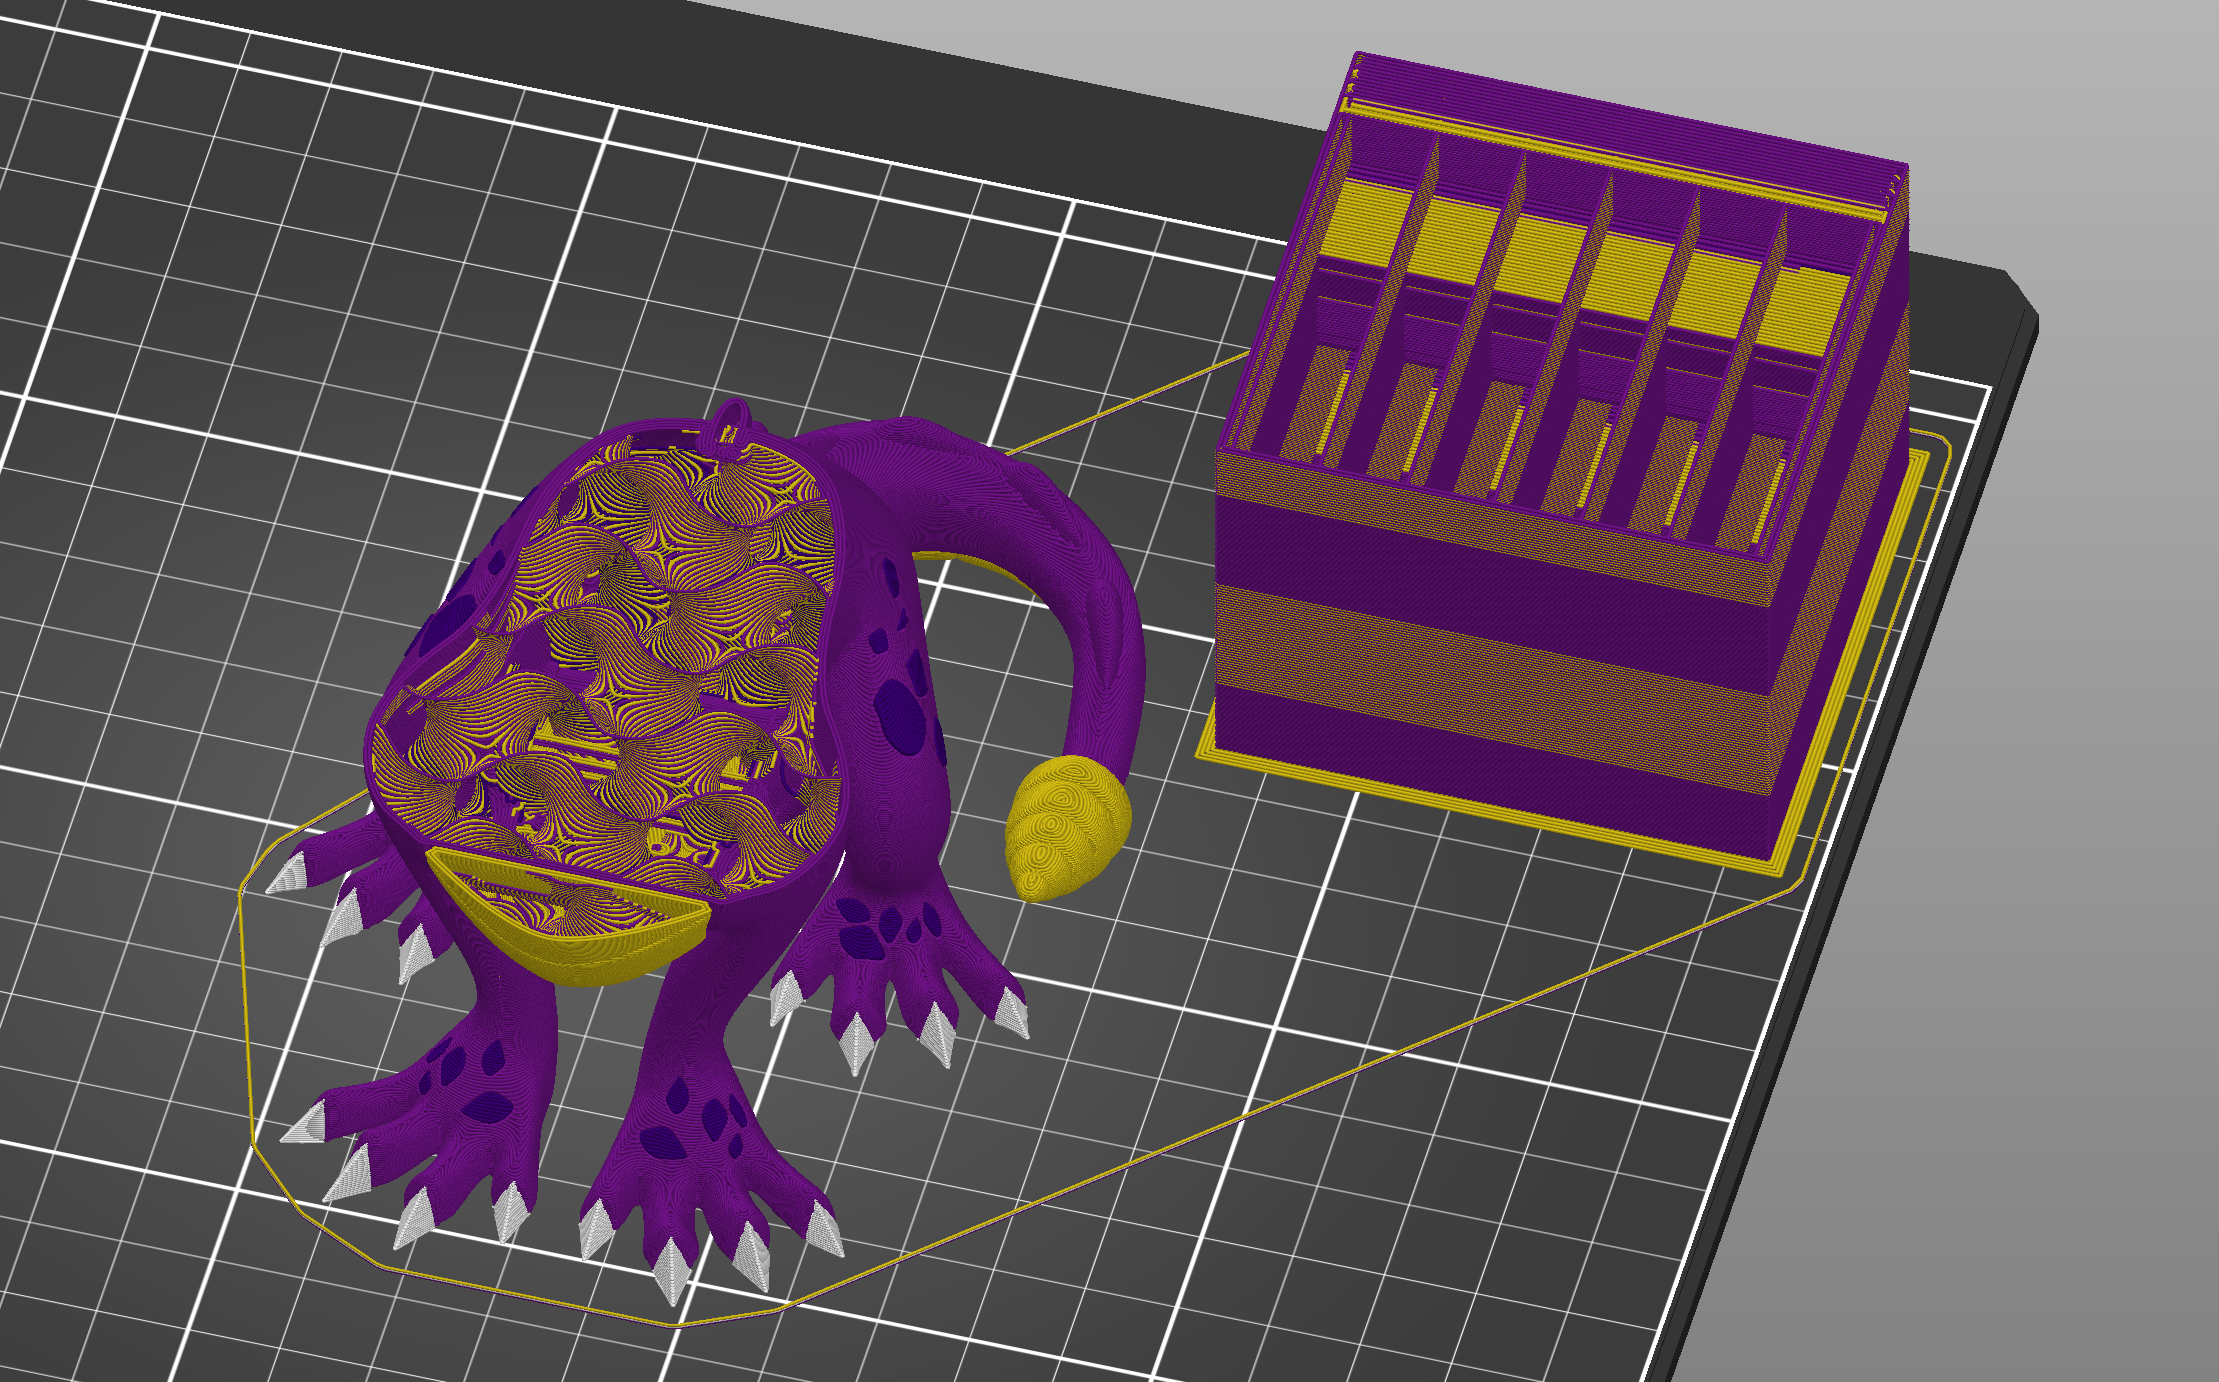
Since only one nozzle is used, it has to be cleaned after every filament change as opposed to the Original Prusa XL where the filaments are loaded into individual extruders. We’re sticking to our proven solution – a smart compact semi-hollow wipe tower that is automatically created next to the printed object. The excess filament from the nozzle is efficiently wiped into one compact location and you don’t have to worry about bits and pieces of plastic piling next to your printer.
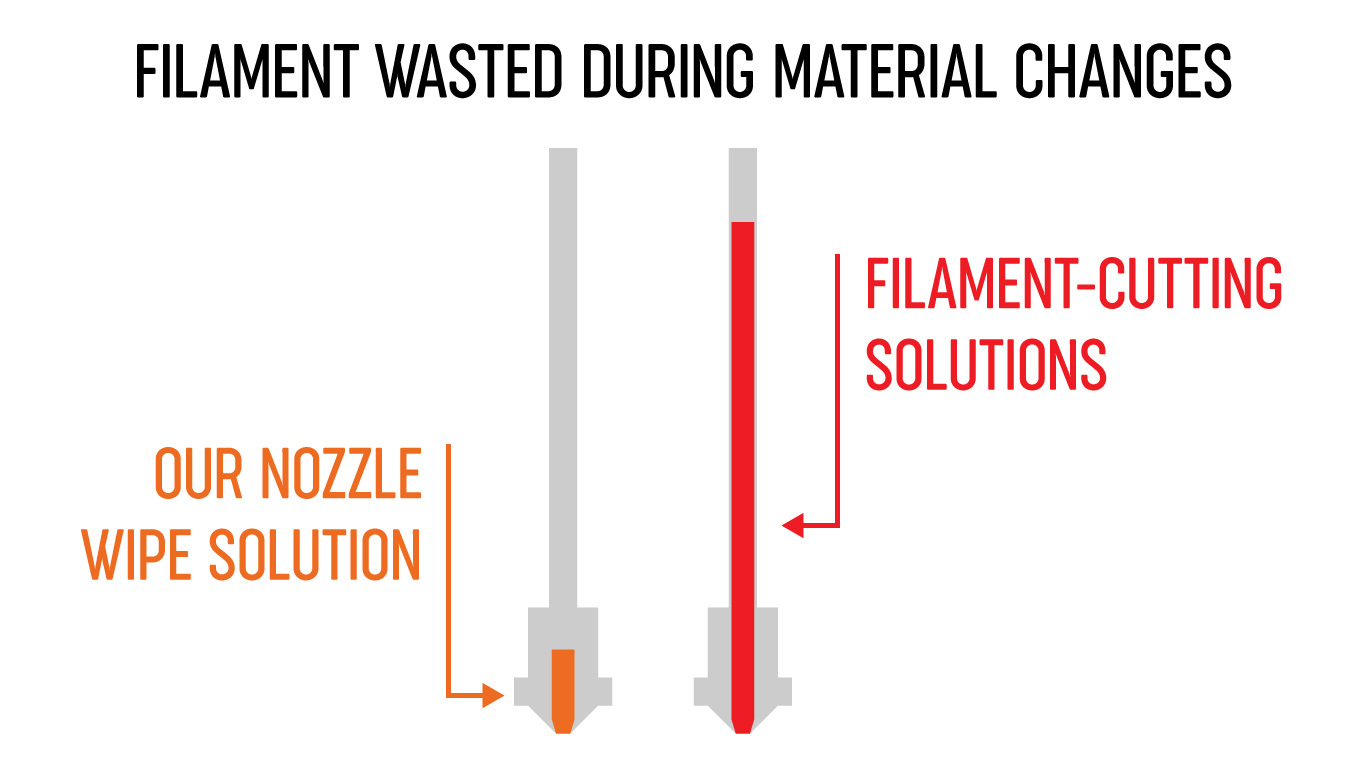
To make things even less wasteful, you can take advantage of the PrusaSlicer features we developed for this purpose: wipe to object and wipe to infill. These are pretty self-explanatory, so just in short: wipe to object allows you to purge the excess filament into a selected object where you don’t care about its color – this is ideal for functional parts or objects that you’re planning to paint. Wipe to infill is even easier: most of the filament during a filament change will be purged into the object’s infill which is not visible in the finished object and only a small amount will go into the wipe tower, saving a lot of material. Below is an example of wipe to infill and the hollow wipe tower.
Plenty of quality-of-life improvements
The majority of users had no major issues with the Original Prusa MMU2S and printed all day long with minimal hassle. However, we have also received feedback that the Original Prusa MMU2S is too demanding when it comes to proper assembly, setup, maintenance, and general running conditions like the correct placement of the buffer and spoolholders. In short: When everything was not a hundred percent up to scratch, it wasn’t fun to use.
It was a stark contrast to the Original Prusa i3 MK3 which can take a lot of beating and even with poor maintenance still runs relatively smoothly although the print quality may suffer. The Original Prusa MMU2S needed to be in top shape to perform as expected. We decided to improve the design to make it less prone to assembly-related issues and make the controls easier to understand. There were two major areas to address: the path of the filament (make it extremely reliable for the filament to travel from the spool all the way to the nozzle) and the user interface (make it easy to understand what the Original Prusa MMU3 is doing).
Your feedback was hugely helpful and helped us to bring various improvements.
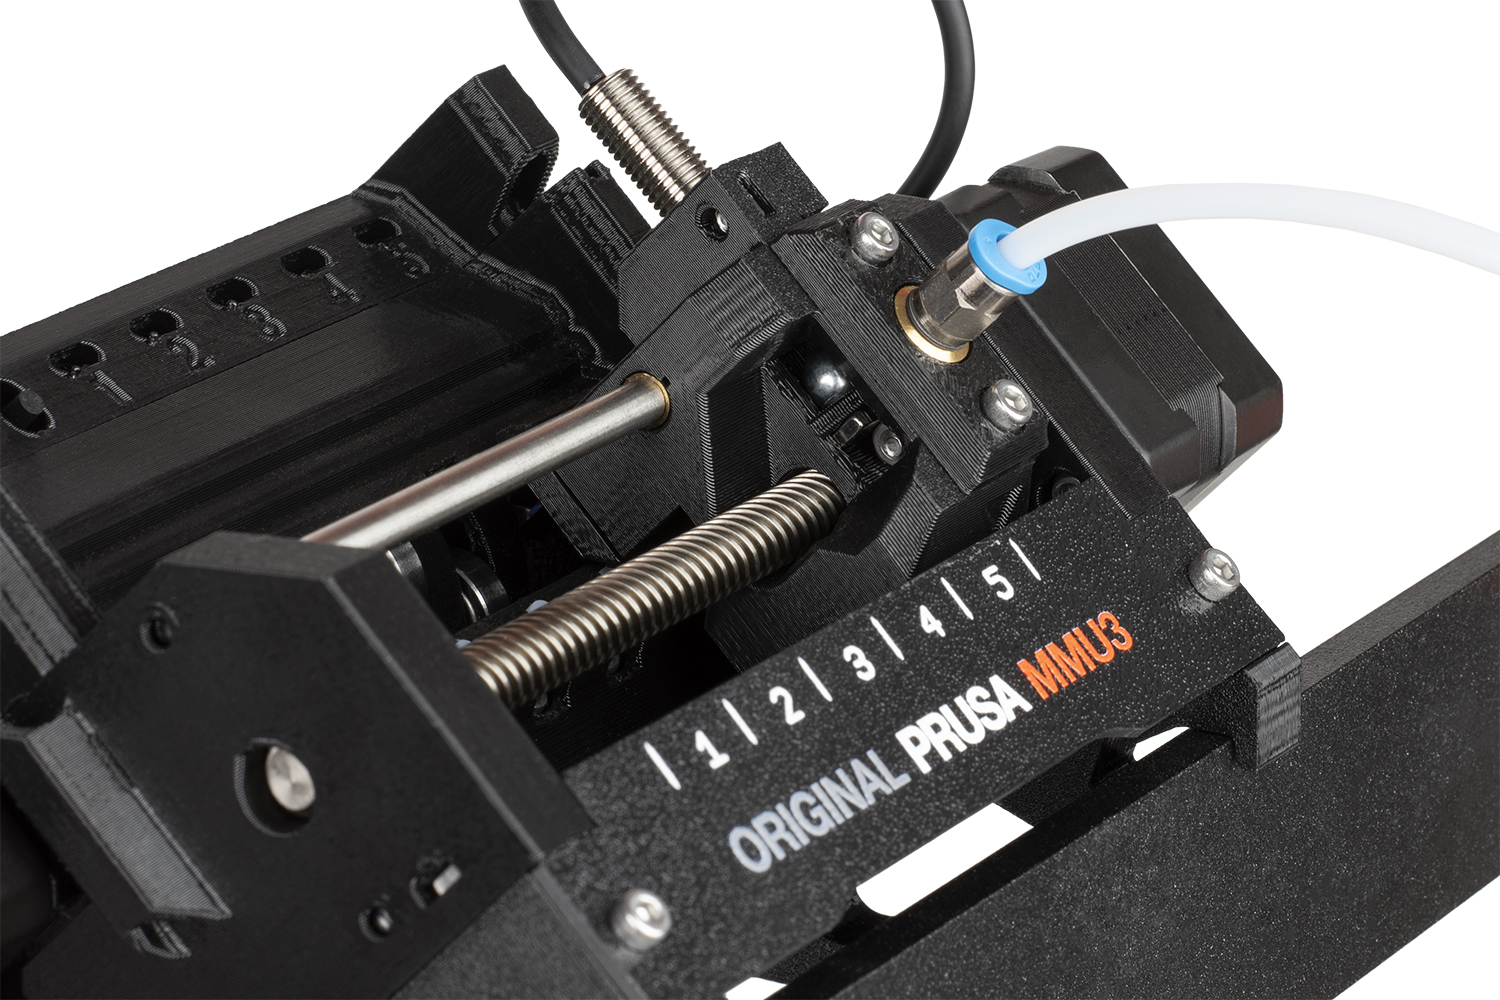
In the end, we reworked all plastic parts of the multi-material unit and improved the overall robustness of the unit by adding new metal parts (e.g., the rotating idler barrel is now connected to a stepper motor with a metal part). The Selector is also redesigned – the filament sensor (FINDA) is magnet-assisted and performs with much higher reliability (small pieces of debris won’t make it stuck). Plus, there’s a small maintenance window built into the Selector so you can easily check on the sensor without disassembling the unit. Also, the Selector has an improved sixth “service” position for better access. There are dozens of little tweaks that, in terms of user experience, put the Original Prusa MMU3 up to par with the Original Prusa i3 MK3S+ and the Original Prusa MK4. For example, we added a maintenance position, so you can easily access the unit. There’s also an improved IR filament calibration system.
I would like to acknowledge that we had a big help from the community – there are plenty of mods at Printables.com and other websites that helped us to pinpoint the most important areas by analyzing what the community was focused on. We looked at these mods and took them as a springboard to come up with our own designs. I hope I didn’t forget anything important:
- MMU2S pulley-body mod by mdj
- MMU2S Building a Better Base by jfromel
- MMU2S Idler Tension Screw Retainer & Thumbscrew by Terence
- Prusa MMU2 Selector with magnet by darBis
- Prusa MMU2 PTFE Holder M10 Passthrough Adapter by vertigo235
- Prusa MK3 MMU2 rear PTFE tube holder by JustMe
- Improved MK3S MMU2S Filament Sensor Mount by 01chevyguy
- MK3S+ MMU2S Precise Calibration Chimney by David
and several buffer mods such as:
- Gravity Spoolholder for MMU2S by Michal Fanta
- Universal Auto-Rewind Spool Holder by VincentGroenhuis
- MMU Slot Buffer – Martin_J.
- TZB MMU2S Filament Buffer by mdjurfeldt
- Prusa MMU2S Slot Buffer Holder by Canavese Daniel
- RMU-MK3 Filament Buffer
We also improved production tolerances to make the unit easier to assemble and opted for slightly larger PTFE tubes to reduce the friction of traveling filament.
A massive improvement to the general user experience is the brand-new firmware. We essentially threw the old one out of the window and wrote a new one and made it also compatible with the MMU2S.
New firmware, rewritten from the ground up
Here’s a fun fact: the Original Prusa MMU3 actually started as an endeavor to add new features and optimizations in the Original Prusa MMU2S firmware. In an attempt to make the Original Prusa MMU2S as simple as possible, we have, admittedly, overdone it. The result was that the unit had mostly one-way communication with the printer and a majority of its interaction was done through LEDs on top of its body. Instead of being simple to use, it actually might have been slightly cryptic if you didn’t have the handbook at hand.
One thing led to another. What started as a simple task of adding a couple of things to an existing firmware, slowly transitioned into a brand-new project that took several months to complete. Everything was rewritten using a three-layer system consisting of HAL (Hardware Abstraction Layer), Modules and Application logic. We’ll dive into the whole story in a separate developer diary, so to avoid excessive details here, let me just summarize it like this: the new firmware allows for full two-way communication with the printer. If the Original Prusa MMU3 unit needs something, a detailed message is displayed on the printer screen, with suggestions on what to do, sensor status, options to repeat the last action and so on.
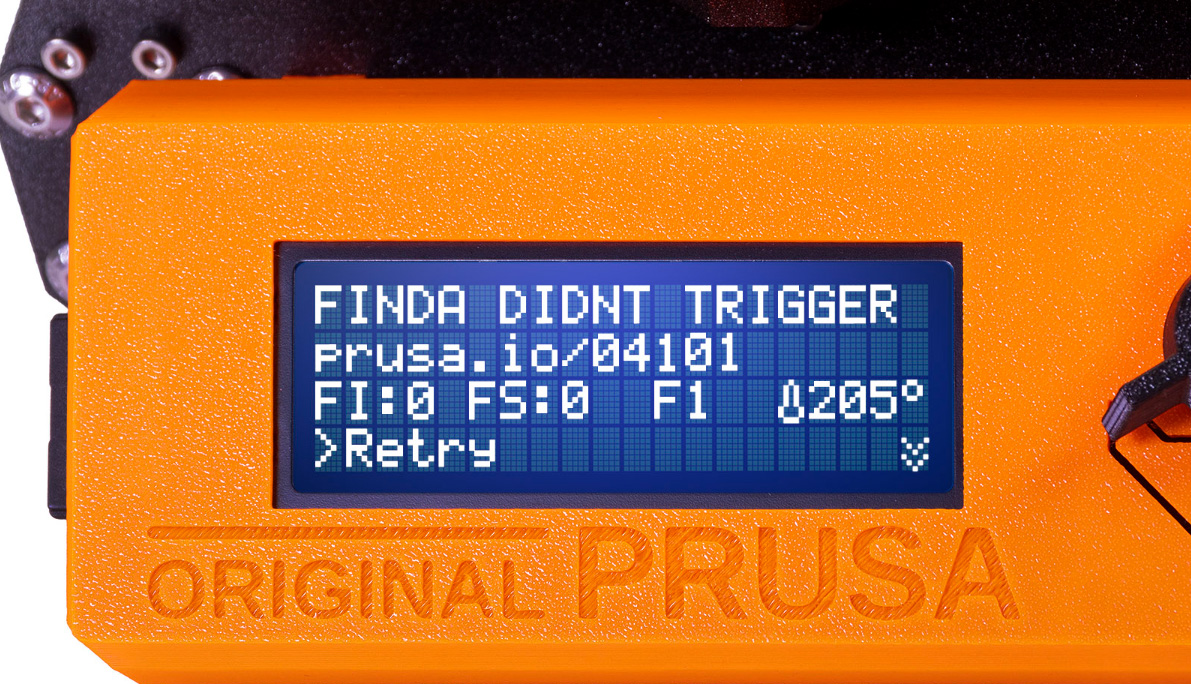
Troubleshooting is rarely needed thanks to improved communication between the two mainboards. The Original Prusa MMU3 “knows” what to do when, i.e., the filament wasn’t loaded into the nozzle correctly, and will attempt to automatically resolve the situation. Only if it fails after three attempts, the print is paused and the user is notified. For example, before a “user attention” error is raised, the Original Prusa MMU3 will attempt to reload the filament several times and if it fails, the unit knows where exactly it failed and may perform additional actions – e.g., use a small blade to cut the end of the filament because it is likely that a deformed filament tip is the culprit. Only when the self-repair fails, the user is notified with a proper description of the situation on the screen.
The printer shows real-time information from the SuperFINDA (filament sensor in Original Prusa MMU3) and the filament sensor on the screen, so you can immediately tell where there’s a potential problem. Better interaction between the electronic boards prevents even some rare edge cases. Plus the system uses proper registry entries, so advanced users can play around with G-Codes M707 and M708. The operation is also a bit more silent compared to its predecessor due to mechanical and firmware changes.
We also added a PD board to the MMU3 that provides a more stable and interference-free power supply directly on the Original Prusa MMU3, avoiding communication-line interference and improving overall reliability.
New firmware and MMU2S owners
And as I mentioned, we have awesome news for all MMU2S owners (there’re over 50.000 of you after all) – we didn’t want to cut you off with the release of the MMU3. So this new firmware can be flashed onto the MMU2S board, greatly enhancing its capabilities. Things like easier preloading and controls, self-repair routines, real-time information on the screen and more will be instantly available on your unit. And, of course, more reliable operation and improved troubleshooting.
We know that the MMU2S could have been challenging to properly assemble and set up. Every time you got in touch with our tech support, we did our best to solve the printing issues you might have had. Often it was something simple like changing the position of the buffer, but sometimes things might have become frustrating. Trust me, we took all your comments very seriously and they were one of the main reasons why we started with the new firmware in the first place. We don’t want you to keep your MMU2S on the shelf – on the contrary, we want to reach out to you and help.
So, if you have contacted our tech support in the past and you didn’t manage to get the MMU2S unit fully up and running without issues: please try installing the new firmware first. I’m pretty sure it can do a lot to make the MMU2S better. And if the new firmware won’t help, get in touch with our support team to consult your case and troubleshoot the issue. If a solution still cannot be found, we are ready to send you a free voucher for the MMU2S->MMU3 upgrade kit (available in about 4 weeks). We’re keeping this opportunity open till the end of this year.
PrusaSlicer makes things easier
PrusaSlicer is our internally-developed slicing software. We have a team of 11 people working full-time to invent and implement new features to create the most comprehensive free and open-source 3D printing software package on the market. Honestly, I can’t say enough about how amazing this team is – I guess the fact that many other slicers out there are derivative works of our PrusaSlicer is a real testament to its qualities. We welcome all friendly forks to PrusaSlicer, and enjoy collaborating on these features also. Check out our recent interview with community contributors Thomas Rahm & Daniel Schubert to learn about the development of organic supports.
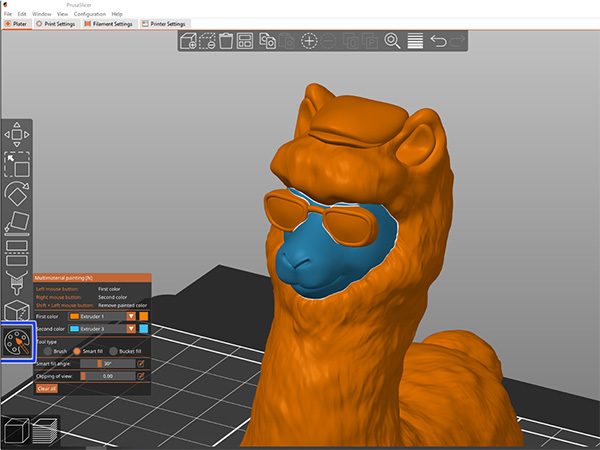
Since we know that most objects at Printables.com and other libraries are meant for single-color printing, it was essential to give you the right tools to turn any single-color material into a colorful object. PrusaSlicer is fully equipped for the job: in the left menu, there is an option that enables Multimaterial painting. With three tools (Brush, Smart fill and Bucket fill), you can easily add colors to imported objects. While Brush works as a standard surface brush, Smart fill can detect and paint whole sections of the model depending on the adjustable angle between two surfaces. Bucket fill is here to quickly swap two colors.
Original Prusa MMU3 versions and shipping information
The Original Prusa MMU3 is available in several configurations, so you can pick the right one for you.
Right now, we’re starting to ship the Original Prusa MMU3 full assembly kit for the Original Prusa i3 MK3S+ 3D printers. If you don’t have a multi-material unit yet, this is for you. You can also choose whether you want to receive printed plastic parts from us or you can opt for a cheaper option and print the plastic parts yourself (filament spool is in the package).
Check it out on the store page here.
We’ll soon follow with the Original Prusa MMU2S->MMU3 upgrade kit for the Original Prusa i3 MK3S+. If you have the Original Prusa MMU2S and only wish to upgrade to a newer version, this is the one you need. The upgrade will be available in our e-shop in August and the package will contain a spool of filament so you can print the parts yourself (we’ll publish them on Printables).
As for the version for the Original Prusa MK4: we’re still in the process of testing the modified Nextruder plastic parts that enable smooth filament loads and unloads for the Original Prusa MMU3. It’s already available on our e-shop and we’ll start shipping it in late August / early September. The MK4’s extruder is very different compared to the MK3S+ so we need to ensure that everything works smoothly – so far, everything seems good and we’re wrapping up our testing. We’re also aiming to release the final Original Prusa MK4 Input Shaper firmware in the upcoming weeks and the Original Prusa MMU3 will be, of course, compatible with it.
Whew, that’s a lot of different versions. You might have noticed that we’re not specifically mentioning Original Prusa i3 MK2.5, Original Prusa i3 MK2.5S, Original Prusa i3 MK3 and Original Prusa i3 MK3S. Due to production and processing capacity, we have decided not to prepare specific packages for these printers. However, do not worry, we’ll publish an article in our Knowledge base which will describe how to adjust the Original Prusa MMU3 designed for MK3S+ to make it work with your Original Prusa i3 MK2.5 / Original Prusa i3 MK2.5S / Original Prusa i3 MK3 / Original Prusa i3 MK3S printer with some simple steps.
And that’s about it! Once the MK4 version is ready for shipping, we’ll post a short summary on our blog and we’ll also share a proper deep dive into the MMU3’s new firmware. Stay tuned!
Happy (multi-material) printing!
 |
 |
 |
 |
Models:
Jordan One by Samprintingtiktok
Pikapool by Madmax
Grogulorian by Hex3D
Garfield by reddadsteve
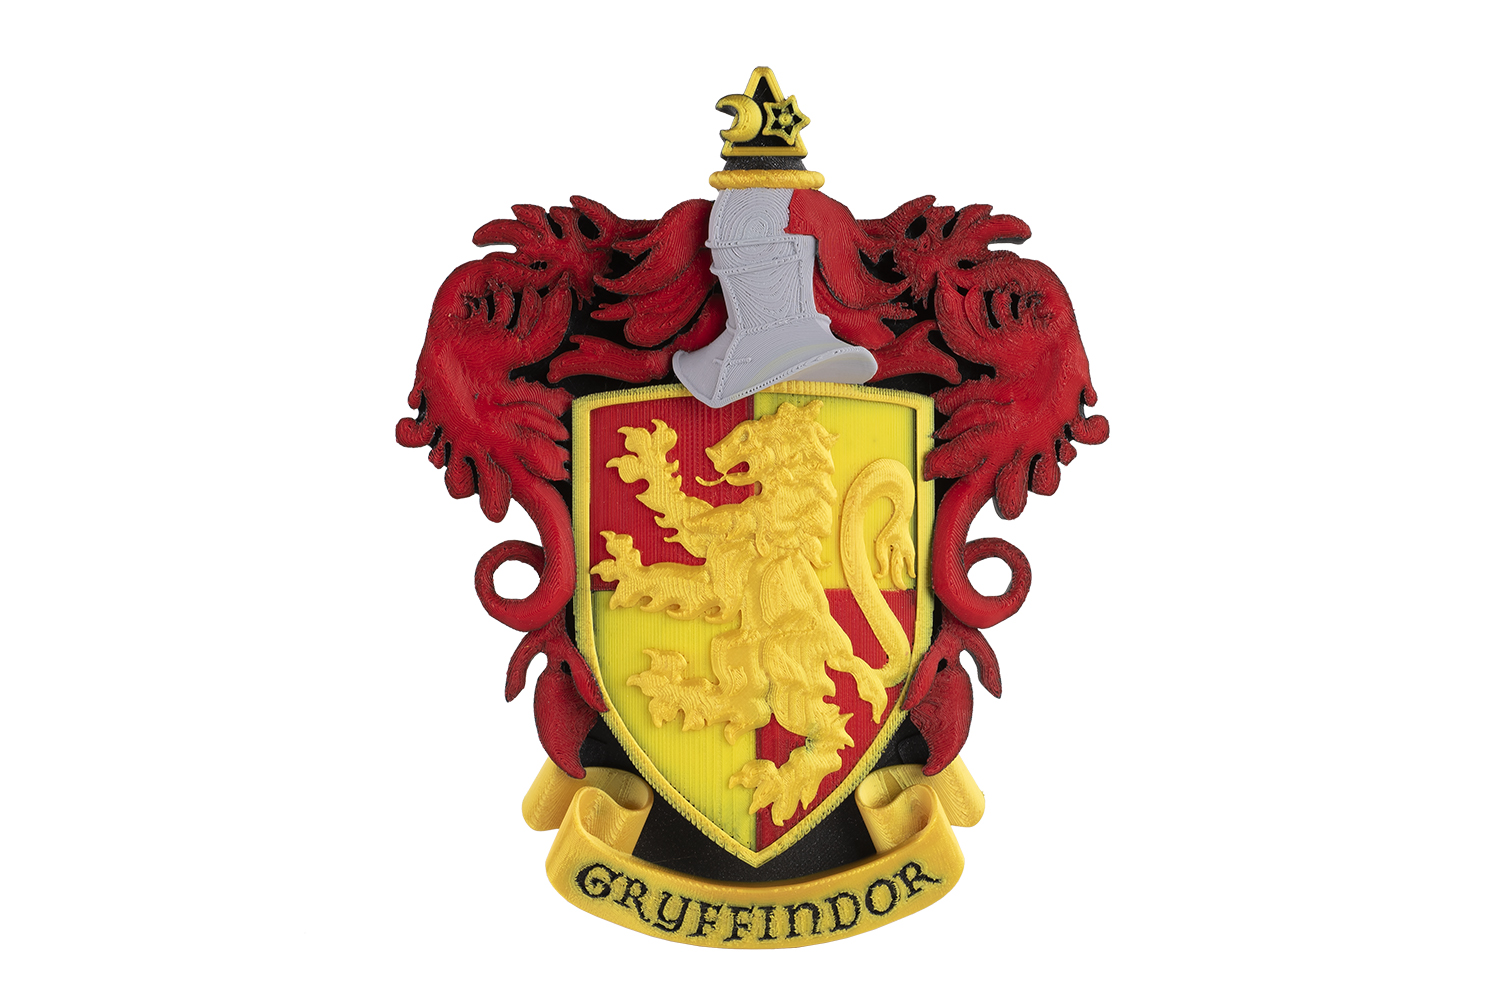
Hogwarts House Crests by Markus
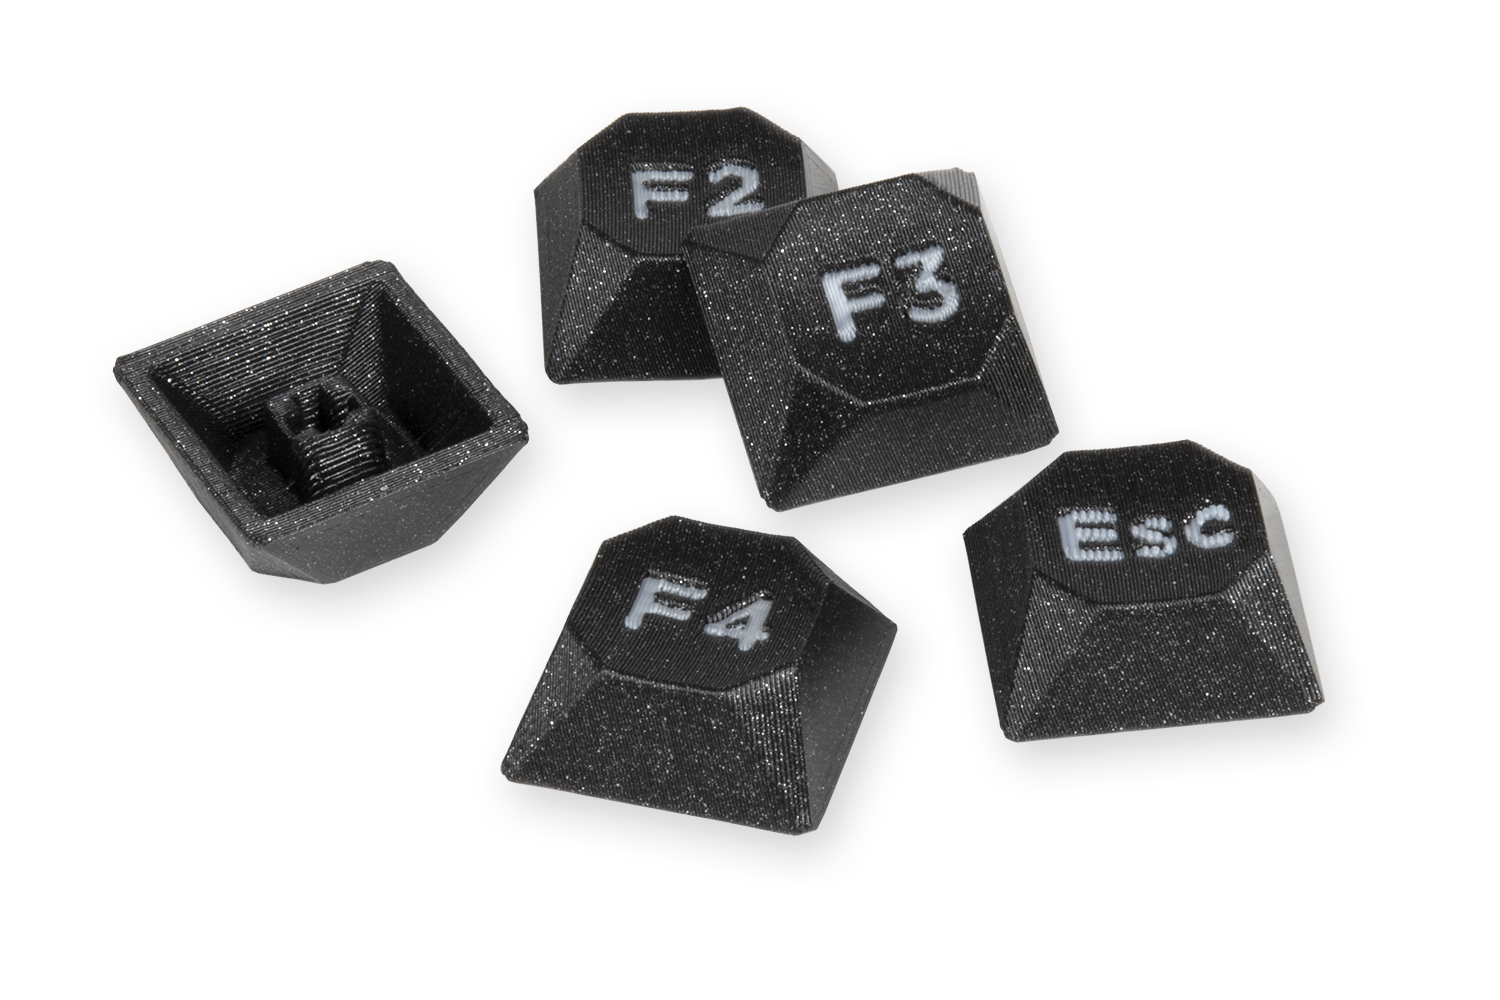
Cherry MX Keycaps by Riskable
Little Joe Goes to the Moon by Dominik Císař
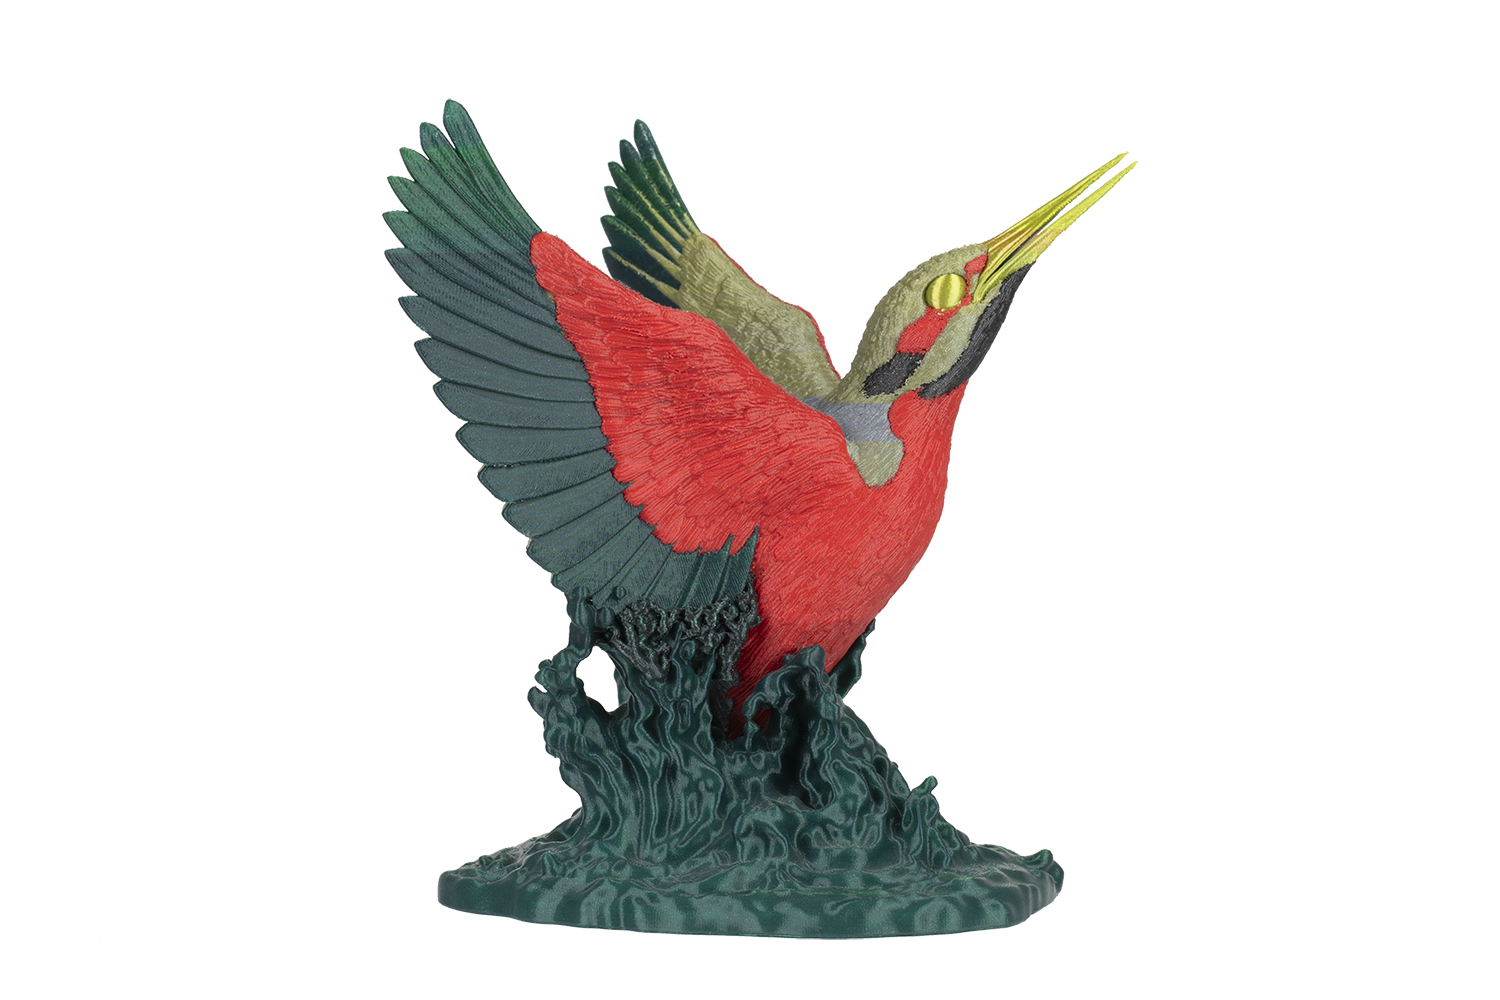
Kingfisher by Sidnaique
Thank you for adding the links to the models, however, please note that the link for Garfield is to the wrong model. “Garfield – MMU” is the correct model for MMU printing. “Garfield'” is the multi-part model for printing in separate parts.
Teamwork,
Steve
I was expecting whole new compact design to reduce overall footprint. Filament buffer and a bunch of PTFE tubing seems so 2016. You still need a lot of dedicated space for multi material setup…
of course you need a lot of dedicated space for a multi material setup and that will never change.
the biggest thing taking up space are the 5 spools of filament so if you dont have space just get 250g spools and you will instantly be saving like 80% of the space this setup needs.
“of course you need a lot of dedicated space for a multi material setup and that will never change.” ?? Guess you’ve never seen Bambu AMS solution yet…
i have seen it and it takes up more space than 5 spools would despite only supporting narrow spools.
just because they made it into one case doesnt mean it takes up any less space.
in fact the AMS takes up more space than the MMU and 5 spools do despite not even having full sized spools.
When will the MMU3 firmware be available to download? I’m really looking forward to trying it out with my MMU2S!
Never mind, I found it on GitHub. You just haven’t added it to your downloads page yet.
Have you already tested this? I have regular problems with the mmu2s. I have now updated the firmware of the mmu and prusa, but everything is still much worse than before. When starting a new print it goes wrong already after the measurement of the bed. Immediately error messages getting stuck in a loop. It no longer manages to load filament into the mmu. Just as if something is blocked.
What version of MMU3 works with MK3.5?
I never bothered to assemble the filament buffer as it was a pita. I just have my spools on the rollers on a shelf above the printer, which has been working great in terms of buffering and swapping spools.
So to upgrade the MMU2s to an MMU3, do I really need the upgrade kit with the new electronics? Or can I just upgrade the firmware and some printed parts? What will I be missing out on in terms of features?
What will be the differences between MMU3 for MKS3+ and MKS4. Today I own MKS3+. First of all, I will want to update MMU2S to MMU3 for MKS3+.
If I upgrade MKS3+ to MK3.9 at a later date, will my modified MMU3 work with it?
I’m asking because you keep writing about the differences between MMU3 for MKS3+ and MKS4.
i have a same question.
How does this work with the Original Prusa Enclosure?
Wondering the same.
Me too
Looking forward to trying this out. My MMU2S is partially working: in some cases it prints beautifully, in some cases it makes me want to throw it out the window.
I was trying a PETG/PLA print just two days ago, and the MMU was doing some weird things like moving the selector before the filament was out of the tube! This is something I hope 2-way communication will solve.
Thanks for continuing to develop the MMU for us users, and I’m still hoping this will help solve things.
How does MMU3 fit in a MK4 + enclosure setup? I just ordered this combination and already thought about the MMU but did not find how this might work together.
As I did not receive the order so far I can’t tell if the MMU3 would fit in the enclosure as well or if there will be a different solution to mount it from outside the enclosure. Would be nice to read on this combination as well.
The new firmware 3.13.0 (3.0.0) for MK3S/MMU2S looks really good. Identified the problem with the power supply and after tightening the screws and revising the connector, the MMU2S is still running as it should. The engine stopped heating for the idler and the traffic generally became quieter. Great!
Looks like a great improvement, if you really wanted to show your appreciation to the community mod creators, you would offer them a free upgrade as well! Cheers!
Also, if you appreciate community mods to improve your product, please at lease release solid files to enable easier modifications.
Does the new firmware:
-Unlock the extruder / MMU motors when it wants filament adjusted? My primary frustration was that it shoved the extruder far left (mostly blocking the extruder gear from being accessed), locked the extruder motor, locked the MMU motor and engaged the selector every time it jammed when it should have been doing the exact opposite. I’d have to reset extruder tension and MMU tension EVERY jam. On the fly. In the middle of day long prints. Repeatedly.
-Tell you where it wants filament to be positioned with an error? Previously you just had to guess if it was loading, unloading, and all steps in between or it would error out again. Now I see from a screenshot that it at least tells you what sensor it’s checking but not of it wants the filament before or after it.
-Allow access to the UI for more than “retry last action?” We’ve gone from “there is a problem” to “There is a problem here: expected X but have Y” but if you need to do something like clear a jam you’re out of luck.
Does the new hardware:
-Actually use the cutter? We had ~4 years with it being vestigial on the MMU2. Is said cutter now designed in a way to make it actually able to cut filament? I’d rather snip the ~2 mm of die swell off the tip than try ramming it through the V6’s heat break because that just strips it at the extruder.
My situation is that I saw the MMU1, skipped it because it was (thankfully) properly advertised as an experimental product. The MMU2 was experimental but advertised as functional with an experience wildly different than what I’d come to expect. This was followed by a cycle of “nothing is wrong with the design” -> “Here is an upgrade that fixes all the problems” -> “nothing is wrong.” This is another paid upgrade that fixes all the problems that don’t exist or have been fixed up to twice already.
This is great news. However, I notice the article is careful to discuss only color changes and not material changes. This is called a multi-material unit (MMU), after all. PrusaSlicer needs just a minor small fix – already done and tested in this pull request https://github.com/prusa3d/PrusaSlicer/pull/9737 – to allow filaments of different temperatures to be switched correctly. Currently, a previous ‘hot’ filament remaining in the nozzle can jam due to being purged on the wipe tower using the ‘colder’ temperature of the next filament. This PR ensures that the purge happens at the higher of the two temperatures.
With that fix, the MMU becomes a true multi-MATERIAL unit, not just a multi-color unit. You can do interesting things like mixing PLA with PLA+, or print PLA with PETG supports. It’s been working fine for me, but I have to use my own build of PrusaSlicer to have this capability. It would be nice if it got merged into an actual release.
Like the valid questions and comments, I am hopeful this new update fixes a lot of previous problems that made the addition not worth the effort.
I have one feature request, that is really software-only, and that I have always been surprised wasn’t an option already on Prusaslicer with an MMU; it is to get rid of purging altogether. A zero purge option.
There are plenty of use cases I have come across where having a perfect, no-blending-of-color transition is not necessary… sometimes, not even desirable. And for all the effort that went into purge to infill and purge to other object functions that are available (and the rare times I did spend the time and effort to use the MMU again, I definitely used these functions, and they were great), a zero purge feature would be even easier!
Even when purging to 3 other identical objects to get the best object to waste ratio and having only 1 object with perfect, clean color transitions, Prusaslicer still always required me to have a purge block. At that point, it was waste for the sake of required waste, and I am still confused by it.
Under print settings > Multiple Extruders > Wipe Tower > Enable
Uncheck “Enable”.
On my screen, this disables the tower. Or do you mean something else?
Funny enough my issue with the MMU2s was never actually the hardware after I replaced the 2mm PTFE tubes with 3mm inner diameter ones. It was always the electronics crashing (because of undervoltage I think). I even got a replacement board that didn’t help at all.
After I saw some forum post I soldered a wire bridging a diode and since then I haven’t had a single crash. The homing is now a bit broken since it stops too early and then moves to the left and skips a lot but after that i works perfectly.
Could you please link to the forum post you refer to? Thanks!
@tramsgar here is the link : about https://forum.prusa3d.com/forum/original-prusa-i3-mmu2s-mmu2-hardware-firmware-and-software-help/i-found-serious-design-error-in-mmu2-electronics-hardware
Thanks for releasing the new FW for MMU2S owners too! Dedicated long-term support is why I continue to use Prusa machines.
The new FW, and the parts redesign, would’ve been even more appreciated a few years ago. Whatever was the reason for the development hiatus, especially in the light of the poor MMU2S design and performance, I hope that is in the past now.
Hope the blog grows and brings more good articles. Wish the blog more and more success and continue to inspire the community. Go to -> Drift Hunters try and see how it is.
This post includes a list of High CPC Keywords that will increase your blog and website’s earnings by 100%. You can find a complete list of keywords with high CPC rates in this list. One of the best CPC networks for making money online is Google AdSense. Use these keywords in your blog entries to maximize your AdSense earnings. You can raise your AdSense CPC (Cost Per Click) by using these keywords.
Thank you for your article, let's explore Getmodnow is your go-to destination for downloading a wide range of apps, including the highly sought-after <a href="https://getmodnow.com/terraria-1-4- 4-9-2.html/">terraria apk 1.4.4.9.2</a> game, all for free. Our platform provides easy access to a diverse selection of apps, ensuring you can enjoy this popular game and many others without any cost. Explore our website to discover a world of free app downloads, granting you access to exciting adventures like Terraria APK 1.4.4.9.2. Dive into the world of gaming and endless possibilities with Getmodnow.
Thanks for your article, let's explore Getmodnow is your go-to destination for downloading a wide range of apps, including the highly sought-after https://getmodnow.com/terraria-1-4-4-9-2.html game, all for free. Our platform provides easy access to a diverse selection of apps, ensuring you can enjoy this popular game and many others without any cost. Explore our website to discover a world of free app downloads, granting you access to exciting adventures like Terraria APK 1.4.4.9.2. Dive into the world of gaming and endless possibilities with Getmodnow.
First, initiate a simulation using apps like Remodel AI to ensure design compatibility. Exciting news: the Original Prusa MMU3 is now available for shipping, featuring enhanced multi-material printing and a new firmware update for MMU2S.