


The top surface of 3D prints is typically not perfectly smooth. As the nozzle draws the perimeters and solid infill, small gaps and ridges remain visible between the toolpath lines. However, if your model has flat areas parallel to the print bed, you can use Ironing to smooth them.
How does ironing work?
Ironing smooths flat top surfaces by running a special second infill phase in the same layer.
As the hot nozzle travels over the just printed top layer, it flattens any plastic that might have curled up. The nozzle also extrudes a small amount of filament to fill in any holes in the top surface. The spacing between individual ironing passes is usually a fraction of the nozzle diameter. That means the nozzle will go over the same spot several times. Ironing is angled at fixed 45 degrees compared to the first phase of normal top infill as this approach produces better results.
Macro comparison of Ironing OFF (left), Ironing ON (right)
PrusaSlicer 2.3
At the time of the release of this article, PrusaSlicer 2.3 is available as a release candidate version. You can download it from our GitHub. You will not find ironing in the previous versions of PrusaSlicer.
History
The Ironing idea was first proposed in 2016 by the Spanish user “Neotko” on the Ultimaker community forum. Neotko prototyped “Neosanding” – a smoothing of top surfaces in Simplify3D by running a second infill phase at the same print height with zero or a tiny extrusion rate perpendicularly to the first infill run. The “Neosanding” was later integrated by Ultimaker into their Cura slicer. Kisslicer integrated Ironing with a small twist: The second phase is not perpendicular to the first phase, but at 45 degrees, which Jonathan, the author of Kisslicer, validated to produce better results. For PrusaSlicer, we implemented Neotko’s “Neosanding” at 45 degrees as in Kisslicer.
When to use Ironing
Ironing is useful for prints with flat top surfaces, like nameplates, logos, badges, boxes, lids, etc.
It can also be useful when you want to glue two pieces together and need the surfaces to be as flat as possible so that the gap between them is minimized.
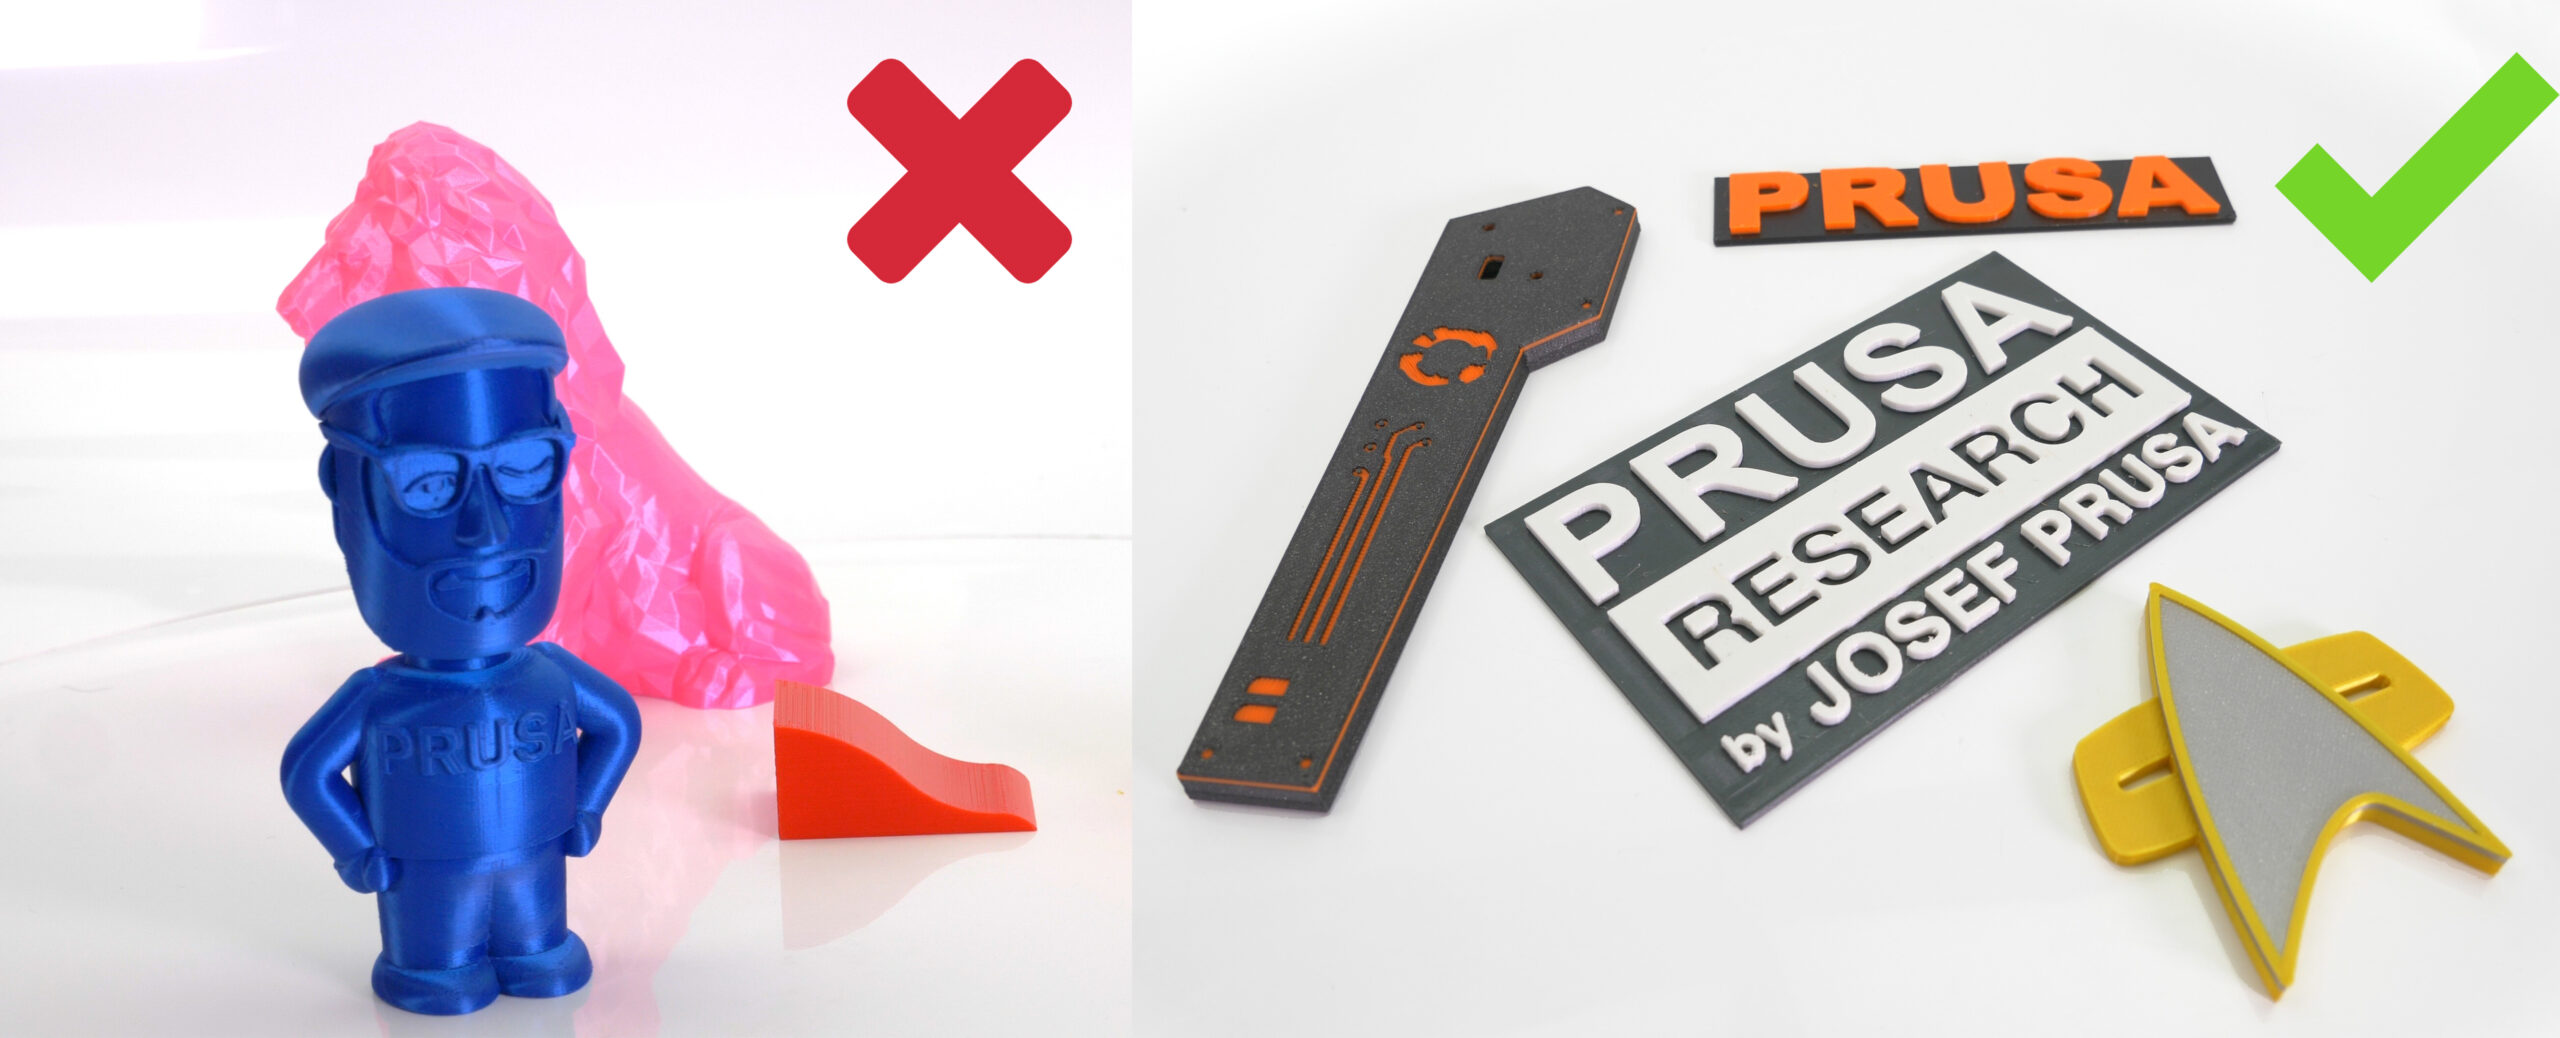
Ironing is not useful for round objects, figures and organic shapes in general. It’s also not useful for objects which do have flat areas, but these flat areas are not aligned parallel to the print bed. With that said, ironing will not have a significant negative impact when printing such models. It will just unnecessarily increase the print time.
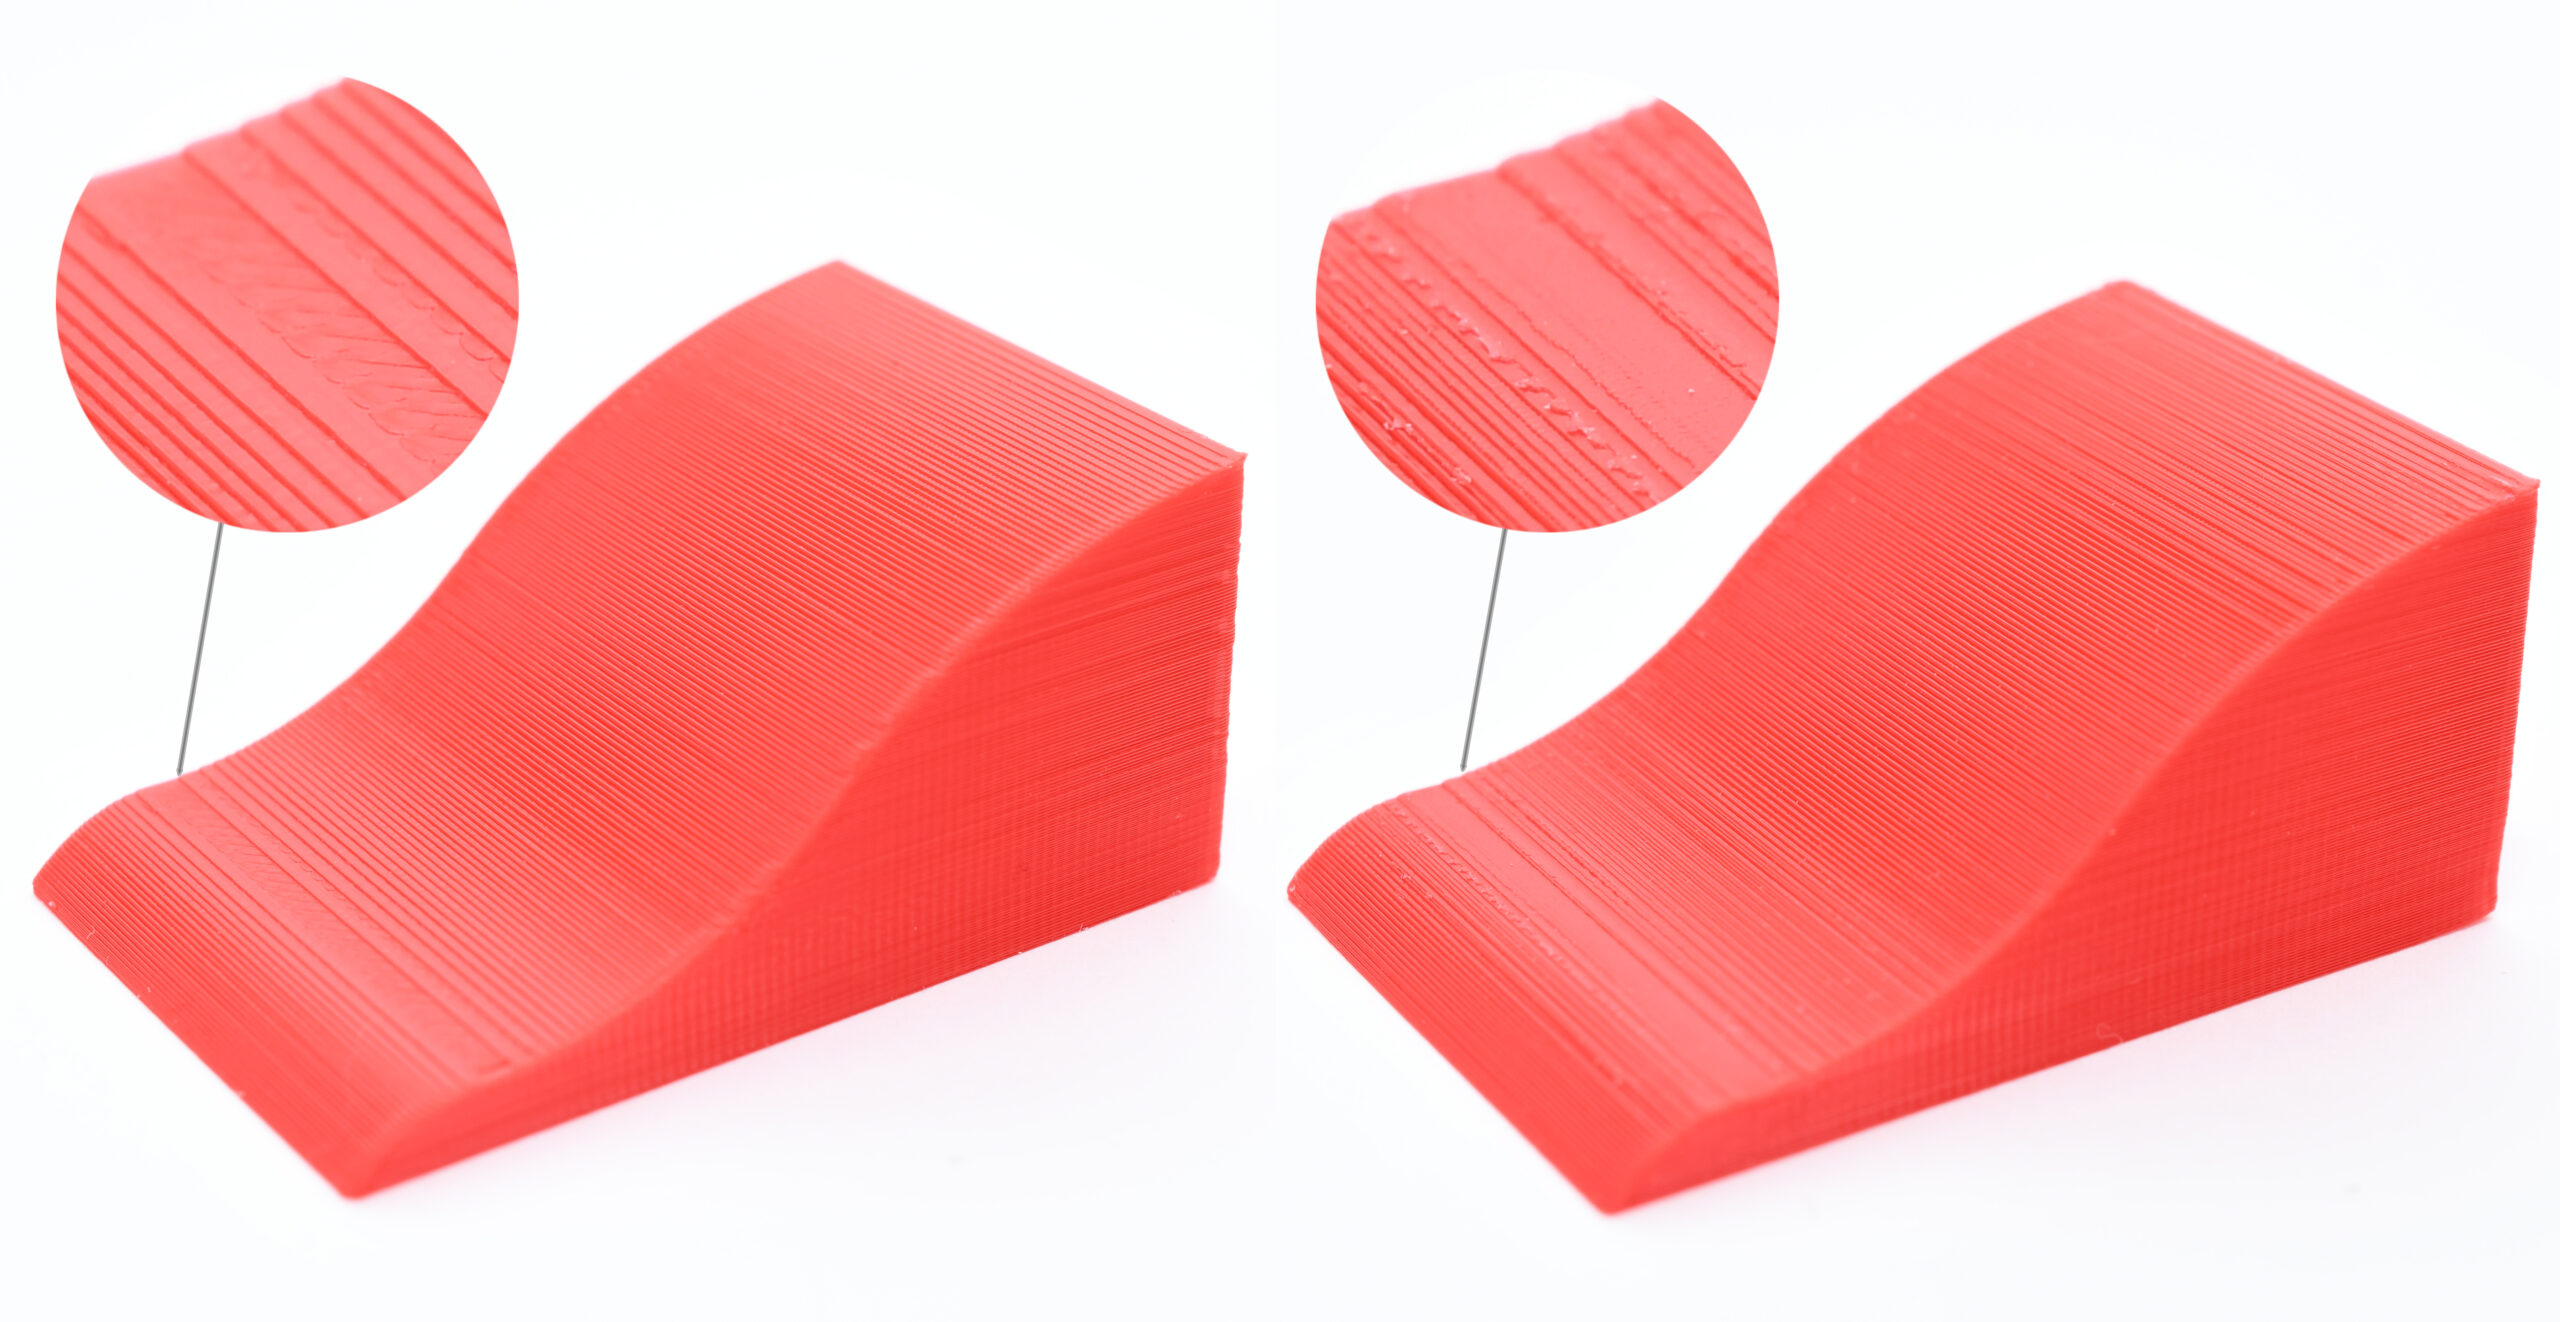
Ironing has little to no effect on non-flat surfaces, Ironing Off (left), Ironing On (right)
Don’t forget, that some models can be printed upside down. The bottom layer printed on the build plate will typically be even smoother than an ironed top layer (depending on the print sheet that you use).
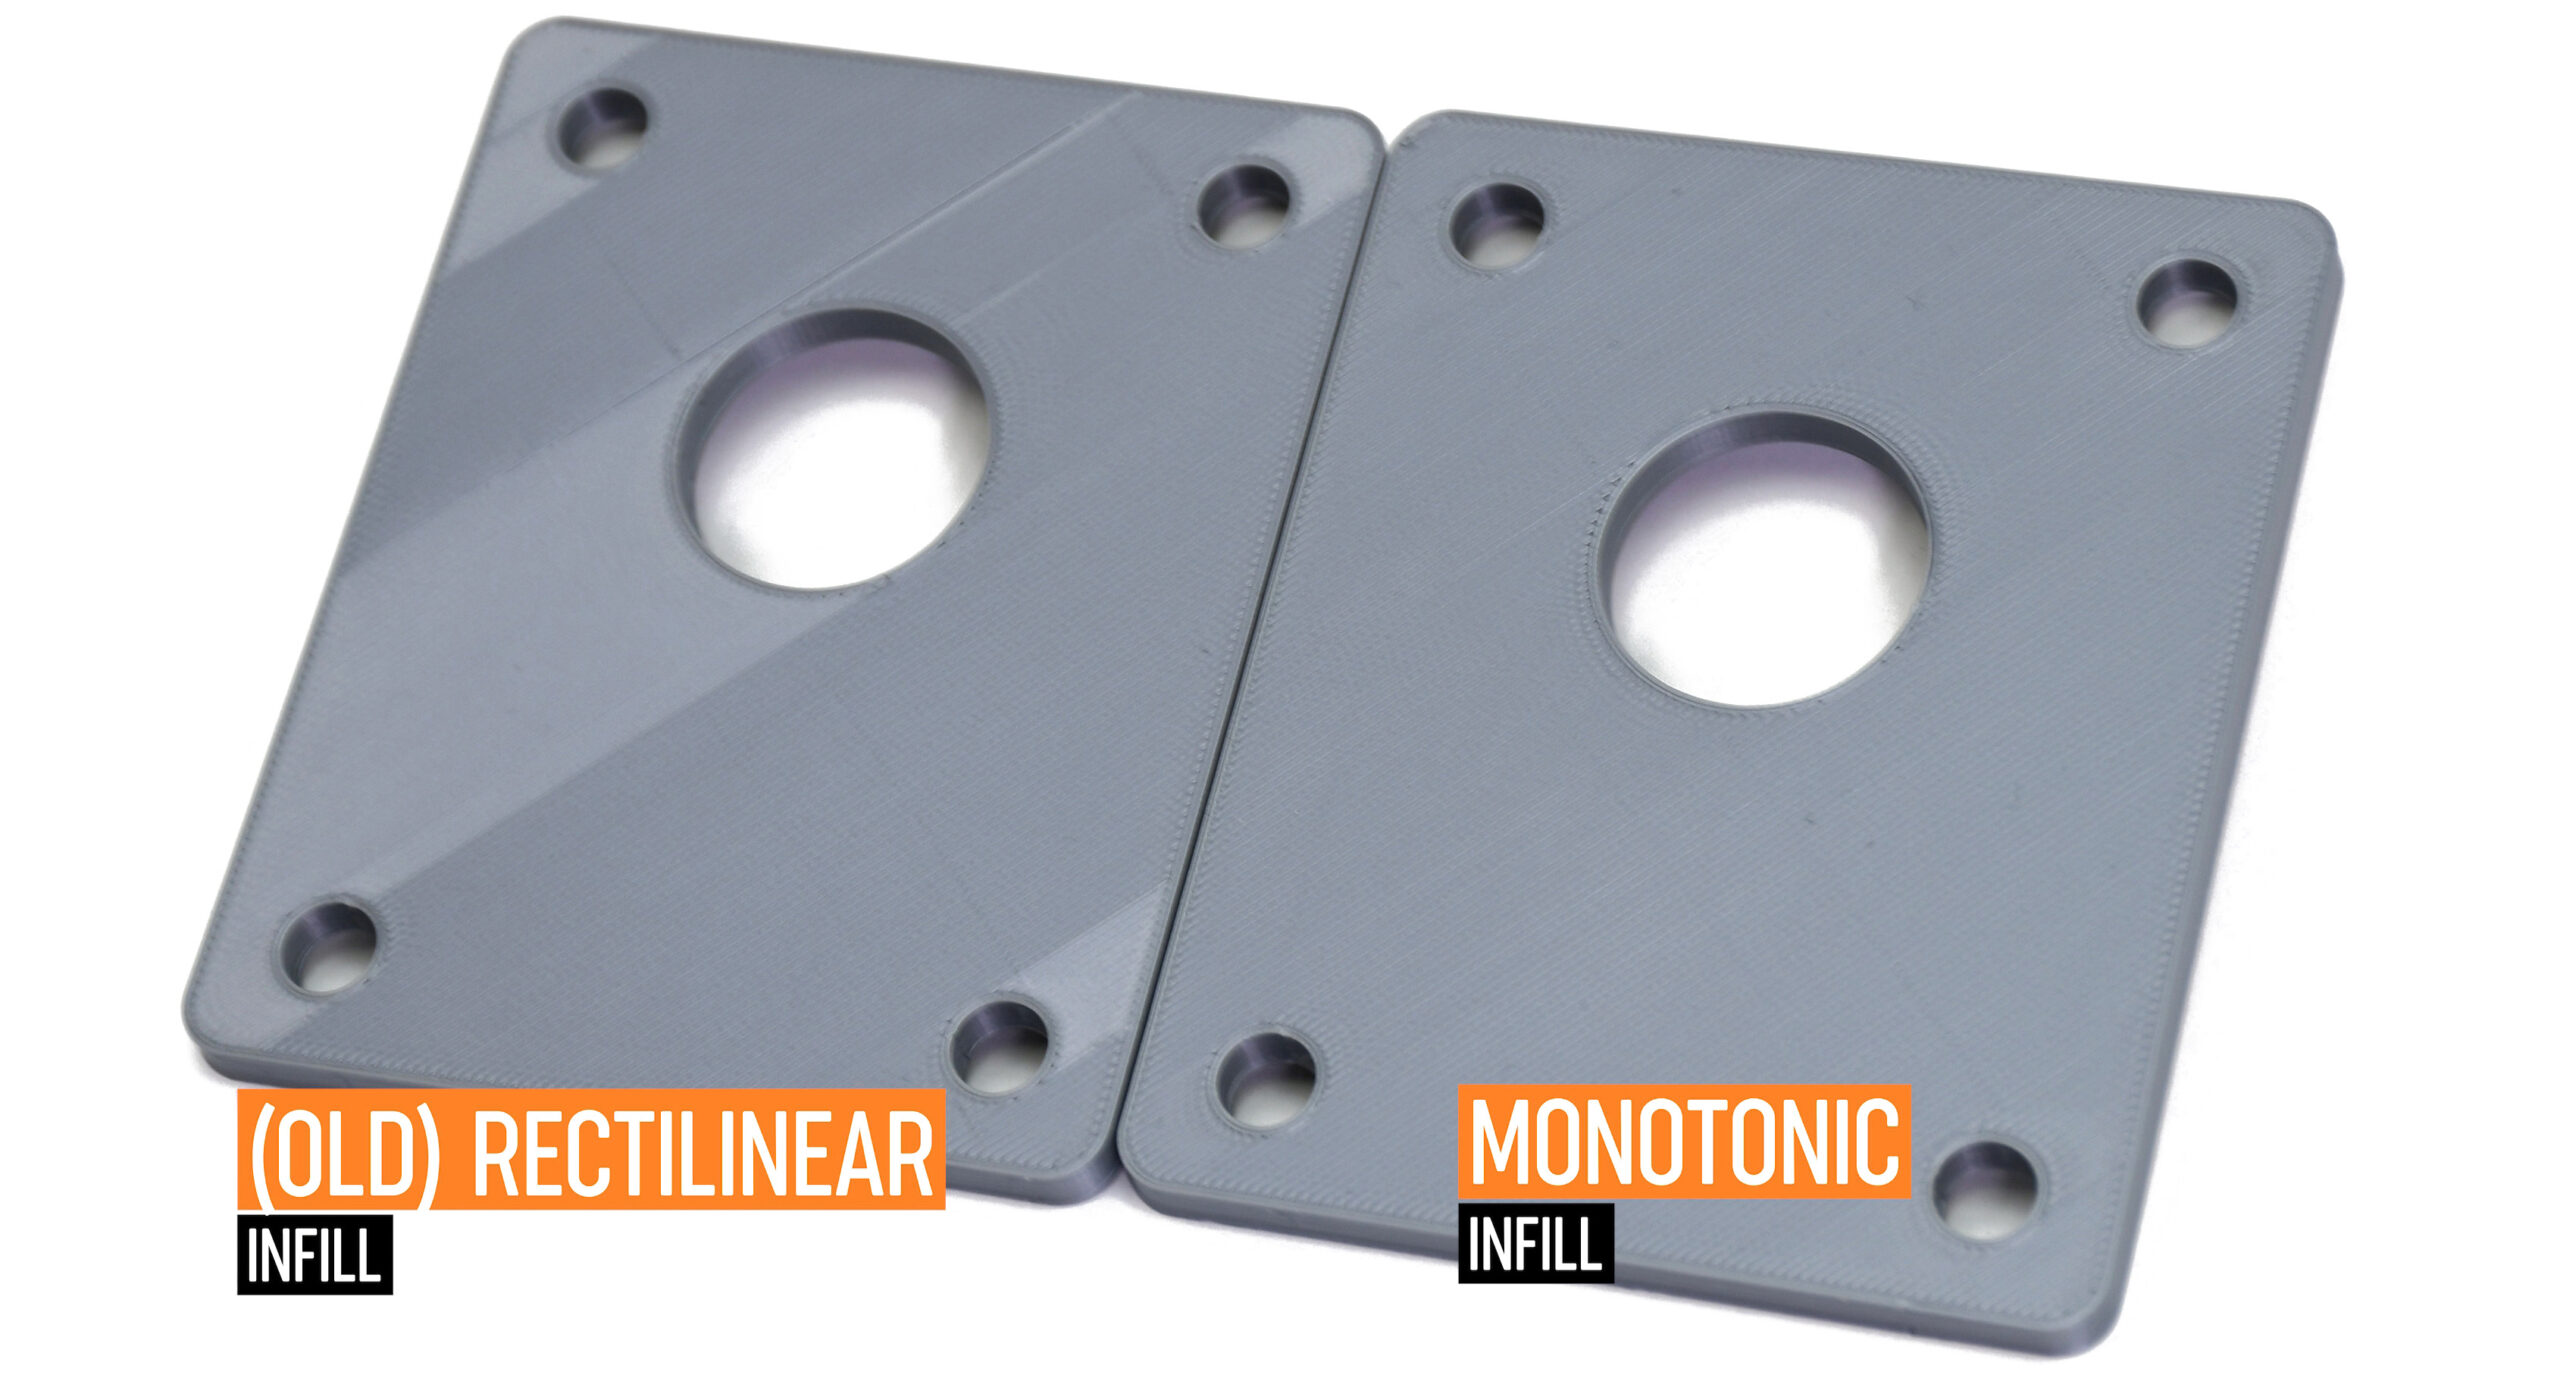
Use in combination with the Monotonic infill
The Monotonic infill is another feature, which improves the quality of the top layers. It’s essentially the good old rectilinear infill with modified path planning – it’s always extruded only in one direction (e.g. left to right). Use it in combination with Ironing to get the best results. Original Prusa profiles have the Monotonic infill already set as the default for top&bottom layers.
Downsides
The main downside is increased print time as the second phase of top infill is performed with very small spacing between ironing lines. You can see how much print time will be spent on ironing in the preview.
For uniformly sized objects (roughly cube shape) Ironing will increase the print time by about 10-20%.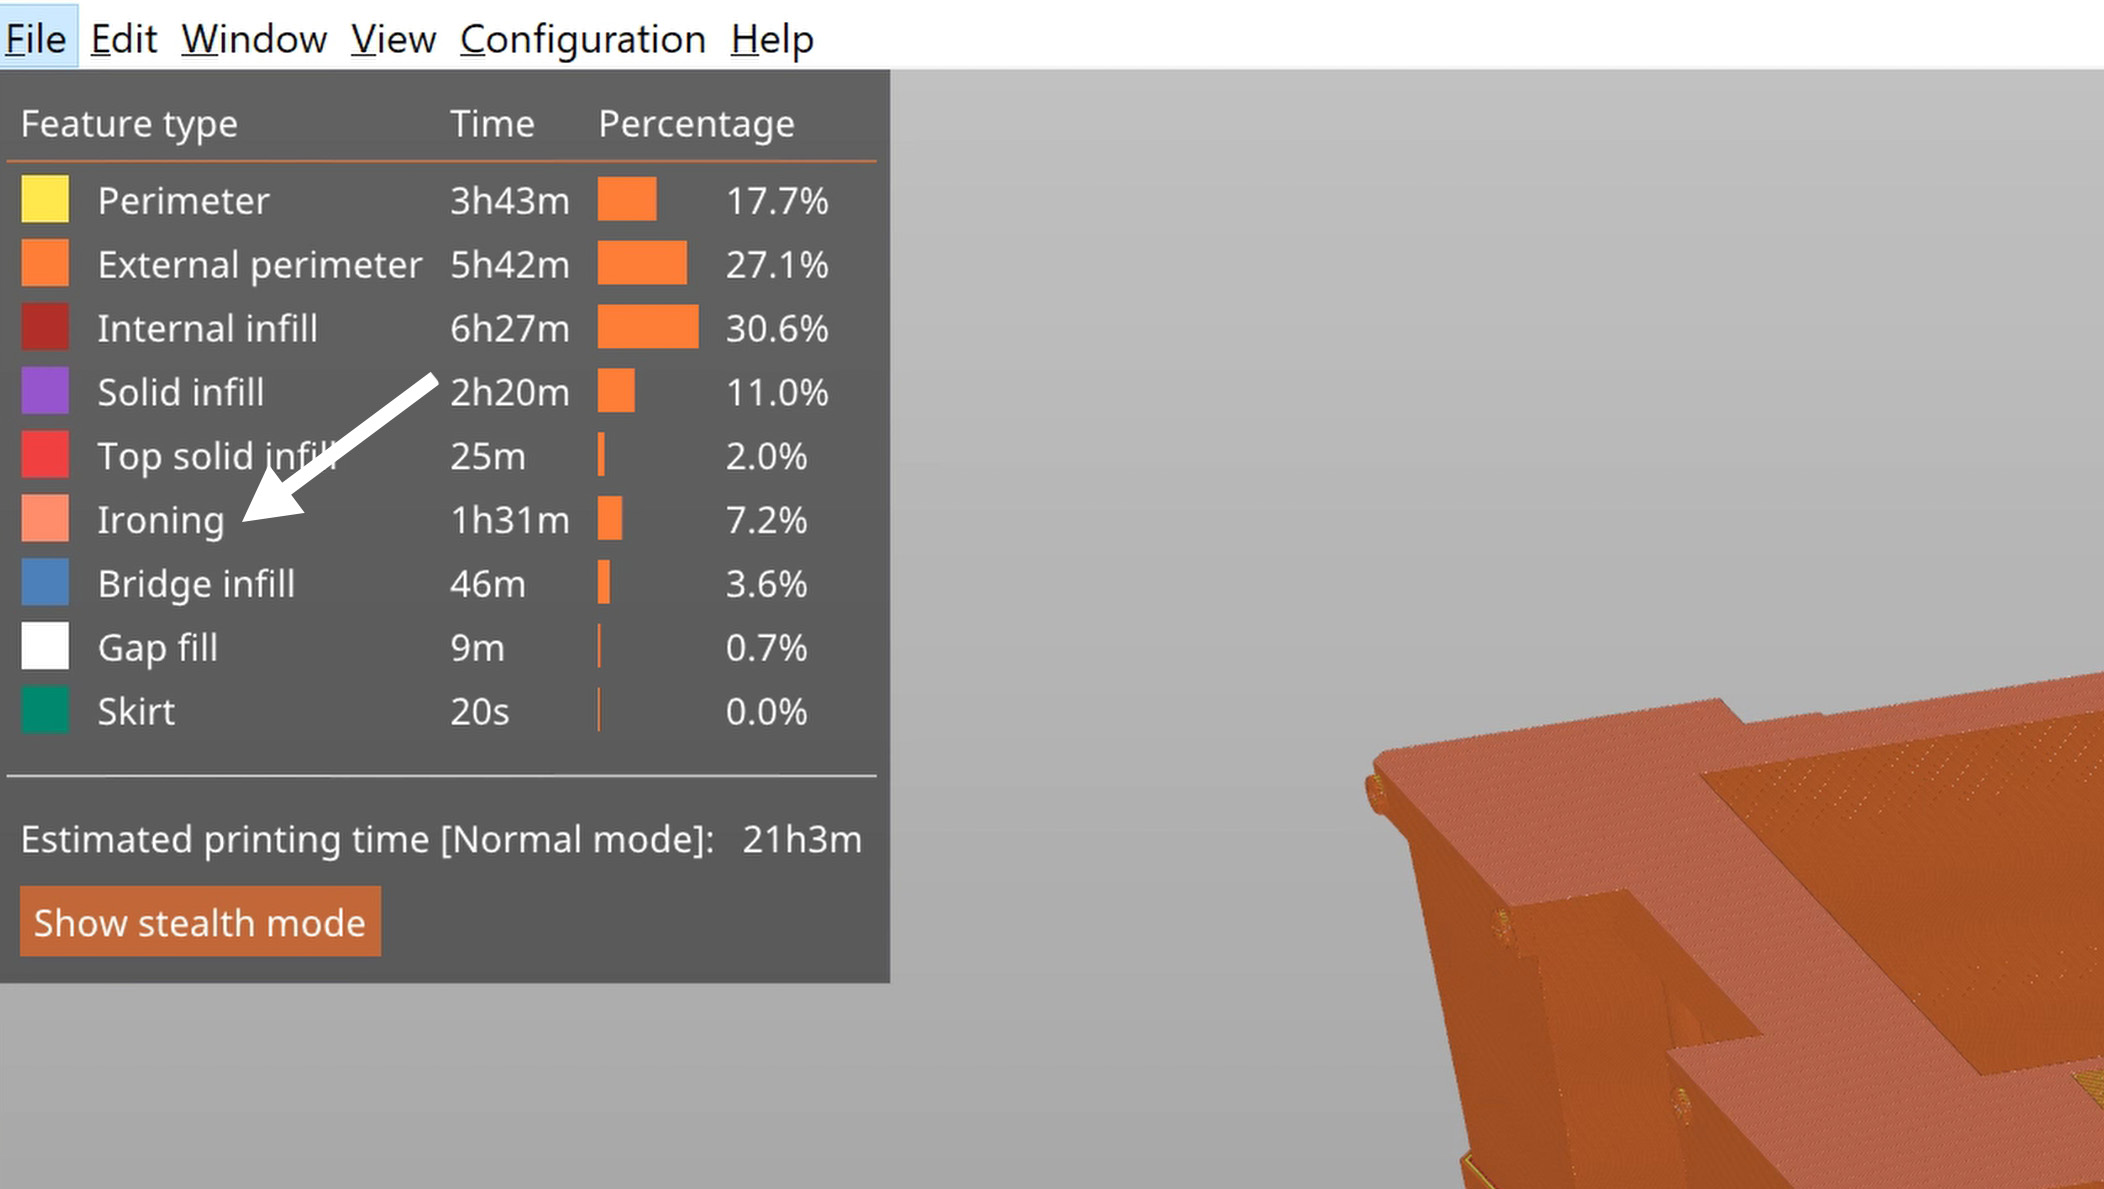
However, for prints just a few millimeters tall, Ironing can increase the print quite significantly. Starfleet badge by Andrew Sink
If you’re ironing a big surface area, on some machines you might experience heat creep and eventually, a clogged hotend because the extrusion is very small and slow during ironing. This might a problem mainly when printing with PLA, because of its low-temperature resistance. The risk is increased during summer heatwaves.
Another downside is that the edges will be a tiny bit fuzzy or less sharp. The ironing toolpath is planned for a small extrusion, but the nozzle is physically still the same size, so some plastic will bleed over the edge.
We wouldn’t exactly call it a downside, but shiny surfaces will also become a bit more matte.
Ironing settings
Ironing is not available in the Simple mode, so switch to the Advanced or Expert mode. To turn Ironing on for all models on the build plate, select Print settings – Infill – Ironing – Enable Ironing.
If you want to turn on ironing just for a selected model, you have to be in expert mode. Right-click on a model and select Add settings – Ironing from the context menu. Tick Enable ironing, optionally you can also select the rest of the ironing settings in order to customize them for individual objects. You can now change the ironing settings for this model using the right panel.

The Ironing type All top surfaces is selected by default. The nozzle will iron the top layer of each surface (the last layer of each flat area).
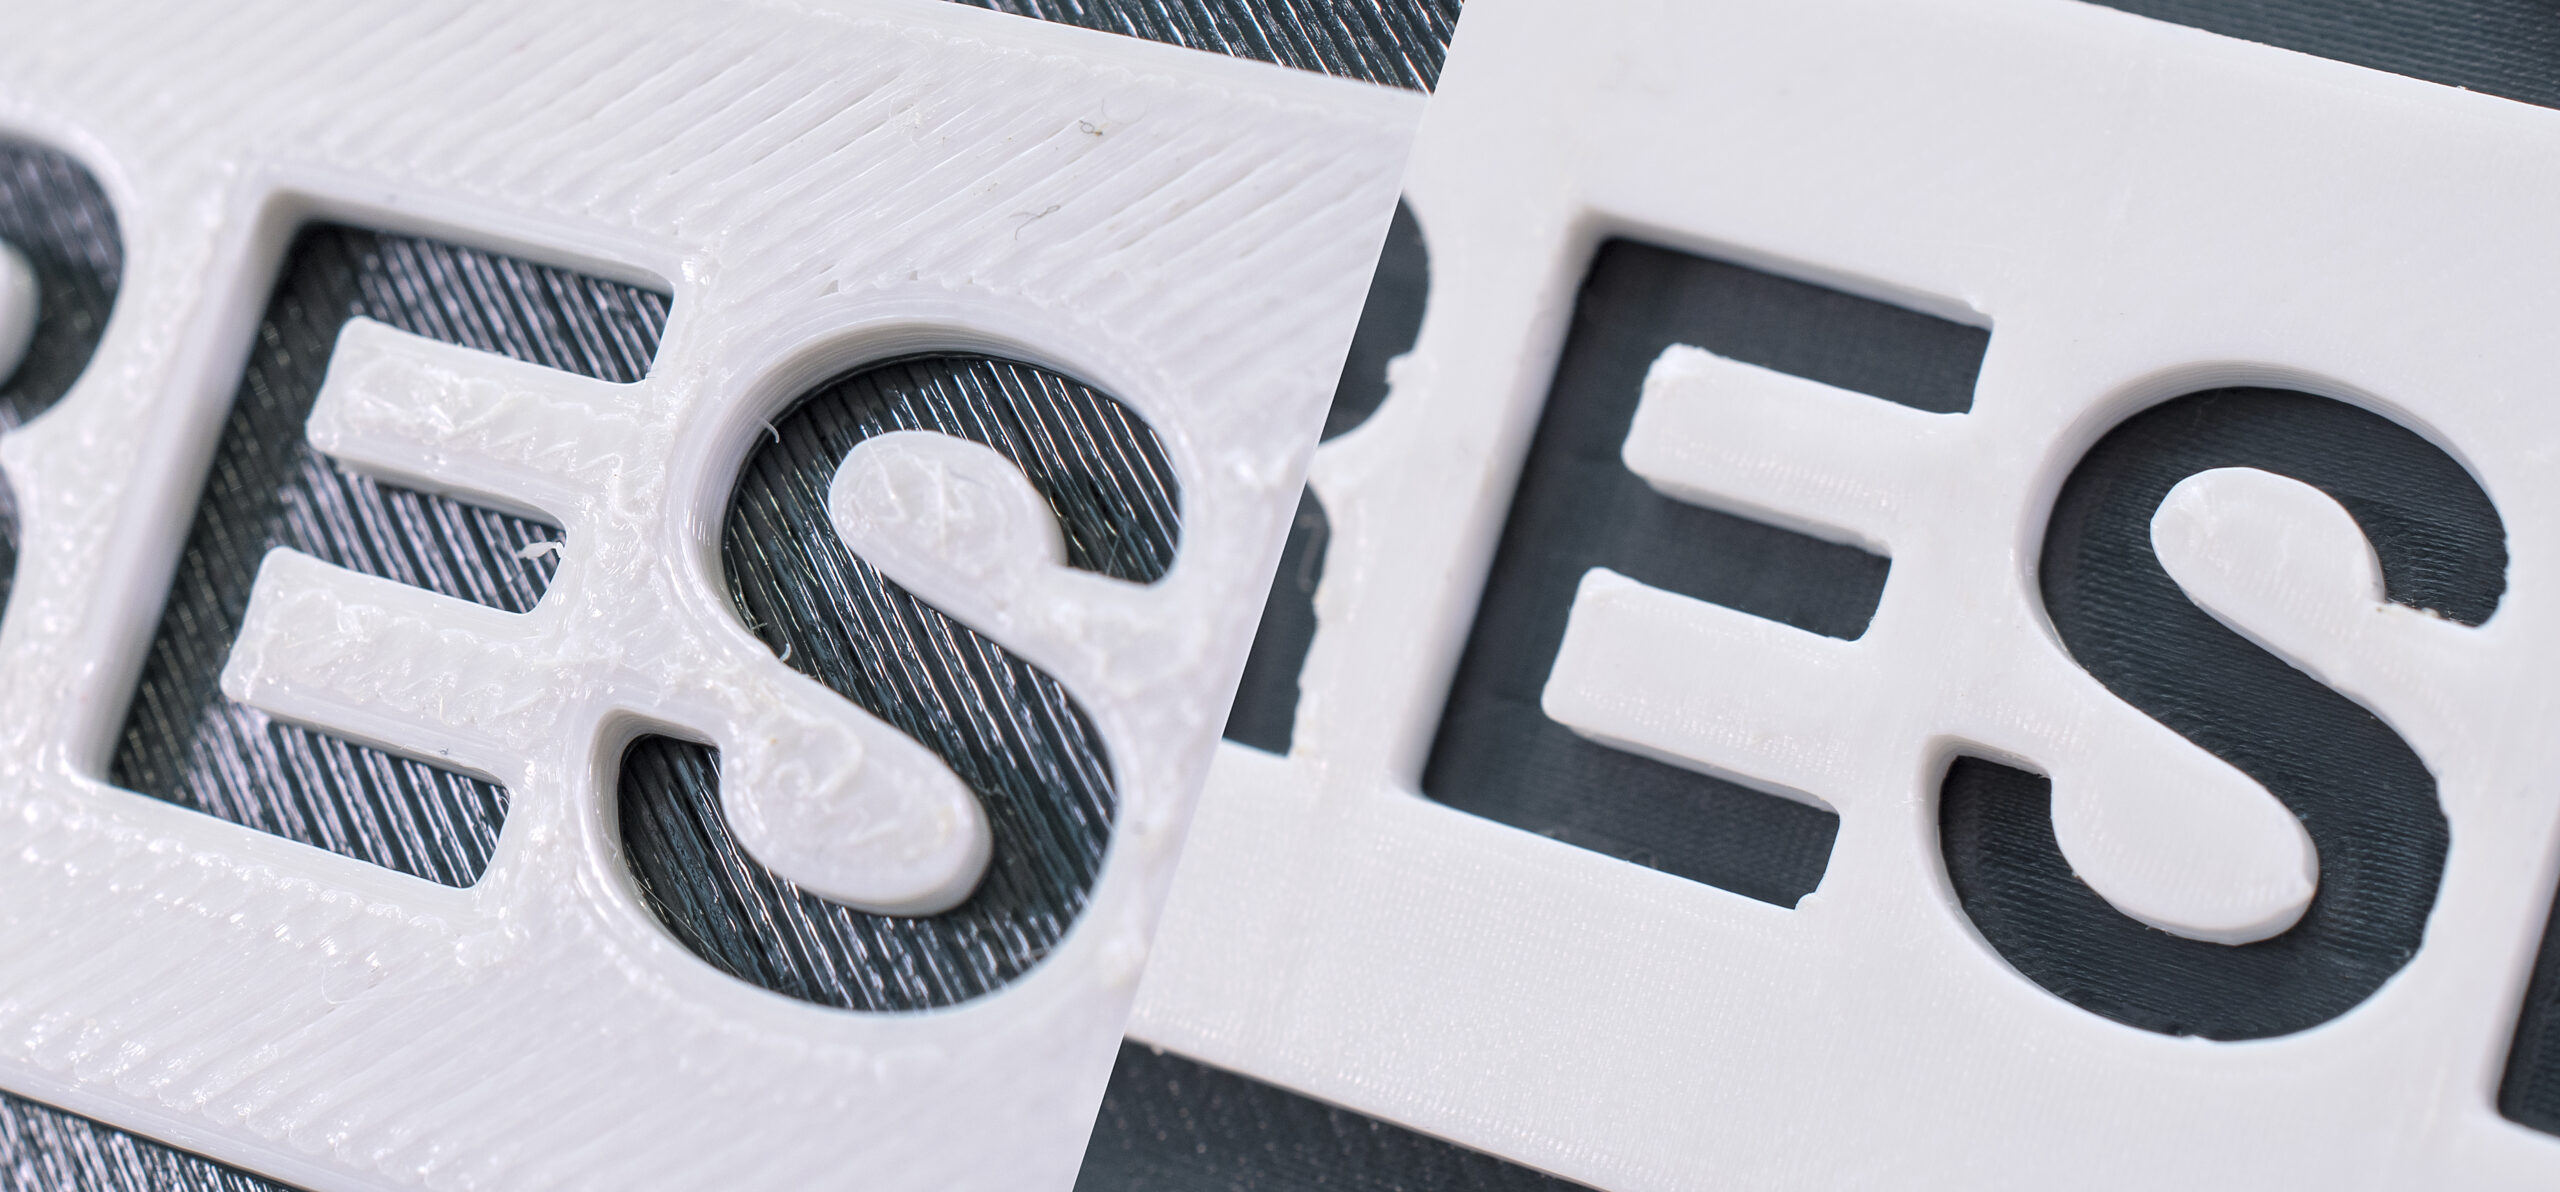
If you switch the Ironing type to the Topmost surface only, only the very last layer of the object will be ironed. This means that in the case of an embossed text (oriented parallel to the print bed) the nozzle will iron only the top of the letters, but not the space between the letters.
You can also use Modifiers to turn on Ironing just for a selected part of a model. Check our Documentation for a step-by-step tutorial.
Different materials
As far as settings go, there’s nothing much to tweak no matter which filament you use. However, different filaments produce different results based on their specific properties.
PLA irons very nicely, however, it is most prone to heat creep (depends on your printer and ambient temperature).
PETG irons fine, but there’s an increased risk of extra filament sticking to the nozzle. This plastic might accumulate on the nozzle, get dark as it’s overheated and eventually attach to the print. The same goes for FLEX, but much more pronounced.
ASA irons incredibly well, producing super smooth top surfaces.
When we tried ironing WOOD FILLED filaments, we didn’t achieve very good results. But your experience may vary.
Calibration
If you’re using an Original Prusa printer, all you have to do is to turn Ironing on. We’ve already tested and set all the values for you. Furthermore, many community profiles included in PrusaSlicer will also have Ironing already set-up.
If you want to use Ironing with a custom machine, you’ll have to experiment with the ironing flow, speed and line spacing. Make sure you’re in the Expert mode, you won’t see these values otherwise. Ironing is very sensitive to accurate extruder calibration. Too little and shiny groves will be visible at the top layer, which will not be ironed. Too much and the excess plastic will be dragged by the nozzle to the edges of the top surface. So calibrating is a matter of trial and error.
Conclusion
Ironing is a great tool that you can use to smooth models like badges or logos. It works so well you might even have problems recognizing which part of the model was printed on the build plate and which one was smoothed with ironing 🙂
However, keep in mind that it increases the print time and that it’s not useful for figures and other organic shapes. So it’s not something you should leave turned on all the time.
The new features in the betas and now this new RC are all such great improvements! Looking very forward to the implementation of so many of the cool new tricks this slicer has! Keep up the great work!!
I really love this feature! The default settings are really great and always come out looking perfect. One thing I would like to see added is the ability to offset the perimeter of the ironing layer. I noticed sometimes there was a tiny bit of excess material on the top edge caused by ironing too close to the edge. Thanks again!
This feature feels as if I got a new printer, it is absolutely great!
Unfortunately heat creep is a real issue with my MK2.5S. I use a silicone sock in order to be able to set print fan back to 100%, which is not possible otherwise after the upgrade from MK2.5. That helps a bit.
But there is another issue with „fat“ perimeters after an ironing layer. Fortunately I found a workaround using a second object during printing: https://github.com/prusa3d/PrusaSlicer/issues/5113#issuecomment-747602704
I’ve tried this on a few prints and have been very pleased. In fact, most have come out looking better than examples in this blog post.
Is this feature currently in beta? When will ironing be added? I’ve checked to make sure I’m in expert mode (I am) and that there aren’t any updates available (there aren’t), and it isn’t available. I’d love to be able to use this feature for keychains.
I am Dr. Davinder Soni, working as an endodontist at Soni Dental Hospital and Implant Centre. We provide the best services and treatments as the best dentist in Punjab at a reasonable price to satisfy our patients.
WTF, how desperate do you have to be to spam your dentistry on a FAQ page for 3d printing ironing settings.
This is cool. It does distort the edges a bit, but it does make for a nice surface. This along with monotonic top layer really improves the finish for flat surfaces… Now if they would add 2.5d so it could iron curved surfaces….. (it has been done by others already)
Hi – I am trying to print some clear “windows” using PETG. I have found that when printed with a single layer, the clarity is decent when looking through the the side against the heatbed, but less so on the side of the extruder, due to the toolpath lines. It seems that ironing would be great to solve this issue, but it does not appear to work on the first layer (a part needs two layers for enable ironing to do anything). Is this something that can be tweaked?
I would like to know about this too. I’m printing single layers of clear Ninjaflex and would love to iron it for better clarity.