
Maybe you have already seen some of those fancy enclosures people build for their printers. How do they work? And do they work? Today, we will shed some light on this matter! Plus, we are going to dive into patent wars and explain why not all printers come with an enclosure. To top things off, we will even give you a full guide with information on how to build an enclosure for your own printer. But first, let’s start with the fundamental question: what is it good for?
- Stable printing environment – Drafts can negatively impact your print. An enclosure will keep the temperature stable and high. Big differences in ambient and printing temperatures can lead to warping and shrinking of the printed object, especially when printing with ABS. Layer adhesion may also improve with higher ambient temps.
- Reduce and contain smell – Some filaments (looking at you, ABS!) can release unpleasant fumes during printing. An enclosure will contain these fumes, and you can quickly vent them outside through an open window when the print finishes.
- Noise reduction – As if you needed the MK3 to be any quieter 🙂 But another level of sound isolation can’t hurt, especially if you place the enclosure next to your work desk or in a living room.
- Dust collection – The bearings and smooth rods will appreciate the reduced amount of dust that settles on your printer.
- It’s fun to build 🙂
However, if you’re not printing with ABS or other high-temperature filaments that suffer from warping, you won’t see much of a difference. You might actually want to keep the enclosure open with, for example, PLA to ensure there’s enough cool air around the printer for the part cooling fan.
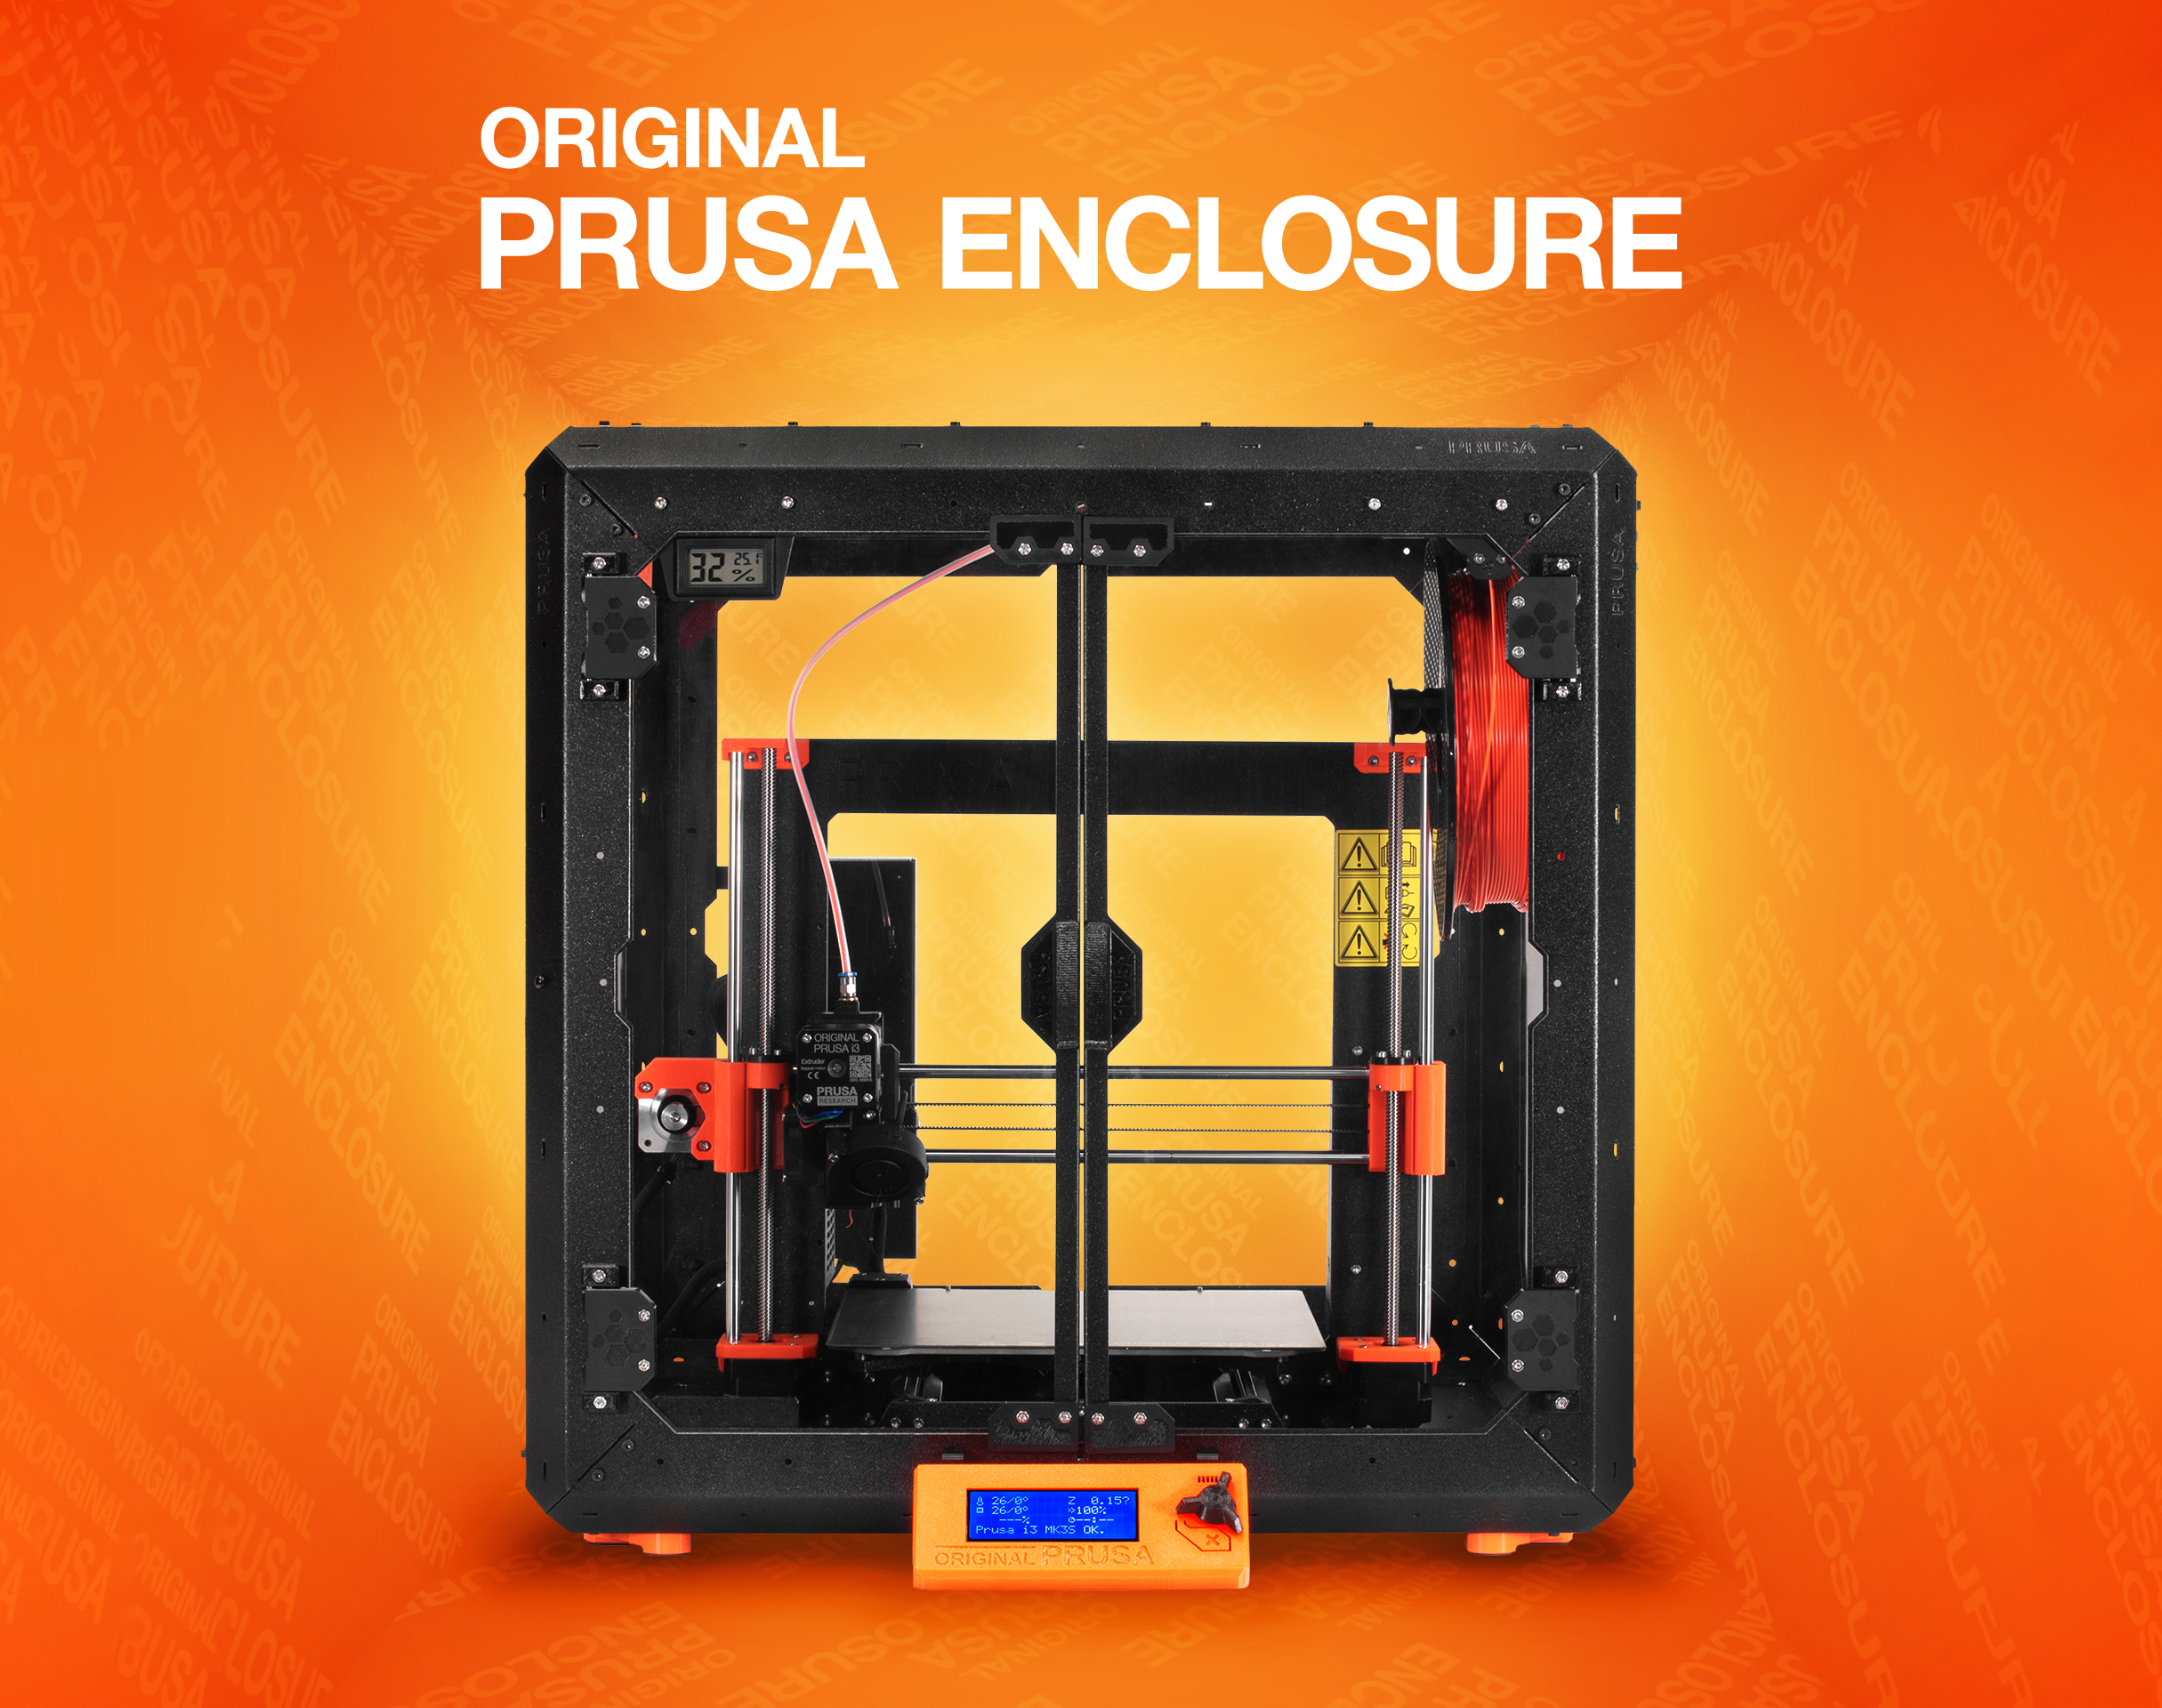
If you’re looking for a high-end enclosure that’s expandable with official and user-made add-ons, we created our own solution. You can learn all about it in the Original Prusa Enclosure release article and order it from our eshop.
If you own the MMU2S, we created a modified version of the enclosure – check it out here.
Why aren’t all the printers on the market enclosed by default?
There are two factors here – price and patents. There is no doubt that the rise of consumer 3D printers was delayed by patents. Companies like Stratasys, Zcorp or 3D Systems have patented nearly every 3D printing technology you can think of. It’s pretty crazy when you look at the sketches from 1980s-1990s and realize just how much some of the current 3D printers are similar to them.
It was only after these key patents expired in 2009 (20 years after application) that the RepRap movement started. And cheap, easy-to-build 3D printers quickly started to be developed. Even though most of these basic patents have already expired, some of them (most importantly the ones owned by Stratasys) are either still active, or have just recently expired. For example, Stratasys’s (still active) patent describes an apparatus “That builds up three-dimensional objects in a heated build chamber” (…) “The motion control components of the apparatus are external to and thermally isolated from the build chamber.” That means if you put the stepper motors outside of an enclosure, you can’t sell the product, as it would violate the patent.
Another obstacle is the price. We have considered and even developed a Prusa enclosure quite a while ago. It was made mostly of Plexiglass. Our target was $90 price tag and considering the packing, shipping and material cost, we just couldn’t make it work. It makes much more sense to build the enclosure yourself from locally sourced materials.
How hot should the enclosure be and can the PSU stay inside?
Let’s get something straight, we are not targeting really high temperatures inside the enclosure. You don’t need an extra heater. The printer itself produces a lot of heat and all you have to do is to not let it escape. The goal is to achieve stable temperatures without any sudden changes from wind or draught. Even just 35°C inside the enclosure will make a massive difference, increase layer adhesion and may prevent ABS from warping.
The PSU is not made to work in extremely hot environments. By keeping the PSU in temperatures above 40-50°C can significantly shorten its lifespan. Ideally, you’d place the PSU outside the enclosure. You can even place the LCD outside to be able to control the printer without letting the hot air out.
2 simple enclosures
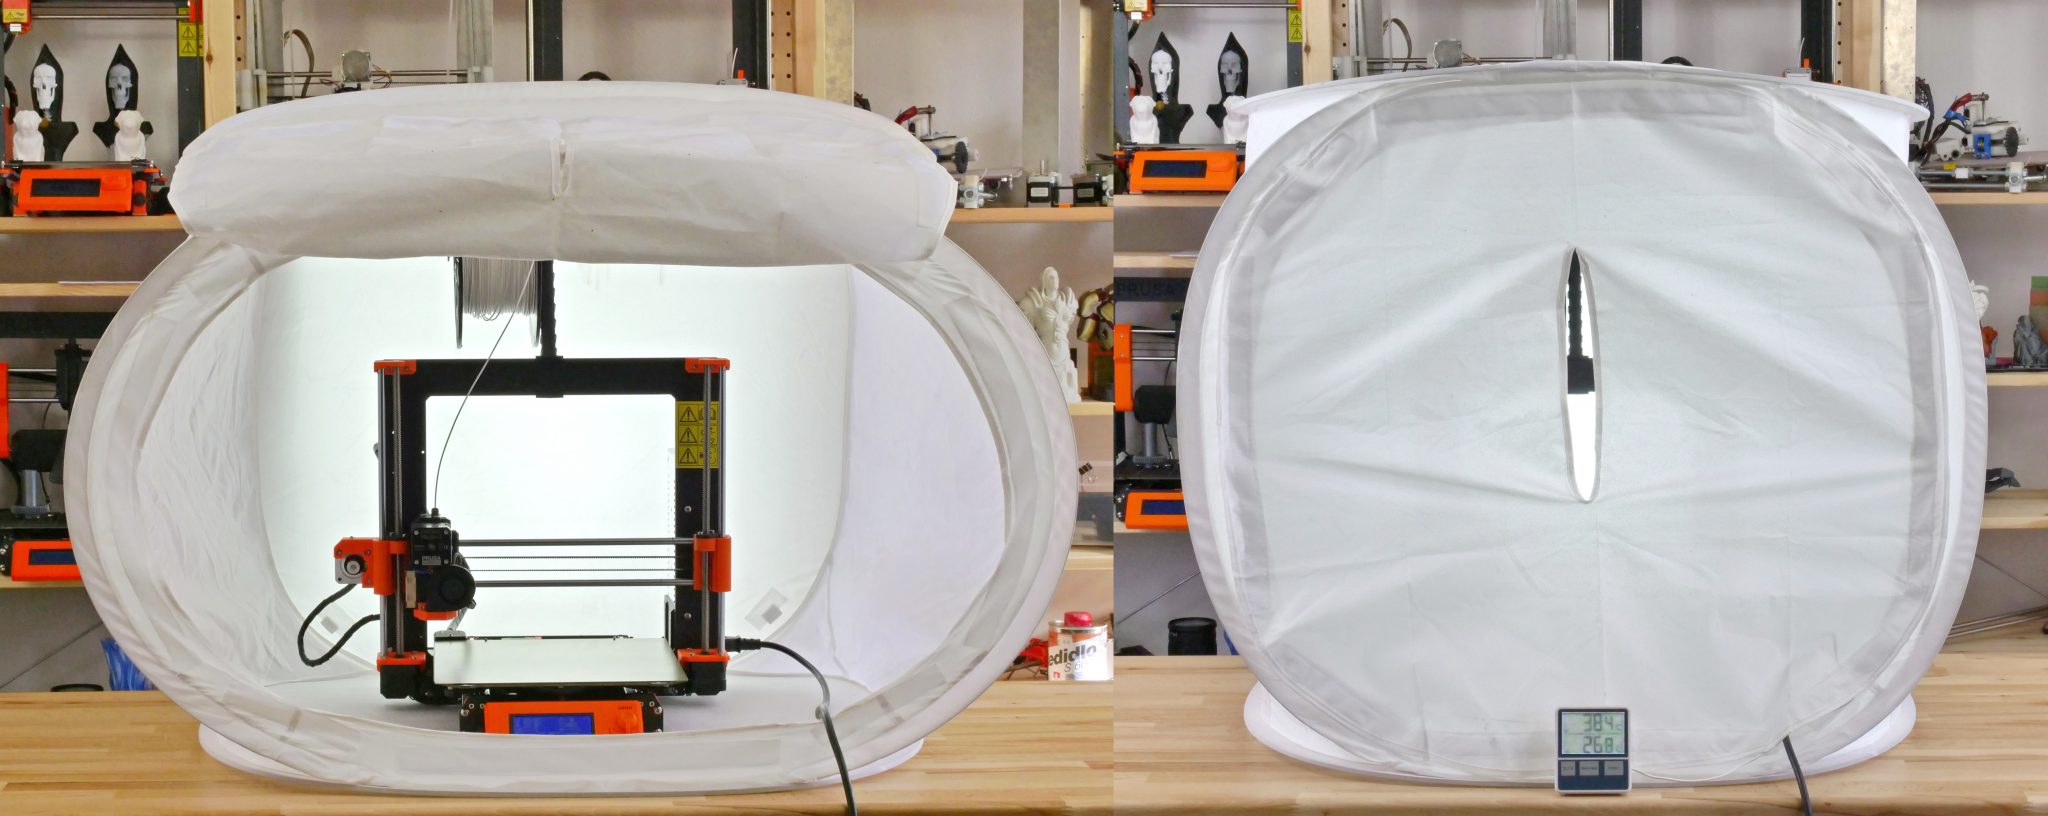
Photo studio tent – no work required at all
An enclosure can often be created from an object originally made for a completely different purpose. This photo (80×80) tent can be bought on eBay or Aliexpress for about $15-20. And all you have to do is place the printer inside the tent. It’s made of textile material, which means it’s porous. A textile enclosure won’t let you reach crazy high temperatures, so you can even keep the PSU inside. We reached temperatures around 38°C after 10 minutes of printing inside a room with the ambient temp. of 26°C – that’s a significant improvement. And as a bonus, you have a photo tent for your prints 🙂
Ikea Lack – when you care about looks as well
Using Ikea Lack as an enclosure is the most popular choice among the 3D printing community. If you search online, you’ll find dozens of Ikea Lack enclosure designs. The table can be bought for under $10 and has almost the perfect size for Prusa printers. You can stack the tables on top of each other to create bays for multiple printers, or use one as filament and tools storage. Even though some of the existing enclosure designs are pretty good, we wanted to give it our own spin.
Advantages of our enclosure
- PSU placed outside in a clip-on holder, but easily placed back if you need to move the printer
- LED lighting connected to the printer’s PSU
- Hinges built into corner extensions
- Double-door opening
- Individual tables can be lifted at any time
What you’ll need
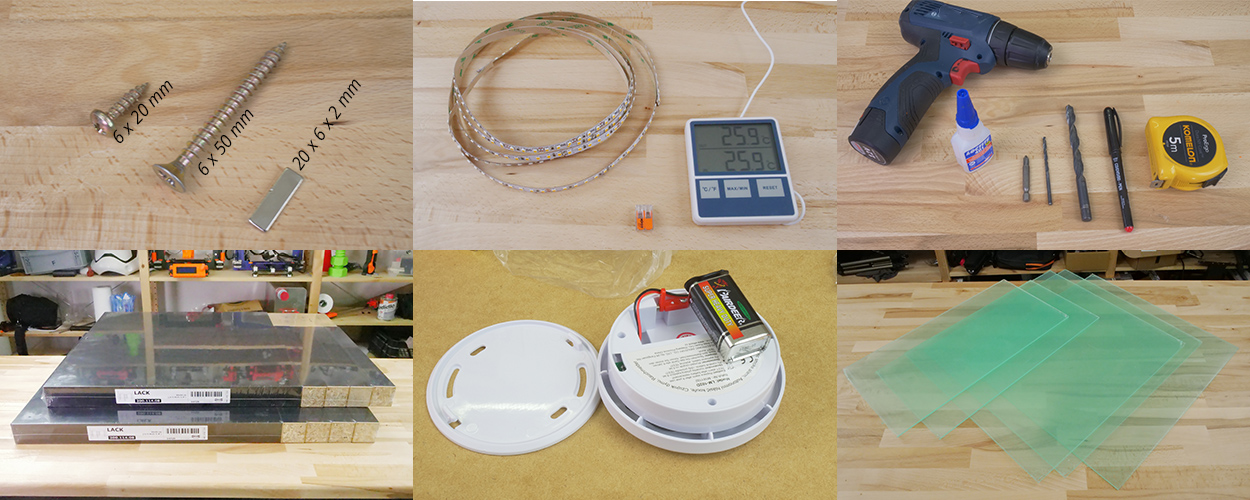
Printable parts
Construction
- 2x or 3x Ikea LACK table
- 4x Neodymium magnets 20mm x 6mm x 2mm
- 3x Plexi 440 x 440 mm, 3mm thick (if you’re in the US, try Queen City Polymers)
- 2x Plexi 220 x 440 mm, 3mm thick
Electronics
- Fire/smoke detector
- Indoor/Outdoor Thermometer
- LED stripe 24V, 30 cm
- 24V for MK3, 12V for MK2/S
- If you want to use a 12V LED strip with the MK3, use a separate power supply.
- Twin cable, 100 cm
- 2x WAGO 221 or similar compact lever connector
Screws
- 12x 6×20 mm (12 x 3/4″)
- 4x 6×50 mm (12 x 2″)
Printed parts
- Upper table (enclosure box)
- Lower table (support table)
- Spool holders
Tools
- Philips screwdriver
- Allen keys
- Super Glue
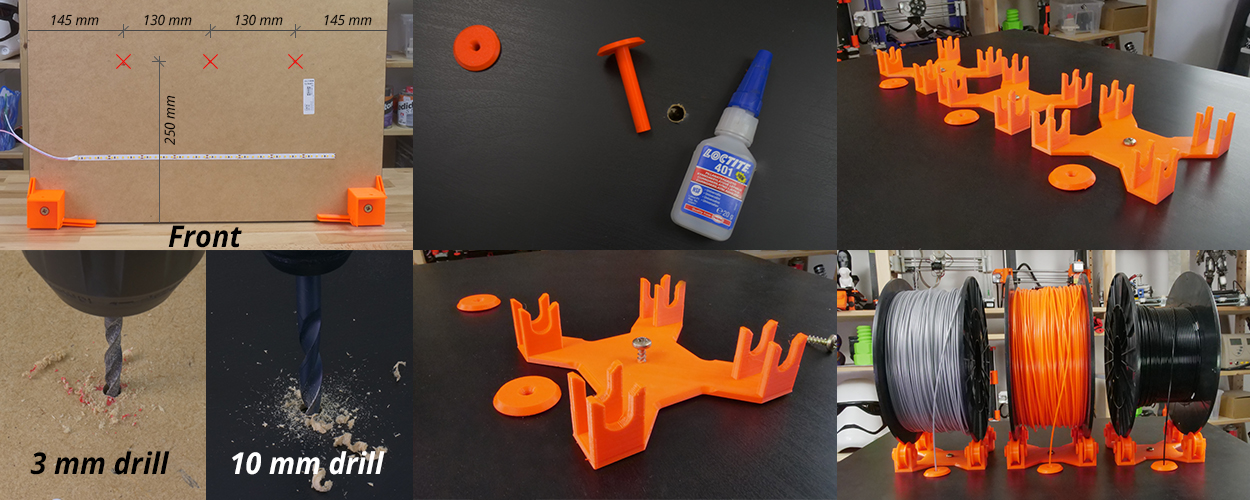
- Drill + 3 mm wood drill + 10 mm wood drill
- Measuring tape
- Marker
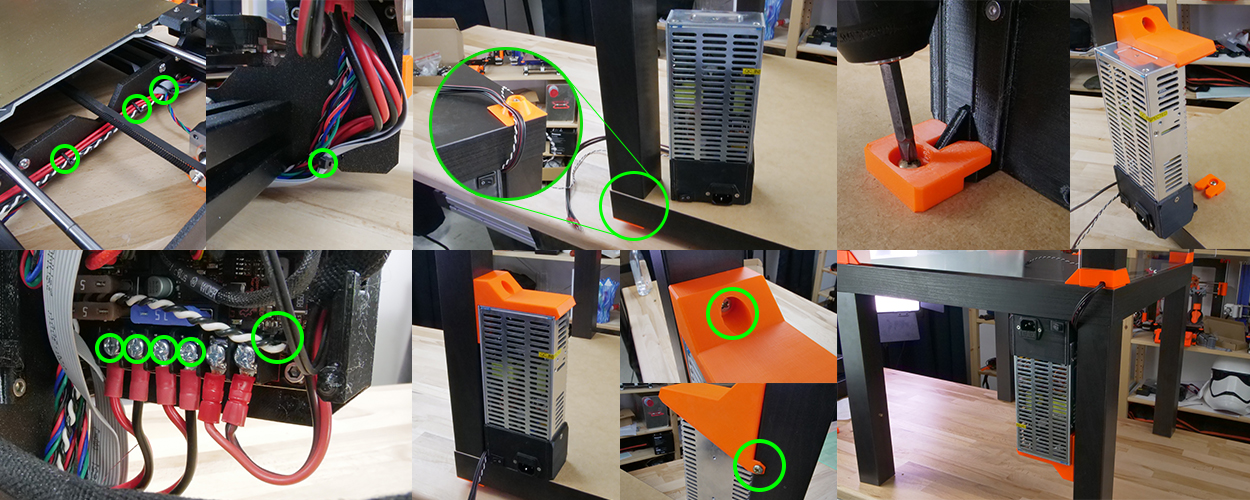
Enclosure (upper table) assembly
Upper corner standoffs installation
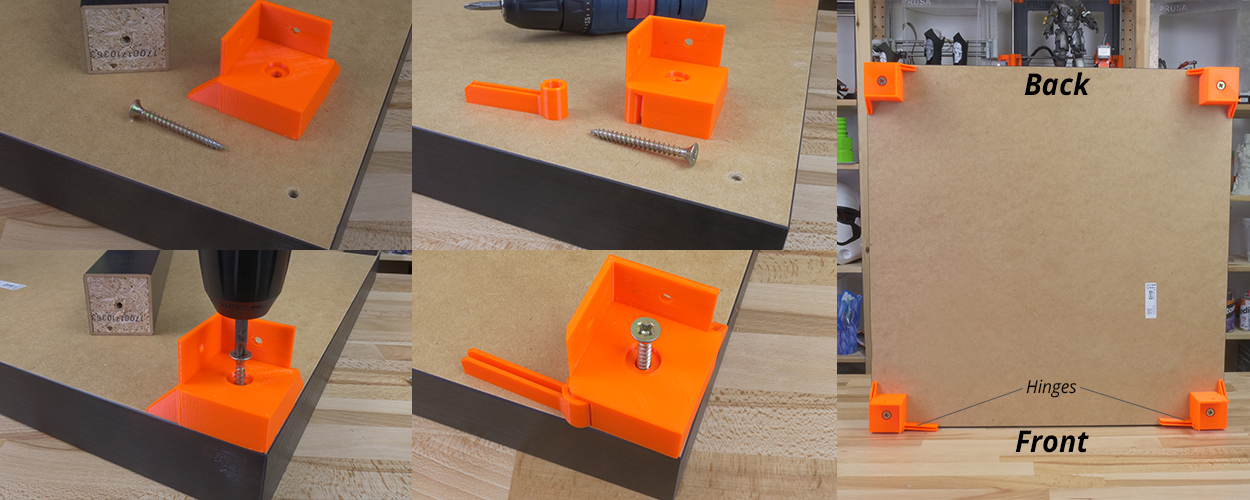
Attaching the legs
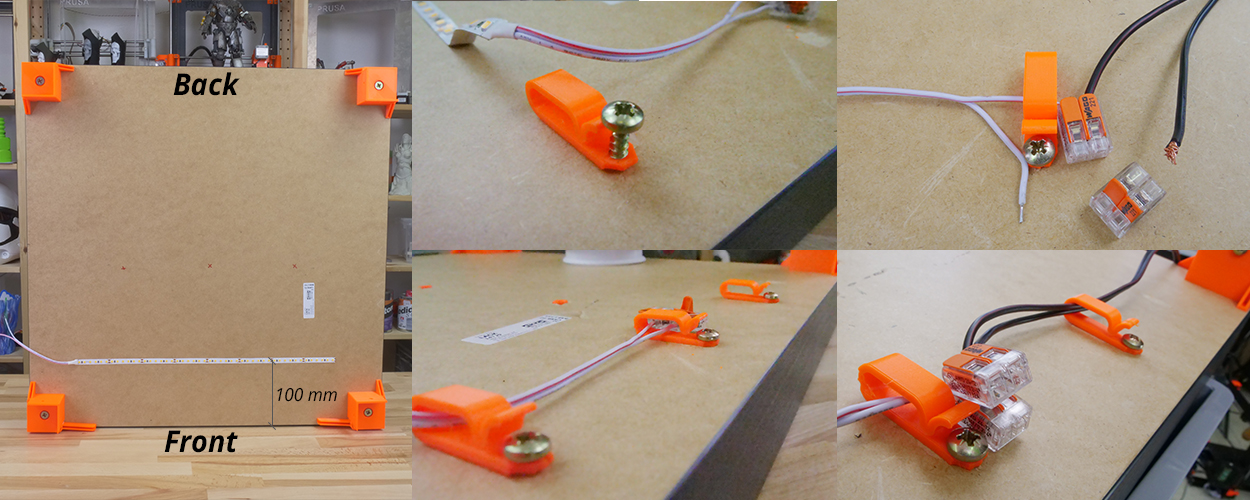
LED stripe
For about $12, you can buy an LE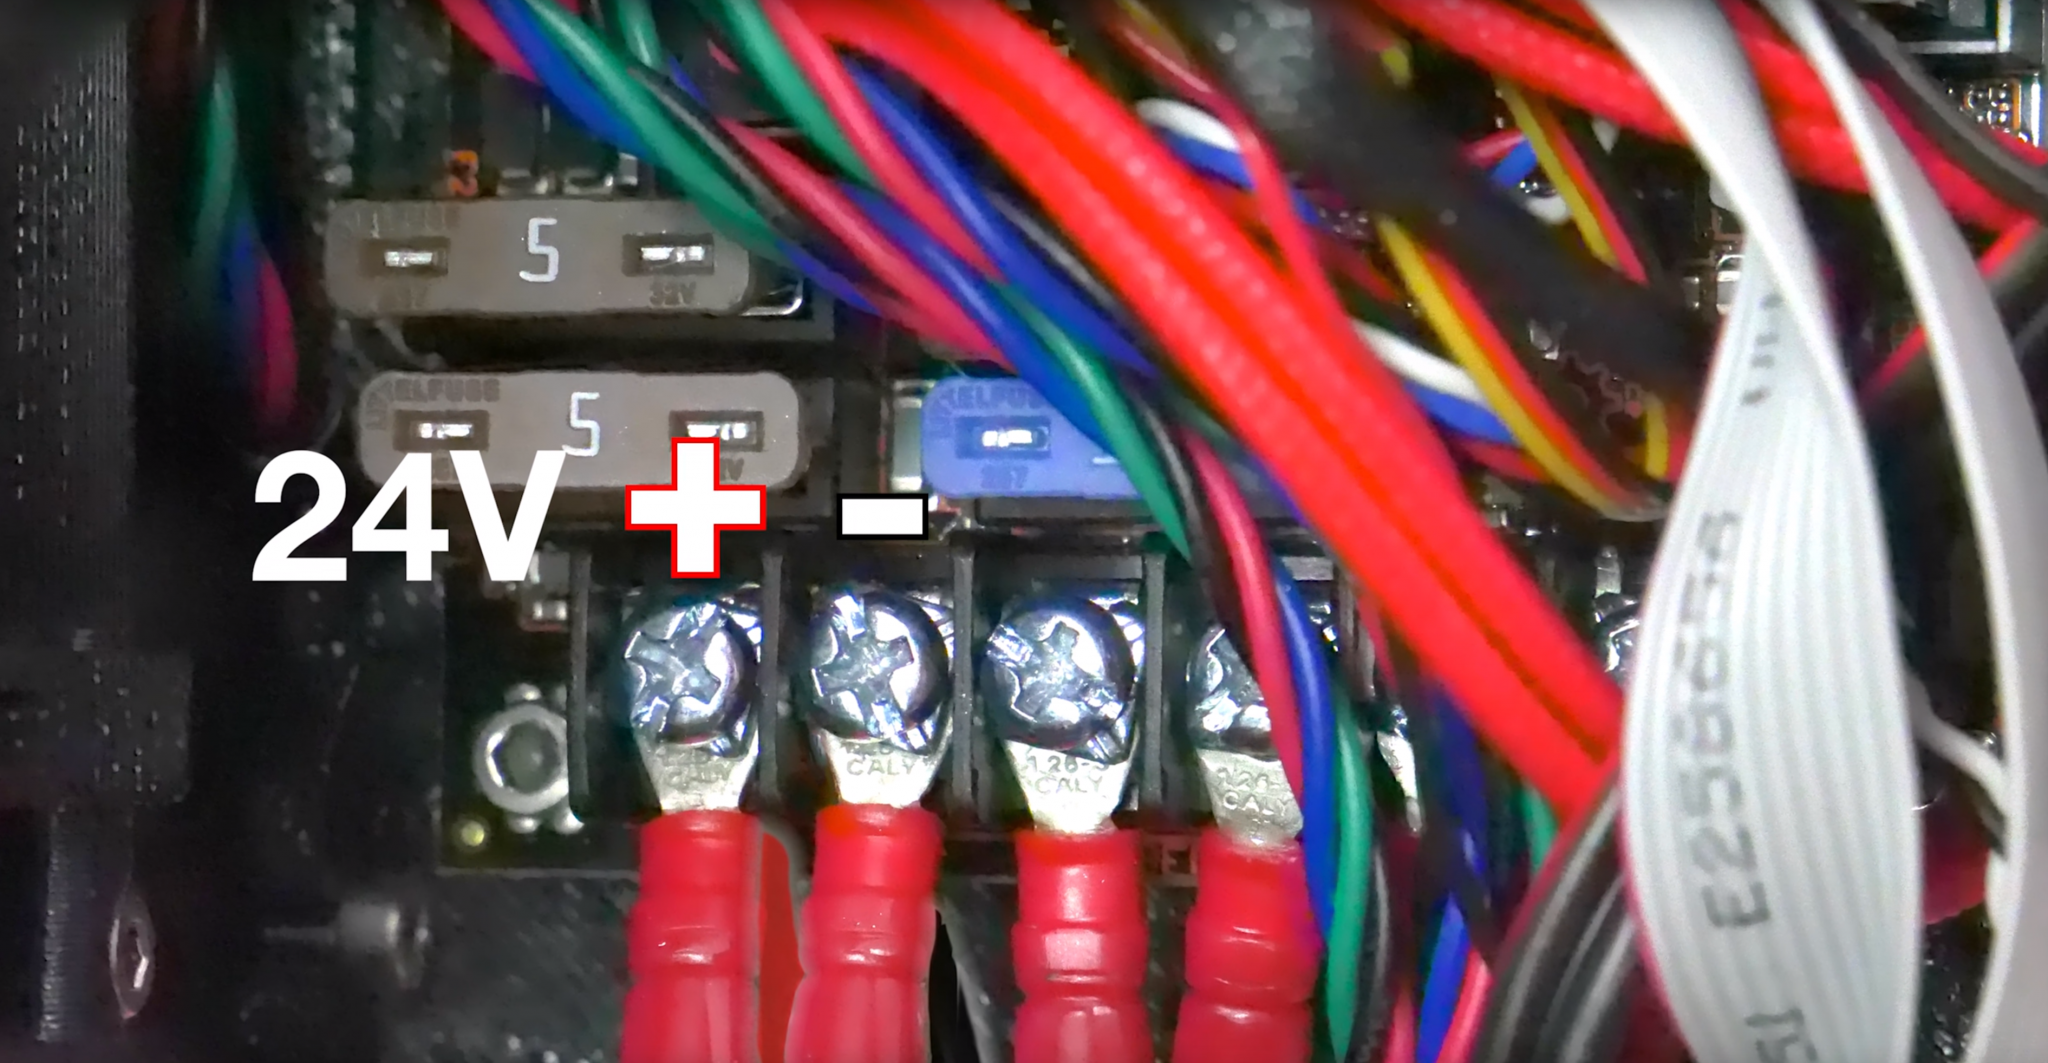 D strip with a power supply, like this one. However, if you’re feeling a bit adventurous and have some experience with wiring up electronics, you can power the LEDs directly from the printers power supply. Remember, that the MK3 runs on 24V, whereas MK2/S runs on 12V, so make sure you buy the correct LEDs.
Spool holders
Smoke detector installation
 Place the smoke detector in the rear part of the table so it will not obstruct filament insertion or won’t get in the way when you’re taking the printer out from the box.
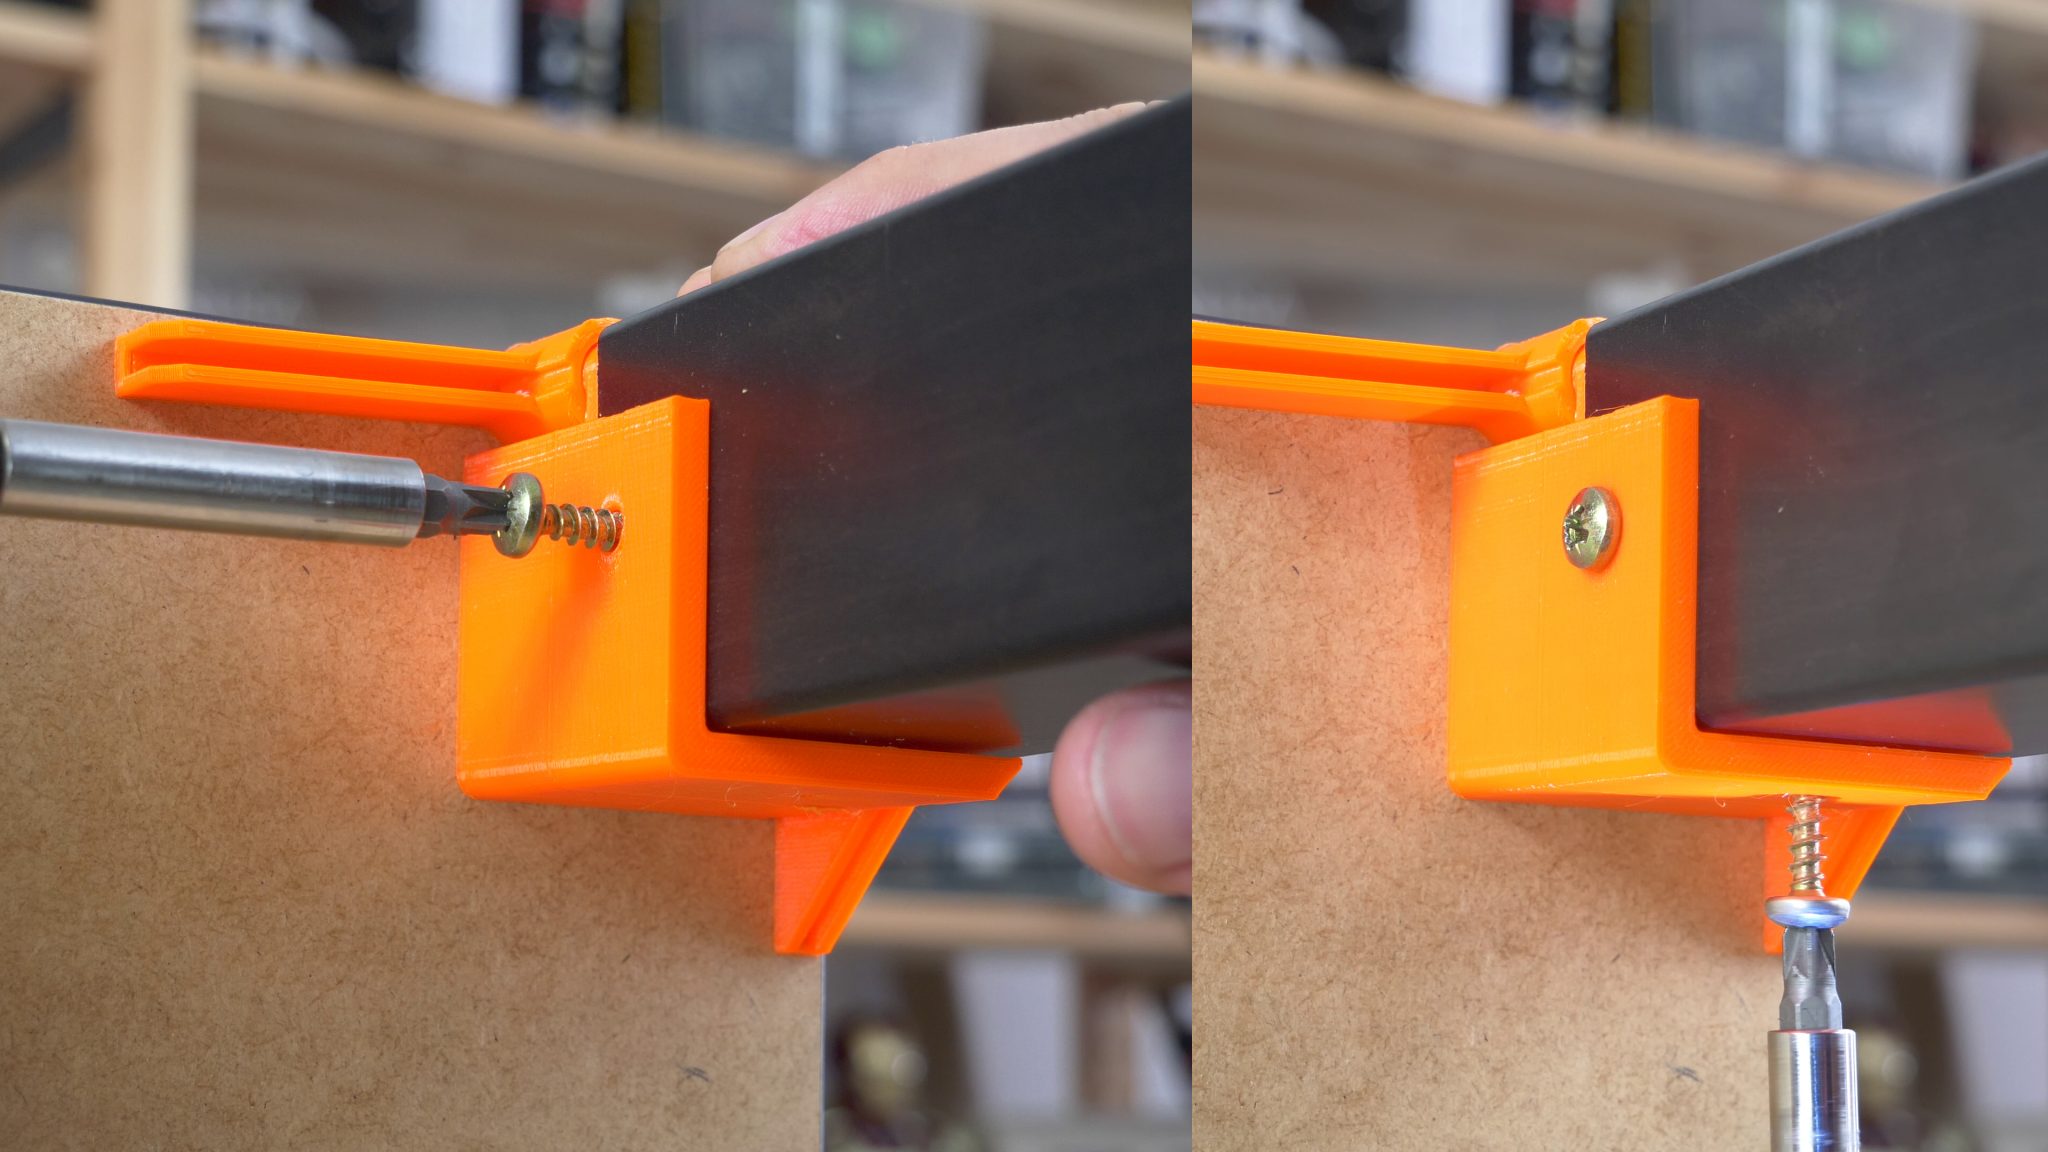
Bottom corner standoffs installation
Before you start screwing the bottom standoffs, make sure you place the Plexiglass in first. As soon as you tighten the standoffs, the Plexiglass will be fixed in place, and you won’t be able to remove it. This means you can easily lift this section of the enclosure without worrying that the glass would fall out. Note, that one of the four standoffs has a hole for cable pass-through. Make sure you place this standoff on the left side so that the cables can be routed directly to the EINSY board.

Support table (lower table) assembly
PSU holder
Electronics do not thrive in higher temperatures inside the enclosure. To preserve PSU in good condition, it’s better to place it out of the box. It is even safer!
- Unplug the printer from the power socket. Remove zip ties on the frame to release PSU cables. (Tighten the rest of the cables with new zip ties.)
- Disconnect the cables from the EINSY board. Do not forget to unplug the Power panic sensor as well.
- Unscrew the PSU form the frame.
- Hold the PSU next to the rear left leg (the one with the cable pass-through). Tighten the PSU holder printed part with two screws and then install PSU catcher printed part.
- PSU is now fixed, but it is possible to slide it out when you need it.
- You can replace the PSU on the frame with this printed part to ensure the rigidity of the frame.
Frame brace and right-angle cable cover
After removing the power supply from the frame, it’s possible to replace it with a printed part and ensure frame stiffness. The heatbed cables may hit the plexiglass in the back of the enclosure. To prevent this from happening, print an alternative 60 degree heatbed cable cover. (EDIT: Users reported several problems with the right angle one shown in the video and on the pictures below, so we switched the suggestion to the 60 degree one).

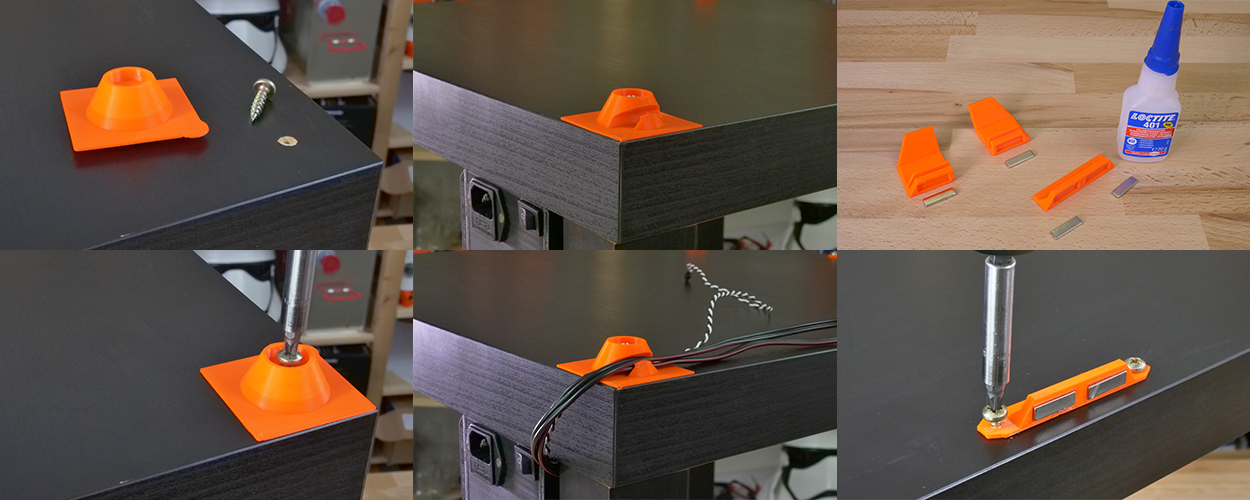
Plugs fixing and magnetic handles
Fix the four bottom plugs. One of them has a hole for cable pass-through. Place it in the rear left corner of the enclosure. Glue two magnets to the door stopper and screw it to the front of the table. Leave enough space for the plexiglass and the handles (1 cm).
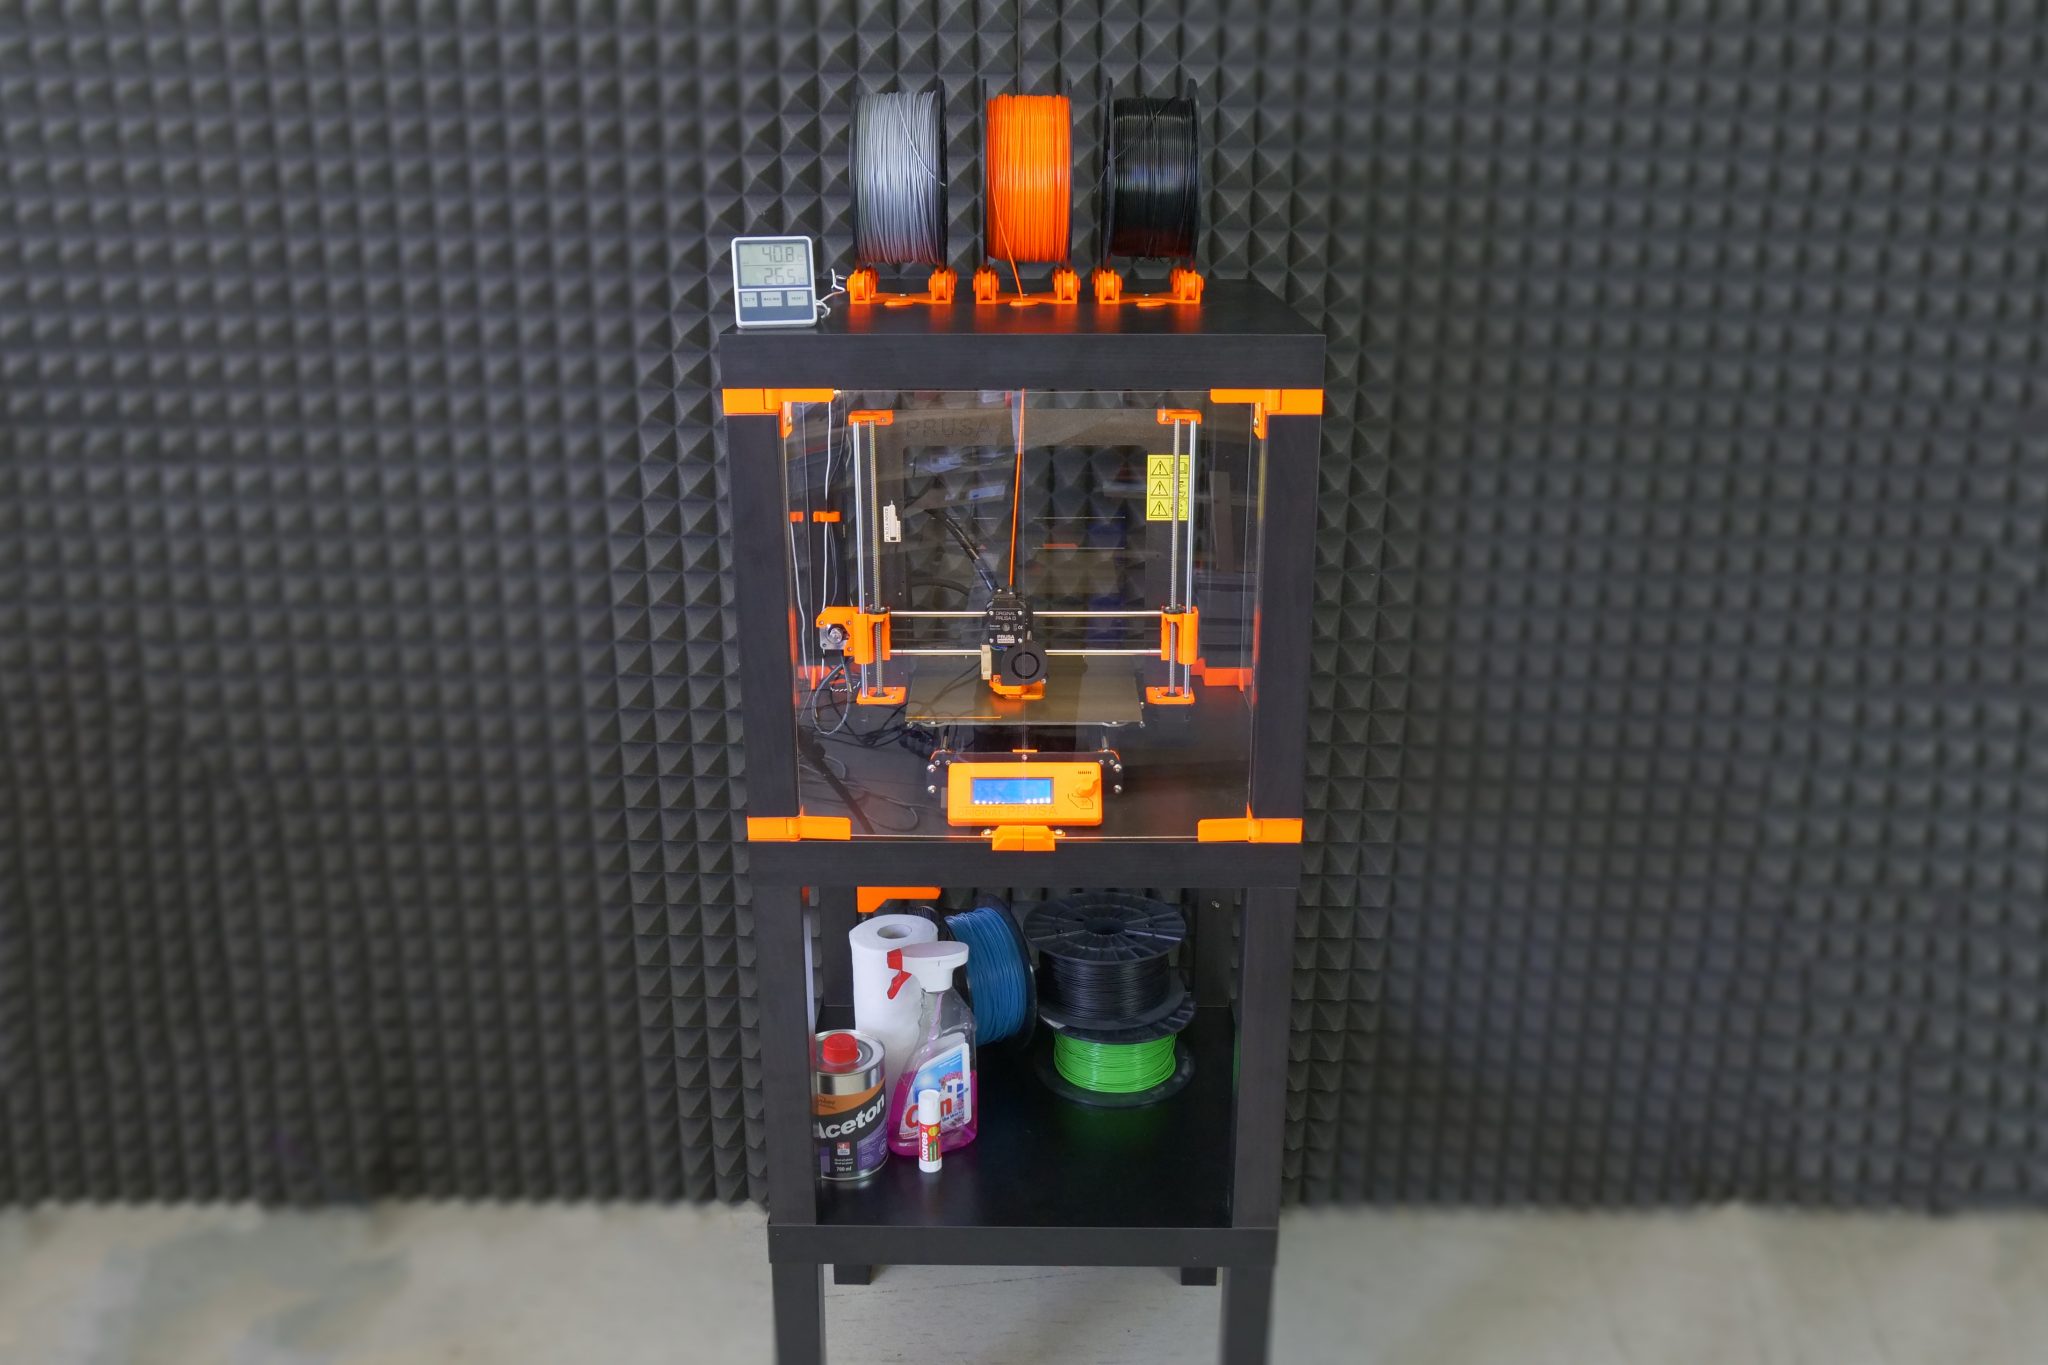
Finished enclosure
Now just stack the two tables on top of each other and the enclosure is complete. Optionally, you can add another Ikea Lack table to the bottom to raise the printer to a more comfortable height.
Amazing!
I am wondering about the electronic card (Rambo mini). Is it fine at 40 50 degrees or it would be better to bring it outside like the PSU ?
I am having the same interrogation, does somebody has an answear?
The hottest part of the control board will likely be the stepper drivers. I print in an an enclosure at ~45C and to give myself some peace of mind I put a 40mm fan pointing directly at them on the outside of the rambo cover with the slats in that area cut out. To power it I made a “Y” cable for the extruder fan connector and tied the rambo fan into it. That way whenever the extruder is above 50C (ie I’m about to/am/just finished printing) the rambo fan is spinning. I moved the power supply and display out of the enclosure and have been running that way for quite a while. Prints come out much better, especially large ABS parts.
I had this problem and solved it well by reading this article. https://klingeltonemp3.com/
You suck with your spam. Hope you fry your motherboard.
Are you selling the lack enclosure parts? 🙂
Well, you can print the plastic parts within hours from the comfort of your home and I’m sure you’ll find an Ikea nearby, no need for us to sell them, that’s the beauty 🙂
Be aware, with the ‘default’ Prusa software settings of 0.15mm build height and 20% in-fill, the entire kit of parts will set you back the better part of 40 hours to print!
Just so you know what you are getting in to. For the default PETG g-code files provided…..
The printed parts take 142 hours to print — if they all go perfect the first time. The longest part collection takes 20.57 hours to complete.
6 of the files are over 15 hours, so plan more than a week to print these parts.
Curious… how did you get 142 hours? Am I missing something because it was no where near that amount for me and all the file times don’t point to anything over 100hrs.
However, if you want to save time, purchase a 0.6mm nozzle and you will drastically cut down print times. For example, the corner print times were all 9-10hrs and with a 0.6mm nozzle they went down to a little over 6hrs. Many of the print jobs were reduced by 1-2hrs.
Excellent article! Does this Lack enclosure support the MMU v2?
The encloser looks amazing indeed. Regarding the MMU 2.0, I would be interested to know the answere as well.
I would also like to know if MMU 2.0 will fit.
Yes, same here. i would like to build it, but with the mmu2.0 upcoming i do not want to waste my money by having to rebuild it in different dimensions once the mmu2.0 is there…
Same here, would it fit and can you still put spool holders on the top of that table with mmu 2.0?
You guys (to all of you in this MMU 2.0 thread) are obsessed with the MMU 2.0 😀 If you order the MMU 2.0 now, chances are you’ll get it no sooner then by August or September, as stated on the product page.
That’s like 4 months from now. By that time the files for the enclosure might look completely different, we keep updating them as we keep finding places of the enclosure to improve. For example, Dominik has just changed the spool holders to be adjustable in width to take any spool size 🙂 We’ll upload it as soon as we finish testing it.
Yes, probably the files will be different, but i do not want to get the plexiglas in the wrong size…so the question is if the height of the enclosure is sufficient to use it with the mmu 2.0..
Exactly. I’m fine waiting for the MMU 2.0, not fine with paying $80 for plexiglass twice because it won’t fit.
If you know it will fit, let us know and we can order our plexiglass and enjoy the enclosure now. If it will not fit, we can wait for a new design before spending money on a four month enclosure.
Same for me. I don’t mind reprinting but don’t want to change all the plexi so I will wait before getting the right recommendations from the Team on whether it all fits on the top and we don’t need to change the height or if we have to have taller plexi
It does NOT fit!!
Put two Lack tables on top of each other, and you cannot fit the MK2 MM printer underneath 🙁
The PTFE tubes that carry filament to the printer point upwards before descending. You could force the printer under the top table, but that would interfere with the flow of filament.
Also, this design assumes that the filament is delivered to the printer from the top down, whereas the MM unit delivers filament from underneath the extruder motors, which doesn’t fit this design.
My plan, which I will try over the next day or so, is to have the printer sit on top of the top table, and then have the filament on the table below, using the filament rollers provided with the printer, but pointing backwards so the filament travels around the back of the tables. I *think* this will work.
Another adjustment I made (but not MM related). I bought three tables, but the overall effect was rather overpowering, visually. So I took the bottom table and sawed off the legs to make a 10cm ‘stand’. What totally surprised me (but is obvious in hindsight) is that the legs are hollow, so I needed to put something underneath the bottom table legs when it sits on the floor.
More ideas on thingiverse (mine included 🙂
Would you sell this enclosure already built ? 🙂
Shipping and packing cost for such a huge thing would probably make it really expensive, plus, it’s really fun to build yourself 🙂
Nice. I personally use a Ikea Stuva cabinet with a Besta Sindvik door. The printer fits nicely sideways when detaching the display.
That’s my set-up x 2 and it works well. I added some eva foam floor mats to the floor to help reduce the vibration and I have some thin metallic ‘bubble wrap’ insulation just in case. I’m thinking of adding some reptile heaters and independent temperature controllers to help regulate it.
The only thing of caution with any enclosure is that you are more likely to be printing ABS, which has fumes. It may be woth looking into building a air scrubber using some of the removable filters from an air respirator – plans available on thingiverse.
Compared to $8.00 each for the Lack Tables, $100.00 for the Ikea Stuva cabinet with a Besta Sindvik door, makes them very expensive. The Lack Tables also give you something to build and modify if you desire and a very low cost.
Stunning enclosure!
Couple of questions though, is it possible to add another spool holder, seeing as the multimaterial upgrade can use 4 different filaments at once? What would the measurements of the spoolholder spaceing be then?
Also, is any fire detector usable? Or are there special ones for 3d printing? Will a “normal” succesfull print using PLA or ABS trigger the alarm with its fumes?
We used just a normal smoke detector 🙂 And it didn’t trigger even after many hours of printing ABS.
And as far as the filament holders go, imagination is really the limit here. You could create either 5 holes on top for 5 filaments or for example create a continuous couple centimeters wide slot in the top. Then you can use the stock filament holders that you get with the MM upgrade or any other spool holder you come up with.
Is the screw size no 6 screws or 6mm screws (no 12)?
Thanks Mikolas.
Also certainly in the UK 2mm thick neo mags are tricky and all seem to be 1.5 I imagine at that levels it won’t matter particularly.
I ment 6mm in diameter of the thread 🙂
And as far as the magnets go, 1.5mm might even be better, the ones we used are super strong, almost too much for the glue that holds them.
#6 screws are ~3mm in diameter. I supposed I’m 3 years late but be more clear with your wording.
Mikolas Zuza, great build. Can we have the original models? The STL files contain too many parts and are bigger than my build platform.
Thanks!
You can split them inside slic3r using the Split button or in Meshmixer with Edit-Seperate shells 🙂 I can upload the separated parts, but this way, you’ll learn how to do it with any set of parts too big for your build plate 🙂
Hi.
That would be nice to know what part can be adapted to the MK2 (PSU frame brace) and adapt the heat bed connector for the MK2
Many thanks.
This looks like a very well thought out enclosure. I’d like to build one, but living in the US I have to convert to the illogical system of measurement for sourcing materials.
Here’s the conversions to save some else the trouble of doing them:
440mm is 17-5/16″
220mm is 8-5/8″ (erring on the low side, it’s actually closet to 8-11/16″)
6x20mm screw is #12 x 3/4″
6x50mm screw is #12 x 2″
The nearest Ikea to me is about 150 miles away, but it looks like they sell the Lack side table through their web site for $8 each. Shipping to me is a flat $9 if I order either 3 or 6 tables.
3mm thick plexiglass is labeled as 1/8 thick here, even though the actual thickness is 3mm (0.118″). Plexiglass here is sold in 1-ft increments, which works out well since 440x440mm is just under 18×18 inches. The local hardware store has a 36″x72″ sheet for $75 which would make 2 enclosures. I see a 2-pack of 24″x36″ sheets on Amazon for $35 with free shipping, enough to make one enclosure. Or to avoid any cutting, TAP Plastics will sell cut-to-size pieces for $40 + $20 shipping for the whole set.
Hey, this is awesome! I really appreciate your work. I’ll edit this info into the article 🙂
Could a link be provided? I’m having a Devil of a time trying to find Plexiglass that isn’t over $40 a sheet.
Super late reply, but for other folks. I found Allied Plastics in the Dallas, TX area. I got my plexiglass cut to size (all five pieces) for around $36. Not sure what they’d charge for shipping. Even with the conversion to inches it fits the enclosure.
For anyone currently looking to build this I found this site for the Acrylic sheets. They sell it in a kit already cut for this build only $55 and free shipping in the US.
https://www.printedsolid.com/collections/enclosures/products/acrylic-sheets-for-prusa-lack-enclosure
When?
#12 screws are the wrong size, as other have pointed out, these should be #14.
I found Tap Plastics as well and they seem to be willing to cut things to spec.
I’m wondering if you found those pesky magnets yet, though. I can find 20x10x2mm, but not 20x6x2mm
Here are the magnets that I sourced. I haven’t received them yet, but they appear to be the correct size.
4x Neodymium magnets 20mm x 6mm x 2mm $2.44
https://www.kjmagnetics.com/proddetail.asp?prod=BC41
I don't know why I didn't think of it right away (maybe it was too obvious?): You can get the magnets on the prusa site!
Check it out: https://www.prusa3d.com/product/set-of-magnets-8pcs/
Going to try the 20x6x1.5mm magnets from GuysMagnets dot com.
Hey James, I have the same issue with Ikea being so far away, Walmart for me actually has the same table, except their brand. I have about 4 of them currently and they look the same as the Ikea ones. Same price too 🙂
Walmart – Mainstays Parsons End Table ($10)
https://www.walmart.com/ip/Mainstays-Parsons-End-Table-Multiple-Colors/47827019
So does this kit fit those tables? Also, how about the plexiglass, is that the same dimensions?
I tried replacing the IKEA lack screw that where originally install with #12 x 2″ but they would not secure tightly. A larger diameter screw, closer to the original lack screw diameter, would be better. You can also try filling in the holes with some wood filler or plug the holes with some scrap wood to get a tighter fit. Also if you cannot find #12 x 3/4″ for the smaller screws, #10 x 3/4 would work well too.
I used toothpicks and a dab of wood glue..
I ended up using #14 x 1 3/4″ screws for the upper corners and they worked perfectly. My local Lowes was out of #14 x 2″ so I decided to try the slightly shorter ones and they worked fine.
I think the material list in the directions should be updated to #14 x 2″ since they are the proper diameter.
^this. The #12 is not accurate please adjust the original post. I have to go back to the hardware store now….
Agreed. #14. I wish I could easily get Metric here in the US but they are impossible local, have to order everything.
I think the $35 plexi 2 pack you found on Amazon was .03 mm thickness not 3 mm. not the 1/8″ or 3 mm. That 2 pack is $50.
James, this was super helpful! Thanks a lot for pointing me to TAP plastic. This saves me a ton of time and effort.
This little book you may find very useful we use it a lot in the UK
cheers jimrat
sorry doh for got the link
https://app.box.com/s/4ulzu8egtjin3etmkyj5
jimrat
Thinking about building one of these, it occurred to me that a 4th table added to the stack and also enclosed with plexiglass could perhaps serve as a dry box for hygroscopic filaments. You already have the filament holders positioned on top, so this seems like a pretty minor change. Do you think this would be useful, or are the gaps around the edges of the plexiglass too loose to keep humid air out?
I was thinking about it too.
The gaps are imho too big to keep the humidity out. They are there on purpose in order to avoid reaching way too high temps. That said, I can imagine it would be easy to either place one of the Ikea Samla boxes that people use as dry filament storage on one of the floors of the Lack enclosure stack. Or maybe sealing the gaps with a silicone or something like that. But that would probably make it so that you can no longer separate the two tables.
This little book you may find very useful we use it a lot in the UK
https://app.box.com/s/4ulzu8egtjin3etmkyj5
cheers jimrat
Not trying to be “that guy”, but I think it is super cool that you, as a company, though about selling an enclosure but then chose to design a really well thought-out version that you then offer freely to everyone. I have so much respect for this, thank you very much.
Is it possible to get the source files? I only have 4mm plexi and it‘s already cut to the right size.
I have uploaded dxf and stp files on thingiverse;)
https://www.thingiverse.com/thing:2864118/#files
When you are done with redesigning it would be nice to share it the comunity. If you would be willing to, we would like to place it in to the article as well;
Why STP, I’m an OpenSCAD programmer and would like to be able to modify the files. I’m also a Linux user, so limited in access to several CAD programs.
Is there a way to adapt the “Frame brace replacing the PSU” and the “Right angle heatbed cable cover” to be used on an MK2/MK2S
Many thanks
I’m in the same boat, I can’t use the Frame Brace replacing the PSU on my MK2.5.
I want to know this also. Have the MK2.5.
Printing and sourcing all stuff for this right now.
I’ve updated the article with the links for a PSU brace and alternative heatbed cable cover for the MK2/S
Mikolas,
I just recently assembled the i3 MK3S+. This one has a BLACK PSU.
WIthout any modifications, the power switch sits, when mounted to the print at the back in the small side.
Your PSU Holder always ref to the silver one, where the PLUG and switch sit in a printed part and on the broader side of the PSU, which a 90° different to the black vovered PSU.
So I feel the provided PSU catcher printed part is useless and I am not sure if the PSU holder printed part ( which I am printing just this minute ) is correct.
As a result, I am confused.
can you help, please?
Too bad there is no ikea supplier where I live.
Duke,
no IKEA in the country you live in or just NOT nearby??
I am asking, because IKEA has an online ordering and shipment option.
have success
Would it be possible to get the scad files? I’d like to use the 8x3mm magnets left from my extruder visualizer .
Hi, I am sorry, no SCAD. Rhinoceros was used for the design. But .stp and .dxf files are placed on Thingiverse as well:
https://www.thingiverse.com/thing:2864118/#files
Would you please provide the file for the spool holder?
All the main parts are on:
https://www.thingiverse.com/thing:2864118/#files
or go for:
Adjustable spool holder:
https://www.thingiverse.com/thing:2867521
How is the vibration on the 2 lack tables? I’ve been using a paver stone (1.5″ thick) to get rid of any vibration and has worked well for me so far.
Though the files as is, I had to play with the Z-axis scale on the individual corner pieces to get a height that would compensate for it. I am wondering if I should be go with the stone in the enclosure or not.
Mikolas Zuza, awesome design.
Is it possible to get the spool holder for 750G spools? (200x55mm)
Thanks!
Adjustable spool holder:
https://www.thingiverse.com/thing:2867521
Any risk of the frame brace softening up in the enclosure if it’s printed in PLA?
It would be great if you could design up a system that works with the MK2s with MMU. I printed out 3 sets of legs I found on thingiverse before I gave up. Doesn’t seem like there is much out there for the current MMU
The inclusion of the smoke detector is causing me to wonder if building an enclosure significantly increases the chance of a fire. Is this indeed a significant risk increase or are you being extra careful?
We’re just being extra careful.
We hooked the LEDs to the printer’s PSU and there’s nothing wrong about that, but the user could possibly make a mistake at this step, short the board out or something like that. So we thought having a smoke detector in really can’t hurt.
cant find pictures of how you hooked op Led’s to PSU
It’s best visible in the video at 3:48 🙂
I’ve updated the article, so the same picture from the video is now in the LED section of the article.
Well, it’s advised to have a smoke detector above or near your 3D printer even without an enclosure. I am not aware of fires with Prusa machines but I am sure it must happen. Certainly I have seen posts about fires with cheaper brands of 3D printer. In some ways, an enclosure actually reduces the chance of a fire, as it makes it much less likely that flammable materials could fall or blow onto the printer, or pets interfere with it, etc.
Is there a smaller version of the spool plate to fit thinner spools? Thanks in advance.
I am already working on the adjustable version. Now the test print is being done;) Hold on…
Adjustable spool holder:
https://www.thingiverse.com/thing:2867521
You rock. Thanks for getting that up so fast.
What happened to this model?
It’s really cool. But, it doesn’t look tall enough for the MMU 2.0 upgrade.
You will always be able to place the MMU 2.0 with the spools outside on the top, and lead inside just the bowden tube 😉
Hello, could you give me the measurements of the wood of the table? so I make them; I do not have access to an Ikea LACK. Thank you. Sorry for my bad English. I am from Argentina. It would be nice to find these tutorials as other information in Spanish.
Hi, Ikea Lack table Product dimensions can be found on their websites;)
https://www.ikea.com/us/en/catalog/products/20011408/
I was referring to the thickness of the wood; both the legs and the base. Because they do not give me the measurements of the area where the plexiglas goes. Thank you
Hello Everyone! We have a team of highly trained and experienced writers from all over the world who provide excellent assignment writing service to students, GetAssignmentHelpOnline.com is a saviour for students who are sailing in the waves of assignment problems. Take Assignment help online from us and avoid hampering your exam scores.
Nice design. I’m successfully printing my first ABS design after a couple of failures without an enclosure. A couple of comments:
1) I’m getting an internal temperature (measured at the top of the enclosure) of about 20 degF (7 degC) over ambient. This is a designed, without trying to fill the gaps between the plex and the frame.
2) For us US types, #12 screws are slightly too small. 1/4″ would be better.
3) After cutting the Plex it may relax so that it is not perfectly straight. If it bows, make sure the bow on both sides of the doors match.
4) If you are just putting the enclosure on a desktop (see pix below) all the cable lengths are already long enough (just).
A couple of picture of my enclosure on a Jerker desk here:
The link to my ftp site didn’t work, try this for the pictures: http://www.porcine.com/prusa3d
(moderator – you could just add the link to my original post)
Thank you for all the work – looking forward to building this out. One question as I haven’t started printing, but do you think the enclosure brakets are stong enough to hold 3mm (1/8″) glass vs plexi? Thinking of using glass as a less cost / better noise suppression – I can get the glass cut ~$44 USD.
It should be strong enough to hold it. That said, normal glass is way more fragile, so watch out for that. You could probably get away with thinner glass and just something to fill the gap between the printed parts and the glass.
Where do you buy these Neodynum Magnets?`
I find them in all sizes but not in 20x6x2 =/
Fine way of telling, and pleasant article to take information about my presentation subject matter,
which i am going to present in school.
Had to redesign the placement of PSU. I had to put it on left back leg instead of right wich ment so redesigning of some parts. Because my cable from PSU to einsy board was so short it barely made to its original placement on mk3.
https://imgur.com/a/0hEKi
any chance of sharing?? im running in to this issue too and its driving me nuts
Has anybody else tried running XYZ calibration with the new heatbed printed part? Mine collides with the cable bundle during calibration, with so much pressure that it flexes the bed and the printed rods. I strongly recommend against using this until someone from Prusa can weigh in on this.
Could you please describe a bit more which 2 parts collided with each other? I passed XYZ calibration just fine, I also ran over 48h long test where the bed violently goes back and forth to ensure this part won’t break the cables.
I have this same issue. During the setup wizard it will crash into the right angle connector on the back left corner. It also bends the bed. I had to remove the cover to be able to complete the calibration. After calibration was finished I put it back on but there is hardly any clearance on the back left calibration point.
Oh God, so I wasn’t the only one. On the Mk3 I was unfortunate enough that the jagged edges of the middle screw hole absolutely ruined the textile sleeve on one of the heater cartridge wires. Be very careful with this part, file it down well before installing it.
I raised my cable bundle as much as I could – I had to remove the zip tie that held the cables together from “factory” to achieve a better fit. It still touches but not violent enough anymore to move the bed.
I would add this info the blog post. That part is just too tall, I thought about trying to cut it down in Meshmixer but I haven’t gotten around to it.
OK, I know believe this is also related to the original firmware that is shipped with Einsy. If you update to 3.2.0-RC1 from github then the XYZ calibration process is different(has been since 3.1.4 according to changelog but the download page gives you the 3.1.1 version). With this new process it seems to not ram so hard into the bed.
Nice Work ;D
Scheduled as next weekend project.
Just a short question:
Is there a glass plane on top of the tabletop right under the printer ?
Reffering to the last picture of the picture group shown at PSU holder.
No, there isn’t. But it kinda looks like there is, right? The table is really glossy, so it mimics the look of a glass on top a little bit.
This is wonderful, I’ve been looking for a sleek version of this, and it blows so many out of the water with all the tweaks you’ve made!
I’m wondering if it is possible to make latches of some sort to hold the top more secure until you are ready to remove the whole piece or if it is necessary. I’m primarily building my enclosure to keep the MK3 and my cat safe from each other, and he’s likely to jump on the very top of the case despite what I do.
I’m still very new to printing, so I’m not sure how I would go about designing something. Any tips or help would be very appreciated!
Anyone wants to source the Magnets I found them here https://www.umagnets.com/p/20mmx6mmx2mm-thick-neodymium-block-magnet-n35-thin-magnets-super-strong-rectangular-rare-earth-flat-magnets-20-x-6-x-2mm/?attribute_pa_pack-of=pack-of-20
The real MVP. Thanks bud, the search has been driving me bonkers
So this place has AWFUL reviews – all 1-star reviews on their Facebook page of people never getting their order after months and no response from customer service at all…. Ouch.
I ended up ordering these (1mm short on the width, so 20x5x2mm) from eBay – exchange rate to USD wasn’t bad at all. Ordered two sets, one for myself and a friend and shipped them together.
Here’s the link if anyone wants it… https://www.ebay.com/itm/4-x-Pc-s-Neodymium-Magnet-20-x-5-x-2-mm-Magneten-Stabmagnet-Magnete-Neodym-NdFeb/152993701542?hash=item239f229ea6:g:reIAAOSwo~1aydBv
Made and extra edition to the enclosure.
Fabricated a drawer
https://imgur.com/a/YI5RzyS
I ended up buying my plexiglass cut from Liard Plastics in the US – they have locations all over so you might get lucky and have one nearby.
I’m picking it up in a day or two and it only cost me $42.40 for the material and the cuts all together with tax out the door.
https://www.lairdplastics.com/
Hello Dominik and all the geeks 🙂
I am receiving my 1st 3D printer in a couple of weeks (so MK3) but have the MMU2.0 also ordered. In order to help me waiting, I wanted to get started with some of the orderings (Ikea, plexi, magnets, …) but I don’t understand yet what would be the modification required for the MMU 2.0.
If I understand we will not need to have a taller height and that the MMU will be installed on top of the LACK table. Therefore only the “bowden tube”
will be going through.
How can the 5 spools and the MMU fit on the top and is the length of the tube long enough to cope with the table extra width?
Any picture or more precise explanations would be fantastic.
MERCI
XabiX
I ordered the fabric one from the aliexpress link, but the printer doesn’t fit in. The description even says 40×40, but the printer is more like 55*40*60 cm with the bed in the back and a spool attached :/
I’m really sorry, that’s my mistake 🙁 I was hunting for the cheapest one and I missed that it’s 40×40 instead of 60×60 🙁 I fixed the links now.
Same here… I just received mine to find out it was too small for my printer. I just order a 60cm x 60cm x 60cm. I’m sure I will find something to do with the 40cm one 🙂
The dimensions for the plexiglass are not 18” x 18”. The corrct measurement is 17.323” x 17.323” and for the doors is 17.323” x 8.66142. Unfortunately, I did not do the conversion before I had the plexi glass cut and took it for granted the 18” x 18” was the correct size.
Hello,
I’m building the ikea enclosure described here and I’ve found a big issue with it:
– First, the right angle heatbed cable cover for the MK3 causes that the extruder wires crash with the heatbed wires. So it requires use the original cable cover for the heatbead at calibration point number 9.
– The PSU cables are too soort and the oposition of the printer inside the enclosure is bottom left. This causes that the heatbed cable crash with the bottom metacrilate pannel. The only way to fix this problem is make a hole with a grommet and pass the PSU wires trought it.
Hello ,,
Many of the printable parts use PET,, Can i Replace those with PLA?
Hi,
Really nice, i’m on it !!
But why do you use a 3mm drill and a 10mm.
Is that diferent hole, or just a dredrilling to avoid some problems ?
Thanks
Drilling with a smaller drill first prevents chipping of the wood (mdf) that the Ikea Lack is made of 🙂
Hi, thanks for your efforts here. I’m anxiously awaiting my new printer from Prusa!
Can you give me an idea how much filament is needed to print the Lack Enclosure Main Parts?
Hi Mikolas,
I made https://www.thingiverse.com/thing:2890592 “Prusa i3 MK3 60 degree heatbed cable cover” since the one linked in this article (https://www.thingiverse.com/thing:2837970 “Right angle heatbed cable cover for the MK3”) will damage the extruder cables in case the hotend is moved to the upper left corner. If you like it you could recommend that one instead (I have read that some people have already damages their extruder cables).
Thanks, I’ll add the link to the article, it looks good! 🙂
Hi
Are there separate STLs available for the variable width Spool Holder components please because when I print the base slide assembly it always prints stuck together, and I can’t separate the parts.
Mark
Can you advise a specific model smoke detector (NL/EU area)? Bought one in the local shop but manual states operation temperature must be between 5 degrees and 38 degrees Celcius which obviously makes it useless in an enclosure like this. Been searching for an hours or so but only found 1 sofar that seems to do the trick temperature wise (Hagar TG600AL) but unfortunately that one needs to be mounted 50cm or more from each side….
Out of options?
Do you have separate stl files for every piece of the table?
Some of them haven’t been printed well and I want to re-print them
You can split them into individual pieces in Slicer with the “Split” button or in Meshmixer with Edit-Separate shells 😉
Will this work for the MK3 MMU
Do you have a link to the “PSU Holder” part? I can’t seem to find it on this page. Thanks!
It’s in this pack of the enclosure parts linked in the article 😉
https://www.thingiverse.com/thing:2864118
got it, thanks!
Is there a fix for the mk2s power supply? The bracket that holds the mk3 power supply won’t work since the mk2s power supply has the cables coming out of the top instead of the back.
Just built this. The PSU Wires are NOT long enough. I have them as tight as possible and it still isnt good. The 60degree bracket will hit the plexi. If i switch the the 90 it might work but it leaves the psu wires under constant stress.
I have an MK3 and the PSU cables are too short? Has anybody found a solution?
I made a similar enclosure and tried to print polycarbonate at 290 degrees. The thermistor inside was showing 40 degrees but the temperature around the extruder was probably higher and the part that holds the pinda sensor slightly deformed. Fortunately it still works (I only had to adjust the Z offset) , but I do not recommend going to high temperatures with PETG parts.
I had to change the cables from PSU, the original ones where too short. Fortunately both ends are connected to screw terminals, so it is quite easy to replace (sure you need to disasemble the PSU cover). But I would recommend to use at least the same cable crossection (I went from 1.5mm2 to 2.5mm2 to be sure) and also use proper crimped ferrules at the ends. Not everybody has got the proper tools at home, but it is worthy to ask somebody well equipped. I am talking here about 60cm cable instead of 45cm. Going with much longer cable will already affect the voltage significantly.
With the MMU2 you can print this: https://www.thingiverse.com/thing:3389853 And then it should fit inside all in one piece.
Due to the fact, that the new black PSU has a width of 106cm (instead of 100cm old version), I’ve created a new PSU holder:
https://www.thingiverse.com/thing:3658088
I mean 100.6 cm 😉
no 106mm^^
Thank you!! I don’t know why no one else had this problem!
Really wish I saw this before printing the part and taking the psu off to find out it doesn’t fit
Had the same problem.
Mikolas: Can you update the article with the alternative files please?
I’ve just wasted a print run to find that the PRUSA part is 6mm too small for my PSU!
Now putting the PSU back together so that I can print a replacement. :'(
This is another nice alternative that I found.
It’s a bit more rugged and includes a cable guide so the cables can route straight down.
https://www.thingiverse.com/thing:3512467/files
And a 4mm spacer used for shorter LACK tables: https://www.thingiverse.com/thing:3658264/edit
I think there is either a typo or a change in the lack tables. I bought the #12 x 2″ screws, in a round head and they were not large enough.
I had to use #14 x 2″ in order for the mounts to not rotate when installed. Just figured i’d share.
I just received my MMU2s and I want to know if you plan to update this tutorial to adapt Ikea Lack with MMU2s? I would like to be sure before starting my project.
Hey! thanks for sharing informative ideas, I liked this post, after reading this article I have an idea to make a 3D printer (https://www.hpsupport365.com/blog/7-easy-hacks-avoid-hp-printer-offline/) at cheap cost.
Have a good day!!!
I built this enclosure for my MK3S. I was hoping that printing PLA in a warm environment would help reduce warping but I found that the extruder clogged (filament kinked between the gear and the PTFE tube) when the enclosure temperature reached about 35C. I am wondering if anyone else has had a similar experience or if this an issue with my printer?
From the top of this article:
“You might actually want to keep the enclosure open with, for example, PLA to ensure there’s enough cool air around the printer for the part cooling fan.”
Keeping it open might also solve you issue.
Thank you for a wonderful idea. Although I will probably rebuild this enclosure out of lumber in the near future since the lack table is literally a cardborad not even a particle board. Quick question is there a remix for PSU cover that goes on top of the terminals. Since PSU is mounted upside down the cover does not fit right anymore.
Should the parts be printed with PETG or PLA? I have a spool of Prusa Orange PETG, but I read from Thingiverse page that at least the PSU replacement part should be printed with PLA to make it strong enough.
Did you get an answer to this question?
This is really good to see, I want to add something on that. If you are using 3d printer and the printer not compatible enough with your system then while you are using this you might be face some problem of Softwares. Like when I was using without checking the compatibility then the iTunes automatically got uninstalled and then I need to go through https://itunessupport.org/blog/why-cant-install-itunes-on-windows-10/ for the best solution.
When searching for enclosures, this is still the number 1 article showing up. I see it’s been updated in the past, so it really needs two things updating in it now: Firstly the PSU-replacing bracket is only suitable for the SILVER version and there is a different bracket for the newer BLACK version (I’ve gone and printed the one in this article but it doesn’t fit), and secondly there is an updated version of this enclosure that has a more refined design and is compatible with the MMU system at https://blog.prusa3d.com/mmu2s-printer-enclosure/
Really cool Project!
I printed the first parts today. But I noticed that the cones have some slack (about one millimeter) in the cone shaped holes. Is this intended? Or did I do something wrong?
I used Prusa PETG with 15% infill and 0.15mm height from prusaslicer with all other parameters to default.
Cheers
Volker
In the process of making the LACK enclosure now – super excited!
One thing I noticed – the screw size designation may be a little undersized for the table leg holes. I couldn’t find any metric wood screws (I live in the U.S.) so I opted for the 12 x 2″ wood screws. The threads barely bite into the table top’s holes, and it seems the screws bottom out. Not sure if IKEA changed hole size or if I misread the screw size, but I’ll be going to Lowe’s later with the IKEA screws to compare sizes with larger screws. I’ll look to bump the size up to a 14, and reduce length to a 1-3/4″.
Has anyone tried designing an enclosure that keeps outside airflow going to the fans (so it can also be used for PLA)? I can’t be the first to think about it and there must be a reason it’s not done… Maybe it causes too much air to be moved inside and defeats the purpose even though there’s no direct path from the printed part to the cooler outside air?
My design would have folding flaps (or maybe something like dryer tubes) that have springs trying to pull them up and the z axis holding it down. It would also mostly be a tube straight down with a separator down the middle to keep the hot air away from the intake cool air.
hello, i have the ikea lack assembled, but I find it a bit weak… wabbling, anyone have ideas to make it more stable? i’m worried about vibrations while printing.
legs are very well tightened.
Finally built mine a few weeks ago. Ended up buying some pre-cut plexiglass from Printed Solid that was advertised to fit this. Well, there’s nice 1/8″ – 1/4″ gaps all over the place. Not too thrilled about that, but whatever.
The one thing that drove me absolutely nuts was the horrendous noise the spool holder rollers would make. Sounded like a wagon train was continuously rolling by. I printed out new wheels that take bearings (https://www.thingiverse.com/thing:2962209) and purchased a set of bearings (608-2RS 8x22x7). Infinitely better now. I’m surprised no one else has brought this up.
After putting this together im quite unhappy with both the design and myself. Its easy math and I felt I should have noticed before starting the whole thing. The tables are 550mm x 550mm. The legs are 50mm x 50mm cross section. So with plexi glass at 440mm that leaves 10mm gaps all over the place. The printed slots that holds the glass arent even flush with the table legs and add about 2mm witch they didnt have to if designed properly. Im sorry, but making cheap stuff that look cheap isnt fun. Would not recommend these parts for people looking for an enclosure.
Im sorry for my previous negative attitude. Why cry over somthing you can fix…? So I made som gap fillers which made my build quite nice! Thanks
https://www.thingiverse.com/thing:4100738
How do you attach a third table? (Where you write, “Optionally, you can add another Ikea Lack table to the bottom to raise the printer to a more comfortable height.”) It doesn’t appear you used any printed parts for that – do you recommend glue, screws, or some other method? I’d like to be able to deconstruct the tables for when I move again.
First of all, I’m quite happy with the enclosure but better is allways possible:
– when you screw the parts together remove them again and grind the cumulated matrial.
– do not use srews with a countersunk. This might “center” the parts out of position.
– use threaded bushings for the pillars.
– in addition use glue like Pattex for all parts.
– the exit for the cables is only on the right back side. It would be nice to have it on te left side as well.
– IKEA has also nice LED sets with powersupply and switch for very little money. (they are 24V but I prefere to keep it seperate from my MK3S
regards Nicolas
To be honest I’m annoyed as hell with this. I’ve printed all the required parts, gathered materials and in the middle of building it seems that this was not updated for MK3S at all. HeatBed cable cover doesn’t fit, holder for the PSU doesn’t fit, triangle that holds the frame instead of PSU doesn’t fit… I get it that it might require some time to update the designs etc. but AT LEAST IT WOULD BE NICE to write an short info on the top that the update is in progress and some parts might not fit…
The way you explain things overhear is pretty cool and i going to try this for sure. Thanks for share these kind of blogs because it is valuable for user like me. (https://printererrorstate.com/hp-printer-in-error-state/)
As others have said, the screws in the US are wobbly – I’m going back to Home Depot to get four #14 x 1 3/4″ screws to hold the legs to the top table.
Also, your bill of materials mentions twelve #12 x 2/3″ screws – that will be enough for ONLY the top – you need 2 of each one for each leg to the bracket, and then 1 for each leg, leaving nothing for the spool holder, bottom part, or the clips, or if you want to relocate the power supply. I suggest changing the parts to reflect the #14 screws (which I haven’t tried yet, but read from comments) and adding 20 more of the 6 x 20mm screws (#12 x 24). I’ll try this out later, I hope my acrylic was cut to fit properly and looking forward to this design – thank you.
Wishing I had seen this before heading to the hardware store. You are spot on, hopefully the page will be updated to include this information.
Thank you, gary-2
I found IKEA Lack tables on the web. It says that they are 55 cm in length, but my printer with its moving bed already takes around 60 cm of space. Are there multiple versions of the table?
it is the reason for the new heat bed cable cover, it reduces the space by a few cm
is there any one who has success with having glass on both the middle and the top lack table, it seems to me that it would cause issues with the psu
Is this still up to date?
According to the comments, this build does not work for the MK3S nor its PSU. ( short cables etc)
Hi, works except for the heatbead cable cover and the PSU-holder.
Also, some genius designed the adjustable spool holders wrong. Keep that in mind.
Catch 22: I need the enclosure to regulate the ambient temperature in my hobby room. I can’t print the parts because the room is too cool. So I have opened the window, covered the AC register and turned on a space heater. Wish me luck!
I hear you! I need an enclosure to print my enclosure. 🙂 I ended up using a bed sheet to make a “tent” around the printer. Part of it is tacked to the wall. The rest is carefully arranged or propped so that it isn’t resting on the printer much. There is a small opening so some air can escape that I hope will keep the PS from overheating. So far it’s been working well. The temp inside the tent is warmer than the rest of the room and I haven’t had a job fail yet. We’ll see . . . 🙂
Will this suit the Prusa Mini?
Looking forward constructing this when my Mini arrived 🙂 Could not think why it should not work. There should be less parts to print too, since it has external power supply that can just sit somewhere. Might do one spool holder at first to get going faster, and add another level also afterwards.
I myself jumped the gun and started getting the parts and screws before getting the printer. Once I got it, I printed the parts, and started assembly, following the instructions on this page. But, like a lot of us, run out of screws, and though this has been reported going back a few years, the page is still not updated. Seems Prusa is no longer looking at this page.
My issue is that the doors Plexiglas slide off the mounts. The instructions do not address this, and I was not able to find comments on the doors. Anyone had issues with them sliding off? I am not sure if I should glue them, or drill holes and bolt them to the swing mounts.
https://www.prusaprinters.org/prints/36286-lack-locking-hinges-knobs
cool
isn’t it a problem for tall prints that the side spools feed the printer on the extremes, and not in the center?
I live in an apartment in Manhattan and just want an enclosure, or have someone build it for me.
Can someone either:
a) sell the whole completed thing,
or
b) sadly, supply all the printed parts, and I’d have to hire someone to find all the other parts, screws, acrylic.
Check out 3D Sourcerer on Facebook. We’ll have something like that in a few weeks
After anxiously waiting for months I finally received my Prusa MK3S. Was anyone successful in making this enclosure work with the MK3S? If not, were you able to find alternative options?
Thanks!
Hi Dominik
First great work thanks.
Are the files as well available for the Prusa Mini? The combined printer files are to large arranged to be printed on a Prusa Mini ;(
Thanks Rene
Is there an Update of this article which regards remixes and other fixes?
I will soon get the MK3S and then build this enclosure…
I just built the half of this enclosure for MK3S. Half meaning only the top part (I keep the printer on a desk) and using only two plexi on the back and on the left. It takes so long to print the combined files provided here, so I printed the parts one by one. I also printed the cable clips but I decided to not use them, I think it is easier to use traditional cable clips with nails. Also I made only a single hole on top for the filament, and using the TUSH spool holder (on thingiverse) with ball bearings.
I mounted a 40cm LED panel from IKEA which works quite nicely. I also mounted a (smart) smoke detector which turns off the power plug the printer is connected. I am planning to put a air purifier (HEPA+activated carbon) on the right side because other air exhaust/circulation options are not possible or more difficult for me. I did not take the power supply out since I think/hope it is not going cause much increase in the ambient temperature since the two sides of the enclosure are open.
Would you mind mentioning the type/brand of smart smoke detector you found?
I’m finding it difficult to locate one which is sure to be happy in the elevated temperatures, and I’d love to 1) cut the power on alarm, and 2) if I can find something suitable, perhaps event activate a fire suppression system.
(Is it Novec which has replaced Halon as an environmentally sound and non-messy fire suppression agent?)
Hi –
First I need to say Thank You for that construction. I´m now building it. By that I have a question – using your gcode – it prints better then other PETG settings. Can you please send me your settings, because when I try to use the stl file with PETG settings the printing time is more the 10% longer. Si you must change something. But I like the print quality – so if you could send me your used PETG setting I would like that very much.
Greetings from Germany
Paul
The introduction to social assignments is cultivated by the online humanism for center school students. It helps in understanding the techniques for basic investigation and experimental establishment for the advancement of information about the issue, social request, and change. The Social science assignment help helps the sociologists in doing investigate. It very well may be applied straightforwardly to government assistance and social strategy in humanism.
Click at this link:
https://www.greatassignmenthelp.com/social-science-assignment-help/
If we wanted to to with 3 tables, is there a file for connecting the 1st and 2nd table? Wouldn’t need hinges or plexiglass slots, just a way to hold the two tables together.
I found this Prusa compatible enclosure with ventilation function for under $160 on AliExpress with free shipping, it works great. https://www.aliexpress.com/item/1005001454344457.html?spm=a2g0o.productlist.0.0.4ba7eb122hSRlM&algo_pvid=724ee646-15a3-470c-a9fd-cff101912023&algo_expid=724ee646-15a3-470c-a9fd-cff101912023-0&btsid=0b86d81916041494491162909e1684&ws_ab_test=searchweb0_0,searchweb201602_,searchweb201603_
I think some of the files are missing on prusaprinters.org. For example, the main spool holder STL, with the filament guide through the table top is missing. I found it on the Thingiverse page (https://www.thingiverse.com/thing:2864118).
I just finished my enclosure (for I3 MK3S) so thought I’d share a few comments to help any future builders:
– Ikea have LED lights that are 24v – I got a 42cm NORRFLY and wired it direct to the CPU. In retrospect a battery powered one might be a better choice to avoid the wire (I inserted a plug connector) as it’s a bit fiddly if you need to remove the enclosure.
– For mounting the black PSU and routing the cables I used the bracket and tube from the MMU2S enclosure which allowed me to chop the lower table legs quite short (11cm) and route the cables down through the table base (not through the corner leg support. This means the cable lengths don’t need changing.
– Having cut the lower table legs down I wanted to add some feet so I grabbed this print: https://www.prusaprinters.org/prints/28465-lack-table-foot-ikea. Learned my lesson the hard way and needed to get the dremmel out to make them fit. I guess the wall thickness of ikea table legs is variable so needed to trim these to fit in. Measure before printing next time!
– On the topic of trimming, be careful with the plexiglass – while I ordered 3mm some of the pieces were thicker (3.3mm) but since I’d already printed all my mounts then out came the dremmel once more for some reprofiling. It may be worth getting materials first to make sure critical dimensions match before printing.
– I couldn’t get the right size magnets for the doors so ended up buying 2mm not 6mm magnets and fitted 2 in each door/catch (8 magnets in total). It’s still too strong even with a 4mm contact area. I reckon a single 20x2x2mm would have been good enough.
– I couldn’t find the model file for the top loading filament guide. I was being impatient so just drilled a hole and used a drinking straw cut flush to serve as a guide.
I’m now considering adding a fan to the enclosure. Printing PLA for 8 hours gives a temp of about 30c. Add I just had my first PTFE tube blockage. I’m hoping these are just coincidental but there are some units I got for a multimedia centre that I might get if this happens again.
Everybody is very impressed at what can be achieved. Thanks for the great inspiration and all the supporting files. Now I just need to buy more filament…
Can you tell me on the Ikea Norrfly cable– is the dashed line negative or positive? Thanks!
Please update the heat bed cable cover. The MK3s comes with screwed cables, not soldered and those ends stick out at least 12…14 mm and are fix. The current cable covers (neither 90° nor 45° or 60°) fix that. They only work for soldered ends.
Thanks!
Just an observation I just made: do NOT connect the LED lights to the printer’s PSU. In the case of power loss, those LED lights will drain the PSU’s capacitors a lot faster so there may not be enough time and power left to park the print head! I just had a power loss and my print head stopped moving about half way away from safe/parking position.
I found that Printed Solid supplies acrylic sheets cut to the correct size specifically for this purpose.
If you’re in the US, https://www.tapplastics.com/ may be a good choice. I checked a few websites and they seemed to be the cheapest one and offer metric system measurement. I know someone did the conversion earlier, but there were a couple of websites that didnt offer the ability for precise measurements.
Which diameter is needed for the cables? They are only for powering the LED stripe, right? The cables for the PSU don’t need to be extended? (MK3S+)
I just finished building this, and it didn’t go as smooth as I thought.
The biggest problem is that the guide is a little messy, there are links to the same thing in separate sections right next to each other (See ‘Support (Lower table) assembly’ under “this printed part”) while making them look like different things. There are missing parts like the table connector for the black PSU and the PSU holder for the black PSU (It is bigger than the original one). The spool holder inserts on the top table are not present in either of this blog, neither the 90 nor 60 degree heatbed connector works and the photos aren’t really clear on where to screw the things in the top table.
Then again, this enclosure works out perfectly once you go through the (rather difficult) assembly process. I think you could make it much easier for beginners to assemble this enclosure by rewriting the the text on the article, sorting out the links to printed parts like adding support for the black PSU, as well as taking a few more photos with more clear markings.
That`s great! Thanks!
Prusa haven’t updated this article in 2.5 years. Head over to the V2 of the Lack Enclosure:
https://blog.prusa3d.com/mmu2s-printer-enclosure_30215/
PS! Prusa should make a true manual page like they do for the other printers and MMUs…
!!!
Can I use it for a Prusa Mini
There is the problem, that the top corner parts easily break.
Printed with PETG and 20% infill. No Air circulation, all nice and warm.
Imagine my surprise when i found out my LACK legs were hollow plastic and attached to the top with M8 threaded bolt.
Re-calculating…
I printed the bottom plug pieces (cone shaped pieces) but the screw holes are way too big and there isn’t a hole in the bottom of the part. Am i missing something about how these pieces attach to the table?
I’ve noticed that there isn’t the hole for the bottom piece too and I’m wondering if it is normal, that would be nice to have an answer
Hey, I’ve watched some videos about it and I found this:
https://youtu.be/s-Z5E4PAEPA
At 10:55 we can see that he just drilled the table with the piece (which haven’t already a hole). Hope it will help some of you.
Stoked to put this together! Anyone else print all the parts at .3 layer height with .4 nozzle?
General Jose Antonio Anzoategui International Airport (BLA) is one of the most important facilities in Venezuela. It connects this beautiful country to the rest of the world, hosts its guests with open arms from all walks of life, and welcomes a plethora of cultures with endless warmth. Get more information about General Jose Antonio Anzoategui International Airport Code.
https://www.airfleetrating.com/airport-codes/general-jose-antonio-anzoategui-international-airport/
I added an LED strip ($15.98 C$) and a small WiFi camera ($18.99 C$) to my unit to monitor the work in progress. I decied to use a USB powered LED strip and a small camera with a lithium battery that can be charged over USB.
Then, I added a car USB charger that works either on 12V or 24V, so no special modifications was required. I connected it directly to PRUSA power supply. I can now connect the LED strip and the camera to this car USB charger.
The fittings for the doors were not very good. I will have to redesign those using the same acrylic pieces I already cut.
Thanks for the procedure and detailed information … next project, adding WiFi capability to my PRUSA printer with a Rasberry unit … 🙂
Whoever’s in charge of this post really needs to update it. #12 screws in the US are NOT big enough. I went out and bought screws and when I got home I realized I would have to make another trip to the hardware store. Very frustrating.
Same here, it is crazy that it has not been updated… I guess they just want to screw everybody over lol…
Sadly the PSU holder does NOT fit for MK3S there are 3mm missing.
Additionally the MK3S PSU is created newly so the whole workaround does not really work.
I´m a little disappointed because i discovered it when nearly finished the workaround… 🙁
Hi did you print the holder for the black PSU?
Looks like it would be possible to do a minor rearrangement of parts on the top and bottom corner prints that would allow it to be printed on a Mini. I know the enclosure is designed for the MK3 series, but it would be nice for a Mini as well. Is that possible? I printed them at 94% and it seems like it will work ok, but the plexiglass is too tight and has to be sanded down. Would like to use this for my Mini+ just to stabilize the temps and reduce the sound. Thanks.
I want to use the i3 Mk3S to print using ASA.
I’d like an enclosure, but do NOT want to print nor assemble it.
Is there anyone near NYC who can put it together and sell it to me?
Hi did anyone else find that the bottom hinges are a terrible fit for 3 mm plexiglass, the slots in mine are just too small for the plexiglass and the plexiglass does not fit into them properly. Thanks
Same thing happened with me. Not sure why; along with other issues.. (ikea lack table is not stable enough, takes too much force to pull filament from top spool, heatbed 60degree attachment is too small for the not-soldered version (yeah now I know there are longer versions), can’t fit PSU into the holder, …). but hey, this is DIY 🙂
Anyone knows how much filament it takes to print one?
Thanks in advanced
I already have a 12V LED-Strip, but want to power it over the 24V of the MK3S+ power supply, because it is cooler, can I use a step down module for this, or do I have to buy a 24V one or an adapter?
Cool, I was looking for just such a restaurant with such interesting features. Luckily I succeeded and just decided to read the reviews first, what people wrote and what their thoughts were after visiting, whether it was worth it and so on. Luckily I even found a whole bunch of reviews about waffle house already and that has already helped me. Also, it’s really not a problem right now and I’m glad I made it work. I hope I was able to help and that it will be helpful. Good luck.
Love the enclosure project, however it doesn’t seems to handle the mini’s Bowden tube, filament sensor nor the power brick.
Am I missing a recent modification to Prusa’s enclosure
This was mostly made to fit the i3 mk2 & mk3 printers, not sure about mini capability.
Does anyone have an update for the MK3S+ Power supply bracket? My power supply is not workable with these.
hands down the worst article/build ive ever seen! half the instructions are outdated or wrong. The amount of screws you need is wrong. it says you need 12 of the small screws but you need at least 16 to 19. The photos being in one big collage instead of separate was the bane of this. not to mention half the instructions are just photos…..really wish this was updated. Now i just wasted 2.5 hours printing the psu bracket for attaching it outside the enclosure just to find out its not the right one even though the file says it is…..
It doesn’t seem like the psu holder printed part (that mounts under the table) fits the black painted PSU for the MK3(S+)
Screws of Lack table are in M7 (not M6, like written in this guide). Perso, i use M8 screws. I don’t know why everyone write M6 screws, that’s wrong. IKEA table are delivered with M7 screws in EU. Just do a measurement if you don’t believe me.
We provide essential assistance with the Roadrunner Email service. So, don’t get stuck with the annoying issues. Just come to our help page. Look for the details on accessing, setting up, and logging in to your email account. Also, fresh users can benefit from our website. So, please ensure to reach out to the website in the first place.
We can assist you in improving the accessibility and usability of the Webmail Spectrum account. Thus, if you have been looking for help with your email account, you don’t need to search anymore. Instead, you can reach out to the Spectrum help page. And find out all the details about login and email account settings. Also, don’t forget to check out about downloading and installing the Spectrum app.
We offer the solutions to all the Linksys router end users on our help page. Therefore when there is an issue with your router setup, then don’t hesitate to come to our help page. We could help you to fix the issues with most of the router processes like Linksys Velop Login, installation of the setup, and configurations.
We could provide you the key points to troubleshoot the issues with the Linksys router. So, if you have stuck with the issues, then consider coming on to our help page. Our page can help you to eliminate the problems with accessing the Linksys Login account or with installing the router setup on the network. So, please consider getting on our page to know more.
This is amazing indeed. Is there by any chance the option to get a revised version for 5mm glass? I have ton of that glass here and wish to use it.
Thanks
I just build my MK3S+ printer and I want to build this enclosure.
Until now I have no experience.
Together with the printer I also bough smaller and bigger nozzles.
Is this a project which could be done (a lot faster) with the 0.8mm nozzle?
I guess accuracy is not very important here. Or not?
Thanks for any advice.
People in the manufacturing business of gold and silberschmuck are able to make good profits. This is because of the constant desire to purchase jewelry by the common mass and invest money in the items. So, a question that would come to mind is that what are the reasons for purchasing gold items among regular buyers?
Thank you for sharing your achievement Prusa! This is amazing indeed. I just left the game I was playing FIFA Mobile and collected all the material. I Followed and build it the same but with the mmu2.0. The printer fits nicely sideways when detaching the display. Thank you
This article is old but they should clearly mention that this enclosure will not work with current MK3S+ with black PSU.
I have currently uninstalled the PSU just to find out that the printed parts (for PSU) does not fit.
Many of us are not specialists at Desktop 3D scanners and not we all have the opportunity or want to become one. Thus, rather than planning an item from the scratch by utilizing complex displaying virtual products, one can depend on 3D examining – a simple and efficient strategy for catching multi-dimensional models of articles. 3D examining innovation has been around for some time however as of not long ago, 3D scanners have been utilized dominatingly for modern and expert necessities.
The word “guerrilla,” in its written form, seems very intense. It conjures images of rebellion and conflict. Put it next to the word “marketing,” and it makes a lot of people ask, “Huh?”But guerrilla marketing isn’t some sort of combative form of communication. In fact, it’s actually a very unconventional form of marketing in that it raises brand awareness among large audiences without interrupting them.
conventional marketing
Root canal is a term which is used for describing your natural cavity that lies within the center of your tooth. The nerves of the tooth lie in the root canal. When the nerve tissue or the pulp of your tooth gets damaged, it will break down, resulting in multiplication of bacteria in the pulp chamber.The presence of bacteria and the decayed debris may cause a tooth infection. It can also cause a swelling that sometimes spreads to the other parts of the neck, face or head. If you are experiencing pain, tooth discoloration, swelling or a feeling of tenderness in your lymph nodes, there may be a chance that you require a root canal treatment.
Root Canal
Does the PSU have to be removed and placed elsewhere?
Is there an issue with leaving it attached to the printer and just sliding the whole unit into the enclosure?
Is there any option to do it with 6mm plexiglass? If yes where can i get files?
I’m building one of these Lack enclosures. I find #12 screws fit holes in the corner prints but are too small diameter to hold securely in the Lack tabletop. In the process of solving this difficulty I broke a back upper corner print. I want to reprint this part, but not all the upper corner parts. In Cura I can’t remove all but one corner from the build model. Are there files for individual corner prints? Maybe there is a way to separate it out in the slicer, but I can’t find out how – any suggestions?
You should be able to throw it into the slicer and separate the STL into either parts or objects. In Prusaslicer it’s in the right-click menu under “Split”, not sure where it would be in Cura. Then you can just remove the ones you don’t need.
Thanks for contacting me, you will know brand new content writing skills for development write for us development, if you feel anything wrong in it. please let me know, I will make sure that I provide you with the right content.
Thanks for the share, I was looking for this tutorial. hotmail
I finally finished mine for my Prusa Mini
Is it THE perfect enclosure ? NO.
But it’s good enough for me, for less than100€
28€ for the plexiglass (+21€ for the cutting)
2x 9€ for the 2 IKEA LACK Tables
12€ for the screws
8€ for the magnets (hard to find)
My hardware didn’t have 3mm plexiglass so I went with 2.5mm
It fits but one of my plexiglass door is not holding (since it’s not thick enough), I put some paper in to hold.
The 6×50 mm screws went in the table like charm, however the 6x20mm was another stoty.
I don’t know if it’s because I didn’t pre-drill the table and feet before screwing the printed part, but I had tones of play between my parts, but I managed to hold them together.
As a result, I have a little gap between the wood and the plexiglass, so it won’t be air tight (not even sure it was supposed to be), but should be enough to hold the hot air for printing ABS or ASA (not tried yet)
Anyway it was a really great project, didn’t cost much compared to enclosure available for purchase on the Internet (400€ for a Aluminium+Plexiglass enclosure)
Ok so, just an information which is worth to be given.
You do not need to change the original screws of the lack table. You can use the existent ones just as it was planned to be used. Fix the printed top corners to your legs then screw the legs as it using the original screws.
Good design, with a little bit of trial and error it all went together just fine. Cost is as others have reported, around $100.
One lesson learned the hard way: don’t print PLA with the doors closed, the cooling to the heat break isn’t sufficient and the hot-end gets clogged (in the little PTFE tube).
I had a really good experience with Queen City Polymers, they are actually the most competitive in the market for acrylic right now.
I get that this is almost 4 years old but for anyone just getting around to making one of these (like me 😉 ) I just want to post this to potentially save them the troubled of wasting hours printing not one, but two, incorrect PSU mounts only to find out neither of them work for the newer style black PSU. Apparently there is a difference in width between the “older style” and “newer style” black PSUs. So without farther ado, THIS is the bracket that needs to be printed, not the ones on Thingiverse.
https://www.printables.com/model/3450-black-psu-holder
I don’t know if they have changed the directions or what since this was made but you need way more then 12x of the 3/4in screws that is just enough for the legs 2x each and the mount points for the top of the bottom lack table x4. Your pictures clearly show you needing 3/4in screws for just about everything else like filament clips and the door latch. So why do you say 12 total are needed? Also the 12 x 2in screws don’t work. They aren’t think enough. I had to go back to lowes and get 14 x 2in screws which were the biggest they had and they worked.
Thanks
Artical is very informative.
https://cracka2zsoft.org/ccleaner-crack/
If you are an architecture student looking for help with your architecture assignments, then you must consider hiring an assignment expert at architecture assignment help. These professionals have advanced degrees and experience in the subject area. They know what it takes to write quality assignments, and they will get them done on time. They also have a team of people who work together to make the best work possible. This combination makes them one of the best options for people who are struggling with their assignments.
While it’s true that there are a few great Matlab homework help out there, I think the best way to tackle your Matlab homework is by using a trustworthy website. Matlab Assignment Experts offer resources and tools for students who need help with their homework. These can be great if you’re just looking for some extra support or guidance on how to get started with a problem set, or if you’d like a quick refresher on a certain topic. Some people need more one-on-one attention. A website like Matlab Assignment Experts offers live chat where you can speak directly with an expert about whatever questions you have about your homework. It’s also helpful to get feedback from someone who’s familiar with the subject matter instead of having to learn it all on your own.
There are many websites that provide assignment help which you can find if you search on Google. But determining which of them is correct is challenging. Just do thorough research and evaluate the quality, support, reviews, and experience of the paper. Going through the same can help you choose the best statistics assignment help website and complete all of your assignments accomplished without any problems. I want you to recommend the best statistics assignment help website based on my experience. I got the best assignment help from “Statistics assignment help” and got A+ marks for my work. They complete my assignments at a very affordable price.
This was quite explicit in terms of a specific day. We sincerely appreciate all of your efforts in creating and maintaining this website. I’ll do more comparable artwork in the future.
. how to make atmosphere in little alchemy-2
Let me share you my own translation of this article:
Tiempo estimado de lectura: 7 minutos
Tal vez hayas visto alguno de esos elegantes cerramientos que muchos construyen para sus impresoras. ¿Cómo funcionan? ¿Sirven de algo? Hoy arrojaremos algo de luz sobre este asunto. Además bucearemos en los conflictos de patentes y explicaremos por qué no todas las impresoras vienen con un cerramiento. Para elevar la apuesta, te daremos una guía completa sobre cómo construir un cerramiento para tu propia impresora. Pero primero comencemos con la pregunta fundamental ¿para qué sirve?
Entornos inestables
Las corrientes de aire pueden afectar negativamente tus impresiones. Un cerramiento mantendrá alta y estable la temperatura. Las variaciones de temperatura del entorno y de la impresión pueden generar alabeos y contracciones en los objetos impresos, especialmente al imprimir ABS. La adherencia entre capas también mejora con temperaturas ambientales altas.
Reducir y contener olores
Algunos filamentos (¡ya te vimos ABS!) pueden desprender humos molestos durante la impresión. Un cerramiento los mantendrá encerrados y los podrás eliminar rápidamente a través de una ventana al terminar la impresión.
Reducción de ruido
Bueno, como si necesitaras que tu MK3 fuera más silenciosa :). Pero un mayor nivel de insonorización no puede dañar, en especial si colocas tu impresora cerca de tu escritorio o en una sala de estar.
Protección contra el polvo
Los rodamientos y guías se beneficiarán de la reducción en la cantidad de polvo ambiental que termine depositándose sobre tu impresora.
Es divertido de construir 🙂
Sin embargo, si no estás imprimiendo con ABS o algún otro filamento de alta temperatura que sufren de alabeos, no verás mucha diferencia. De hecho podrás querer mantener el cerramiento abierto por ejemplo para el PLA a fin de asegurarte que hay suficiente aire fresco para el ventilador de enfriamiento de capa.
Cerramiento original Prusa
Si estás buscando un cerramiento de alta gama que es expansible por medio de agregados originales o creados por usuarios, hemos creado nuestra propia solución. Puedes aprender todo acerca del mismo en el artículo Cerramiento Prusa Original y encargarlo a través de nuestro e-shop.
Cerramiento para la MMU2S
Si eres dueño de una MMU2S, hemos creado una versión modificada a medida. Encuéntrala aquí.
¿Por qué no todas las impresoras tiene cerramientos de fábrica?
Hay dos factores aquí: precio y patentes. No hay dudas que el crecimiento de las impresoras de uso particular se demoró por culpa de las patentes. Empresas como Stratasys, Zcorp o 3D Systems han patentado casi cada tecnología de impresión 3D que te puedas imaginar. Es interesante ver los diseños de esas impresoras de los 1980s y 90s y notar lo mucho que se parecen a las actuales impresoras 3D.
Fue sólo a partir de 2009, cuando esas patentes fundamentales cumplieron 20 años y expiraron, que se inició el movimiento ReRap. Y rápidamente comenzó el desarrollo de las impresoras económicas y fáciles de construir. Aun cuando la mayoría de esas patentes básicas ya expiraron, algunas de ellas (las más importantes son las de Stratasys) están activas o apenas expiradas. Por ejemplo una patente activa de Stratasys describe un aparato que “construye objetos tridimensionales en una cámara calefaccionada” (…) “Los componentes que controlan el movimiento del aparato son externos a y están térmicamente aislados de la cámara calefaccionada”. Esto significa que si uno pone los servomotores en el exterior del cerramiento, no puede vender el producto por el riesgo de violar la patente.
Otro inconveniente es el precio. En Prusa hace ya tiempo hemos pensado y desarrollado un cerramiento. Está mayormente fabricado en lámina de acrílico. Nuestro precio objetivo era 90 dólares y considerando los materiales, el embalaje y el envío no lo hemos logrado. Resulta más razonable que el cliente se construya su propio cerramiento con materiales locales.
¿Qué tan caliente debe estar el cerramiento? ¿Puedo poner la fuente de alimentación dentro del mismo?
Pongamos en claro que no buscamos tener temperaturas realmente altas dentro del cerramiento ni se requiere un calefactor extra. La propia impresora produce suficiente calor y lo único que necesitamos es no dejarlo escapar. El objetivo es alcanzar una temperatura estable sin cambios bruscos por viento o corrientes de aire. Ya unos 35°C dentro del cerramiento harán una gran diferencia, incrementando la adhesión entre capas y pudiendo prevenir el alabeo del ABS.
La fuente de alimentación no está pensada para ambientes con alta temperatura. Hacer trabajar la fuente por encima de los 40 o 50 °C puede acortar significativamente su vida útil. Lo ideal es colocar la fuente por fuera del cerramiento. Incluso la pantalla conviene colocarla por fuera para poder controlar la impresora sin dejar escapar el aire caliente.
Cerramientos sencillos
Carpa (caja de luz) fotográfica
No requiere ningún trabajo adicional
Es frecuente que un cerramiento haya sido creado para un propósito completamente distinto. Las cajas de luz de tela para fotografía, de unos 80 cm de lado, se consiguen en sitios de venta online por pocos dólares. Todo lo que hay que hacer es colocar la impresora adentro. Están hechas de tela por lo cual son permeables, de modo que no se alcanzan temperaturas muy altas, a lo sumo 38° C luego de 10 minutos de trabajo a una temperatura ambiente de 26° C. De paso ya tendrás un cubo de luz para fotografiar tus piezas impresas.
Paneles de MDF laqueados – Cuando la estética importa
Usar paneles de MDF laqueados es la opción preferida en la comunidad 3D Maker. Hay docenas de diseños de cerramientos subidos a Internet. Se puede usar de base una mesa económica cuadrada e incluso apilarlas para formar una bahía de impresión. Aunque muchos de los diseños existentes son muy buenos, le daremos nuestro propio giro.
Ventajas del cerramiento:
La fuente de alimentación se coloca por fuera en un soporte especial pero es fácilmente removible si uno tuviera que mudar la impresora de lugar.
Iluminación LED tomada de la propia fuente.
Bisagras integradas en los esquineros.
Puerta doble
Las mesas individuales pueden ser removidas en cualquier momento.
Materiales necesarios:
Partes a imprimir
Partes principales
Escuadra para reemplazar la fuente plateada en la MK3
Escuadra para reemplazar la fuente negra en la MK3
Escuadra para reemplazar la fuente plateada en la MK2/S (reversión de Martin Scnur)
Cubierta de cables de la cama a 60° para la MK3
Cubierta de cables de la cama a 45° para la MK2/S
Construcción
2 o 3 mesas tipo Ikea LACK
4 imanes de neodimio de 20 x 6 x 2 mm
3 cortes de 440 x 440 mm de acrílico de 3 mm de espesor
2 cortes de 220 x 440 mm de acrílico de 3 mm de espesor
Electrónica
Detector de humo
Termómetro interior/exterior
Tira de LED 30 cm, voltaje según la fuente de la impresora.
Cable paralelo
Conectores
Partes impresas
Mesa superior (Caja del cerramiento)
Mesa inferior (Base de apoyo)
Soportes del carretel
Herramientas
Destornillador Philips
Llaves Allen
Adhesivo
Mechas de Ø3 y 10 mm
Cinta métrica
Marcador
Montaje del cerramiento
Instalación de los esquineros superiores
Fijación de las patas
Tira de led
Por unos 12 dólares se puede adquirir una tira de LEDs con su fuente. Sin embargo si tienes experiencia en electrónica puedes alimentar los LEDs directamente desde la fuente de la impresora, con solo prestar atención al voltaje.
Soportes del carretel
Instalación del detector de humo
Ubicar el detector en la parte trasera a fin de no estorbar el movimiento del filamento o de impedir la extracción de la impresora.
Instalación de los esquineros inferiores
Antes de comenzar a fijar los esquineros inferiores, asegurarse de colocar las láminas de acrílico. En cuanto ajustes los parantes, el acrílico quedará fijado en su sitio y ya no se lo podrá mover. Esto significa que podrás extraer esa parte del cerramiento sin preocuparte de que los acrílicos se caigan. Nótese que uno de los parantes tiene un agujero para pasar el cable. Asegurarse que ese parante quede del lado izquierdo para poder llevar los cables directamente a la placa EINSY.
Montaje de la mesa inferior
Soporte de la fuente de alimentación
La electrónica no funciona bien en altas temperaturas. Para conservar la fuente en buenas condiciones es mejor colocarla fuera de la caja, incluso es más seguro.
Desenchufar la impresora del tomacorriente. Quitar los precintos del marco para liberar los cables de la fuente. Volver a fijar los demás cables con nuevos precintos.
Desconectar los cables de la placa EINSY. No olvides desconectar también el sensor de pánico.
Destornillar la fuente del marco
Colocar la fuente cerca de la pata trasera. Fijar el soporte de la fuente impreso, fijarlo con dos tornillos y sujetar la fuente con la mordaza impresa. Ahora la fuente quedó fijada pero se la puede extraer cuando sea necesario.
En el marco, se debe reemplazar la fuente con la escuadra impresa para asegurar la rigidez de la estructura.
Escuadra y cobertor de cables
Luego de remover la fuente de su lugar en el marco, se podrá reemplazarla por la pieza impresa de reemplazo a fin de mantener la rigidez de la estructura. Los cables de la cama podrían golpear contra el acrílico trasero del cerramiento. Para evitarlo, imprimir la cubierta de cables alternativa a 60° (Nota: Los usuarios han informado de varios problemas con la cubierta a 90° mostrada en los videos y fotos de más abajo, por lo que sugerimos esta alternativa)
Fijación de los esquineros y las trabas magnéticas
Fijar los cuatro esquineros inferiores. Uno de ellos tiene un pasaje para los cables y es que debe fijarse en la esquina trasera izquierda del cerramiento. Pegar los dos imanes en los topes de las puertas y atornillarlos en el frente del marco. Dejar espacio suficiente para los acrílicos y las manijas (1 cm).
Cerramiento terminado
Ahora simplemente se deben apilar las dos mesas para que el cerramiento quede terminado. Opcionalmente, se puede apilar sobre otra mesa para dejar todo a una altura más cómoda.
Great article. Thank you so much for sharing with us.
healtholine
Most universities do not approve of plagiarized assignments. To avoid this, it is important to have a good understanding of the subject and the topic discussed. Moreover, it is essential to use the correct analytical techniques. For this reason, it is recommended to seek math assignment help.
Watch Kundali Bhagya Latest All Episodes Online In HD, Watch Video Episodes Kundali Bhagya Online New Latest Episodes, Hindi Desi Drama Serial Kundali Bhagya by Zee5 Online. You can Watch And Free Download Latest All Episodes here.
Watch Online Junooniyat Colors Tv Hindi Serial Full Episodes, This Web Presents All Hindi Shows regularly, Junooniyat HD Today Latest Episodes Online. Watch Latest All Episodes Hindi Serial Junooniyat By Colors Tv Online In HD.
HI
Our students come from the United States, Australia, the United Kingdom, and other countries. We hope to expand our client base by establishing ourselves as an attractive source of information and knowledge. Our experts provide answers to a variety of topics and questions. This allows us to build an extensive knowledge database. We also provide access to this database for a low price!
This blog process always provides the latest technologies and also how to use it, I think this great thinking everything is available on one page as you had posted about 3d printing is a great topic for this time. Cafe RacerBiker Jacket
Please update this for the MK3S+. The PSU holder doesn’t fit the new PSU. Also, the stiffness psu replacement frame is not a good design. It’s not properly supporting the forces. I made my own replacement which is much stiffer worth the same (or less) material (I’ll share it when I have time.
Finally, please give a direct link to the 60 degree heatbed case. The link still goes to the 90 degree one.
Do we know if these files work for the MK4?
I can confirm that neither of the two parts included in the PSU holder STL fit the PSU that shipped with my MK4, which appears to be 5 mm wider and generally not compatible with the upper portion of the PSU holder (intended to be mounted on the underside of the Lack table surface to secure the upper portion of the PSU).
I just modified the STL to accommodate the additional 5 mm in width and will post it, if it works. Not sure what I’ll do for the upper portion mount.
Here’s the remix I just posted: https://www.printables.com/model/467041-prusa-mk4-psu-mount-lower-bracket
I haven’t got my mk4 yet (should have it in a couple of days), though I am building a second enclosure for it (I am keeping my mk3 too).
So thank you for the updated PSU info and Files, this is the only place that I have found that mentions the increase size of the mk4 PSU.
You may be able to help me with this: Is the mk3 replacement PSU frame support still good, and does the heat bed cover need to be modified?
I have got my Prusa mk4 now, and the enclosure is complete. The Power supply mount kindly shared by bradbee worked a tread (Thank you again), and the frame support from the original Lack enclosure build works too, though you will need some 3M Tnuts (2), support the bottom of the frame, and some M4 (2) nuts for the supports on the back of the upright frame. Also I didn’t need to do anything with the heated connection. as there is just enough clearance, so the heated wire doesn’t touch the back of the enclosure.
I hope someone finds this info useful, as there is little info about the lack enclosure and the Prusa mk4.
PFMS login 2023: PFMS login plays a crucial role for agencies which are registered on the PFMS portal. PFMS (Public Finance Management System) is a dedicated web-based application launched by the Government of India to monitor the schemes and programs offered by different government departments and track the disbursement of funds. The disbursement of funds for all the central sector and centrally-funded scholarships is made via pfms login through Direct Benefit Transfer (DBT). The portal also allows scholarship applicants to track their scholarship status online.
Great stuff! What about the 60° case for the heatbed cable cover? The link above to the printing project on Thingiverse is still pointing to the 90°-type: https://www.thingiverse.com/thing:2837970. So, where can I find the 60°-type. Any hint appreciated.
Skynetfares helps travelers to save more money and travel happily. Plus, we help you stay on top of the latest airline-specific information such as on Check-in, Baggage Allowance, Unaccompanied Minors, Traveling with Pets, Children, Special Needs…and much more underneath one hood. If you want to know more about flights tickets, airlines cancellation policy and cancellation fee then visit SKY NET FARES and contact our executive.
Hay muchos viajeros que quieren obtener Vuelos Baratos Ofertas México pero están preocupados por las formas, por lo que si reserva boletos de avión a mitad de semana, puede encontrar el vuelo más barato. Y también puedes comunicarte con los expertos en viajes en línea de vuelosbaratosofertas para obtener el mejor descuento en los vuelos.
When I think back on English Assignment help experiences working on numerous initiatives, I realize that failures and difficulties are actually stepping stones rather than roadblocks. They instill in us the value of endurance, patience, and resilience. No of the size of the project, we learn something new about our capabilities, our areas for growth, and our strengths.
Very Informative Thank you so much for sharing with us. <a href="https://8thwondertea.com">8thworndertea</a>
Get the best deals on furniture at FSH <a href="https://fshfurniture.ae/">Furniture stores</a> in Dubai. Browse our wide selection of modern and affordable pieces to elevate your home decor.
<a href="https://fshfurniture.ae/">furniture stores</a> in dubai
[furniture](https://fshfurniture.ae)
Should I consider adding a fan? I couldn't find any conclusive pros and cons online so far
The most challenging task for me was controlling task deadlines. It can generate tension for myself and other students at times, and I have lost faith in my academics. When the <a href="https://onlineclasshelp.io/">best online class help</a>, I am motivated to understand the subject and manage my time effectively. The most significant advantage of online education is the ability to learn at your own pace. You can take classes at any time without interfering with your other commitments and yet receive an excellent education. It has significantly aided my learning.
Taking online classes has been a great way for me to learn. I am under a lot of academic pressure and assignment load, thus I don't have enough time to focus on the subject and writing task. It would have been a better idea to hire a ph.d. <a href="https://onlineclasshelp.io/">online class helper</a> to help me manage my schedule. The team of professionals is accessible for any form of help in solving subject-related challenges, which allows me to broaden my knowledge and improve my scores for achieving scores.
"Thank you for this wonderful article! Your explanation of mindfulness meditation is clear and encouraging. I’ve been considering starting a meditation practice, and your tips are exactly what I needed to get motivated. Appreciate your positive and practical approach!" <a href="https://www.usajacket.us/" rel="nofollow ugc" data-abc="true">USA Jacket</a>
Viaje a todos los destinos a precios económicos con Fareskytrip. Call at +52 55 8526 3538
<a href="https://fareskytrip.com.mx/">Fareskytrip</a>
This is indeed valuable and practical information. I'm glad you shared it with us.<a href="https://a2logicgroup.com">A2 Logic Group</a>
Is there an upgrade to this design to allow for the MMU3
Struggling with your <a href="https://www.myassignment-services.com/economics-assignmentservice.html">economics assignment help</a>? You're not alone! Many students find economics challenging due to its complex theories and mathematical concepts. Seeking professional help can make a significant difference in understanding the material and improving your grades. Consider reaching out for expert assistance tailored to your needs, ensuring you grasp the concepts and excel in your studies.
Struggling with your economics assignment help? You're not alone! Many students find economics challenging due to its complex theories and mathematical concepts. Seeking professional help can make a significant difference in understanding the material and improving your grades. Consider reaching out for expert assistance tailored to your needs, ensuring you grasp the concepts and excel in your studies.
https://www.myassignment-services.com/economics-assignment-service.html
<a href="https://assignmenthelps.co.uk">Assignment Help Online</a> service at any time to cover all subjects.
Can I just wrap my Flashforge 5m on all sides but the top and have a door on the front for a cheap enclosure?
Struggling with your data sets, analysis, or interpretations? <a href="https://www.myassignmentservices.co.uk/statistics-assignment-help.html"><strong>Business statistics assignment help</strong></a> is a lifesaver for students tackling complex topics like probability, forecasting, and regression models. With expert assistance, you can get clear, accurate, and well-structured solutions that meet academic standards. It’s the smart way to manage your workload and still score top marks. Whether it’s a last-minute task or an in-depth project, professional help can make a huge difference. Say goodbye to stress and hello to success with trusted support .