



We’ve been putting a lot of work into making our printers easier to use and output the most accurate prints with just a click of a button. Better hardware, better firmware, less setup and less babysitting. And today, we’re taking a big step with the other half of 3D printing: the software you use to get your models ready to print.
Today we’re releasing the first public preview of PrusaSlicer 3.0. And this is a big one. It’s the biggest upgrade in PrusaSlicer’s history. We threw out the user interface completely and wrote it from scratch, driven by what our users, you, actually need. We’re bringing a new project system, completely reworked profiles designed around modern multi-tool printers, better 3D scene rendering, much better performance, a safe plugin system, and much more.
It’s not the biggest update because of any single feature or because of the sheer volume of them, but because of the potential it brings for future updates. And the timing couldn’t be more fitting: we’re releasing this first public preview exactly 15 years after the very first Slic3r commit, on September 1, 2011.
There’s a lot to say about how and why we rewrote such a large part of PrusaSlicer. But let’s start with what you can actually do with it, because that’s where the scale of 3.0 becomes much more obvious.
Download PrusaSlicer 3.0.0-preview here
Build your whole print job in one project
Multiple beds were introduced in PrusaSlicer 2.9.0, but the implementation was intentionally minimal. In PrusaSlicer 3, beds are real parts of the project.
That means each bed can have its own configuration. You can prepare several beds in one project, slice them independently, use different profiles, and even mix many different printers in the same project.
Prepare a batch for your MK4S and your XL side by side, in one window. You can easily drag models from one printer to another, the 9-bed limit from 2.9.x is gone. And when you slice, beds are processed in parallel.
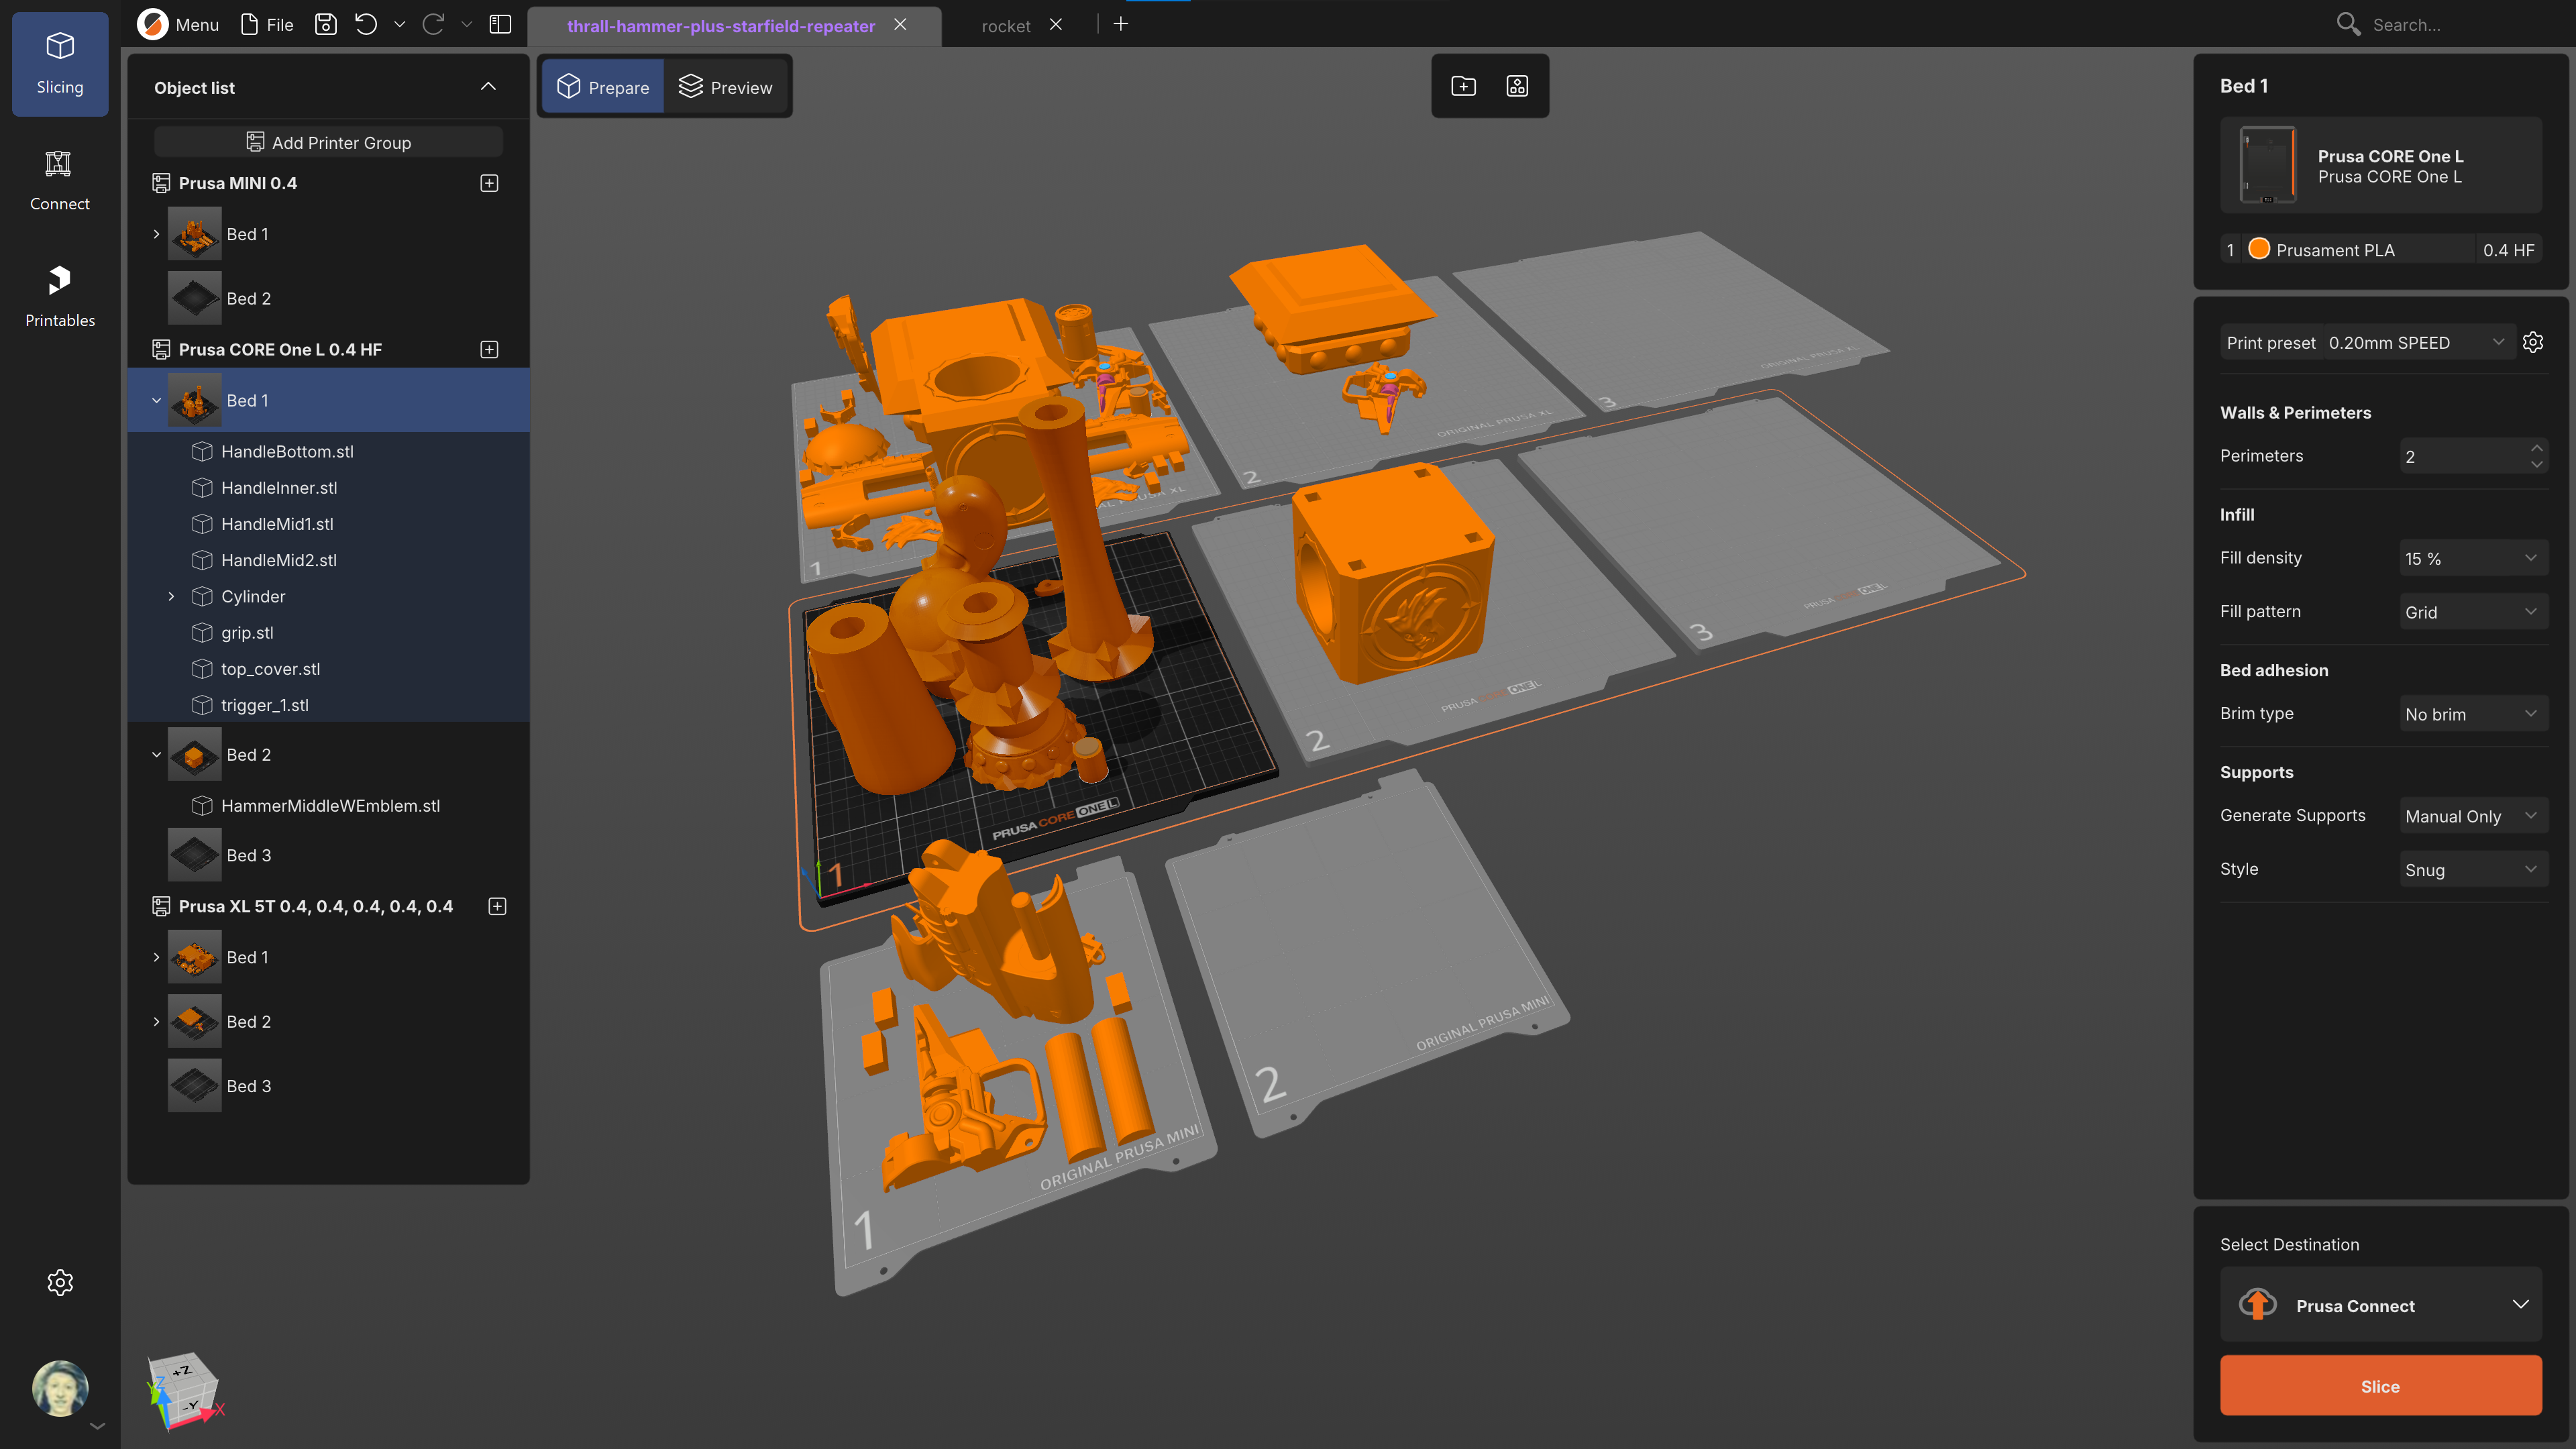
This is a huge time saver and quality of life improvement. Even if you own just one 3D printer, you can create beds for different materials or settings, and manage an entire project within a single file.
Multiple projects in one window
You can also open multiple projects in a single PrusaSlicer instance, each in its own tab. Individual projects have their own context: open dialogs, active tools, selections. Nothing bleeds between them.
Gone are the days of having 6 PrusaSlicer instances open at the same time.
PrusaSlicer now also continuously backs up your open projects locally, so if the application crashes, your work can be recovered. The backups are stored in the backup_projects folder in the PrusaSlicer data directory.

A profile system built for modern printers
This change solves one of PrusaSlicer’s oldest pain points and enables some of the most requested features.
On a printer like the Prusa XL, you can have a different nozzle on each tool. One tool can use a 0.25 mm nozzle for fine details, another a 0.4 mm for everyday printing, and another a 0.6 mm for large, strong parts. They are all installed and ready to be used.
The old profile system could not really describe a printer like this. When PrusaSlicer started, multi-tool printing was an idea, rather than existing method. Everything that came later had to be hard-coded into the original structure. So you often needed three separate printer profiles. You then had to switch between them depending on which tool you wanted to use. It worked, but it was clumsy. Setting up advanced prints that would combine the different nozzles in one print was not just clumsy, but also difficult.
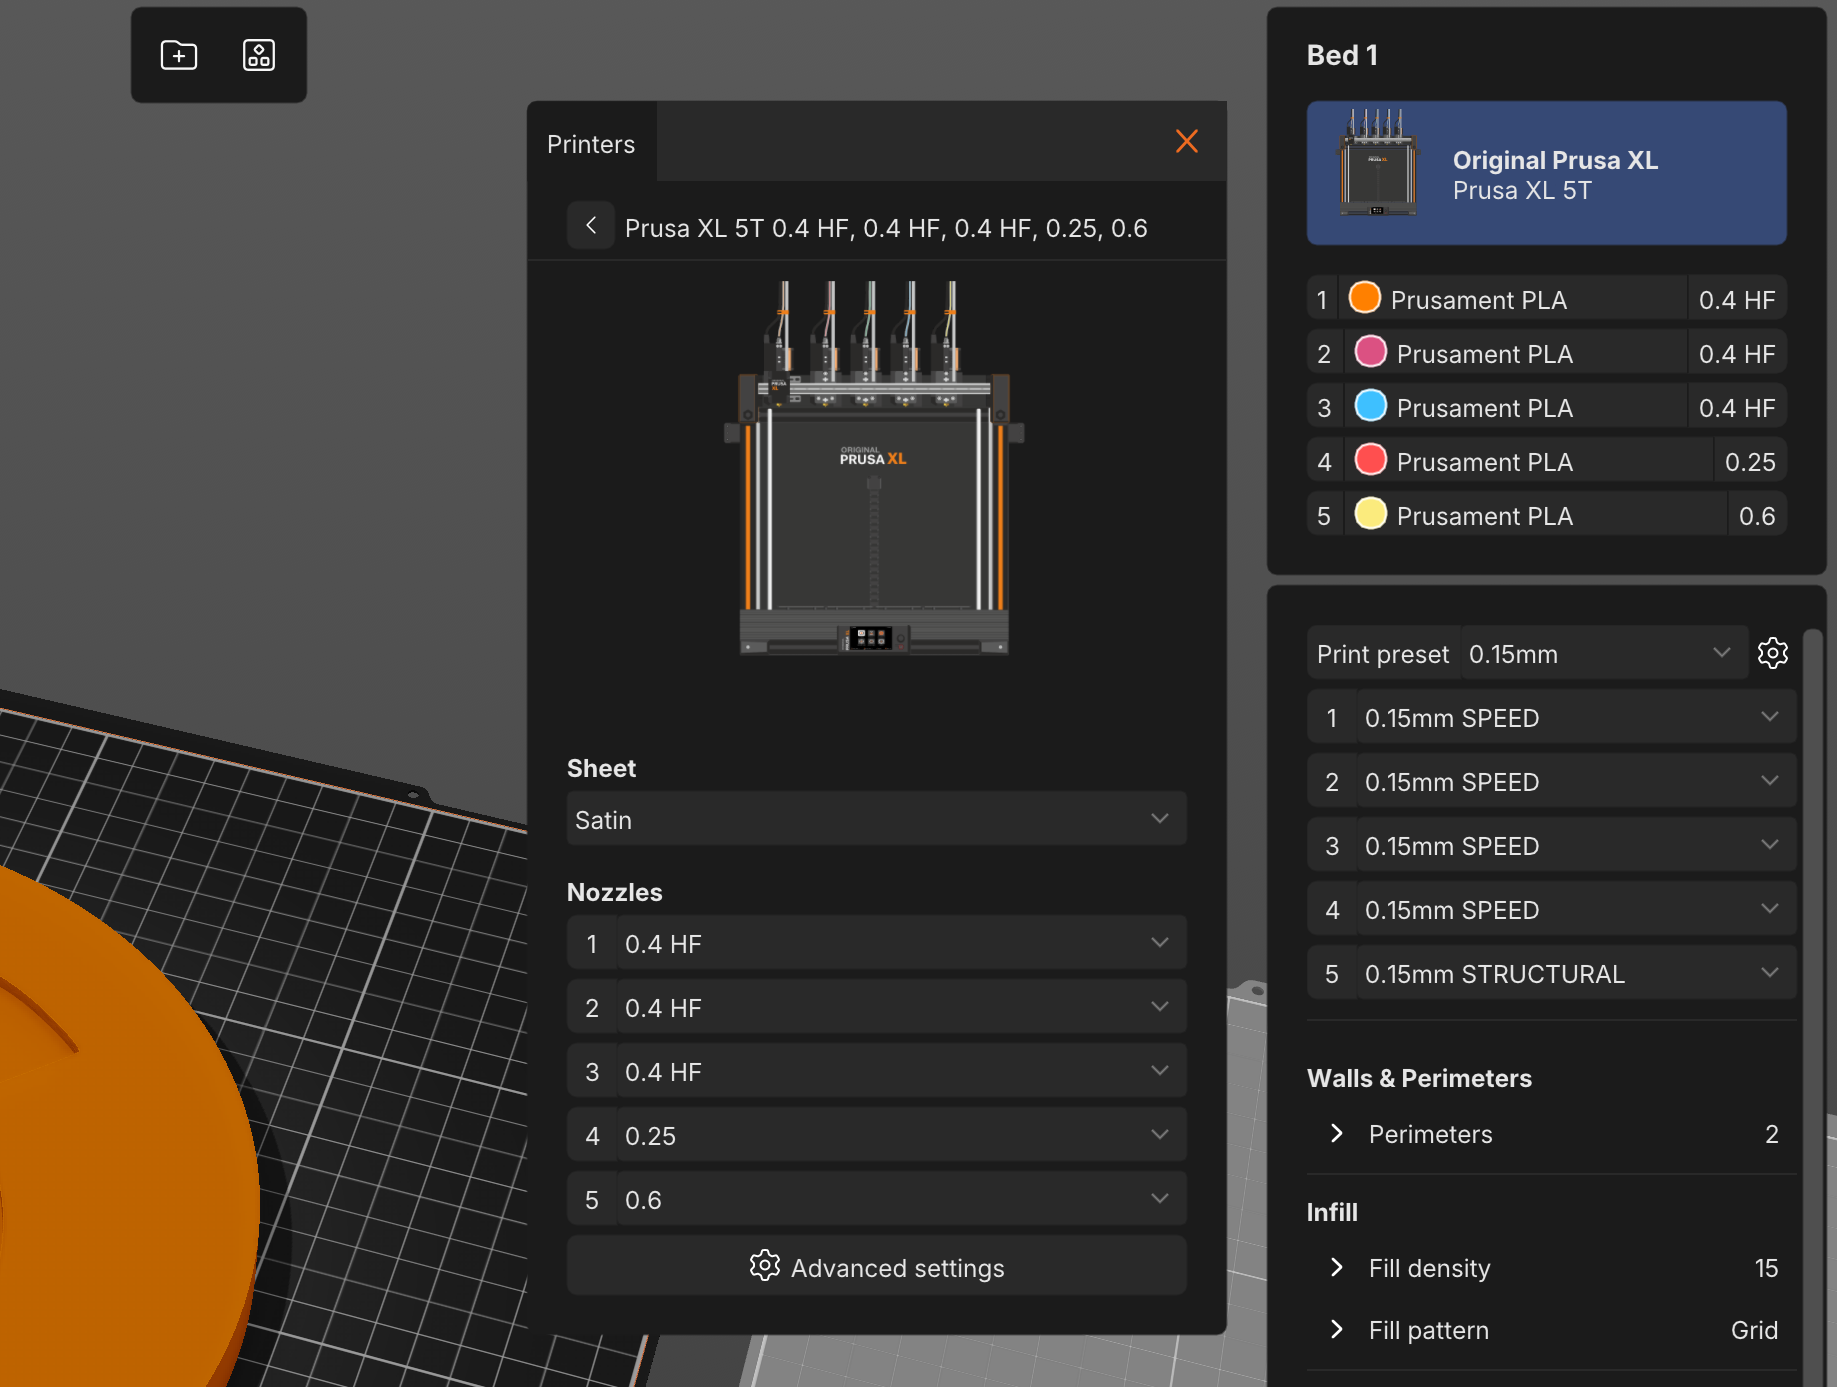
The whole print profile system is now layered and designed around modern multi-tool printers, so PrusaSlicer can describe the hardware you actually have instead of forcing it into one fixed combination of settings. Choosing a nozzle for a print becomes as easy as choosing the tool from a select box. You can even assign whole different print or printer profiles to individual tools and mix them as needed.
We’ve also rewritten the preset updater. Preset Sources & Updates now gives you one place to manage both online and local preset sources, making the whole profile system much more flexible.
The profile format itself has moved from .ini to .yaml, and the whole data structure is new. Old 3MF projects from PrusaSlicer 2.x load correctly. Configurations are transformed and matched to the right system profiles automatically.
These changes also meant rethinking how you interact with PrusaSlicer. With projects, beds, printers and profiles becoming much more flexible, the old interface simply wasn’t designed for what we wanted to do next. So we threw out the user interface completely and wrote it from scratch, driven by what our users, you, actually need, and by the new workflows we need for the future of 3D printing.
Everything you need, where you need it
This is what you’ll notice first when you launch the application: the UI is completely new. And I don’t mean “we moved some buttons around and added rounded corners to them” new. I mean we sat down, looked at how people actually use a slicer in 2026, and redesigned the whole thing.
UI changes are always controversial, but the old layout was showing its age. It had features hidden in places that even experienced users had to hunt for, it was intimidating for new users, and it was difficult to implement new features in it.
Let’s take a quick tour!
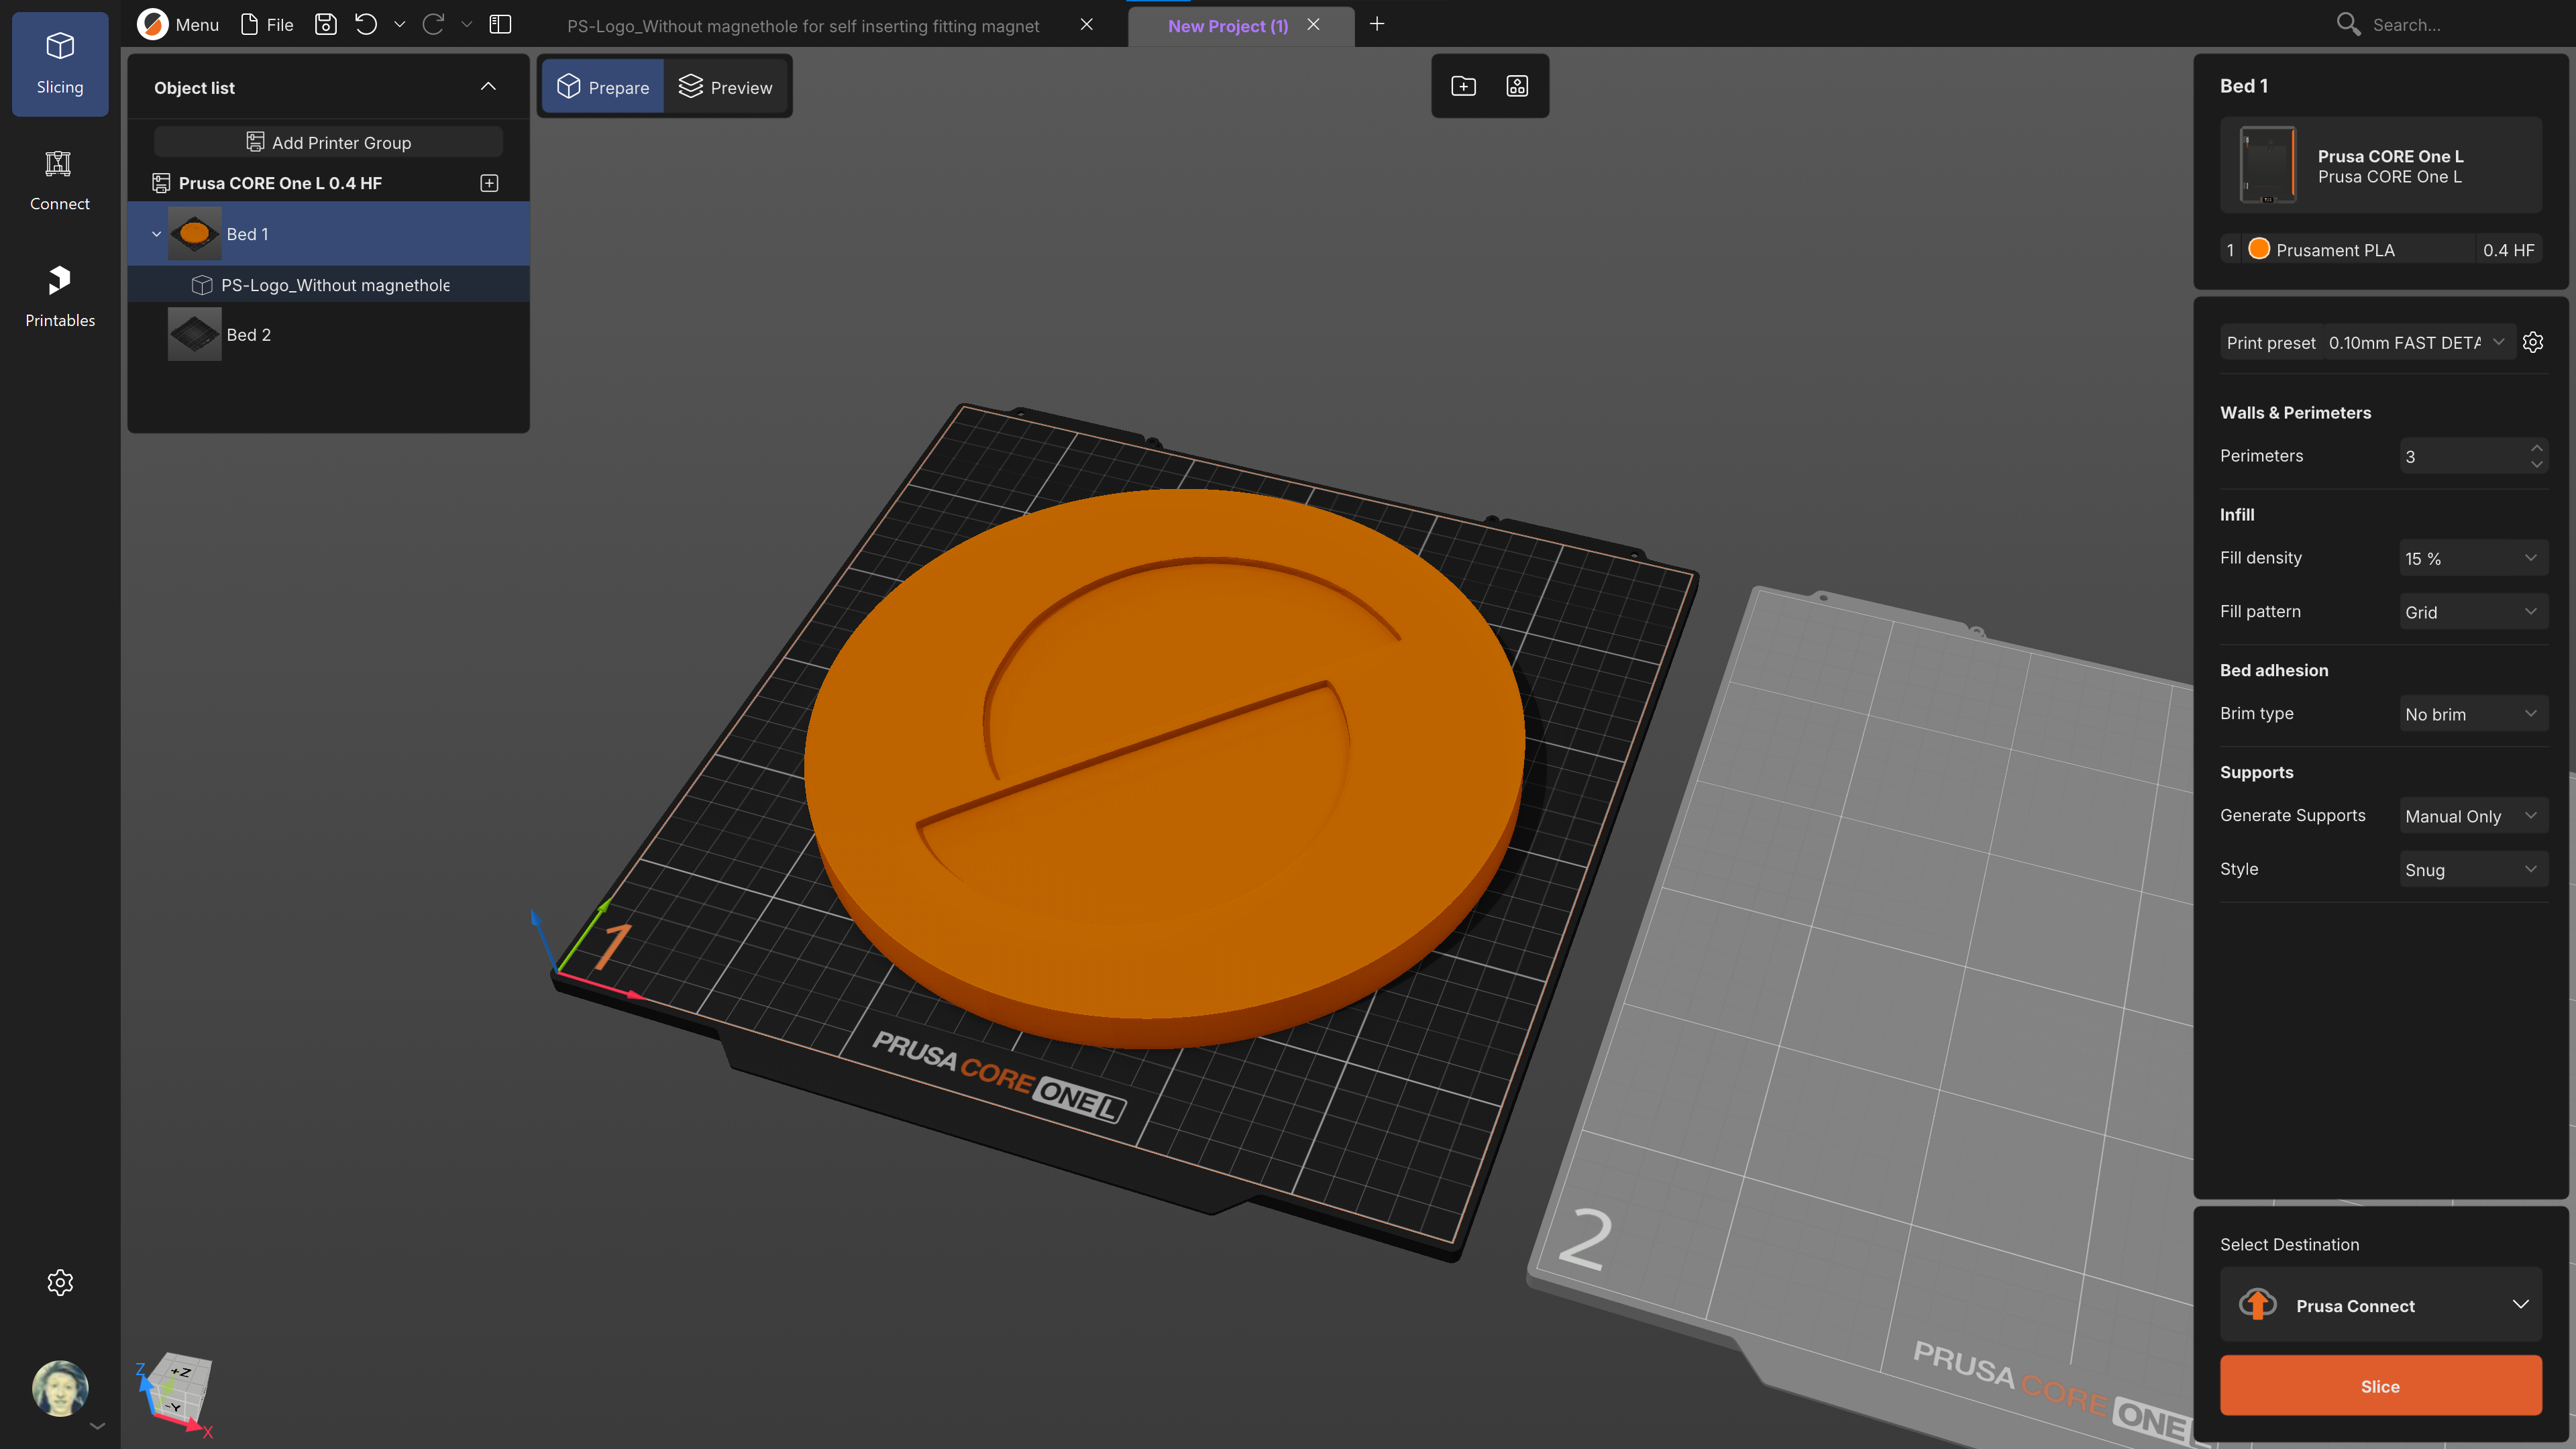
The new layout puts tools at the top, a scene browser to the left and a contextual panel to the right. Many things are still roughly where you’re used to having them, but not all of them and these changes may take a bit of time getting used to. Especially for those of you who have strong muscle memory from the old PrusaSlicer. Don’t worry though, the keyboard shortcuts are mostly the same.
The right panel is now fully contextual. If you have the painting tool active, you need to see everything related to painting, and not the current infill percentage. It shows profile settings when a bed is selected, object-specific options when an object is selected, and tool controls when a tool is active.
The scene browser has its own collapsible panel so it doesn’t crowd the viewport. G-code preview has a basic view for quick checks and an inspection mode for detailed analysis.
We’ve added a View Cube for camera control and a light mode alongside the default dark theme. The viewport navigation is smoother, and the camera automatically centers on a bed when you select it.
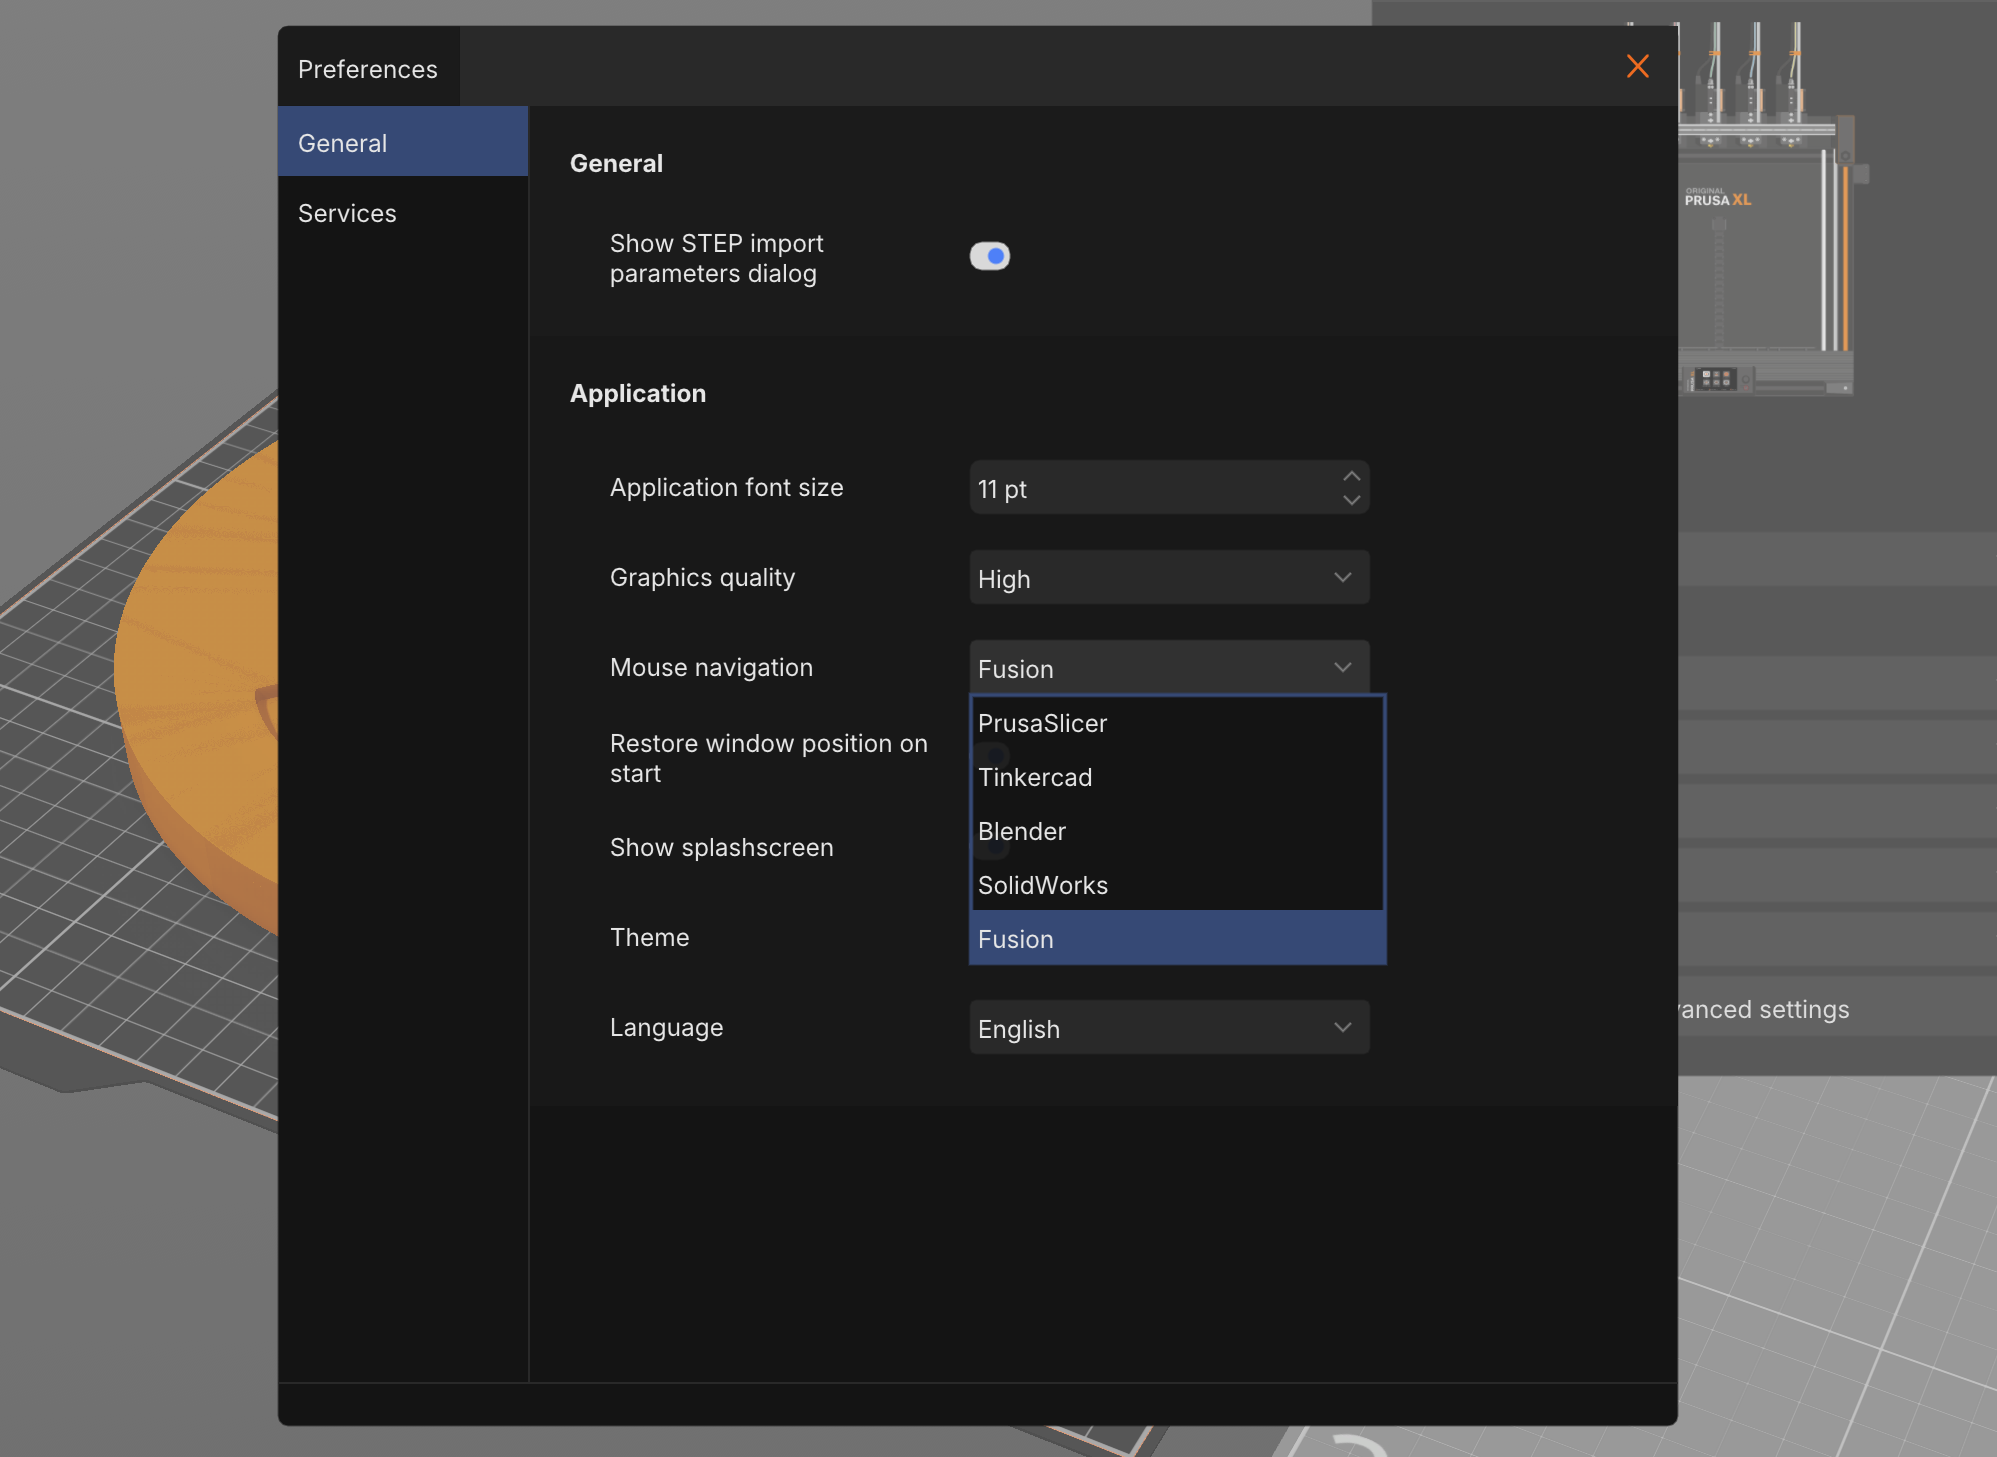
You can also choose the mouse navigation you’re already familiar with. PrusaSlicer now includes navigation schemes matching Tinkercad, Blender, SolidWorks and Fusion.
It’s probably pointless to describe the UI in too much detail. It should above all be intuitive and not require a manual. Try it and let us know what you think. We’re still very much open to making even significant changes, it often takes several iterations to discover something that later feels completely obvious and natural.
A better-looking 3D viewport that stays responsive
The 3D viewport also got a significant upgrade. We’re using more advanced OpenGL rendering (shadows, reflections, ambient occlusion) to make the 3D scene better at matching real life and give you a clearer sense of how objects sit on the bed. All of it is configurable in Preferences, and you can turn it off entirely if you prefer the classic look or if your GPU is limited.
The preview can now handle substantially more complex geometry before it starts to lag. When the scene is too dense, toolpaths are hidden during rotation and only rendered when the camera stops. You get smooth navigation even on heavy prints, and full detail the moment you need it.

Favorite settings in the right panel
This is one of my favorite small-big changes in PrusaSlicer 3.0. You can mark individual settings as favorites. Favorite settings then appear directly in the right panel for quick access.
So instead of opening the full settings pages all the time, you can build your own small set of everyday controls. Power users still have access to everything, but many users may find that their normal workflow becomes much faster and cleaner. To be honest, ever since I builtbuild up my list of favorites, it is very rare that I actually open full print settings (and when I do, I do it via the built-in search function).

Safe Plugins and Community Plugin Marketplace!
PrusaSlicer has always been open-source, which means anyone could fork it and add features. And many people and companies did. That’s how OrcaSlicer, SuperSlicer, BambuStudio and others came to exist. But forking has a real cost. It needs dedicated skilled individuals that are willing to spend significant effort on it. Most people will never bother with actually forking the entire project and compiling their own version just to add the one cool feature that they have in mind. And even if they do, most forks will be abandoned after some time, not getting new updates.
Furthermore, forks diverge, features get reimplemented in parallel, improvements don’t flow back, and progress slows down. That’s not necessarily bad, it’s just the reality of maintaining a separate version of software as complex as any modern slicer is.
Plugins change that equation. With PrusaSlicer 3.0, the community can extend the slicer without forking it, without waiting for us to merge the pull request, it can simply be a plugin.
Custom calibration prints, QR Code generators, automatic model orientation, custom infills, your imagination is the limit. Well, that and the current API. 🙂
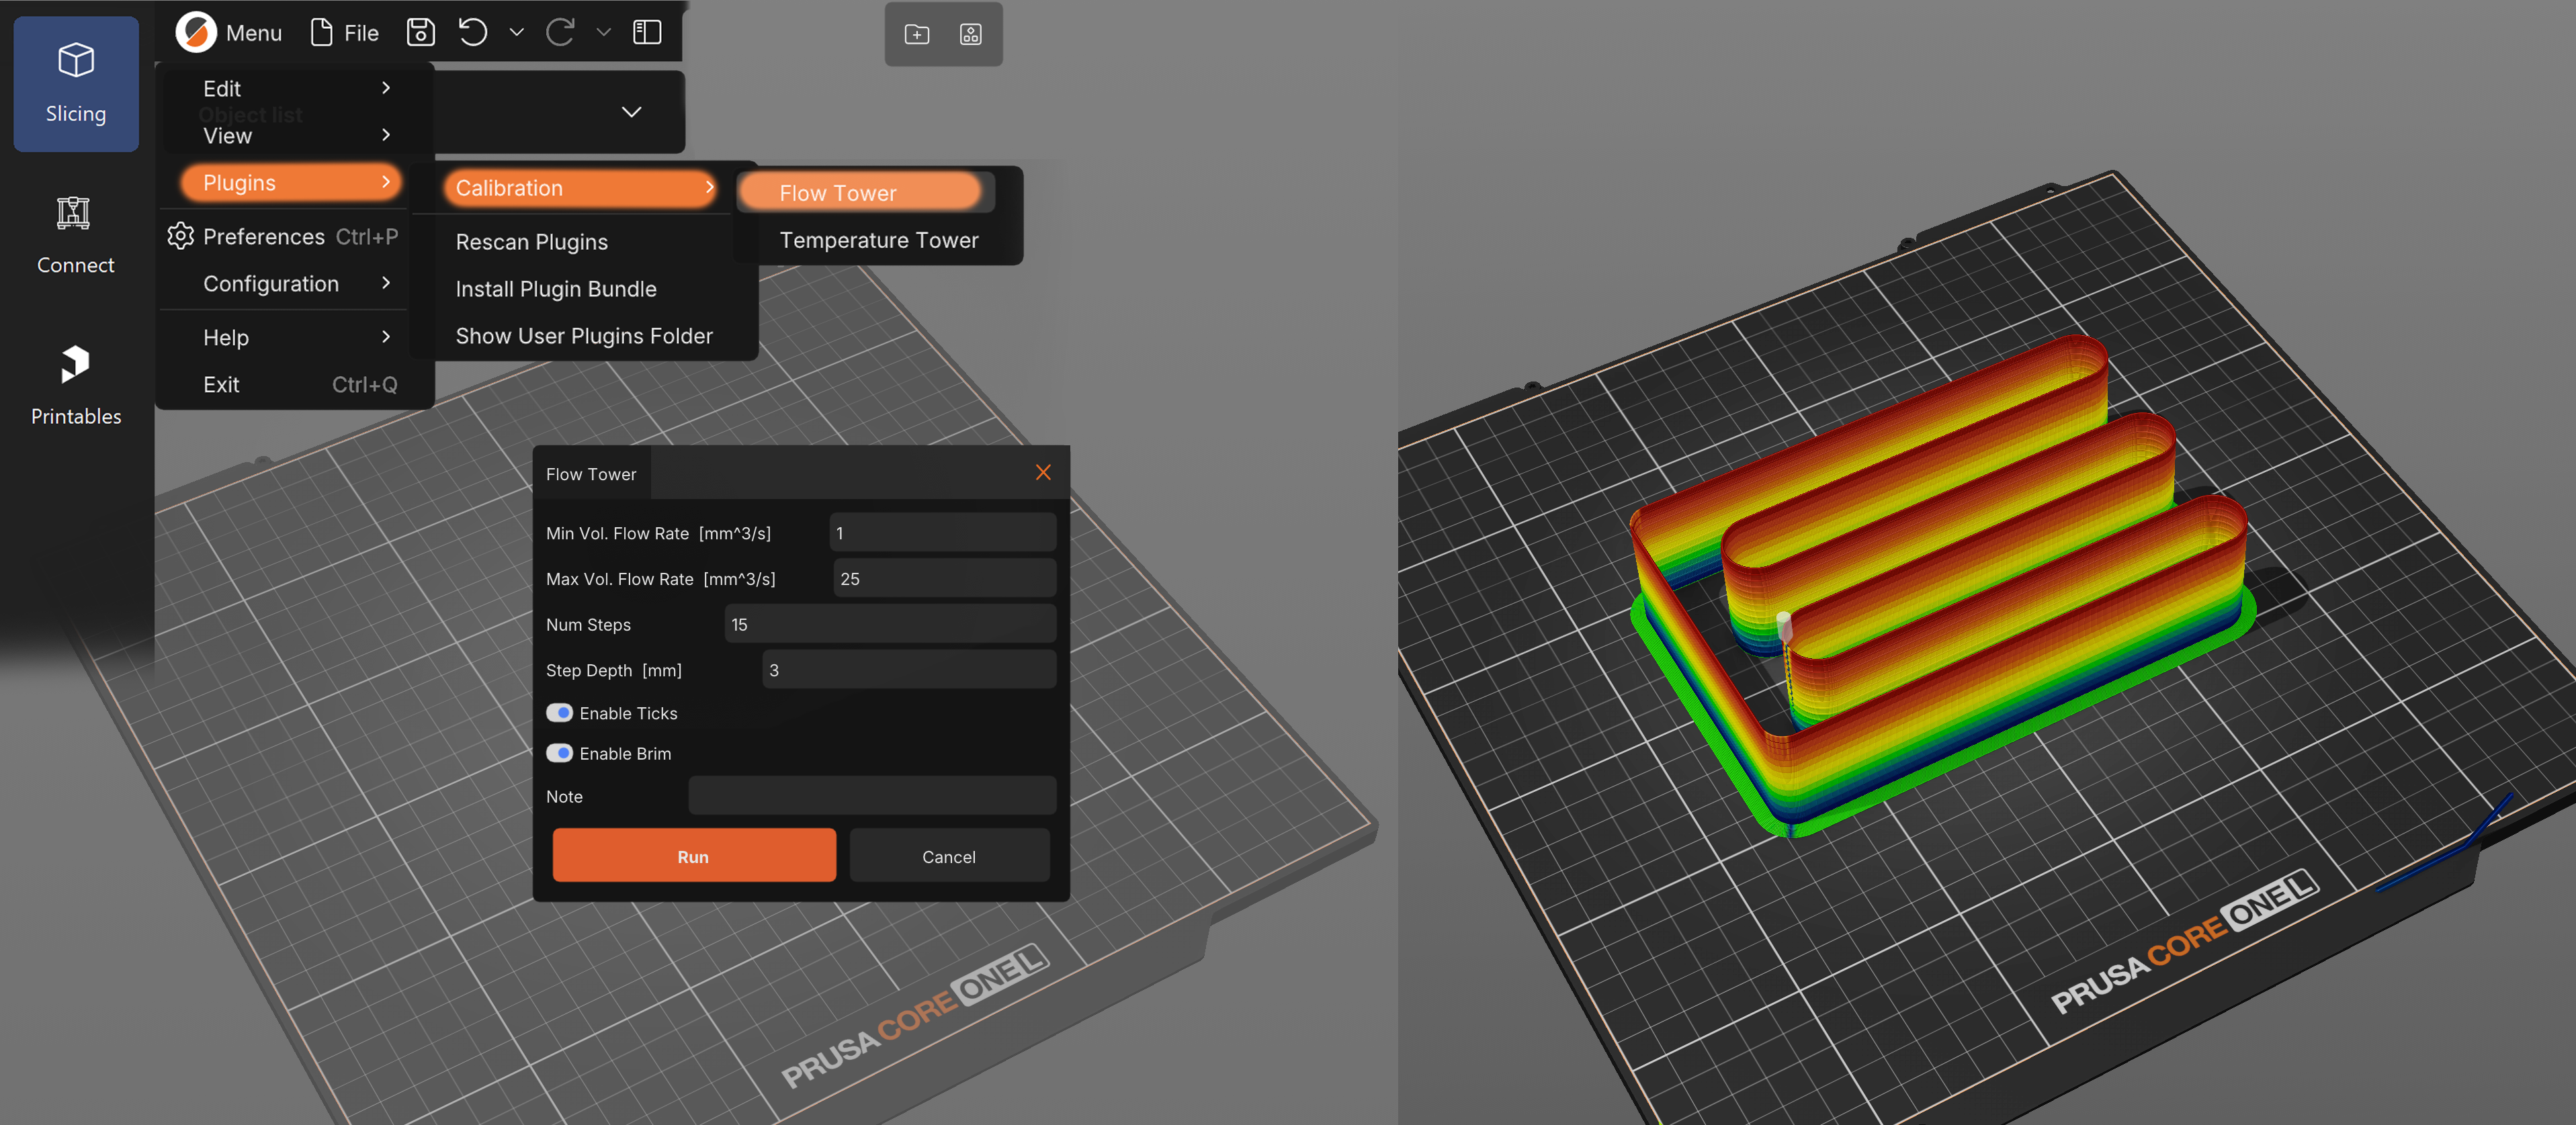
For start, we’ve picked one area where plugins can be really useful, and that’s calibration prints. PrusaSlicer 3.0 comes with two built-in parametric calibration prints: Flow tower, and Temperature Tower. You select the desired print, type in the parameters in a dialog, confirm, and a project containing an object and settings materializes – you can then save or slice it, like any other project. The dialog and the whole “project generation” logic are not embedded inside PrusaSlicer source code, but distributed alongside it in the form of Lua plugin.
The implementation in 3.0 is purposefully still quite basic. We want to get it into your hands, see what people build with it, and then decide where it makes sense to take it next. For those interested in how it works under the hood, here are a few technical notes.
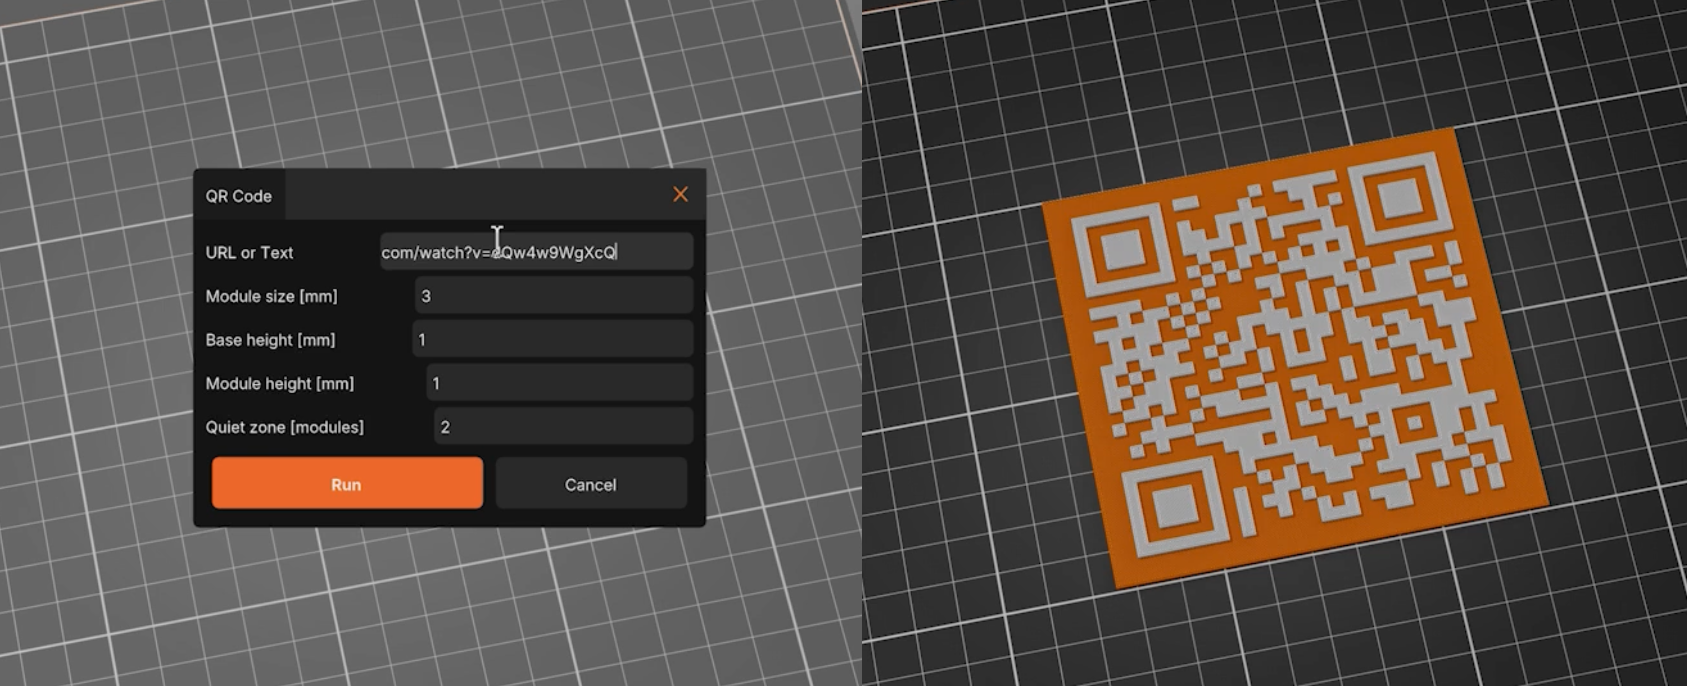
How plugins work in PrusaSlicer 3.0
The application scans the plugin folder and builds the menu items dynamically. The plugin defines its inputs, PrusaSlicer builds the parameter input dialog accordingly and passes the values to the plugin when it is executed. Plugin communicates with PrusaSlicer using some defined API.
We have certain plans on where to move with all this, but at this point we present this purposefully minimal implementation so we can hear your opinion. Couple of notes though:
The Lua API is now experimental and it is subject to change. We will probably do a breaking change every now and then, it will most likely never be completely stable.
Currently existing plugins are of project.plugin type – their purpose is to create objects programmatically. The architecture is ready for more plugin types, with their own purposes.
The API currently revolves mainly around adding something new to the scene, rather than being able to manipulate what is already there. Still, even with this basic API, we managed to create so many more tools, and we’re sure you’ll have a ton of fun with them too.
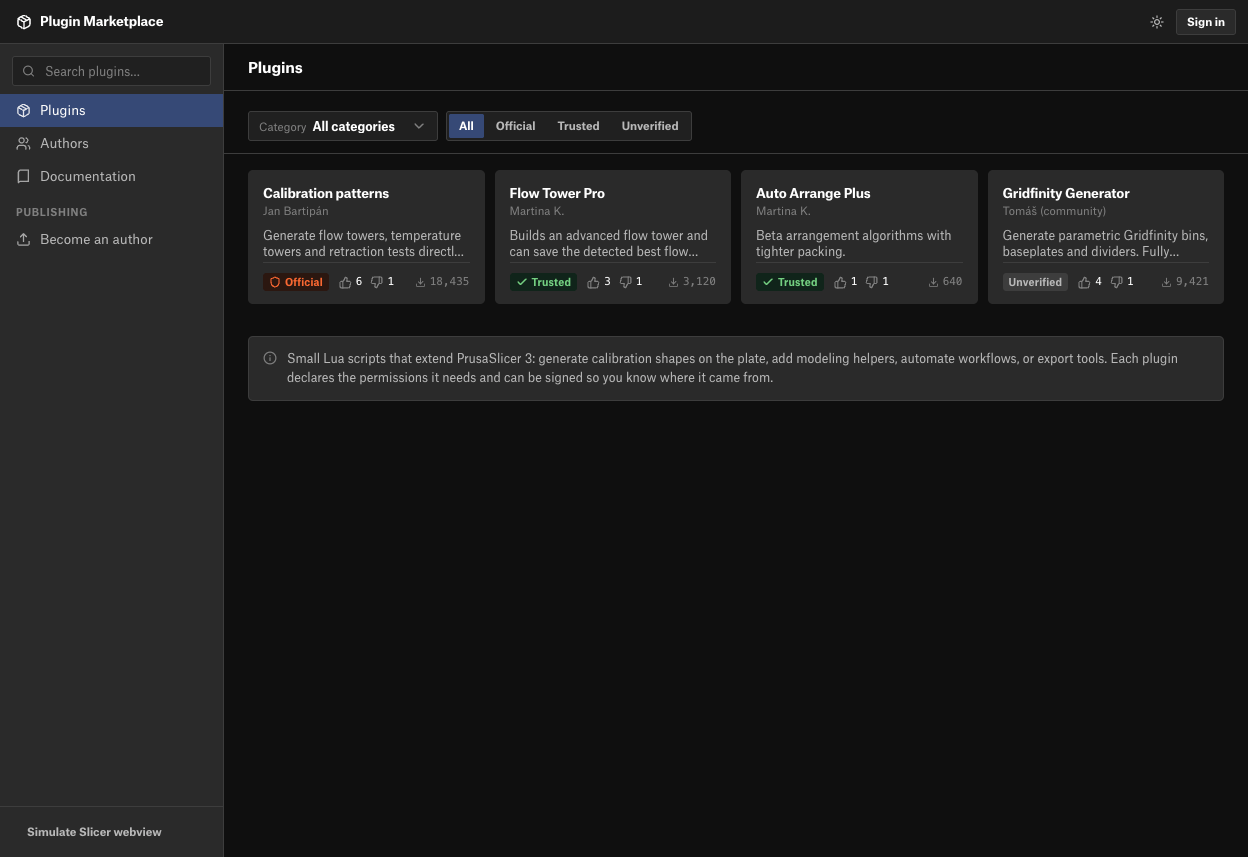
We’re also putting together a basic plugin marketplace. Anyone can upload their own plugins, and others can easily install them and rate them. This functions similar to how Printables does so you can see what’s popular. We’re almost ready with this, the community plugin marketplace will be included in one of the next releases.
Plugins run in a sandbox by default. They have no general access to your disk, no access to your data outside of the loaded project, and no access to HTTP, sockets or other network communication. In the future, we may allow users to explicitly grant some of these permissions to trusted plugins or authors.
Plugins submitted to the marketplace also go through our review process. You can still install unverified plugins at your own risk; they may contain bugs, slow PrusaSlicer down or even crash it, but the sandbox is designed to stop them from reaching outside the slicer.
Performance improvements
Although PrusaSlicer 2.x was already one of the few applications that could handle even very demanding models, with milions of triangles, it would occasionally become unresponsive for a short while, for example, when a slicing task was being cancelled. The startup time of PrusaSlicer 2.x was also quite long because of the many things that were done at the time.
Thanks to the big internal refactoring, the difference should now be easy to feel. PrusaSlicer starts faster, slicing is faster, and whole projects with multiple beds can now be sliced in parallel.
Security and true offline mode
The PrusaSlicer is already leading on the security front with no surveilance baked in and the actual whole source code available for your eye on github. We are not hiding anything.
But we are improving it. The slicer gains a new offline mode where the networking libraries are not even loaded. The new plugin system is designed with security in mind too, with full sandboxing, that means plugin has no access to your data outside of the loaded project and no access to networks. Enabling you to deeply customize your workflow without adding any risk. On top of that we are checking all the plugins submitted to the new plugin marketplace. All this ties nicely with the upcoming Prusa Connect Local, a little cloud running in your home or on premise.
We don’t want to see your files and they are the most secure on your hardware.

When we started integrating Prusa Connect and Printables into PrusaSlicer 2.8, we were clear that all of it was optional. But people were understandably wary. Some considered it the first step toward mandatory logins. Others pointed out, fairly, that when online features are disabled, there shouldn’t be any web-related processes running at all. We heard all of that.
In PrusaSlicer 3.0, you can selectively disable every online service (Connect, Printables, even profile update checks) before any network communication happens. And in full offline mode, the networking libraries are not loaded at all. PrusaSlicer runs in complete isolation. No firewall alarms, no background connections. Airgapped and restricted environments are fully supported.
Why we rewrote PrusaSlicer
At this point, the changes above probably make it clear that PrusaSlicer 3.0 goes quite a bit deeper than a normal feature update.
And this is where the big rewrite comes in.
Over the past decade, PrusaSlicer grew from a simple slicing tool into the foundation that millions of people rely on every day, whether they use PrusaSlicer directly or by using software built on top of it – OrcaSlicer, SuperSlicer, BambuStudio, Creality Print, Anycubic Slicer Next, QIDI Slicer, ElegooSlicer, Flash Studio Desktop, Snapmaker Orca, and others.
It was started by @alranel on September 1, 2011, as Slic3r, forked by us, and continuously developed ever since. And that makes today a pretty special day for this release: exactly 15 years after the very first Slic3r commit, we’re releasing the first public preview of PrusaSlicer 3.0. A new major version, built on a new foundation, on the anniversary of the commit that started it all.
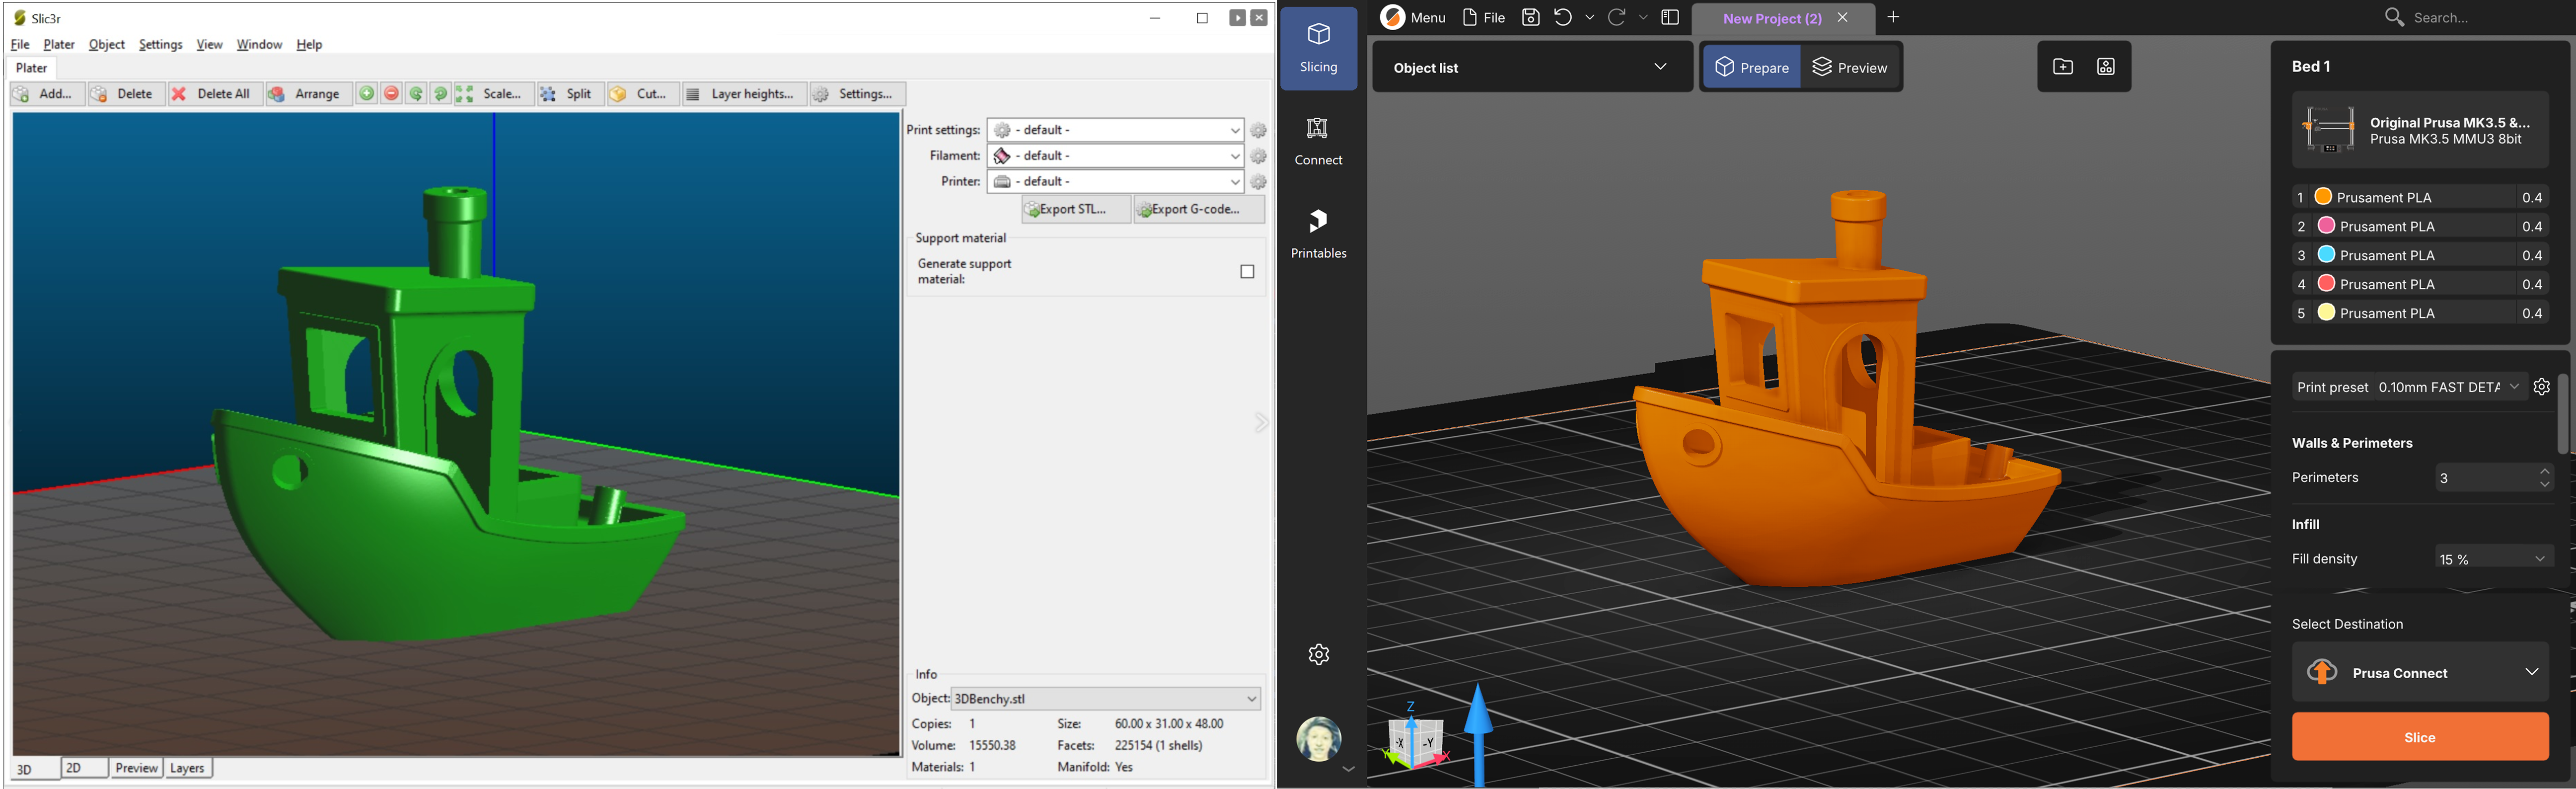
The road from that first Slic3r commit to PrusaSlicer 3.0 was anything but straightforward. We completely rewrote the application from the Perl programming language (does anyone still remember it?!) into C++ in several steps. This alone led to architectural compromises.
And we kept adding new features for workflows that would have been unimaginable when the original architecture was first designed. Settings modifiers, multi-tool printers, projects with multiple beds, support and color painting, SVG and text editing, color-mixing, remote printer management, and more.
Each of these features made sense on its own. But together, over many years, they created a lot of technical debt. This is one of those software terms that sounds abstract until you see it in real life. In practice, technical debt means that a simple change stops being simple. A bugfix touches places it should not touch. A new feature needs strange workarounds because of some decision made in 2016.
The moment when we really knew we had gone too far was when we sometimes looked at an obvious bug and thought: “Yes, this is wrong, but fixing it will cause something worse.”
So we finally did the big leap forward and rewrote a very large part of the code.
What the rewrite lets us do next
The new architecture is designed with carefully defined responsibilities, interfaces and data flow, it is better covered by tests, and the user interface code was cleanly remade from scratch. The proven architecture of the slicing backend was kept, although substantial changes in the backend code were done as well.
I know users don’t have a reason to care about software internals. But this is what made everything below possible, and what will let us ship new features faster from here on.
We want PrusaSlicer to be simple when you need it to be simple, and powerful when you need more control.
The PrusaSlicer we’re building is seamlessly connected to the rest of the printing ecosystem. It knows which printers are available, what materials are loaded, which projects you worked on from another device, and where the finished G-code should go next. For people who need or want it, it runs perfectly completely offline and never even loads any of the networking code.
It runs on almost any device, but fully takes advantage of the computing power when it is available.
While we’re already closer to this vision than ever before, PrusaSlicer 3.0 is more of a new beginning, not a finish line. What you see in 3.0 is the foundation we want to keep building on.
Open source
We’ve noticed various discussions about this on social media. PrusaSlicer 3.x is released under AGPLv3, meaning that it stays as open as PrusaSlicer 2.x, Slic3rPE and original Slic3r. This is in line with the will of @alranel, who has laid the foundations that we (and not only we) now proudly stand on.
Although the GUI rewrite was so massive that it would have been technically possible to separate it from the slicing backend and close its source code without violating the licence, we have decided to honor the principles that our company was based on from the very beginning. You are free to read or modify the source code as you like, provided that you in turn release the source code of any derived work and let others do the same if they so choose (read full AGPLv3 licence for details). The open source journey continues, and everyone is welcome to follow it with us.
Compatibility
- 3MF from PrusaSlicer 2.x: loads with both geometry and settings. Your modified values stay flagged as modified.
- 3MF from PrusaSlicer 3.x in 2.x: geometry loads, settings are discarded. PrusaSlicer 2.9.1+ will notify you about this.
- Third-party 3MF (Bambu Studio, OrcaSlicer): imported as geometry.
- STL, OBJ, STEP: work as expected.
- Side-by-side installation: PrusaSlicer 3.x saves profiles into a separate directory. It runs alongside 2.x with zero conflicts.
What’s not ready yet
This is an early preview, and not the kind of polished, nearly-ready alpha that we have shipped in the past. Some of the issues we know about, others we don’t. What you are seeing is not a production build, this is an unfinished alpha which aims to present the general direction we are taking.
It is also worth noting that the preview build is not feature complete (when compared to 2.9.6). We are still working on porting various things from PrusaSlicer 2.x and sadly, some of them have to wait for 3.1.0 to be fully reimplemented. While we understand that this is a nuisance, a large part of the application was rewritten from scratch and reimplementing everything takes time and effort – PrusaSlicer has surprisingly many features.
You can find the list of unfinished features at the end of this change log.
What comes next
Try it. Break it. Tell us what’s wrong and what’s right. Report bugs in the GitHub repository or on our forum. If you build a plugin or publish a community profile, let us know. We want to see what you make with this.
Just downloaded it and, for an alpha, it's a really exciting step towards a modernised experience! Massive congratulations to the team handling this migration. I'm pleased to see that slicing appears to be quite a lot faster.
Does this support the 3Dconnexion SpaceMouse for enhanced viewport control?
If you read through the release notes, you will See that it is not Ready yet.
Linux seems to load 2.9.6-rc1 and not the 3.0.0 alpha
According to the Community Discussion streamed today https://www.youtube.com/watch?v=3vHgd9U0SAg the linux version was compiling during the stream and the flatpack should be ready by midnight CET tonight. (Today is 2026-09-01).
The commit is in there, but the build failed. Guess they still have some work to do 🙂
The beta for 3.0.0 is in flathub-beta now.
Sadly, I do not see the preview in flathub-beta for Linux yet. All that is listed is 2.9.6. I will have to try again later.
Is there mcp server for the slicer?
Does it currently only support Prusa printers?
According to the announcements, that is correct for now. Currently the pre-alpha (crashed twice on me already) only supports Prusa printers. They plan to add support for other printers as development progresses.
Is there any documentation on the Lua Plugin API yet? Even a pointer to a living document with all the notices and caveats that it "will probably change significantly tomorrow".
Hi, I'm not able to sign in or open printables. Is this available yet?
La línea de comando dada por la mismísima prusa para instalar la beta 3.0.0-alpha11 en Linux desde Flatpak NO INSTALA la BETA 3.0.0-alpha11, sino que la beta de 2.9.6…
!!!UNA MIERDA!!!
Aaí cómo vamos a ayudar a testear??????????????
Deberias relajarte un poco. La build de flathub ha fallado por tanto se descarga la ultima que tiene guardada, ya lo arreglarán a lo largo de estos dias.
Respira amigo
Learn some manners.
Can OpenScad send guidelines to PrusaSlicrer instead of manual slicing, supports etc?
"The API currently revolves mainly around adding something new to the scene, rather than being able to manipulate what is already there. Still, even with this basic API, we managed to create so many more tools, and we’re sure you’ll have a ton of fun with them too."
I hope the ability to change existing objects is not neglected. I see it being more useful for manipulating existing objects rather than just creating new ones. The creating new ones is a good thing, but I can see a lot of use of manipulating existing objects being equally important.
Will we get a option to never load filament/printer settings from 3mf files?
I mean, when I modify things like start gcode/end gcode, all my existing 3mf files use a existing copy of printer configuration saved within the 3mf file itself.
Or I modify settings like temperatures on some filament, and old projects still have the "old" values stored in them.
I would love to see option to only store reference to settings in 3mf files (say, use "prusament petg" filament, but not store entire copy of "prusament petg" inside the 3mf file itself)
With that said, I can see why the current behavior makes sense.
Or, maybe there already is a toggle for that that I missed?
The addition of calibration prints is a BIG improvement. Well done. I would love to see "retraction tower" added to the list of calibration prints.
As soon as the alpha version is available for linux, I am giving this a try.
Someone has already created three calibration plugins.. just a matter of time I suspect..
https://www.reddit.com/r/prusa3d/s/mqgOL4duj9
Not only are there those three calibration plugins, but someone else has thrown Claude at the API and come up with a gridfinity base generator plugin: https://github.com/BellionBastien/the-grid-father/tree/main
Read his readme.md for the repository. He has a section about the current state of the API, what is and isn't supported. More documentation than Prusa has provided (or that I can find)…
I was at first thinking that the plugin API might be a way for others to incorporate compatibility aspects of being able to load OrcaSlicer/BambuStudio profiles and 3mf files to remap their settings to the PS3.x settings (maybe even translate other slicer, including Cura, custom g-codes to the place-holders that PS uses). But the line "They have no general access to your disk, no access to your data outside of the loaded project" in the description tells me that won't be possible.
We need a whole tutorial on it.
Looks great and sounds good on paper, are we reporting all of the bugs on github? Being unable to login to printables or connect is gonna make users not want to test
Thank goodness this new slicer is open source! Keep doing what you are doing Prusa, this is great!
Don’t forget to add the SL1S there as well, because I couldn’t find it! Apart from that, it looks the same, just a bit more modern.
I really hope there will be a possibility to save the filament incl color per printer, after a first attempt, the material is stored / selected per project, but my two printers have different materials and colors in it.
This selection needs to be permanent, until I change one of the firmaments (preferably with the option to be stored in the cloud, so that it doesn't matter which computer I'm using)
Hey, I saw something about this new version not currently being accessible to screen readers and tested it myself, is this going to be fixed in the full release?
Ok, think I'm missing something obvious here.. how do I log into my Prusa account (not Printables).. I click log in and a window pops up.. but then nothing.. nothing in the pop up, not browsers open..
I encountered this problem also. In my case it appears to have been caused by also having PrusaSlicer 2.9.6 loaded before launching PS 3.0. When I shut down both and then loaded PS 3.0 I was able to login to my Prusa account. This also allowed the Connect and Printables buttons to work as expected as well. I hope this information helps.
The new interface is extremely ugly. Will it be possible to return back to the old one from current 2.9.x versions?
Is it just me or are only Prusa Printers supported so far? I'm trying to do a generic Klipper config and can't get past the printer selection screen. What am I missing?
What you are missing is their repeated statements that for alpha11 they only have Prusa printers supported. Support for other printers is in the plan, but not at this development stage yet.
In other words: "Patience, grasshopper."
Appreciate the open source and preview.
Taking UX seriously always pays off.
Also a wise decision to rewrite it from the backbone on. I doubt that the 2.x terror could be saved. It needs courage and its rare companies do it. So I'm quite impressed.
It was about time for an update though. I almost started myself working on it but read you are redoing it from scratch.
I wish you best success with 3.x
——–
+1 on MCP / API access
Bravo!
A couple of requests..
1. Along with the WHAT, please include the WHY a feature was added or changed.
2. This is not meant as a criticism, but truly curiosity. WHY do I CARE. Some times the what only obscures why I will want the new.
3. A tutorial that helps the old timers more easily make the move.
This is exciting, please help smooth the way for those of us that optimized the work flow in 2.x!
Where do we report issues found in the beta release?
Report issues on github here: https://github.com/prusa3d/PrusaSlicer/issues
Several bugs have already been reported, so please search before blindly reporting an issue. We don't want to waste the Prusa team's time sorting through duplicate issues.
Nice improvements and I look forward to using it…I know this is a pre-release, but i crashed it so fast in my using it, it might not be usable yet. I was changing my filament in the two extruders I set up. the first one worked PLA to PETG, the second one PLA to PETG….Immediate crash when i sliced it, manual or automatic. I was able to save often and I did manage to save my g-code. Even with the excessive crashing, the g-code and the printed part turned out great.
This is the wrong place to report bugs, I doubt the dev team pays attention to the blog comments. Once you can reliably duplicate an issue, report it on github with as many details as you can provide to help the devs find the root cause here: https://github.com/prusa3d/PrusaSlicer/issues
Several bugs have already been reported, so please search before blindly reporting an issue. We don't want to waste the Prusa team's time sorting through duplicate issues, we want them to devote their time to fixing bugs and getting PS3.x to final release. 🙂
The plugin system is fantastic. I've already created three plugins that solve print optimization problems at the slicer level. Problems I've been struggling with for years. More information in my thread on the Prusa forum: https://forum.prusa3d.com/forum/prusaslicer/thank-you-for-the-plugin-direction-in-3-0-three-slicing-plugins-it-made-possible-and-a-pr/
This sounds great, I'm looking forward to trying it out! One topic I'm missing is accessibility features. Will it have screenreader support and UI customization re fonts, font sizes, colors etc. beyond dark/light mode? I suppose some of this could be done with plugins but it would be good to have it built-in 🙂
How to add second Extruder with MK4S on prusa slicer 3.0. On Previous slicer it was on printer General option.
Great news! Just Downloaded.
Any plans to redo the prusa academy courses using prusa slicer 3.0?
La interface es realmente fea, parece cura, lo cual es muy feo para mi !
Great, carry on!
I think PrusaSlicer 3.0 is a huge improvement over version 2.9, but the right-side menu could use some further refinement. At the moment, it takes too many clicks to adjust settings, mainly because of all the plus buttons.
My suggestion would be to simplify the right-side menu. Maybe take another look at the OrcaSlicer UI and borrow some of the things that work really well there.
Overall, PrusaSlicer 3.0 is shaping up to be a massive improvement, so keep up the great work!
Sounds like PrusaSlicer 3.0 has officially entered the “I know what you want better than you do” phase.
The random embossed text would be the final straw for me too. Crashing is annoying enough, but when it crashes and then adds design features you didn't ask for, that's getting a bit ambitious.
And yes, the menu system sounds like the real punishment:
“Just change one setting.”
45 minutes later…
“Where the hell did they hide it?”
I think your plan makes sense. Either go back to the previous version that was stable, or try another slicer rather than spending hours fighting 3.0. A slicer should be boringly reliable—you shouldn't need a degree in menu archaeology just to adjust a print setting.
I'm usually not not negative but this journey I have taken in the 3D printing world has been a curve and half. Learning a new software full of bugs and GUI issues, Think I will pass and wait for the 3.0.1, no I thing 3.1, a total overhaul GUI and bug fixes… Look forward to it.
I like the new UI desing so far and found out options that I didn't even notice in old UI design.
What I would like is:
The favourite options in the right side to be clickable
– like I want to adjust some option in "Walls and perimeters", I should be able to click on it and the context window would open right in that section.
So far pretty pleased with what I'm seeing in 3.0.12. Definitely more stable, so far… It would be nice to set a default printer on startup. mine always reverts to "Core One", I'm still using MK4S and MK4S+MMU. I'm also not able to save adjustments to my material settings globally.
Very hard to add a non prusa printer un it, when its works i change the nozzle and it crash …
We plan to add support for non-Prusa Printers in the near future. The release notes go into more details as to the currecnt direction, but simply put, due to profile changes, it allowed faster development as they would not have to redo all profiles each time.
I do as much printing as possible with the 3.0 Alpha. The print results are no different from version 2.9.6. I have no issues signing in to Printables or Connect with the Alpha. In my case, on Windows 11, the Alpha uses Microsoft Edge WebView2 to display these pages.
There are still some crashes when changing printer settings and occasionally when importing additional objects. The new right-hand menu is a good idea, but modifying settings often requires too many clicks because of the "+" buttons.
Overall, the user experience requires some adjustment, especially for those who are familiar with the previous version.
Personally, I think Prusa is doing the right thing by completely rebuilding version 3.0 from the ground up. Keep up the good work. It's the right direction to take.
Can you please add a mouse navigation profile to behave like Autocad or Onshape where the scroll wheel zooms to the mouse pointer? I tried all of the included profiles and none of them do that. That has always been frustrating as holding the shift button does not always behave like it should.