


Update December 18th, 2023: We are updating the article with the info about two new minor releases of firmware v5.1.2 (complete release notes) and PrusaSlicer 2.7.1 (complete release notes). Please always make sure you are downloading the latest version of our software.
Original article:
Apart from the ongoing Black Friday and Cyber Monday sale, we have plenty of other news for you. We’ve got a major firmware update for the MK4, MK3.9, XL and MINI, there’s a new stable PrusaSlicer release, we have news regarding MK3.5 (the easiest way to get Input Shaper into your MK3) and more. Let’s take a look at a quick summary to make sure you’re not missing anything important!
And before we do that, just a quick mention of one thing: in case you like the stuff we do (MK4, XL, PrusaSlicer, Prusament and more), we’d be more than happy if you decided to support us with your vote in the 3D Printing Industry Awards. It takes just a minute to fill in the answers and we’ll really appreciate it! 🙂

Firmware 5.1.0 is here – Input Shaper for XL and MINI, Cancel Object and much more!
Last month, we gave you a detailed overview of alpha firmware 5.1.0 with several major improvements.
The 5.1.0 firmware is now available as a stable release for the MK4, MK3.9, XL and MINI 3D printers and you can download it from here. Please note that in the case of the MINI/MINI+, you need to update to firmware 4.4.1 first if you don’t have it yet. Then, you can flash the 5.1.0 and turn your workhorse into a racehorse. 🙂
The biggest highlight of the new release is Input Shaper and Pressure Advance for both XL and MINI/MINI+ 3D printers. You can now enjoy super-fast 3D printing on both the large-format printer and also on our compact workhorse that is still going strong even years after its release – it’s simply so popular and capable we could not leave it out! And by the way – you can get the MINI+ in a special bundle with 5 filaments during the Black Friday and Cyber Monday sale.

Please keep in mind that the G-code for your printer needs to be sliced with the latest IS-enabled print profiles in PrusaSlicer. Older G-codes are compatible, but Input Shaper will be disabled when printing those. We strongly recommend updating to the latest PrusaSlicer 2.7.0 stable which has been released yesterday – we’ll get to the details in a second.
Major network code improvements and Instant printing
We spent a hefty amount of time improving various parts of the network code to bring you easier, more convenient, and faster over-the-network printing options. Once you transfer a G-code into Prusa Connect, our remote print management system, you will be able to start the printing process within seconds without the need to wait for the entire file to be transferred onto the USB drive. You can start printing pretty much immediately.

To achieve this, we had to implement four things.
First of all, we came up with a G-code streaming system. You don’t have to download the entire file at once. Instead, when you upload a G-code file into Prusa Connect, and initiate a remote print, the system will start sending (streaming) the G-code into the printer bit by bit. Once the header and a few more lines of data are received by the printer, it starts to print. Even with large files, this doesn’t take more than a few seconds. Gradually, the entire file is sent to the printer’s USB drive and is stored there for future print jobs.
Next, we focused on the G-code format itself. A G-code file format is a pretty straightforward thing. You can open it in Notepad and see the entire list of individual instructions. They are easy to read and modify. However, this also means that the format is very space-inefficient. We started looking into this situation and we came up with a proposal for a new, space-efficient (size reduced by up to 70 %), open-source .bgcode format designed for embedded platforms. We’ll get to that in a dedicated chapter because this is a major change.
The third thing we did: we replaced the PNG thumbnails in the G-code file with a much more efficient QOI image format, again saving a substantial amount of space. The only downside is that there was no way to ensure backward compatibility – this is why the thumbnails will work correctly only with firmware 5.1.0 and PrusaSlicer 2.7.0 (and newer releases). We believe it’s a small price to pay considering the benefits it brings. Also, the .bgcode file format can be read only by 3D printers running firmware 5.1.0 and newer.
Finally, we have implemented a number of fail-safe mechanisms to ensure that the network transfers are safe and reliable. In case of a fatal network failure, the print is paused once it detects that the G-code is no longer being streamed. When the connection is not about to be restored anytime soon, you can manually resume the print. Take the USB drive from the printer, plug it into your PC and replace the partially downloaded .gcode file (shown as a folder) with the regular complete .gcode file. When you plug the USB drive back into the printer, the system will recognize the file and find exactly the part of the code where the print stopped and the print job will be resumed.
A small cherry on top is the fact that you can now flash the firmware on your printers remotely via Prusa Connect (in other words – OTA firmware updates are now possible).
Proposing a new Binary G-code format
Coming up with a new file format is always a challenge. People are usually used to working with a specific file type and introducing something new may be considered unwanted or redundant.
This is why we spent a lot of time considering various options and carefully planning our steps. Eventually, we came up with a fully open .bcode file format (the entire specification can be found here). It is open-source, optimized for embedded platforms, and it can be easily converted from .bgcode back to .gcode (and the other way around), so you won’t miss the opportunity to edit the code manually. Using it is, of course, optional. Exporting binary G-code in PrusaSlicer can be enabled or disabled in Print Settings -> Output options -> Export as binary G-code. An option to convert ASCII G-code to binary (or the opposite) has been added to the File menu.
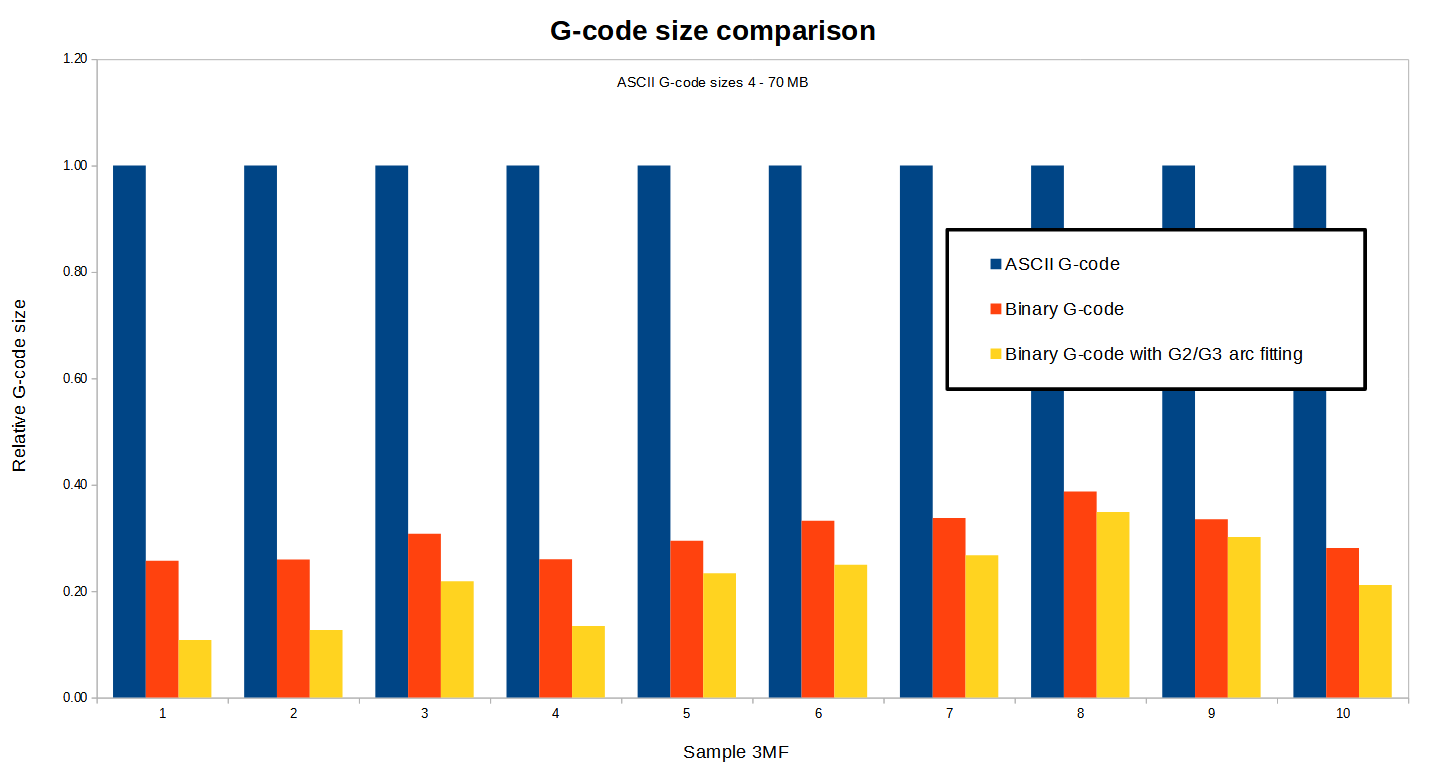
If you decide to use it, you’ll get incredibly small print files. The size difference between ASCII G-codes (the “standard” ones) and binary G-codes will depend on the contents of the file, however, our testing shows that using binary G-codes reduces the file size by 70 % on average. Plus, we’re also introducing new optimization techniques in PrusaSlicer 2.7.0 such as Arc Fitting.
While developing the format, we looked at the solutions proposed by the members of our community, such as MeatPack encoding (utilizing the fact that the character set of a typical G-code is very limited) or heatshrink compression algorithm (designed to have very small memory requirements).
Since we want the format to be fully open and easy to implement, we also provide a libbgcode library which contains the routines to convert ASCII G-code to binary and vice versa. We believe that going open-source with this new format is the way to go. You can learn more about the binary G-Code format, various compression algorithms and more technical details in the release notes here.
We would like to thank Scott Vokes (@atomicobject) for his work on heatshrink and Scott Mudge (@scottmudge) for developing and maintaining MeatPack.
Cancel Object feature in the printer’s menu
Sometimes, there are not just those happy little accidents, but more serious things may happen – like when you print a number of various models at the same time and one of them is not sliced the way you wanted, or perhaps one object came loose during printing. Canceling the entire print job is a waste.
This is why we’re introducing the Cancel Object feature which is available directly in the printer’s menu. During a running print, simply select the Cancel Object menu item, then select from the list of objects the one that should be skipped. You can, of course, use this function multiple times if necessary.
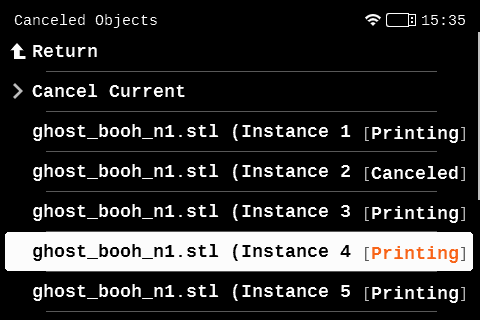
Since in many cases, the objects are instances and their names might be confusing (e.g., Instance 1, Instance 2, Instance 3), it could become difficult to recognize which name belongs to which object. This is why we also added the “Cancel Current Object” action. Wait for the nozzle to get to the object you want to skip and select Cancel Current Object. The system will automatically recognize the correct part of the G-code and disable it. Using Cancel Current Object is the recommended method. And in case you selected an incorrect object, you can use the menu actions to continue printing it.
UI tweaks and updates
We’re also constantly improving the design and functionality of the on-screen menu. For example, we have updated the print-related screens to show more information. The print progress screen features a new layout, the print end screen now displays more statistics – total print time, material consumption, and the prime tower material consumption. The printing screen now displays more information – next to the percentual progress info.
We have also included a huge update for all XL Multi-Tool owners that greatly improves the printing experience: a brand-new pre-print screen. To explain it a bit more: when you slice a multi-material object, the resulting G-code carries information about how individual materials/extruders are assigned to various parts of the object. Usually, you need to take note of this setup and make sure that PrusaSlicer settings and the actual materials loaded in the XL are in sync. The new screen allows you to remap the extruders/materials to different slots. For example, you can switch extruders one and three if you find out that the loaded colors do not match the layout in the G-code.
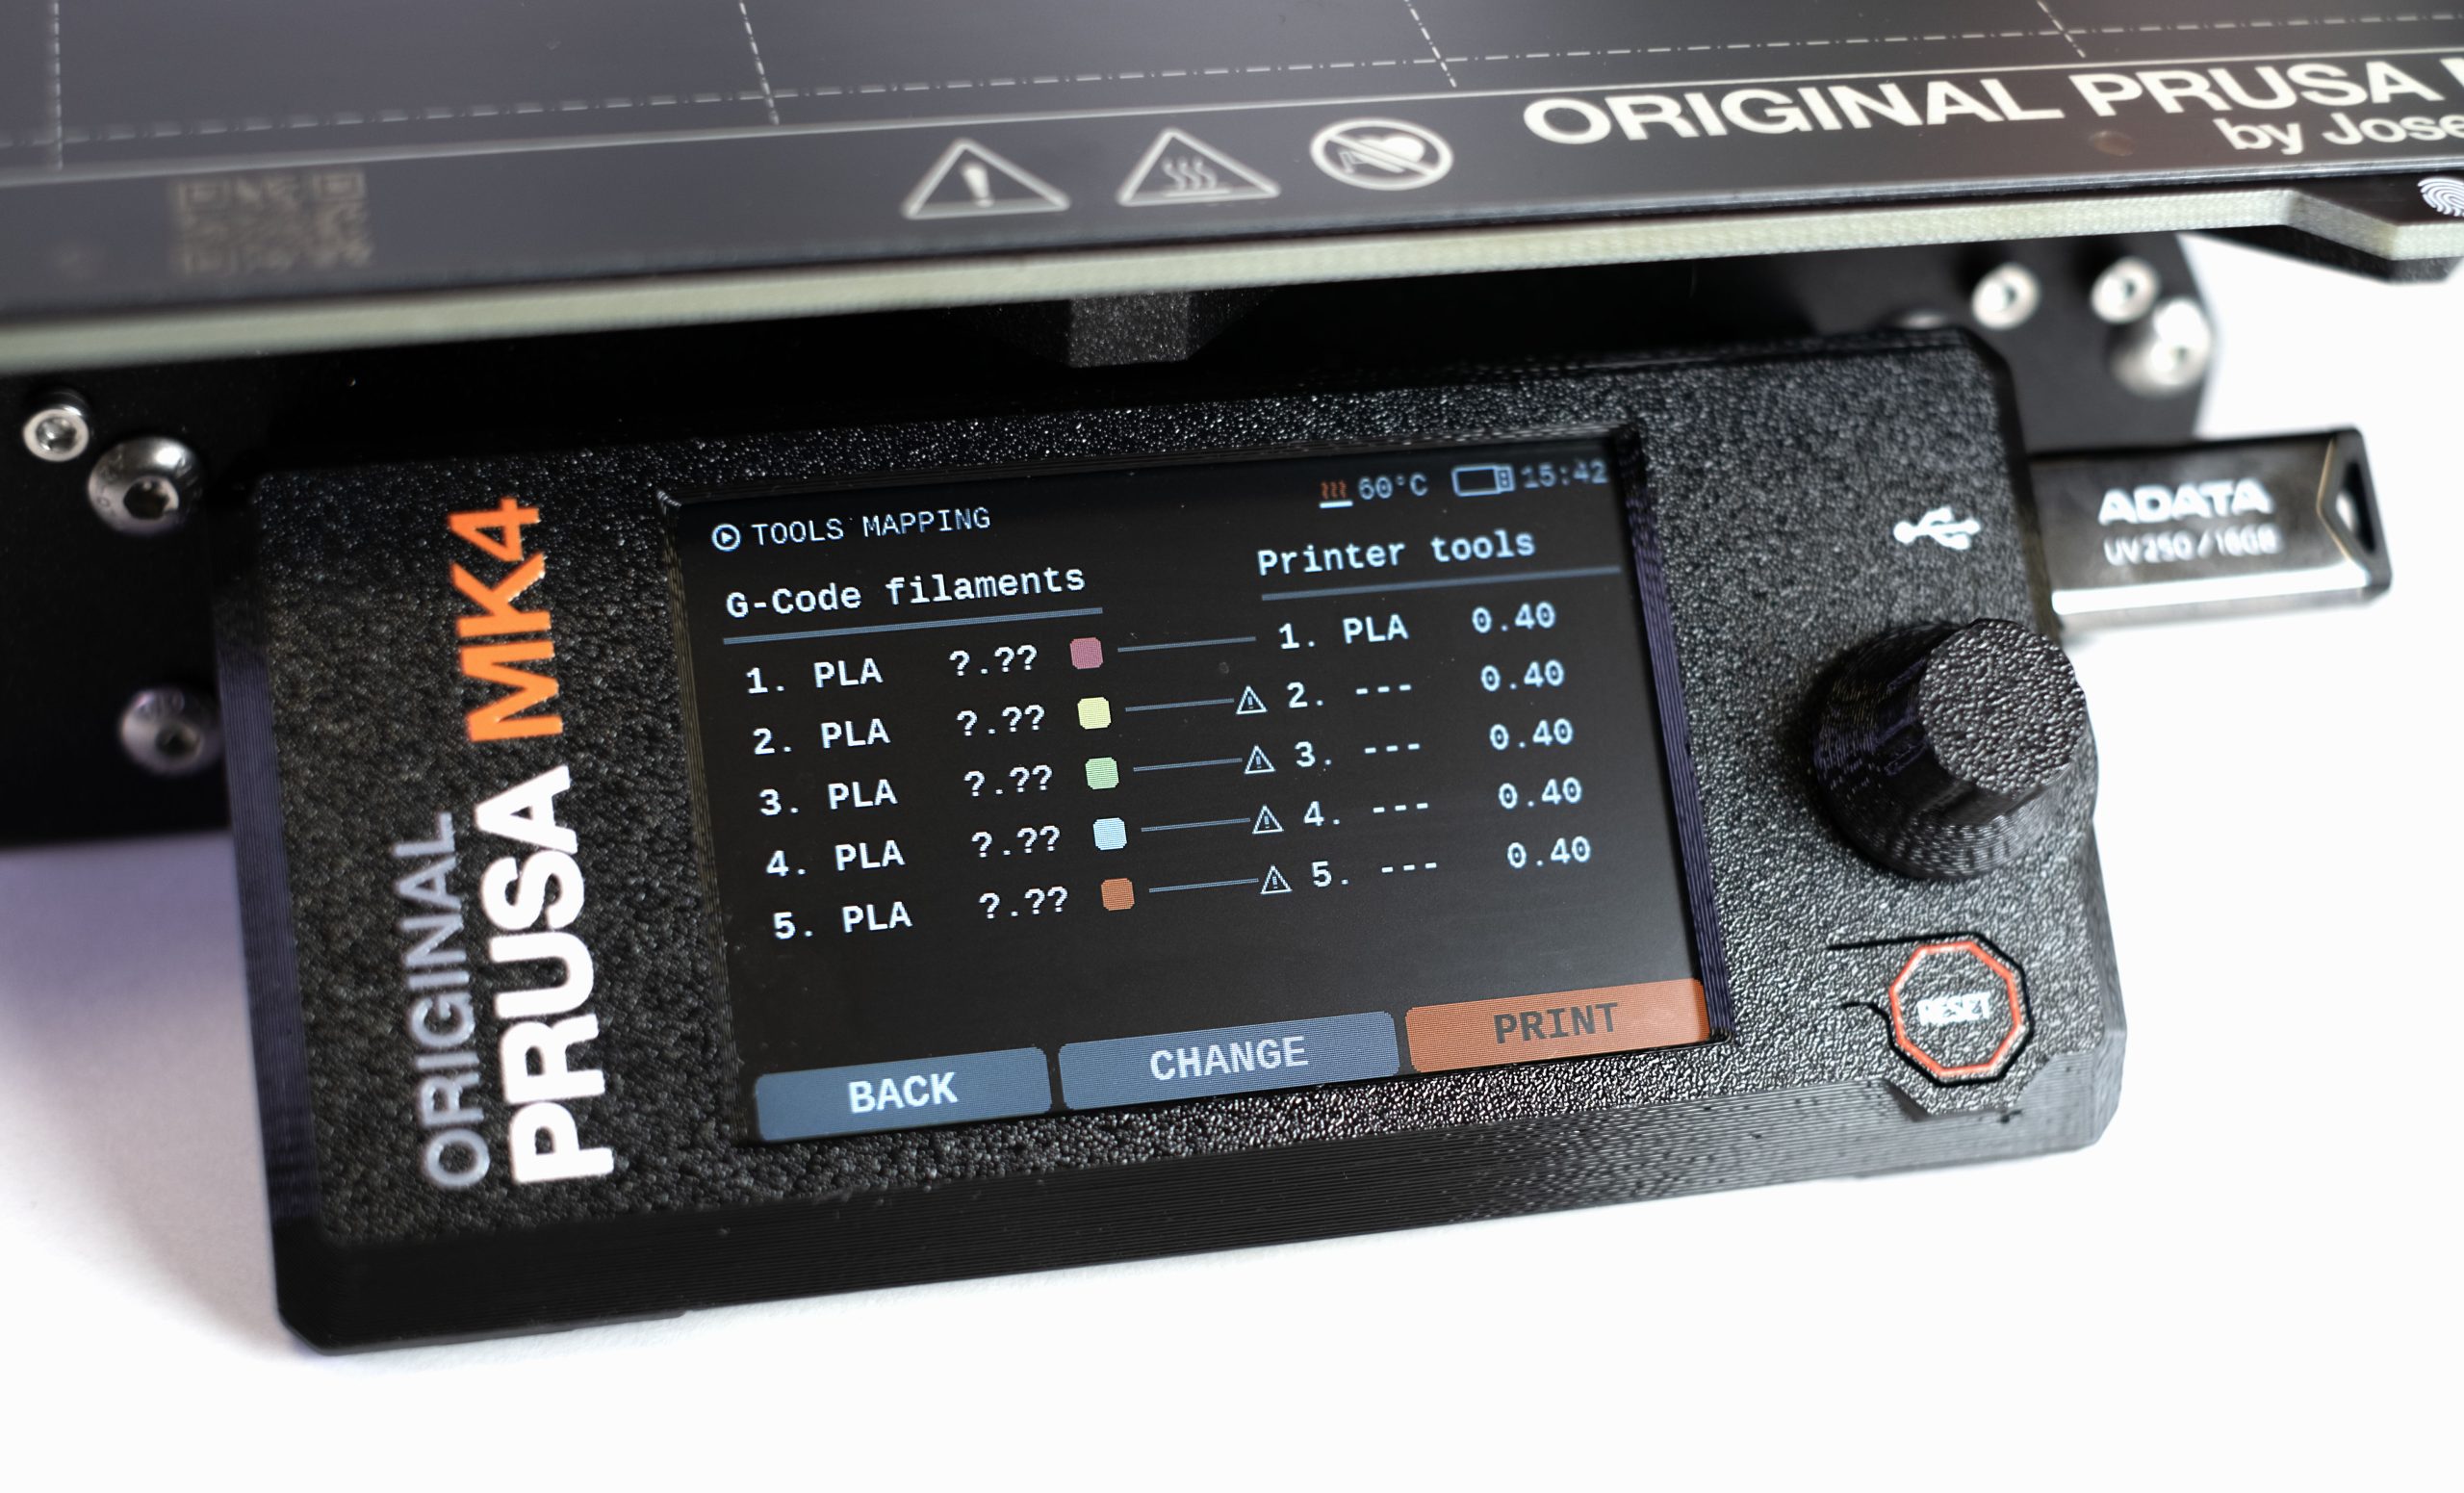
This also makes, e.g., sharing G-codes much easier, because you’re not limited by the “hardwired” material configuration inside the G-code, but you can modify the assigned materials in this screen. Also, it makes it super easy to set up the very useful Spool Join function – this feature enables you to easily consume any remaining filament from half-empty spools.
Improved Octoprint support
This firmware release also includes improvements for users utilizing OctoPrint for remote printing. It’s important to note that this implementation is still a work in progress, some features will be added (fixed) in future releases.
To make sure everything works correctly, you need to update the Octoprint profile with the following G-codes (in the GCODE Scripts section):
- After print job is cancelled: M604
- After print job is paused: M601
- Before print job is resumed: M602
Please keep in mind that support for Octoprint has several limitations at present:
- Crash detection and Power Panic are not supported
- The heat absorption screen on the XL is not displayed and it’s not possible to skip it
- Multi-Tool XL is not supported at the moment
- Binary G-Codes are not supported
You can read about all the new features, improvements, fixes and more in the full release notes here. You can download the firmware here: https://help.prusa3d.com/downloads
PrusaSlicer 2.7.0: Full of new features!
An exciting creative addition is the new SVG embossing tool. SVG stands for Scalable Vector Graphics – it’s a vector image format and PrusaSlicer now allows you to easily import these files, emboss them and even wrap them around 3D objects. Usually, you would need CAD software to make this happen, but now you can just drag and drop an SVG logo, title, or even a QR code and merge it with an existing 3D model. This vastly expands PrusaSlicer’s capabilities and we can’t wait to see what you’ll be able to do with this tool!

To continue the explanation of reduced G-code size: we are further slimming down the filesize with G2 and G3 G-codes (arc and circle moves), which is a feature based on ArcWelderLib by FormerLurker who is also the author of the famous ArcWelder OctoPrint plugin – we would like to express our huge thanks to FormerLurker for all the effort invested into the project and for making it open-source!
The function is enabled by default, but if you want to play with it, the Arc Fitting function can be found in Print Settings -> Advanced -> Slicing -> Arc fitting. The G-code size reduction will heavily depend on the contents of the G-code, but this can, in general, save dozens of percent of space.
So, when we combine the binary G-code encoding with Arc Fitting (described above), the filesize is massively reduced. You can check the following chart for a better overview.
There’s so much more in the latest stable release, though! For instance:
- Custom G-code editor
- Cancel Object feature implemented (see the chapter above)
- Improved user interface
- Generate Wi-Fi credentials for your MK4 / MK3.9 / XL / MINI 3D printer for easier network connection
- PrusaConnect print host is now available for Original Prusa MINI printer.
- …and more
Download PrusaSlicer 2.7.0 from our website. See the changelog of 2.7.0-alpha1, 2.7.0-beta1, 2.7.0-rc1 and 2.7.0-rc2 to learn more!
Original Prusa MK3.5 is coming soon!
Along with finishing the work on the Input Shaper firmware for XL and MINI, we have resumed the development of the MK3.5 upgrade. Currently, the project is in the final phase of internal testing and everything looks very promising. We expect to re-enable the orders for the upgrade in our eshop in January 2024, with the first units set to be shipped simultaneously.
The MK3.5 kit enables you to upgrade your MK3S/+ with plenty of new and useful features for a very reasonable price – you will get 32-bit electronics along with a new LCD, as well as Wi-Fi and LAN connectivity with support for remote print management via Prusa Connect. Last, but not least, the printing speed will be significantly faster thanks to Input Shaper and Pressure Advance support.
Solution for stringing on the XL
PrusaSlicer 2.7.0 brings a new feature called Z-hop ramping designed to tackle stringing on all our 3D printers – this mostly applies to the Original Prusa XL, which is a large-format printer with long travel distances and a 0.6mm nozzle. The XL uses pretty much the same extruder as the MK4, but the distances it travels may pose a problem. We made the following change: once the extruder is about to move to a distant part of the print (or, e.g., to the priming tower), it doesn’t perform the usual vertical move followed by a horizontal move. This feature is on by default once the ramping travel move is used and we consider it to be the first public iteration – we will continue to investigate this topic. More information about this feature is in the release notes here.
The feature can be turned on in Printer Settings->Extruder for each extruder you are using in the new Travel lift section. You can override the setting for each filament in the Filament overrides section. The ramping travel is parametrized by an angle and a maximal ramping lift:

However, we need to stress one extremely important thing: any kind of stringing can be easily fixed by a very simple action – by drying the filament you use. We ran intensive internal testing for several weeks and found that with a properly dried filament, there is virtually no oozing/leaking from the nozzle even after extended periods of time and thus no stringing. We kept the nozzle heated to 220 °C and we let it sit there with filament loaded. Nothing oozed from the nozzle even after several minutes. In fact, even the large 0.6mm nozzle with a properly dried filament can be so oozing-resistant that you can, theoretically, print a multi-material print on the XL completely without any sort of priming or wiping tower!
So, in case you’re experiencing visible stringing on your prints, please consider drying your filaments (even fresh ones) before further troubleshooting!
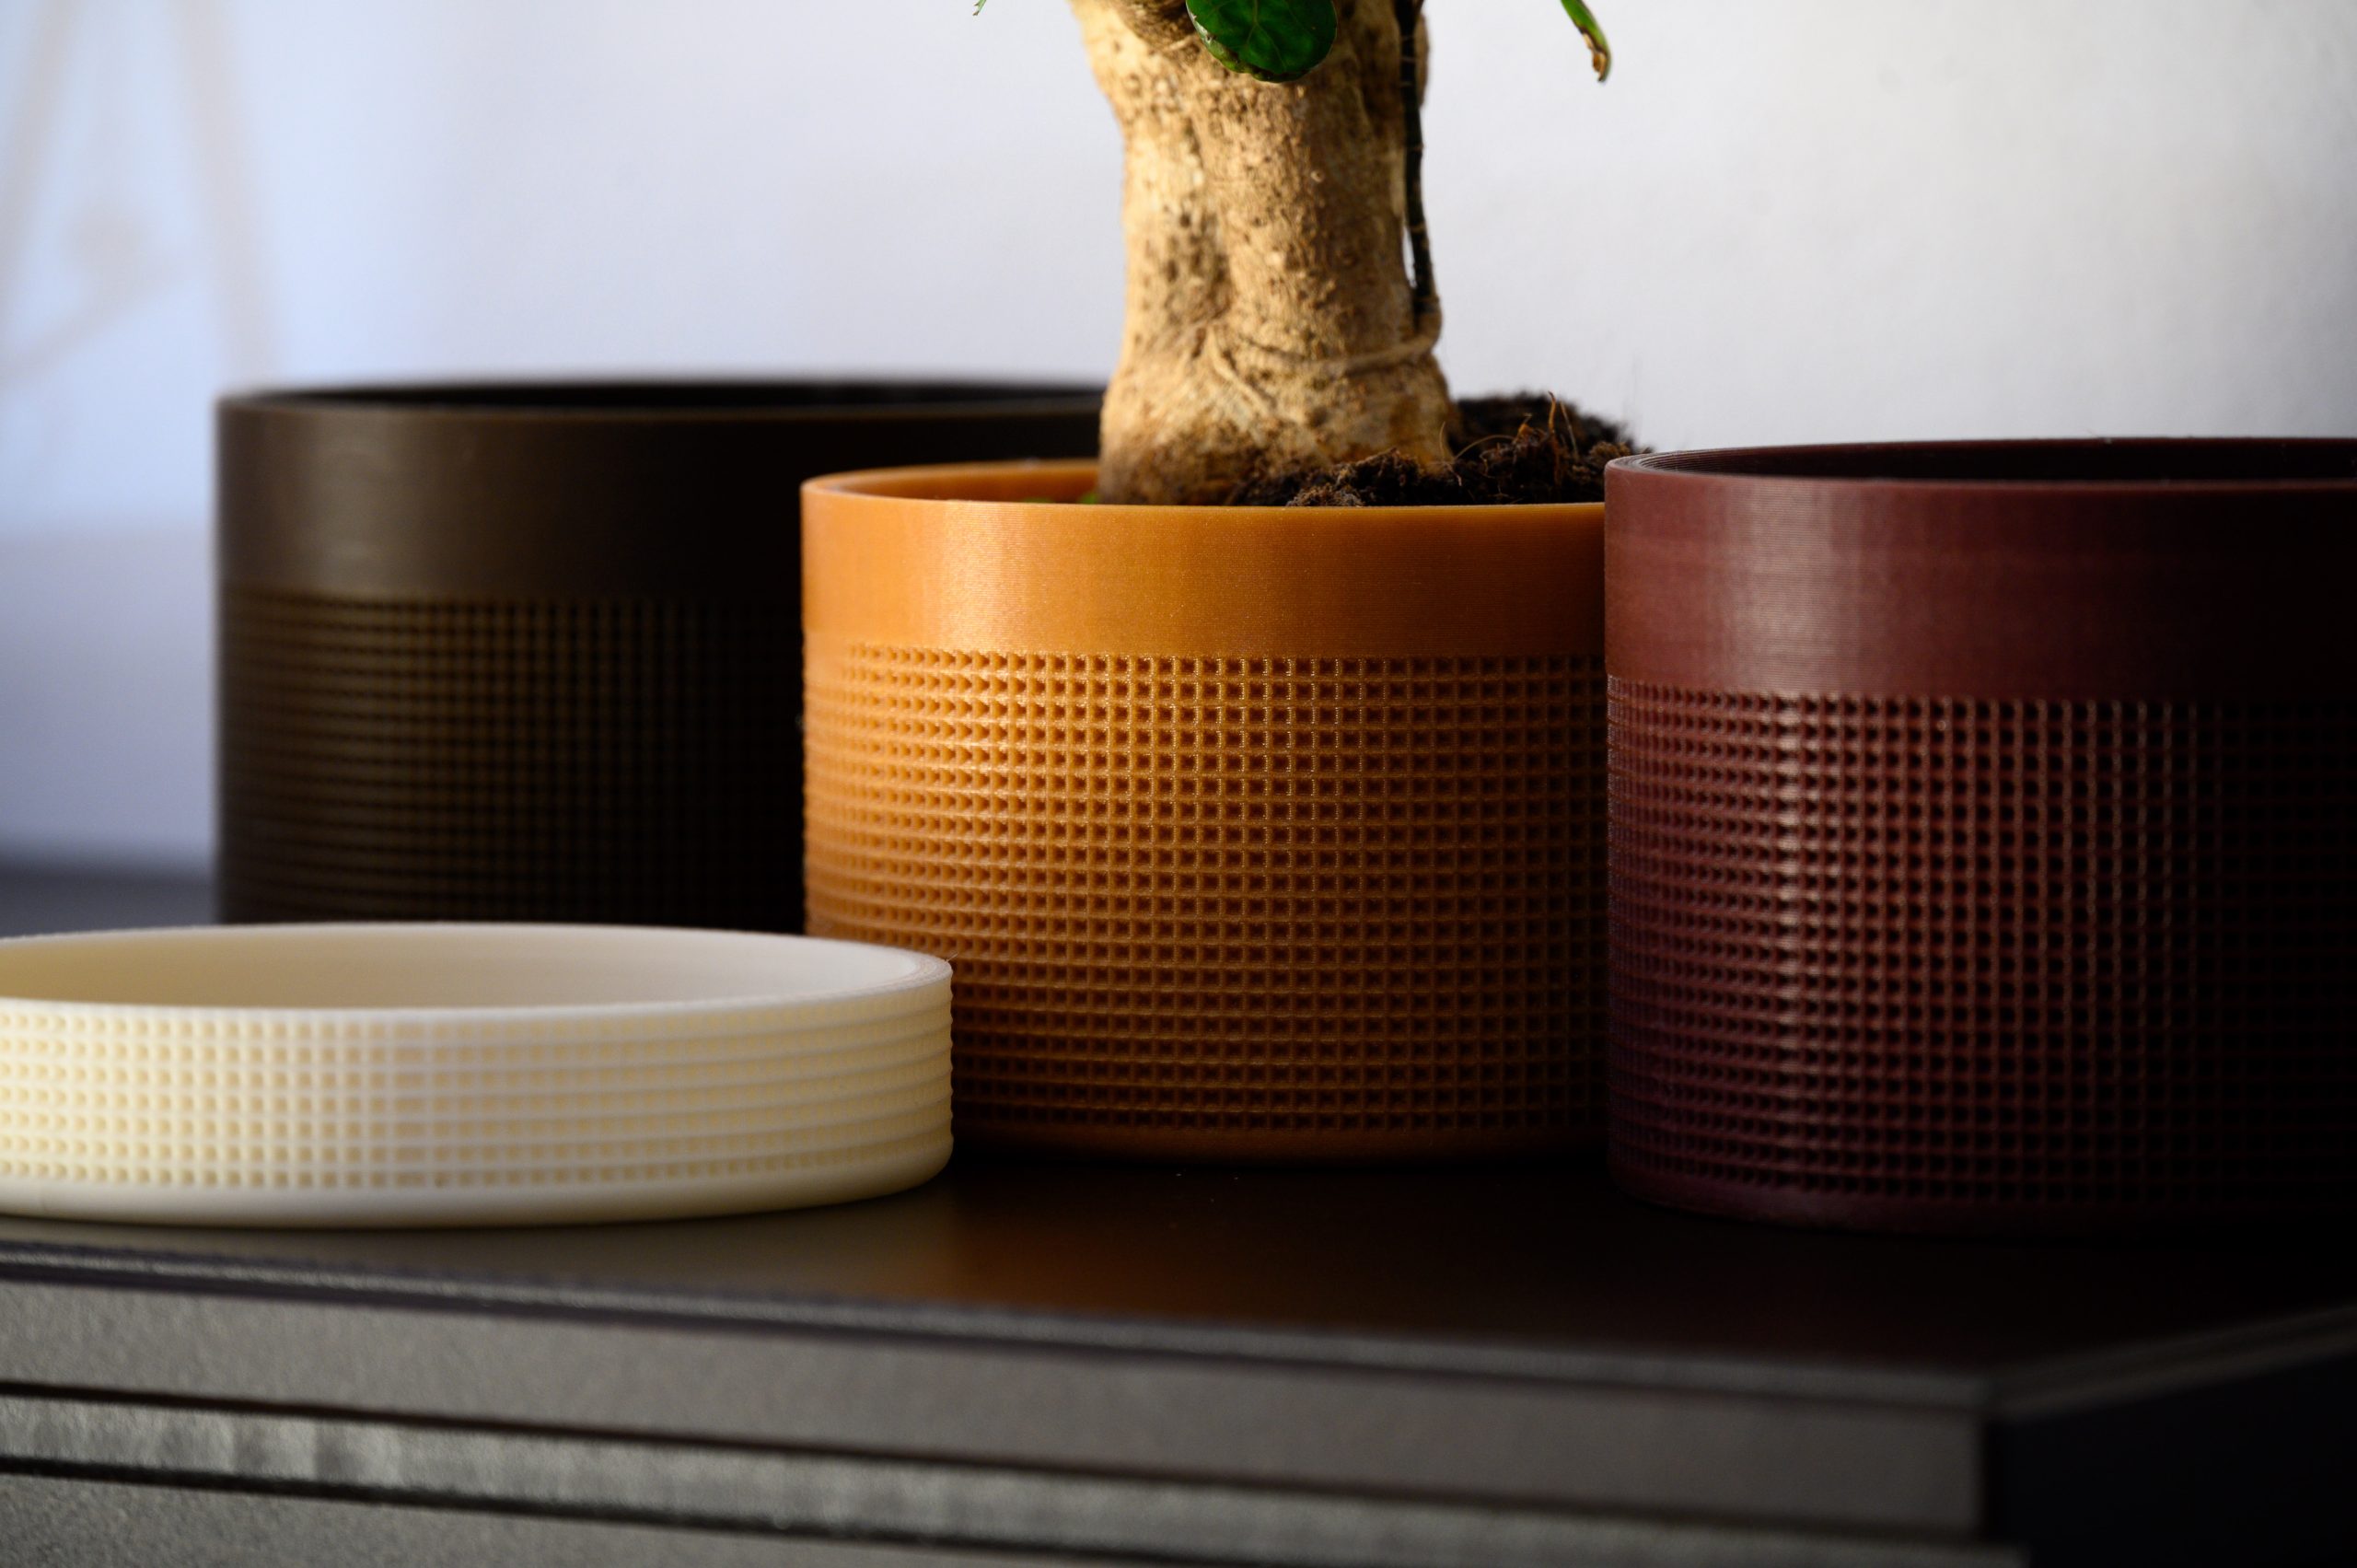
New awesome materials are here!
In case you missed it, we have just released four new awesome rPLA filaments – they are all made from recycled materials and they feature unique natural-based pigments harvested from byproducts of food and pharmaceutical industries. Red algae, wine, corn and even food leftovers are some of the products we use to give our filaments beautiful muted colors that go perfectly hand-in-hand with wood furniture and modern home accessories. Learn more about the process and the rPLA filaments in our recent article here.
And we also continue to expand our lineup of high-quality resins! The latest addition is Model Neutral Beige which is perfect for all sorts of areas: model and hobby applications, rapid prototyping, casting molds… you name it. We’re also aiming to avoid chemicals with a strong odor, health risks, high toxicity, and mixtures containing Bisphenol-A to make our resins as easy and safe to use as possible.

So, this wraps up the latest developments at Prusa Research. We hope you’ll find something interesting in our recent releases! 🙂
Happy printing!
Please consider applying this patch for your Mac Safari users: https://github.com/prusa3d/Prusa-Firmware-Buddy/issues/3287
The latest firmware update makes it difficult to log in using Safari, which is a downgrade, since I used to be able to use it using the old firmware.
Thanks for the rest of the updates! I look forward to trying them out!
Hi Steve. Thanks for the feedback. We are continuously monitoring GitHub. But I am afraid I don't have a date when this will be solved. Please take into consideration there are a lot of request, and we have to prioritize them.
Blas Palencia – Prusa Research
Thanks for the response! Keep up the great work, it is very appreciated.
And this was just fixed in the latest release! Thanks for the quick turnaround
"We ran intensive internal testing for several weeks and found that with a properly dried filament, there is virtually no oozing/leaking from the nozzle even after extended periods of time and thus no stringing. We kept the nozzle heated to 220 °C and we let it sit there with filament loaded. Nothing oozed from the nozzle even after several minutes. In fact, even the large 0.6mm nozzle with a properly dried filament can be so oozing-resistant that you can, theoretically, print a multi-material print on the XL completely without any sort of priming or wiping tower!"
Jo, no disrespect, but I do not believe this at all. Maybe under some REALLY specific environmental conditions but there is no way this what most of us experience with our XLs, MK4s or otherwise even with dry filament.
First off, would like to say a big thank you to everyone at Prusa who continue to support even their older machines like the MINI and MK3 with upgrade kits.
It would be informative and helpful for a new blog article to explain how the Nextruder in the XL and MK4 are able to facilitate higher volumetric flow rates and thus reduce printing times. e.g. what are typical maximum volumetric flow rates for the standard 0.4/0.6mm nozzle using Prusament PLA/PETG/ASA etc. What are the PA/LA values that need to be entered in the filament custom G-code to reduce problems that novice/intermediate users face.
Hi. Thanks a lot for your feedback. I have forwarded internally, and we will consider it for a new article.
Blas Palencia – Prusa Research
Because of this, is that I am more inclined to go to Prusa rather than a Chinese competitor who only focuses on the comercial aspects of the 3D printing world.
If I understand correctly, my “old” MK3S can then be updated to 3.5 and it will support input shaping as the MK4? Is there a table with all the difrerenfe across models so we can clearly see what we would be missing by not upgrading to the following model?
Thanks everyone for the efforts to continue working ethically and with the open source mindset! I hope people can see the strong efforts you invest to improve everyone’s life’s on 3D Printing 😉
There's a comparison table on their store page for each upgrade kit (MK3.5, MK3.9, MK4). Here's the MK3S -> MK4 page: https://www.prusa3d.com/product/original-prusa-i3-mk3-s-to-mk4-upgrade-kit-3/
I find it very surprising that Prusa decided to "Propose a new Binary G-code format" by enforcing it, this is very bad move which left lot of people with non functional printing eco system.
Exporting to .gcode is simply switched on as default. People had to look for solution on the internet as their system stopped working.
Instructions are that one should install firmware update which came at the same time as this newly enforced format. It would be understandable that printers are already updated with support for new format some time in the past, so printers are already ready to use it, and then offer option to switch to new format only after if it is checked that printer supports it.
Also lots of people do have some postproccessing of gcode files after generating that requires textual format, not binary. They are all just neglected. Their printing process is simply made non functional.
That is not user friendly behavior. Making workign systems not working, regardless of how small intervention is needed to make it work.
Users should always be asked if they want to turn on feature that, with high degree of probability, would cause problems.
Please, make new issue of PrusaSlicer that does not use binary gcode by default, ASAP.
It is OK if PrusaSlicer asks uses if he wants that option to be turned on, with explanation what are requirements, and even with checks if requirements are fulfilled (at least if required firmware version is already loaded into printer).
At least Prusa released the library for programmers to use to convert from and to the binary format. There is a plugin for OctoPrint already to decode the binary format back to ASCII that I need to install so I don't have to create my own unique printer profiles to turn off the binary gcode.
On one hand, I agree that Prusa shouldn't have made .bgcode default. But, on the other hand, they are taking care of their customers first, so for their customers that use a MK4 or XL they have it on to help reduce the pain of sending files wirelessly via PrusaConnect/Link. FWIW, I just checked the default MK3 profile (in PrusaSlicer 2.7.0 with Prusa default settings updated as of 2023-11-26) and the .bgcode option is off as it should be.
Maybe a better argument should be that enabling the .bgcode setting should be in the "Physical Printers" settings and then enabled by default for PrussaConnect/PrusaLink host types.
As far as I know the slicer is still making normal (none binary) .gcode files as soon as you select other printers. And prusa did a good job notifying people when it did make a binary version in my experience :
I noticed I get a pop-up message about the new binary code and how to disable it when slicing for the Prusa XL. But when I slice for a Creality or for my MK3's and MK3+'s (with very outdated firmware's >.<) they still all work. So I guess they still get sliced the none binary .gcode files by default.
I noticed that the estimated ship date for the MMU2 to MMU3 upgrade has slipped to February 2024. For those of us that upgraded from a MK3S+/MMU2s to a MK4, this delay is causing some real concern and inconvenience. Can you provide an update on any new challenges that have been encountered since the October update?
Hi. This change of leadtime on the MMU2 to MMU3 for MK3x is related with the amount of Black Friday orders, and not with technical difficulties.
Blas Palencia – Prusa Research
are the nextruder led buttons still a thing
Hi. In the case of the XL, yes. The Nextruder in each head/tool has this button illuminated by an internal led light.
Blas Palencia – Prusa Research
*Crash detection and Power Panic are not supported*
Meaning this will come later or not at all?
I know that MK2/2.5/S are pretty old models and I understand they can't get the latest firmware, but can I use the latest PrusaSlic3r with them? I'm not exactly sure which model I actually have, I believe it was originally just a MK2, but then I got some upgrades and I just don't remember anymore..
Hi Dan. Absolutely yes, and we strongly recommend you to do it. If you cannot see your MK2 printer model after installing it, go to the menu Configuration > Configuration Wizard and you will be able to add it there. The gcodes for MK2 and MK2S are exactly the same, you don't need to worry about this 🙂
Blas Palencia – Prusa Research
Really liking Prusa Connect on my MK4. My MK3S+ currently runs Octoprint on a R Pi Zero 2 and hoping Prusa Connect can catch up so I can upgrade it to MK3.5. This leads to 2 questions:
– Is development still progressing on USB webcams for monitoring prints?
– Will MK3.5 firmware support Revo hotends?
Hello, yes. We are working hard on Prusa Connect and all the features including camera support. The MK3.5 uses the standard MK3s+ extruder which is compatible with Revo hotend. We still have to do some more testing, but if it doesn't work, it should be a quick firmware fix.
This might be a dumb question. If I upgrade my MK3s+ to a 3.5, is there an upgrade path to the mk4 or is it the same kits as the mk3s+ to Mk4 package?
Hello, you can always order the full MK4 upgrade and it will upgrade any printer version (MK3s+ or newer) to MK4. But it is not very economical as you end up with some duplicate parts. Currently, there are no plans on releasing MK3.5/MK3.9 to MK4 upgrade kits, but we are listening to feedback.
Jakub Kučera – Prusa research
Will MMU3 work with the new MK3.5 upgrade? I rely on my MMU3 almost daily and it would be awesome to get these 30 hour MMU prints reduced!
Hello, yes. The MMU3 works even with MK3s+ and it will work with any version after that, including MK3.5
Jakub Kučera – Prusa research
Nice release! So far loving the changes to my XL and the increased print speed is welcome. Is the input shaper on the X making use of the accelerometer in the tool or is it based on a fixed engineering sample? What about pressure advance? Thanks in advance for your response!
Sorry… that last comment should have said "on the XL" not "on the X" – didn't see a way to edit it after the fact.
After upgrading to MK3.9 (and not using octopi anymore), a major complaint I have was the upload speed. Without streaming, even the binary g-code improves it very well ! Well done.
When you feel bored, tired or simply need some inspiration to keep going, <a href="https://fnaf-securitybreach.net/">fnaf security breach unblocked</a> is a great game to have on hand to relax!
The MK4, MK3.9, XL, and MINI get a firmware boost! Expect improvements, bug fixes, and potentially some new features (details TBA). For more info about games visit in bio or https://www.will-zeal.net/
Thanks for sharing