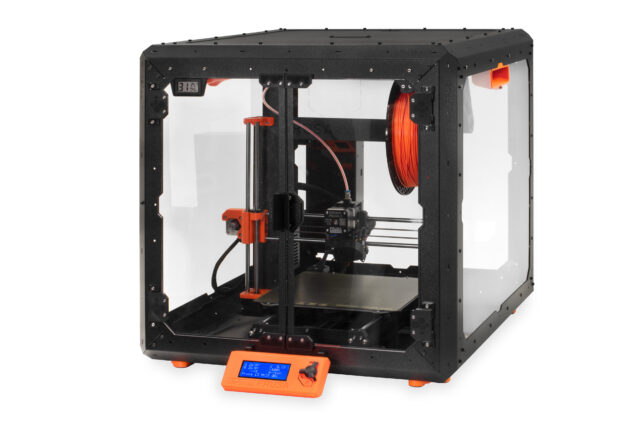
3D printer enclosures are pretty popular because they offer a number of great benefits – and now, we’re introducing our own: the Original Prusa Enclosure!
Probably the most important feature of a good enclosure is the fact that it helps to create a stable environment for your 3D printer. The increased temperature inside the enclosed space is vital when you decide to print advanced materials (ABS, PC CF, PP and others) which are prone to warping. Also, some of these materials might produce unwanted odors during printing and the enclosure helps to contain them. Our model also helps to reduce noise coming from the 3D printer, shields the printer against drafts and protects it against dust. For peace of mind, you can install a lock on the door to keep your machine safe. 🙂 And that’s not all – there are various useful add-ons you can install in this enclosure.
A couple of years ago, we brought you a guide on how to turn IKEA Lack tables into a cheap 3D printer enclosure and improved it further with a “v2” design. Both quickly became the top downloaded projects on our site and turned into highly popular choices when it came to DIY 3D printer enclosures. Now, we have a vastly improved and comprehensive solution, perfect for hobbyists and workshops, but also for businesses and schools: the Original Prusa Enclosure. It’s our internally-developed product for the Original Prusa MK3S+ and it can be easily expanded with official and user-made add-ons and hacks. You can order it on our e-shop right now and the shipping starts in July 2022.
Prices start at 349 USD / 369 EUR (VAT incl.)
CONFIGURE IT IN OUR E-SHOP NOW!
Before I jump into details, let me give you a quick overview of the best features:
- High-quality components: Built with sturdy metal profiles and PETG side panels; the entire box weighs over 10 kg (22 lbs). Everything is included in the package including plastic parts, you don’t need to print anything on your own. The only exception is the handles (seen in some photos) – these are optional and not included in the package because most users won’t need to move the enclosure around.
- Perfectly sized for the MK3S+ and its accessories: There is enough room above the printer’s frame for the installation of the MMU2S. You can place the spool of filament inside the enclosure and lead the strand of filament to the extruder through a PTFE tube, essentially a reverse-Bowden setup, which also helps to even out the rotation of the spool, resulting in a smoother feed of filament into the extruder.
- Well-isolated: The enclosure reduces odors from specific materials, creates a stable environment for 3D printing, maintains increased temperatures required for advanced materials which are prone to warping (PC CF, Nylon, PP), protects against draft and dust, reduces noise.
- Stackable: A rather unique feature among popular enclosures. You can easily stack multiple boxes onto each other and secure them using screws. It’s a great solution for print farms!
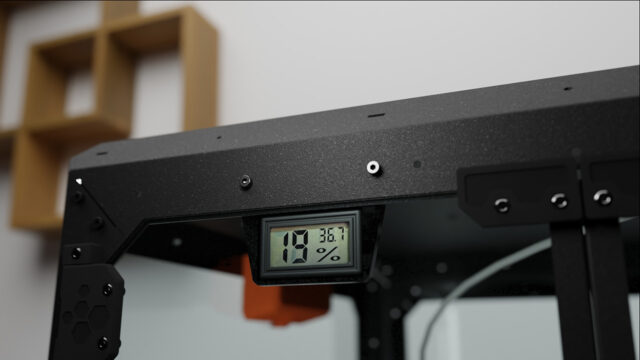
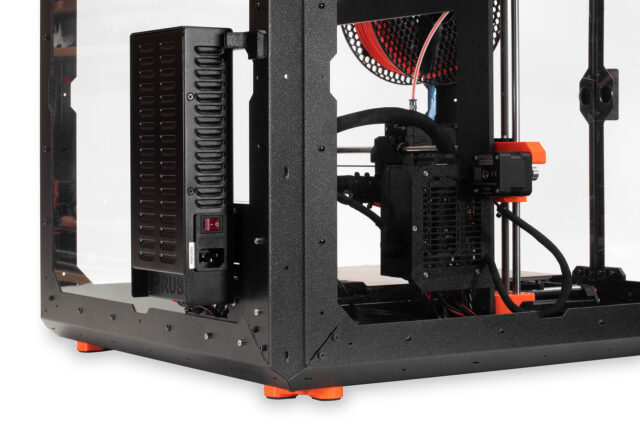
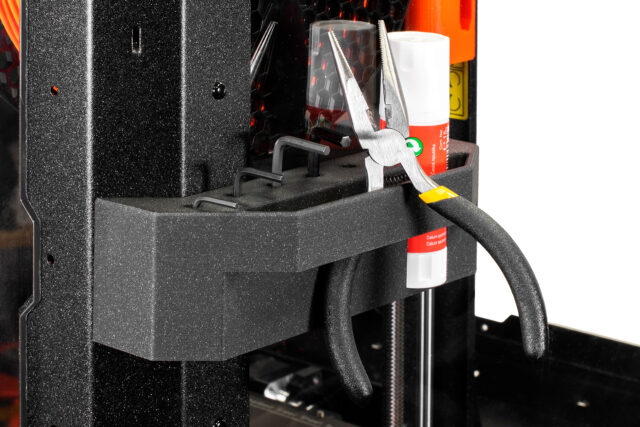
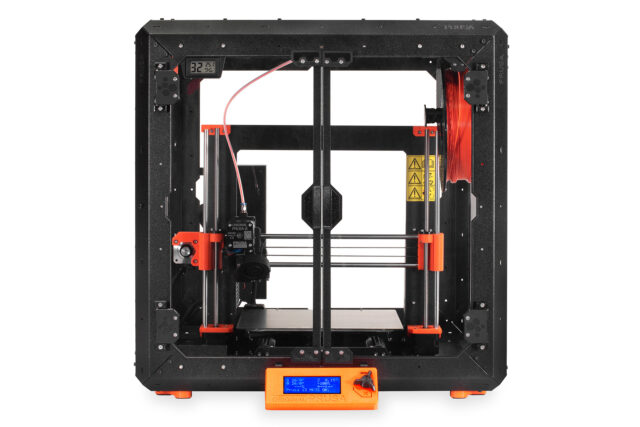
- Smart design: The LCD and PSU of the 3D printer can be moved to the outside, so you can easily control the machine and the PSU doesn’t have to work under increased temperatures (there’s a special brace included in the package so your MK3S+ won’t lose its rigidity when you remove the PSU). A built-in temperature sensor gives you a quick overview of the temperatures inside the box. The frame of the box features various cut-outs and mounting points, so you can expand it with DIY brackets, holders, and more.
- Print high-temperature materials: Some materials are more difficult to print than others. Our enclosure creates a stable environment with an increased temperature that prevents advanced materials from warping and detaching from the print sheet.
- Upgradable: Modify the enclosure yourself or get one of our add-ons. We’re planning to support the enclosure with more add-ons in the future (Smart Box, electronic lock, smart LEDs, RFID module – more details below)
- Secure: You can install an optional lock on the enclosure’s door to prevent unauthorized access, perfect for schools, businesses, events, hackerspaces, etc.
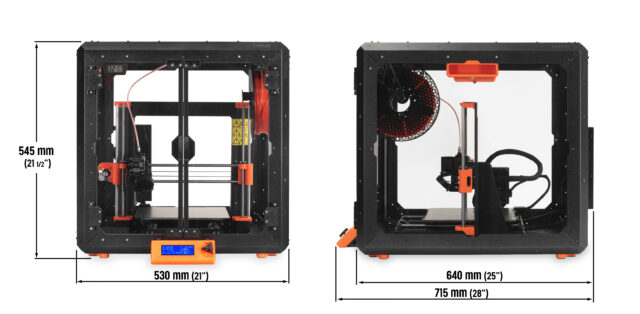
Dimensions with the LCD mounted outside:
530 mm (w) × 545 mm (h) × 715 mm (d)
Dimensions with the LCD inside:
530 mm (w) × 545 mm (h) × 640 mm (d)
It made sense to create something high-quality and advanced (designed and tested by us, aimed for businesses, schools and other institutions) because the DIY enclosure from IKEA Lack tables is still a good budget option, so there was no need to create a replacement for it.
So, when we started designing the enclosure, our primary goal was to build a solid, sturdy box that ticks all the most popular, well… boxes: metal profiles, transparent side panels, metal top and bottom panels, a durable frame, stackable and expandable with a community-friendly design. We put numerous mounting points onto the frame, so you can easily attach various tool holders and other handy accessories to it, but you can, of course, go more advanced and really play around with various ideas and improvements. If you don’t feel like spending time on modifications, we prepared a number of ready-made add-ons, so you can configure the enclosure in our e-shop and equip it with the things you need without any tinkering. Please note that the Enclosure is tailor-made for our most popular 3D printer model, the MK3/S/+. The MK2.5/S has a different PSU and mounting elements (e.g., for the LCD) – we’re currently investigating the options and we’ll share more details in an upcoming development diary where we will also dig deeper into the MMU2S/buffer setup.
I think it goes without saying that bringing a new product to the market in these times is rather challenging when it comes to both sourcing materials and setting up the right price. Compared to last year, the prices for metal, plastics, electricity, shipping and other elements skyrocketed (in general by about 30 percent), nevertheless, we did not want to compromise the build quality and decided to stick with high-quality components.
One last thing before I get to the add-ons: the chamber is not actively heated. The temperature inside is elevated by the heat coming from the MK3S+ heatbed, which is perfectly suitable for a vast majority of materials. We’re considering a separate heater addon, however, it will not be designed to push the temperatures too high (it could affect the rigidity of the printer’s plastic parts). It will be useful for situations where you have the printer and enclosure in a very cold environment (e.g. a garage) and the printer would otherwise show Mintemp errors.
In usual ambient temperatures (20-22 °C), the average temperatures inside the enclosure can reach the following values:
- 33 °C when printing PLA
- 36 °C when printing PETG
- 38 °C when printing ASA
- 39 °C when printing PC BLEND
Please remember that these numbers are affected by the surrounding environment temperature and printing temperatures. Also, it’s important to note that printing PLA at high temperatures may lead to the printer’s nozzle becoming clogged. If the ambient temperature is higher than 28 °C, it’s recommended to print PLA with the enclosure’s door open.
Optional Add-ons
The basic package contains everything you need to assemble the enclosure: metal profiles, transparent side panels, top and bottom panels, mounting material, and a temperature/humidity sensor. There is no need to print any plastic parts. You can get the base package for 349 USD / 369 EUR (VAT incl.).
The optional add-ons include:
Fire Suppression System
Self-contained tube-style fire suppression system. The system is manufactured in Europe and uses an extremely effective, clean, and safe extinguishing medium. The system operates automatically and independently of any power supply by reacting to high temperatures. Our 3D printers are known to be extremely reliable and safe, so there is no risk of fire hazards. We’re adding this system mainly due to the requirements of certain institutions (schools, hackerspaces, etc.) where there is a frequent requirement to have a fire suppression system.
Advanced filtration system
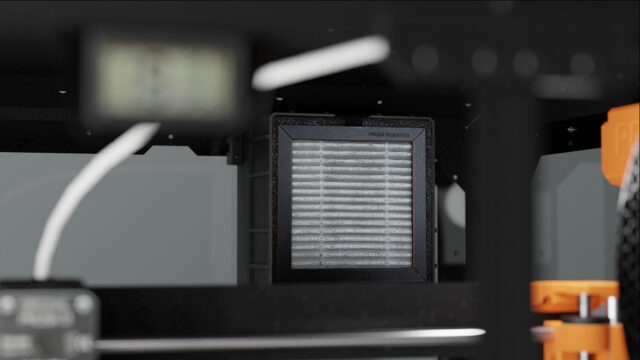
Especially useful when you print materials such as ASA and other materials that produce an increased number of ultra-fine particles and fumes during printing. The base version has a manual on/off switch, however, it will be also compatible with the “Smart Box” electronics (more info below), one of the future add-ons, which will bring automated functionality. Please note that enclosures with the filtration system have extended lead times!
To explain it a little bit more: Studies have shown that most of the commonly used 3D printing materials should be safe, but we wanted to take this a step further. Our farm running over 600 printers has been testing its own air filtration system for some time. When we started designing the enclosure, we wanted to provide you with a similar solution. Fewer particles and less odor in the air are always better. Our first thought was to use ready-made industrial solutions, but their price was way too high.
Instead, we partnered with a company specializing in air filters. By combining a highly efficient HEPA filter (99,9% efficiency) with active carbon granules we aim to get rid of both particles and smell. Currently, the tests are being verified by an independent laboratory at a local university. In the meantime, our developers are further optimizing the design and working to improve the airflow inside the enclosure.
While researching air filtration, we have discovered that there isn’t currently any certification or standards for 3D printing. Once the development is finished we will share our knowledge with the community and hopefully inspire others to join us in this initiative.
Mechanical lock
A standard mechanical lock that fits in the door of the enclosure, so you can keep your printer locked away from prying hands. Perfect not only for your home but also for schools, universities, hackerspaces, and other places where you want to disable unsupervised access to your printer.
PSU quick-release connector
By default, there’s enough clearance in the enclosure (and the PSU cables are long enough) for printer maintenance. However, if you plan to take the printer out of the box often, you can install a quick-release connector on the PSU cables – for instance, if you are running a print farm and need to switch your printers.
White LED strip
With the current version of the enclosure, the LED strip will illuminate the interior of the enclosure. Later along with the Smart Box add-on, this LED strip will become programmable.
We are also preparing a number of free add-ons! Once we start shipping the enclosure, you will find all the models at Printables.com. Then, you will be able to download the STL files and print them! 🙂
Future upgrades
Later this year, we’re planning to expand the enclosure with more add-ons, which are mostly centered around the “Smart Box”. It’s essentially an electronics board that serves as an interface between the 3D printer and additional equipment, mainly the advanced filtration system, but also things like advanced sensors (improved thermal sensors, particle detection, humidity meter) and RGB LED strips. We’re currently beta testing these features in various scenarios – e.g., the printer finishes a print job and the RGB LEDs signal that the print is done. However, before you can open the door, the system automatically sets the filtration fan to max power so that the air in the chamber is cycled through the filter before the electronic lock unlocks the door. You will also have the option to display the measured data on your PC.
We’re going to publish more details about the Smart Box, Smart LEDs, electronic lock and also about an RFID module later this year, so stay tuned!
All add-ons are, of course, available separately, so you can upgrade your enclosure gradually over time.
Coming July 2022!
Right now, we’re putting the finishing touches on the packaging and we’ll be ready to start shipping the first orders in July. The enclosure is, of course, delivered in a disassembled state, so you don’t have to worry about receiving a massive box. 🙂 As usual, the assembly is quick and easy, so your printer will have a cozy new home in no time. I think the owners of the MINI/MINI+ will be happy to hear that we also have a smaller enclosure in the works. 😉
We’ll be back later this year to share more details about new add-ons and their features.
Happy printing!


how many of the features from the new encloser can be incorporated into the Ikea encloser(s)? would love to upgrade mine with the features from the new encloser. especially the features around the PSU and screen.
would the parts be available separately? and would there be an update to some of the previous Ikea enclosers to be compatible with the parts from this encloser?
the problem with Ikea Lack that is its really small, you don’t have much room, so you put your PSU under your printer, which would mean that you would have to make a sturdy enough panel to hold your PSU’s connector and somehow mount the PSU properly. So I don’t think that It could be adapted really easily…
not really. my psu is locked near the printer, attachet to the lack table in external point.
My PSU is mounted outside of my enclosed, I mainly am hoping to upgrade it to use the plugin the commercial for the new enclosed for the PSU. If I want to clean, fix, or make any changes to the printer I would have to work around it or unscrew the wires and pull it out, then leading to me needing to pull up the instructions to ensure everything is getting wired correctly. it’s easy to mount the PSU outside the Ikea enclosed. It’s just maintenance where It gets annoying.
I’m wondering if this case can simply stand on lack table? What are the dimensions between feets?
Is there any restriction or limitation that it won’t work with the MK2.5 line?
I would say the only problem that could happen is with the PSU mount, but I don’t think so there would be anything else that would limit you…
Check out my IKEA enclosure remix. It is taller to fit the MMU2, and it solves the PSU problem by venting the PSU to atmosphere without having to disconnect and mount it outside. The printer is easily removable…just unplug the power cord, and put it comes
How will this work with the MMU2S? How accessible will the unit be when the printer is inside the enclosure?
From what I’ve seen It would be really enclosed, if the spools go in the same way the single material version works.
The spools will be outside the enclosure, since as you can see, you can’t have more than 2 spools inside.
+1, waiting on these details before buying one
What would an RFID module be used for? Then again, is RFID stand for (radio frequency identification)?
To only allow access for certain people in a company or school setting…
PLEASE make this for the MINI+ !!!!!!!
they are already working on a mini-sized one
Hopefully it’s mini-priced. This is way too expensive for an enclosure.
What I’d like to know is an ETA on a Mini enclosure… totally thought about buying this one for my Mini+, but the PSU and display would probably take some adjustment to work – and it would take up more desk space.
I am most interested in the air filtration aspect (followed closely by the ability to stabilize temps for printing ASA). I may work on my own solution while I wait 😉
And let the smaller enclosure still be big enough for a Mini+ with the Mini Base add on! That would be perfect
My biggest question is, will this be “opensource” (like DIY-able) thing, or it will be only purchasable, also will the printable parts be available when the product starts to ship?
Thanks!
the article said that when the enclosure is released, free, printable add-ons would be posted on printables.com
I know that, but my question was about the actual enclosure, will it be DIY-able?
It’s powdercoated sheetmetal…
It doesn’t look like the BOM is optimised with retail sourcing in mind, not to mention the assembly effort. DIY-ing a unit would likely cost more than just ordering it from Prusa.
But it’s likely possible to do a DIY cube enclosure that’d be “compatible enough” with Prusa’s add-ons/relevant mounting points at a lower price point. Prusa may even publish enough diagrams. Or not. There are pros and cons for both.
But if you’re into something like that, the next question is: if you don’t buy an enclosure, will Prusa still sell you the add-ons? I’d bet against it.
I don’t really need the official addons, I can make the ones I need on my own. I just want to build a semi-fireproof enclosure, I know that it’s just powder-coated steel, but it’s a finished design…
Check out my IKEA enclosure remix. It is taller to fit the MMU2, and it solves the PSU problem by venting the PSU to atmosphere without having to disconnect and mount it outside. The printer is easily removable…just unplug the power cord, and put it comes
Where to find your enclosure remix? Link?
Thanks in advance.
Reini
Super 7
Where can we see your remix?
www.printables.com/model/122914-prusa-i3-mk3s-lack-enclosure-with-psu-surround
Remix looks a good firm improvement over the traditional LACK enclousre, but I’d love to see a video or two around the remix before start to printing the parts.
Nice enclosure btw! Looks great, but also expensive, especially docked to Australia. I wish you had some good local agents here…
What about the PETG parts being in the enclosure while printing high temp? Isn’t there a good chance they will deform after x amount of hours? That is the reason I decided not to put my MK3S+ in one, saw too many posts from people having their printer melt.
I am printing ASA at 260/100°C with Mini in enclosure, and the temp. inside is around 38°C max.. PETG is OK until 70°C+
It’s not a heated enclosure so the ambient remains fairly low – ~40C?
That’s lower than what a stepper motor can hit under load, and we’re using petg to mount those, so… should be perfectly fine.
My Mk3S+ is already in a Tukkari enclosure. I noticed that the printer runs into troubles when the door is closed and PETG is printed. Seems like mechanics don’t like temperatures in the high 30s, as I experienced multiple crashes (MK3 stops printing and re-calibrates itself, log later shows crashes).
Belt numbers were out of limits, which probably explains the problems, as they are within normal bounds otherwise (and it’s a factory-assembled printer to begin with).
The Prusa box looks stable and is nice in respect of connectors for adding all kinds of addons, but without a fan the particle filtering as well as printing stability are questionable at best.
And at the asking price for just the basic version – still requiring me to tinker – I’m not sure I’d rather go for a box nearly half the price and tinker there.
Does this enclosure also suit the MK3S or just the MK3S+? I only see there MK3S+ referenced everywhere.
As the MK3S is the exact same size as MK3S+, there is no problem to fit in.
Are you from Prusa? I’d like to get an official confirmation from Prusa that the enclosure works with the MK3S.
Ha Ha! Are you serious?
The people who take the time to reply to your questions on this forum are all Prusa owners or employees. So yeah we know the spec’s of these machines.
The Mk3, Mk3s and the Mk3s+ are all the same machine with small feature upgrades. So they are ALL the same size.
Also, before you ask:- The Mk2, Mk2s and the Mk2.5s also all fit (because the Mk3 series were based on the Mk2).
How do I know? I’ve built and owned a Mk2s, Mk3 and Mk3s (I haven’t bothered with the mk3s+ becuase my Mk3s is working just fine as it is).
Please show us EXACTLY just haw this works with the MMU2S and 5 spool holders….
Yah, that’s the question I have also, though 2 and 3 spools are all I need (currently). Looks like you could do two max (one on each side of the enclosure) and beyond that the spools will start to get in the way of accessing the printer. Maybe for more you have to make holes to run the filament to external spools? I would need to hear from Prusa on this and see pictures also before I would feel confident to order.
I would love it … only if you could make it modify-able, so it could perfectly stick to some usual dimensions of furniture. So I could built it into existing furniture and not have to make decision where to put it just because it is 3cm wider as usual or vice versa.
Like flat dimension of 60×60 and for 50×50 cm …
It looks super nice but where do you put the splool with the MMU2S ?
In the pics I noticed maybe a slit on the top center of enclosure, not sure but maybe a place to send additional filament through? I bet a multiple filament box is in the works that can sit on top or hang behind?
I see many questions about the MMU, and yes, that will fit! The only question I’ve got is: will it fit 5 spools? For that money, I want all 5 spools to be inside the enclosure and not having to buy a second enclosure to fit the spools.
If 5 spools fits, than it is a no brainer and I’ll be ordering 2 of them, if it doesnt fit 5 spools, than I skip this enclosure and stick to my IKEA Platsa enclosure (60x60x55cm ánd fitting in a MK3S+ with MMU2S & 5 spools!!)
Very nice and solid box, very big, and requires a lot of space and a big desk or rack.
I have also a couple of questions:
– it seems there is no internal heating system to control the temperature, and it is just relying to the bed heating. Correct ?
– what is the practical function of the HEPA filter ? As it is now, since the enclosure is not sealed air proof, the nano particles and fumes will exit easily from everywhere, and not through the hepa filter that require pressure.
I would like to see in the something more complex in the future add-Ons:
– Make it a Virtual sealed box (see below)
– One AIR IN tube connector
– One AIR OUT tube connector (to connect to a tube that goes to a window or to the fume tubes in the lab)
– An active heating system controlled by CPU via the Prusa MK3 (connected to any spare I2C pins) and a new gcode in firmware (e.g. M194 R45 to set the air temperature to 45 degree).
– The AIR OUT should be connected to the HEPA filter, and then, just outside of the box, to a strong fan that expels filtered air from the box to the tube connector going to the lab exhausted fumes.
– The AIR IN should contain the heating system, so when the fan extract the air from the box, the air that enters from AIR IN is immediately heated.
– Since the box is always in air depression due to the air extraction fan from AIR OUT, the box will be virtually sealed, no nanoparticles will go in the room since they are all extracted by the fan and expelled in the AIR OUT fumes tube.
Of course this become a nonsense if installed without the tubes 😁
Looks amazing, great job Prusa Research!
The locking doors will be a game changer for public spaces! …but if people are primarily printing with PLA, and keeping the doors open is your solution to airflow, that kind of defeats the purpose of the lock.
I think there will be some people who work in schools, libraries, makerspaces, etc. (places where 99% of users are printing in PLA, in my personal experience) who are mainly interested in this enclosure for it’s ability to lock. So there has to be a better solution than leaving the doors open. But overall I think this is awesome, I want one, and can’t wait to see how it evolves.
For those of us who own a PrintDry we would like to be able to feed in filament from the top or from the side. Will there be a way to do that on the final model?
UL (Underwriters Laboratories) released UL 2904 in 2019 to cover the emissions of UFPs (ultra fine particles) and VOCs (volatile organic compounds) for 3D printers.
Excerpt from the specification scope:
“This standard presents methodologies for characterizing and quantifying coarse, fine, and ultrafine particles and volatile organic compound (VOC) emissions from operating three-dimensional (3D) printers under normal conditions of use in defined indoor environments including classroom, office, and residential scenarios.”
It isn’t clear at all how this accommodates the MMU2S, especially the five feed tubes going into it. I don’t have room for the filament buffer on my desk, so I use rewinder dryboxes for my filament spools. The feed tubes intersect the build volume (as they would with the filament buffer. How is this all supposed to work?
There’s also a firmware change, or a change in the PrusaSlicer gcode, that would be needed to park the extruder on the other end of the X axis instead of at X=0. Often I have to get at the tensioner screw on the extruder, and I wouldn’t be able to do that with the extruder at the zero X position because the enclosure wall is in the way.
Well, I didn’t use this printer yet but would love to try this soon. Actually, my last printer is not working fine and that’s why it is very urgent for me to change it. I have always heavy work from the https://www.resumesplaet.com/ website and that’s why I needed a good quality 3D printer and hopefully this one will be good.
Hello. What about the heated bed cables? Do they fit inside the enclosure without bending or the need of printing an angled bracket? I would like to buy the quick disconnect system for the PSU will this be available in the future?
The fire suppression system looks amazing! Where could we who have an Ikea Lack Enclosure buy something like that??? 😍😍😍
https://augustamotorsports.biz/…/copy-of-blazecut-t100e…
Thank you a lot!
I see that they are stackable at least three high and they show a 3 x 3 print minifarm. I wonder where Prusa sees the differentiation between this and their automatic farm system?
I definitely want to see how the filament handling would be done with an MMU. Especially refusing a second enclosure as a dry box. What kind of upgraded buffer system would work.
And how it interfaces with the Prusa XL enclosure…
This seems really nice! I’m happy they are coming out with stuff like this… but. It seems pricey. On top of that the LED lighting on the one corner seems silly… why wouldn’t there by more lighting in the cube? All 4 corners should be lit, unless this can also be added?
I like the stackable feature and it’s Prusa so you know it’s going to be nice. But it would be nice to be able to access the printer from other sides other than the direct front. I thought the Prusa Box was expensive but now I am thinking that’s a bargain compared to this… Plus it would house my 7″ Rpi touch screen. This doesn’t appear to be able to have that.
After building this I’m at almost $600… which at that point I might as well just buy another mk3s. It would be more beneficial to me..lol.
Excellent work but I think some tweaks could be made 🙂 Still love prusa!
Looks really nice, but the PETG parts are a total game killer. 🙁
Because 3D printing creates ultra fine particles some of which are volatile organic compounds and certain VOCs from 3D printing have been found to be carcinogenic, therefore enclosure filtration should be as standard and not optionable.
I speak from experience as a man who is on suplimentory oxygen due to a my lungs being damaged by atomised industrial cutting fluids 10 years ago.
Protection against lung damage should not be optional!
I was curious if the enclosure is able to be painted and if so is there a recommend type of paint to use? I was thinking of places Individuals, schools, or businesses that might want it in school colors.
I loved it but this sent to Australia is gonna cost me a decent Ender printer or a Mini+, it is so bloody expensive. AUD800 with the filter???? Nah thanks.
30% increase in costs, where??
Don’t take me wrong but it is a bunch of metal screwed together, acrylic panels and that is all about it.
I have the IKEA enclosure on my MK3S+ but it is meh, I don’t trust printing ASA on it coz the fume. Not great for my standard, I wished I had done better resources before I built it.
I will keep my new project then: buy a decent, rock-solid and yet cheap metal rack server (IT stuff), 12-18U. You can get some decent ones local for AUD300 or so.
Huge space inside for those with MMU and “open source” so you do whatever you want It comes with a door, opening already for a fan/filter system without costing AUD800
The Prusa enclosure certainly comes at a premium.
Your comparison isn’t a fair one however. The server rack is a mass produced item, such an enclosure never can come even close to that economy of scale. More importantly, your reference server rack probably doesn’t include clear walls on 3 sides and additionally a clear hinged double door. Those clear PMMA or PETG sheets of substantial thickness aren’t exactly cheap and the 3D printed parts at full costs do also add.
Server racks aren’t quite designed in the way one needs them for a printer enclosure, so they need to be adapted. Yes, even then they might stay cheaper overall but not by all that much actually, if you go for fully steel racks. Manufacturing quality of those racks is often quite basic too. You get what you pay for.
You said, said, but said nothing. That was a lot of BS to justify buying this enclosure.
There is no need to get insulting. I am not pushing anyone into buying that enclosure. Actually server racks are a cost effective way for printer enclosures if you adapt them for that purpose.
That new Prusa enclosure is pricy but it is at no means way beyond what competing specialized 3rd party offers for the Mk3s cost. (Have a look at the “Printer-Box” for example: 240 EUR without the printed parts which would add with Prusament PETG another 50-60 EUR).
Regarding costs. I built my own custom enclosure. The PMMA sheets set me back around 100 EUR and I covered only 3 sides with them instead of 4. The printed parts for my design were another ~90 EUR in material costs alone (Prusament PETG). Another 100 EUR for the BROR shelf. Can you do it cheaper? Sure, but not without changing specifications substantially.
Is the original enclosure prepared for the filter option?
What are the dimensions of the footprint of the enclosure? Not its overall size, but the outside distances between the feet. I’m wondering if this could set directly on top of a Lack table.
My advice: If you can fork up 369 EUR for the enclosure add a few Euro more for a sturdy rack or table to put it on, instead of a shaky Lack table.
I was really looking forward to this, but having seen the dimensions, I haven’t got the space.
After trying to get a Lack enclosure to work (which had the right size footprint), the only thing letting it down was the stability.
Here….. Just take my money
*empties out pockets*
My order is in!
Guess Ill find something to put in the Lack enclosure that will fit better (maybe order a mini+)
LOL
the enclosure looks nice but it seems to be full of holes. 🙂
have you tested (scientifically) if the carbon filter really makes any difference?
i mostly print pla and petg but still i am kind of concerned about the fumes (not because of the smell but because of my health) so it would be cool to have a case that really handles that problem.
The holes are no problem! The fans included with the advanced filtration addon redirects air through the filtration, not the holes. To put it simply, air is being sucked through these holes in to the enclosure, thus blocking any odors or particles from escaping through them!
I am anxiously awaiting the Mini/Mini+ enclosure. I was wondering if the printers base is actually attached to the case any if not can you design the Mini/Mini+ enclosure to have that functionality. I would think that you would just need a slot in the base to accept a hold down clamp. This will ensure that the printer stays put and protects it when you move it around. I move around a lot and I am always trying to protect my printer when packing it up. It would be much easier to have this enclosure. I really need it now. 🙂
Hi Prusa Folks, I was wondering if there is any estimate as to when these enclosures will begin to ship? Can’t wait to get this!
I’m checking the news for the prusa enclosure daily. I am waiting for my complete order including my first prusa printer and it’s delayed just because of the enclosure. It would at least be nice to have an update. Somehow I have a feeling that I’m not receiving my order until somewhere in August.
Well, it is most of the way through July and I have not seen any news on any of these shipping out. Would be nice if there was a progress update. Mr. Prusa?
I wish they would update us… are they shipping yet?
Ordered my enclosure, love Prusa but can you all update more often on shipping and release dates?
Hey – Prusa! When are these things shipping? I paid a lot of money a month ago and still nothing. At least you could keep us updated – not doing so is pretty poor customer care.
LOL – first units shipped today. Classic bad timing by me. XD
Hey Greg, how do you know, that the first units have been shipped?
Can somebody please tell me how thick the walls are? I have read all specifications but can´t seem to find that piece of information.
Any word on when the add-ons will ship? I received the enclosure, but none of the options I paid for were provided, (all stated included and fully paid for on invoice and papers) not even the QD psu cable (i have a black box so it is compatible). I bought all of them except the lock and fire suppression (USA). Order date was 5/7/2022, received 8/12. The rear wall acrylic of the enclosure does have a fan slot cut out. Also, anyone using an MMU2S like i am, be prepared to bang your head on the lid and get cut up alllllllll the time, the walls are extremely sharp. Its like they forgot it existed and needs constant attention. If you run your ptfe tubes through the center slot like I did as well try not to let the bend at your mmu2s get too tight or you’ll snap the filament and jam, good luck trying to take it off the frame, holding it in 1 hand while you stick your arms through the razor blade sharp doors, then you realize its way further back then it looks and you have to stick your head in and slice it on the top frame metal, which is just as sharp and pass out from blood loss. This is going to be your routine anytime you need to do any maintenance aside from nozzle and bed wiping. (We all know the MMU2S never needs any maintenance of any kind, not even a gear cleaning like the book says)
Now you might say “Well why don’t you just take out the printer or mmu from the enclosure instead of all this?’
Well my friend, the most beautiful thing about it is the power supply is mounted behind the enclosure externally, and like i said above i bought the QD but did not get it or any of my other addons. So the printer cant be separated from the enclosure without it, and the mmu is connected to the einsey box, I suggest researching the ability to generate more arms and hands to remedy this.
To make things even better, now every time you want to turn off the printer you have to awkwardly hug the entire box and flounder for the switch. (Said box is roughly 24inLx24inHx24inW. The entire front to back space of a iKea LAGKAPTEN desk, and about a solid 1/3rd of your horizontal desktop space area.)
“What if I pick it up?” LOL good luck, once assembled and with an i3mk3s inside its roughly 30-40lbs, and far too awkward to handle unless you want to drop it and bust through your floor.
I ordered my enclosure on the 1st of July have not had any updates since. It would be a little more customer friendly to let people know what is happening.
I ordered everything in June and still waiting for the shipment.
Prusa Team, could you please update your customers what is happening? I would like to know what is the current status of my order and when I will receive it. Originally it supposed to be just 4 weeks of waiting..
Actually, there is an information about shipping date in respect to your order date:
https://help.prusa3d.com/article/shipping-information_2297?gclid=CjwKCAjwx7GYBhB7EiwA0d8oe52q2-ZKKHu3B5VT08kfHT6RvfKonblnszdNCUVuVUWEPSjaPiYVdBoCQc8QAvD_BwE
I can’t wait until my enclosure finally ships. But I must temper my enthusiasm with the fact that I have MMU2/S and the enclosure must accommodate it and handle buffering and 5 rolls of filament. So Although I see the lid hinge is already an available option, perhaps the complete solution to handle MMU with Enclosure isn’t quite ready yet. Last week I encountered some confusion in Prusa Support when I asked about it. So it would be great if someone could spare the time to put together a blog article on the roadmap for MMU compatibility with the enclosure, so it’s clear for everyone.
My concern is whether this “upgrade” will be available when my own instance of enclosure ships (could be end of October maybe) . If there are any extra parts to purchase can they be included or will I need to pay ANOTHER shipping charge on top.?
It’s not my role to dictate anything to Prusa at all, but I can lobby.
So, it concerns the filament buffer for the MMU2/S.
The standard buffer is difficult to load filament. And the tubes come out too. I suggest many mmu owners discard the standard buffer. So, for the enclosure is the standard buffer a tenable solution ? There are many 3rd party designs. Too many in fact: it’s confusing and wasteful for people to sift through them all to find one that works best.
So the simple request is to include a better mmu filament buffer for use with the enclosure. The idea to terminate PTFE tubes using Festo’s is a good one, in line with the improved quality inherent in the new enclosure.
Dobrý den,box na tiskárnu Průša mini+ by taky nebylo špatný udělat
In the Add-on section, it says this:
We are preparing a number of useful 3D printed accessories for the enclosure – there will be a dedicated collection of prints at Printables.com (coming soon).
I cannot find these on the Printables.com website. Anyone have a link? It says there will be a dedicated collection, but I do not find it.
@PonyXpress https://blog.prusa3d.com/original-prusa-enclosure_67656/
Give us the Prusa mini ++ MMU
With the Prusa enclosure can you feed filament in from an external dryer?
Was any of the "Future upgrades" ever developed? I don't see an option to start and stop the enclosure filter and/or led with the print, nor the rest.