


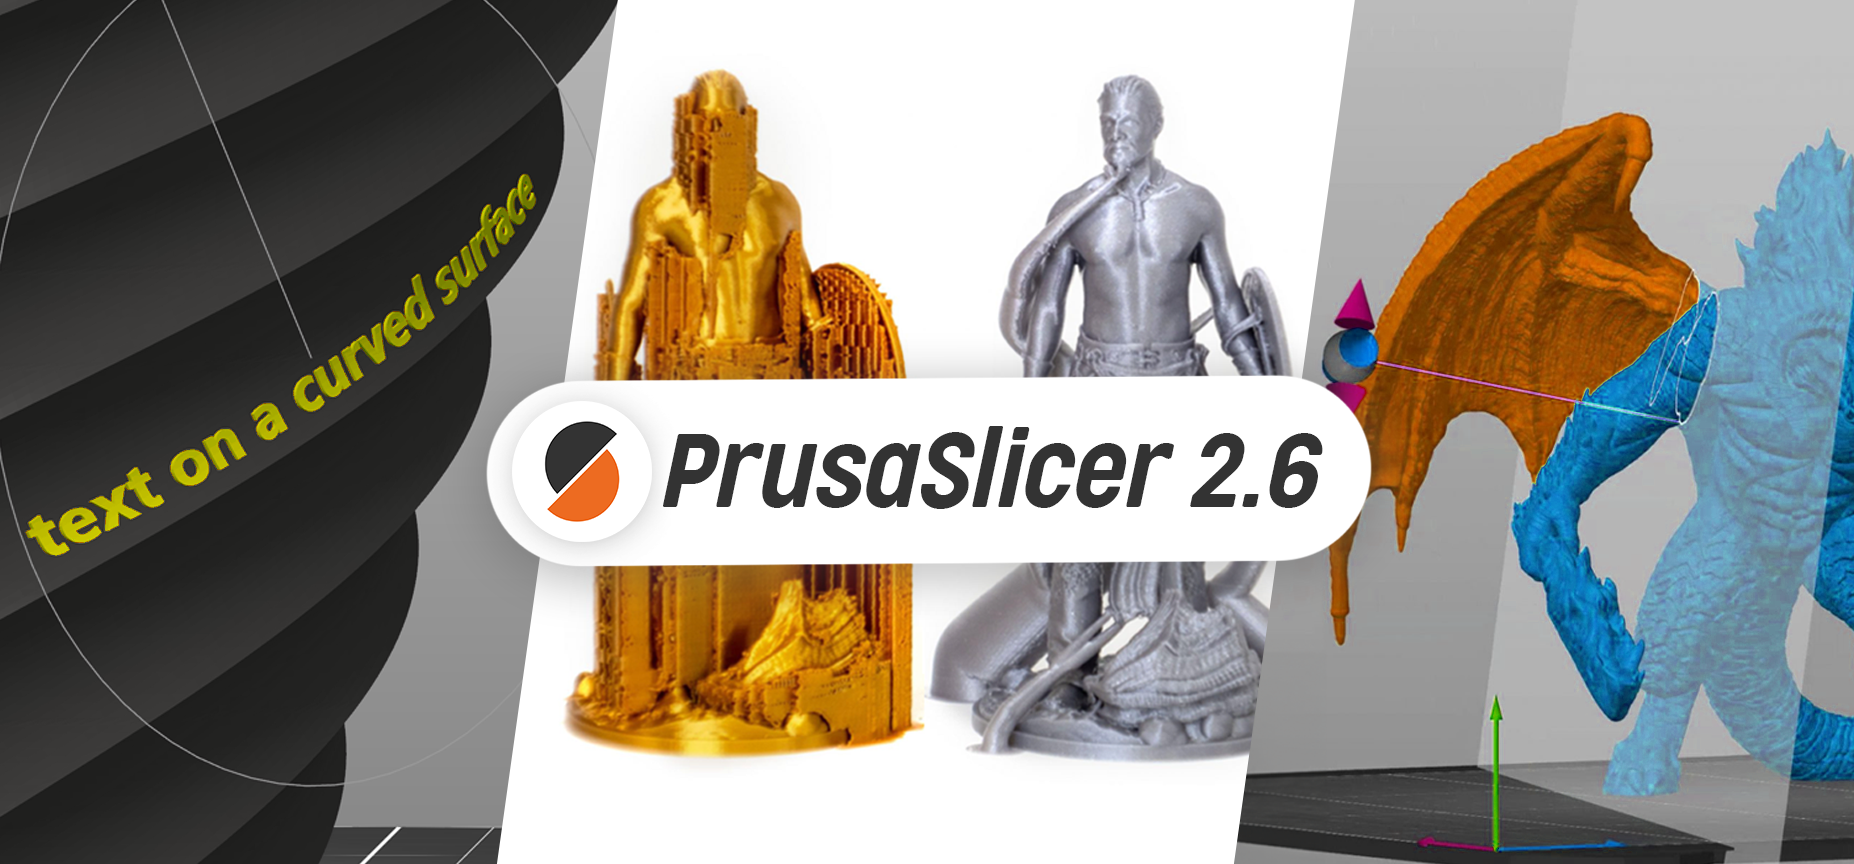
PrusaSlicer 2.6 is here and it brings many huge improvements, not only in the overall user experience and by introducing several new tools but also by refining the heart of our software, the G-code generation.
The improvements to the G-code generation often result in faster print times, they have a positive impact on the print quality and reliability of your prints. We’ve carefully listened to feedback and tried to address the most common requests for new or improved features. Before we dive into details, here’s the overview of what’s new:
- Organic supports
- Automatic FDM support painter and print checker
- Text embossing tool
- Improved Cut tool
- Measurement tool
- Dynamic overhang speed
- Automatic anchoring of bridging infill
- Improved Ensure vertical shell thickness
- Multitool slicing improvements
Organic Supports
Until now, PrusaSlicer’s used a 2D grid-based approach to generate supports. Although this method delivered decent results in many situations, it had its limitations. The supports often consumed quite a lot of filament, took a long time to print, ended up in spaces where they are difficult to remove from, and left visible marks on the model when removed. Especially when the settings were not tuned correctly. We improved some of these downsides by introducing the “Snug” supports in PrusaSlicer 2.4, but they are still only an upgraded version of the old approach.

An alternative approach, which was pioneered by various 3D modeling software and slicers is “Tree supports” – support structures designed to save material and printing time as much as possible. Gradually expanding branches of supports are generated where needed and contact areas with the model are limited to a necessary minimum.
We first implemented these supports for SLA slicing in PrusaSlicer 2.0 (2019) and received a lot of feedback ever since to bring them to FDM slicing as well. Unfortunately, after a few tests, it was clear that a simple modification of the existing implementation wasn’t compatible with FDM 3D printers.
In this release, we are presenting our significantly improved implementation of tree supports, which we decided to call ‘Organic supports‘. We choose a new name for our supports because of their distinctly smooth shape and several differences in their behavior. Our implementation is an evolution of the tree supports by Thomas Rahm, which are significantly improved tree supports originally from Cura. We would like to thank Ultimaker Cura and Thomas Rahm for the effort they have invested into the problem.
In contrast to the previously common implementation of tree supports, the Organic supports are very different. Branching is smarter and we made them straighter (shorter), smoother, and more stable. The cross-section perpendicular to the branch axis is guaranteed to be circular, and the algorithm automatically uses double perimeter walls for the trees where needed (this is configurable).
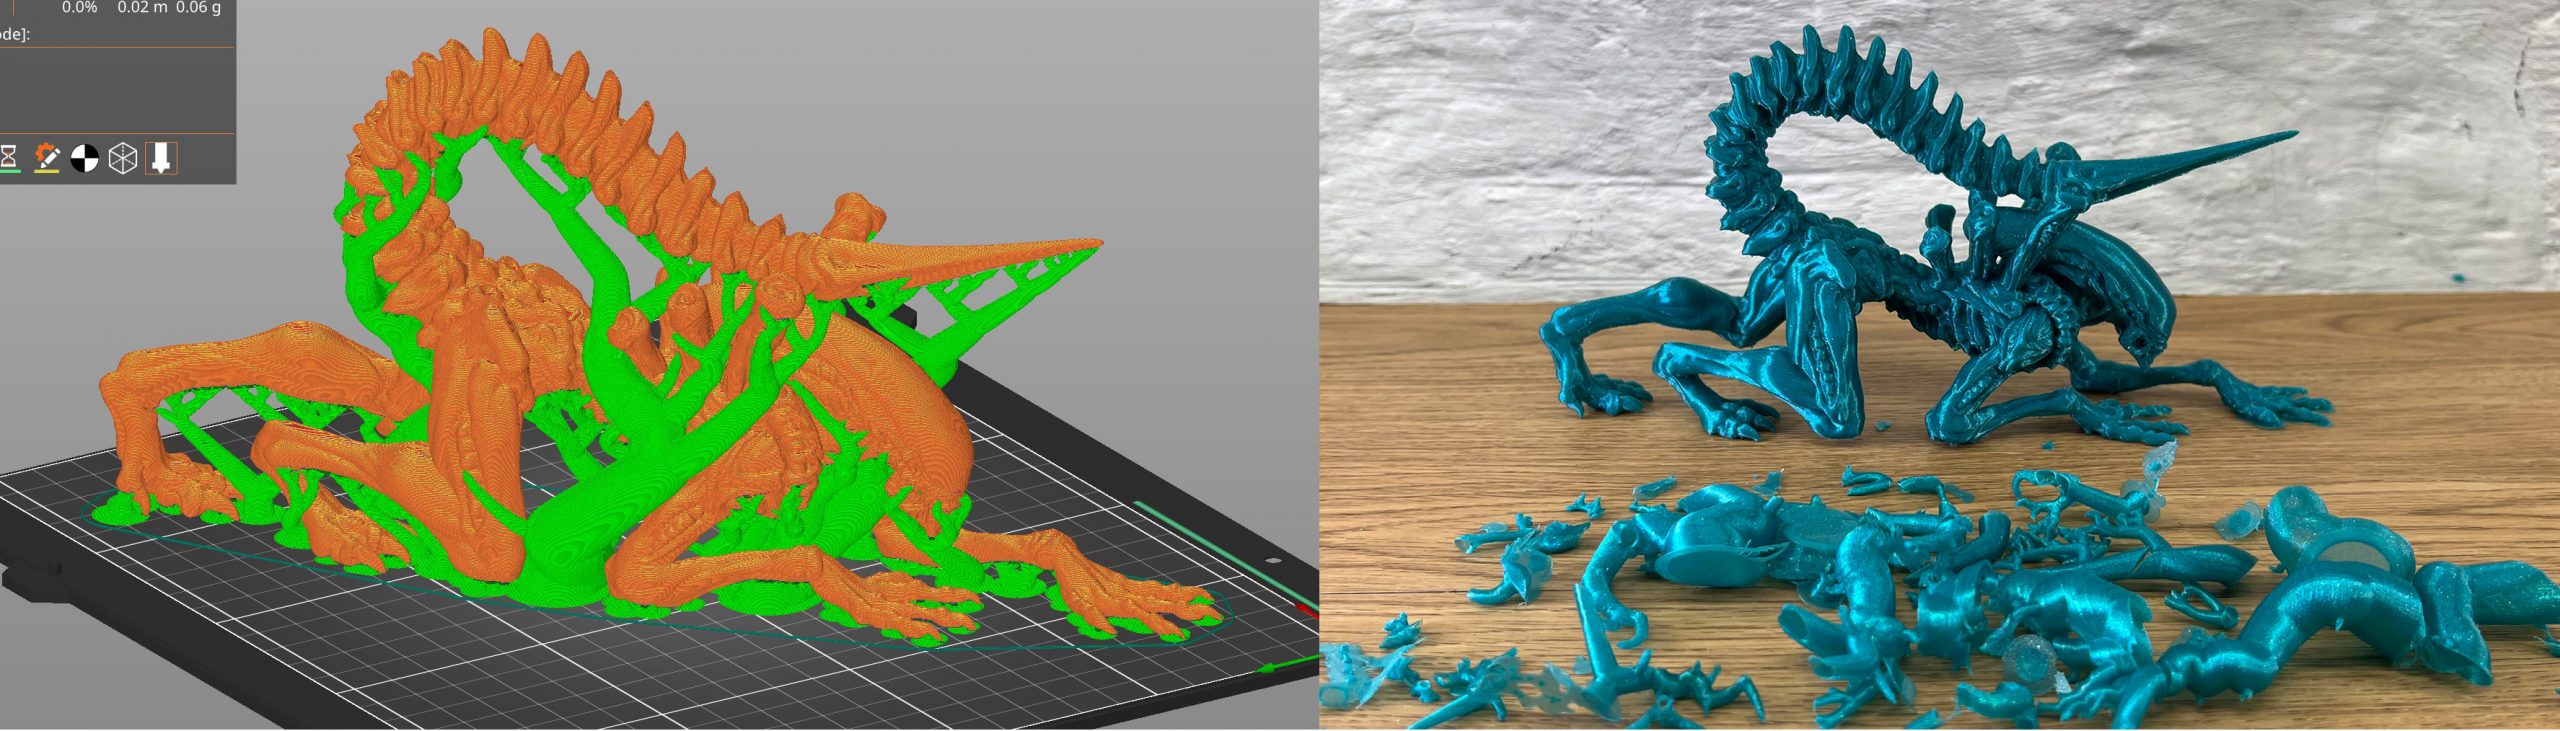
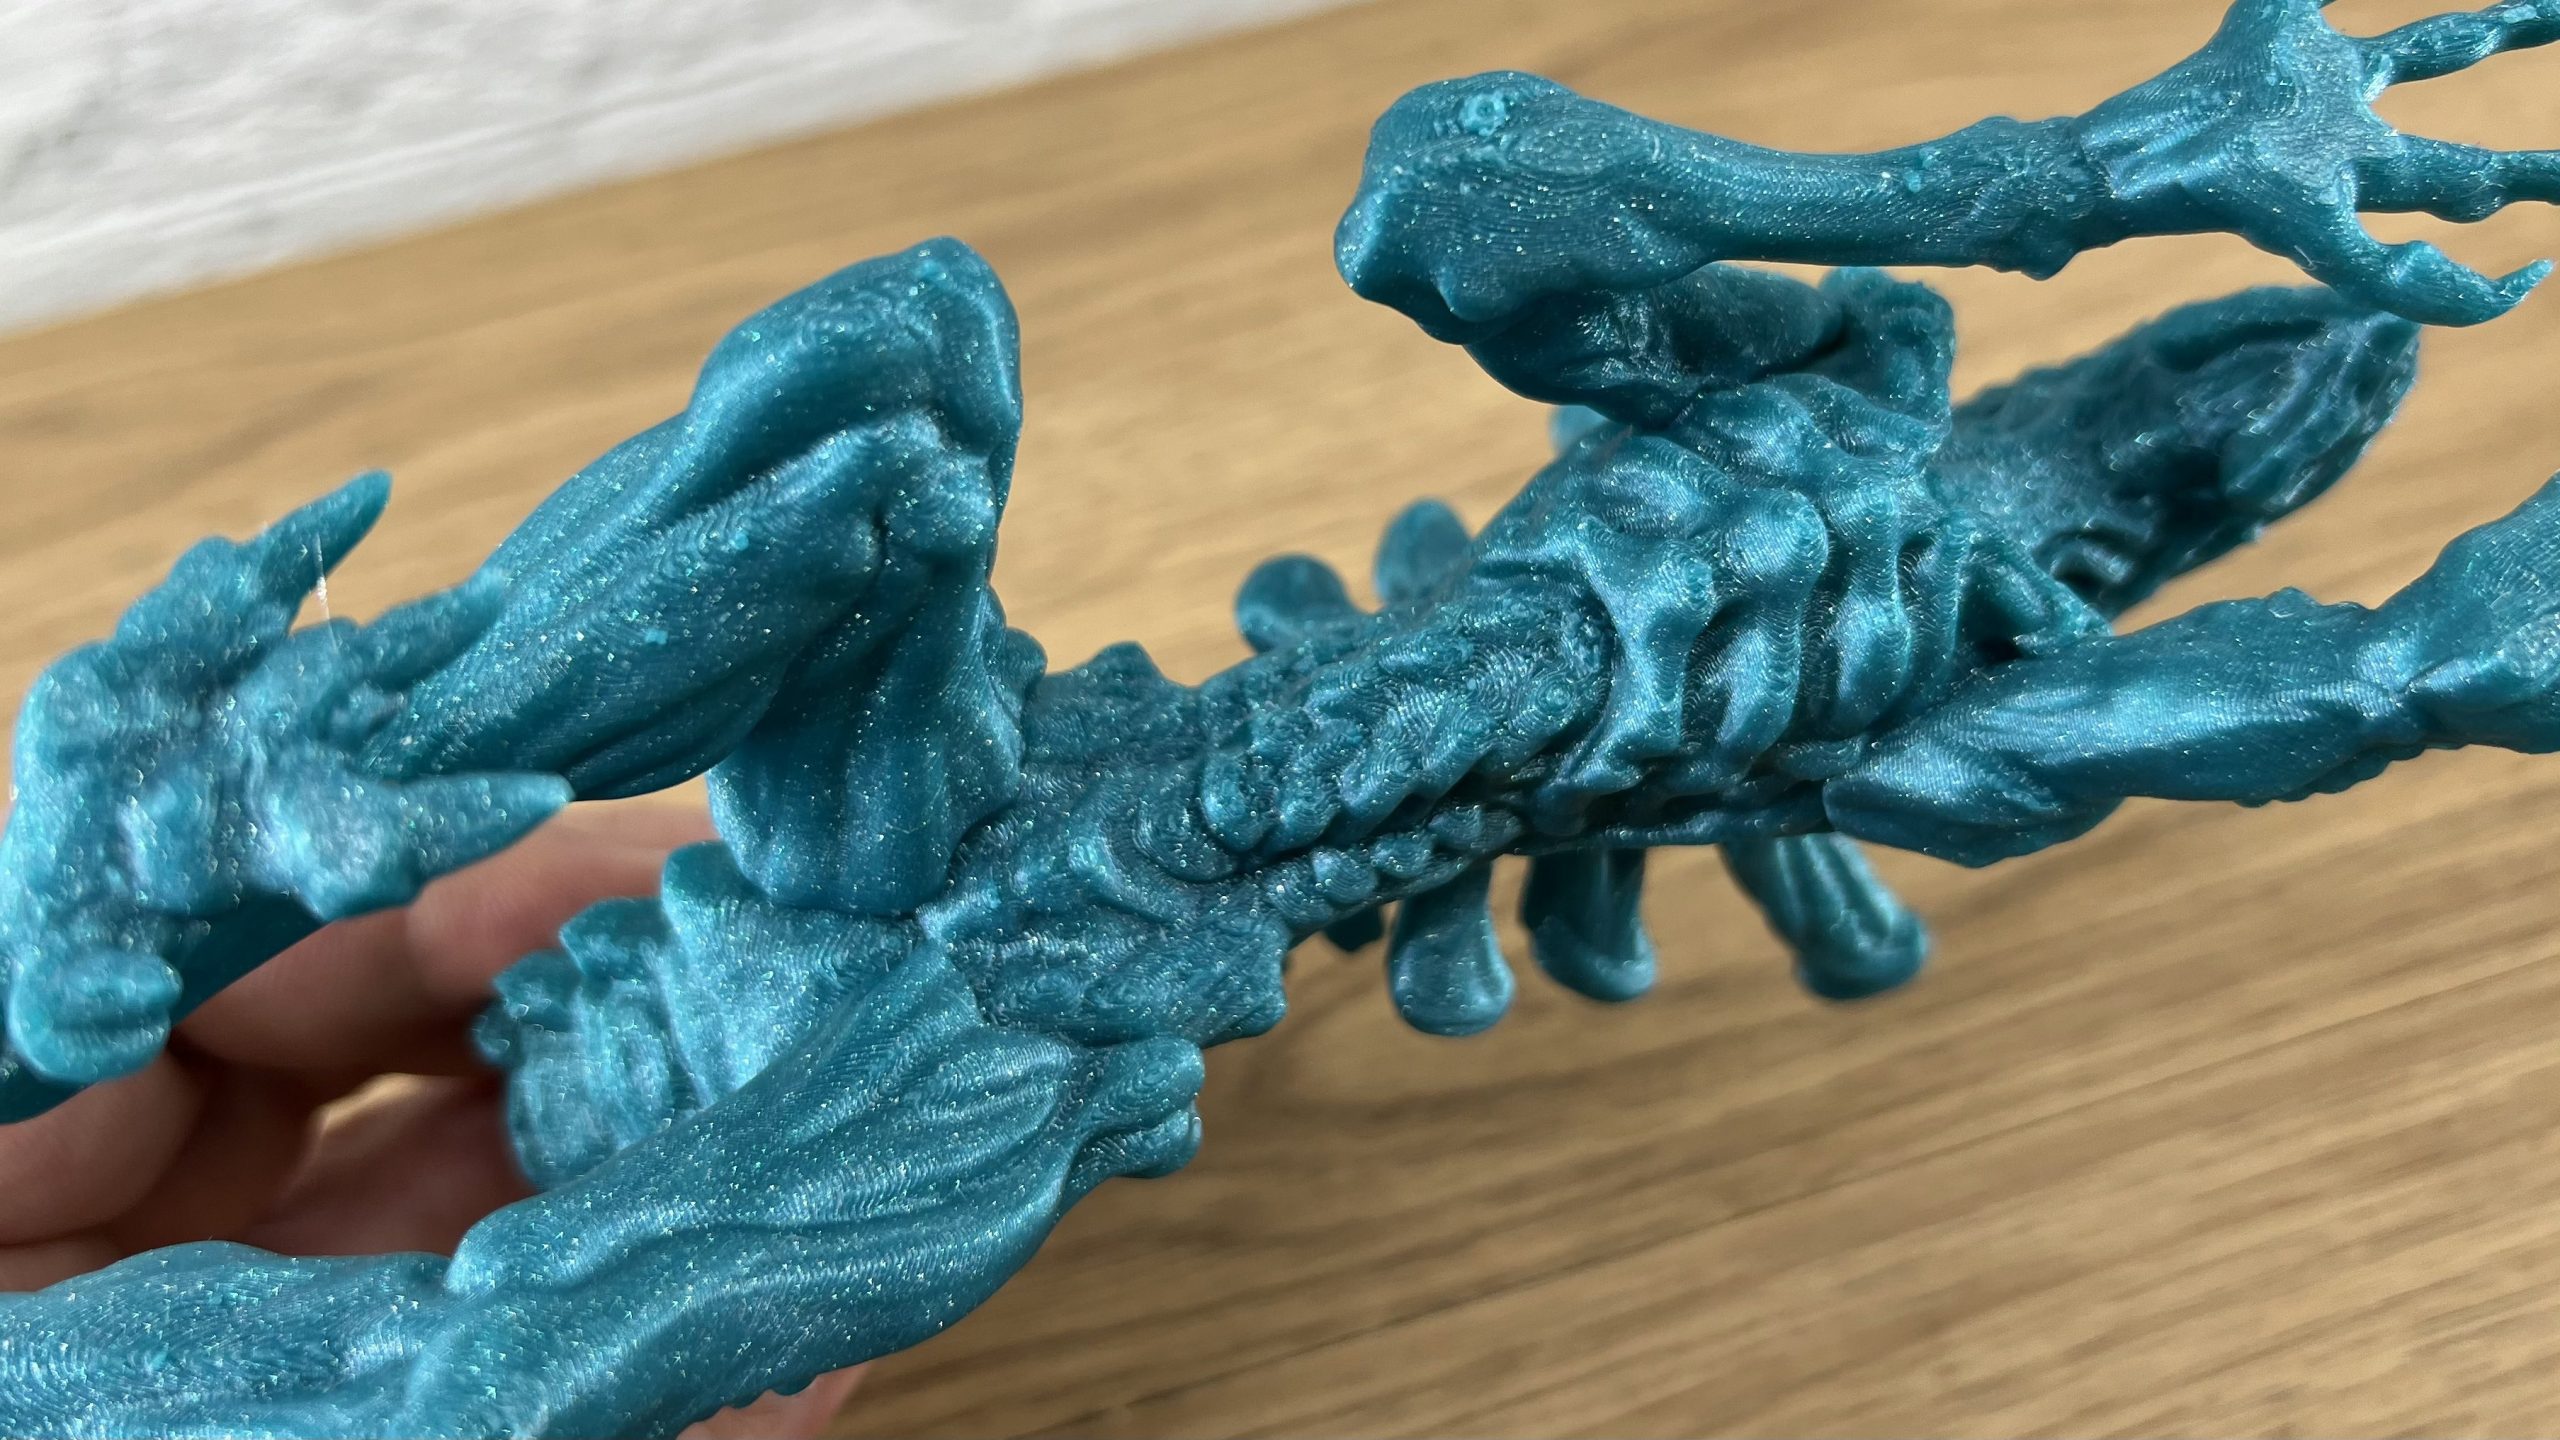 Alien – Xenomorph – Full Figure – 25 CM, model by Printed Obsession, printed by Filament Frenzy
The Organic supports are easily removable, do not scar the surface, and are fast and cheap to print. From our internal and external alpha/beta tests, we’ve seen that the addition of Organic supports changes how we think about FDM 3D printing and even 3D modeling. Models can now be printed in orientations that were previously unthinkable (mirroring SLA printing capabilities) and supports for even the most complex shapes are typically easy to remove.
Organic supports can be manually enforced or blocked using the Paint-on supports tool. This leads us to another key feature in PrusaSlicer 2.6.
Automatic FDM support painter and print checker
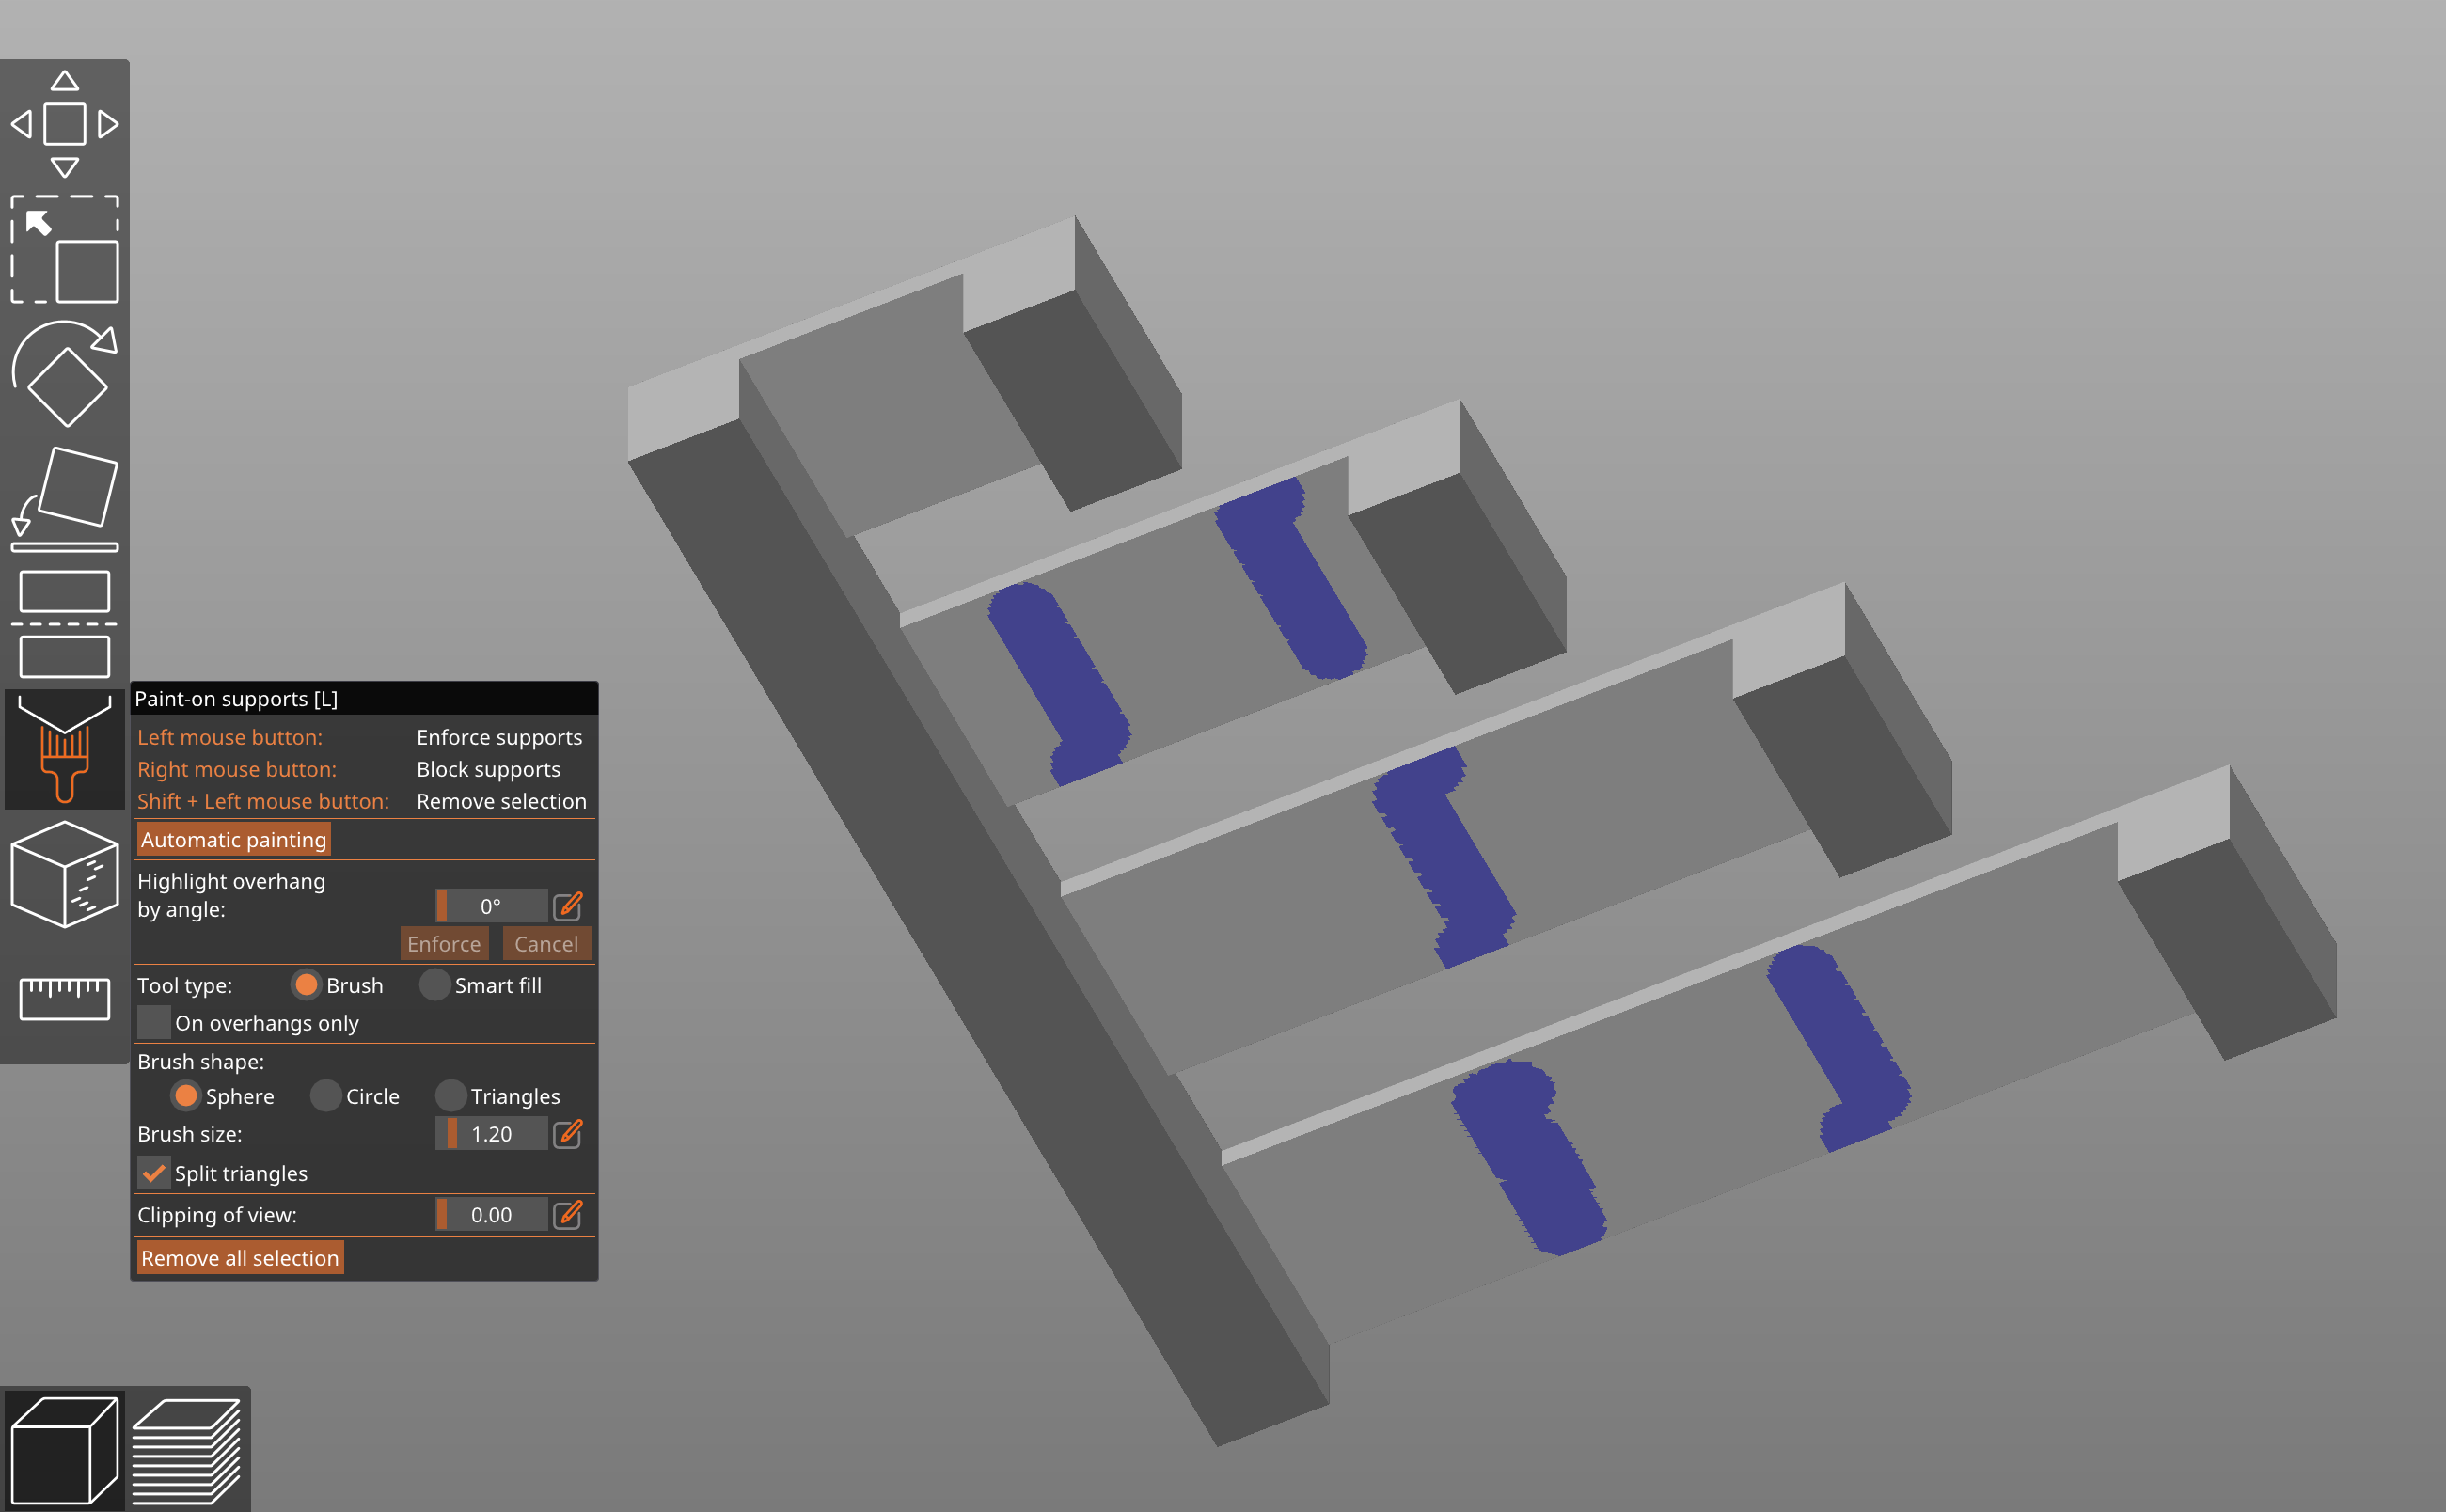
For a long time, PrusaSlicer let you manually paint areas requiring supports. This is a much-praised feature that allows the user to customize supports quickly and easily. As part of a large effort to create more intelligent support creation, the FDM support painting tool now contains an option for the automatic painting of support enforcers on the model.
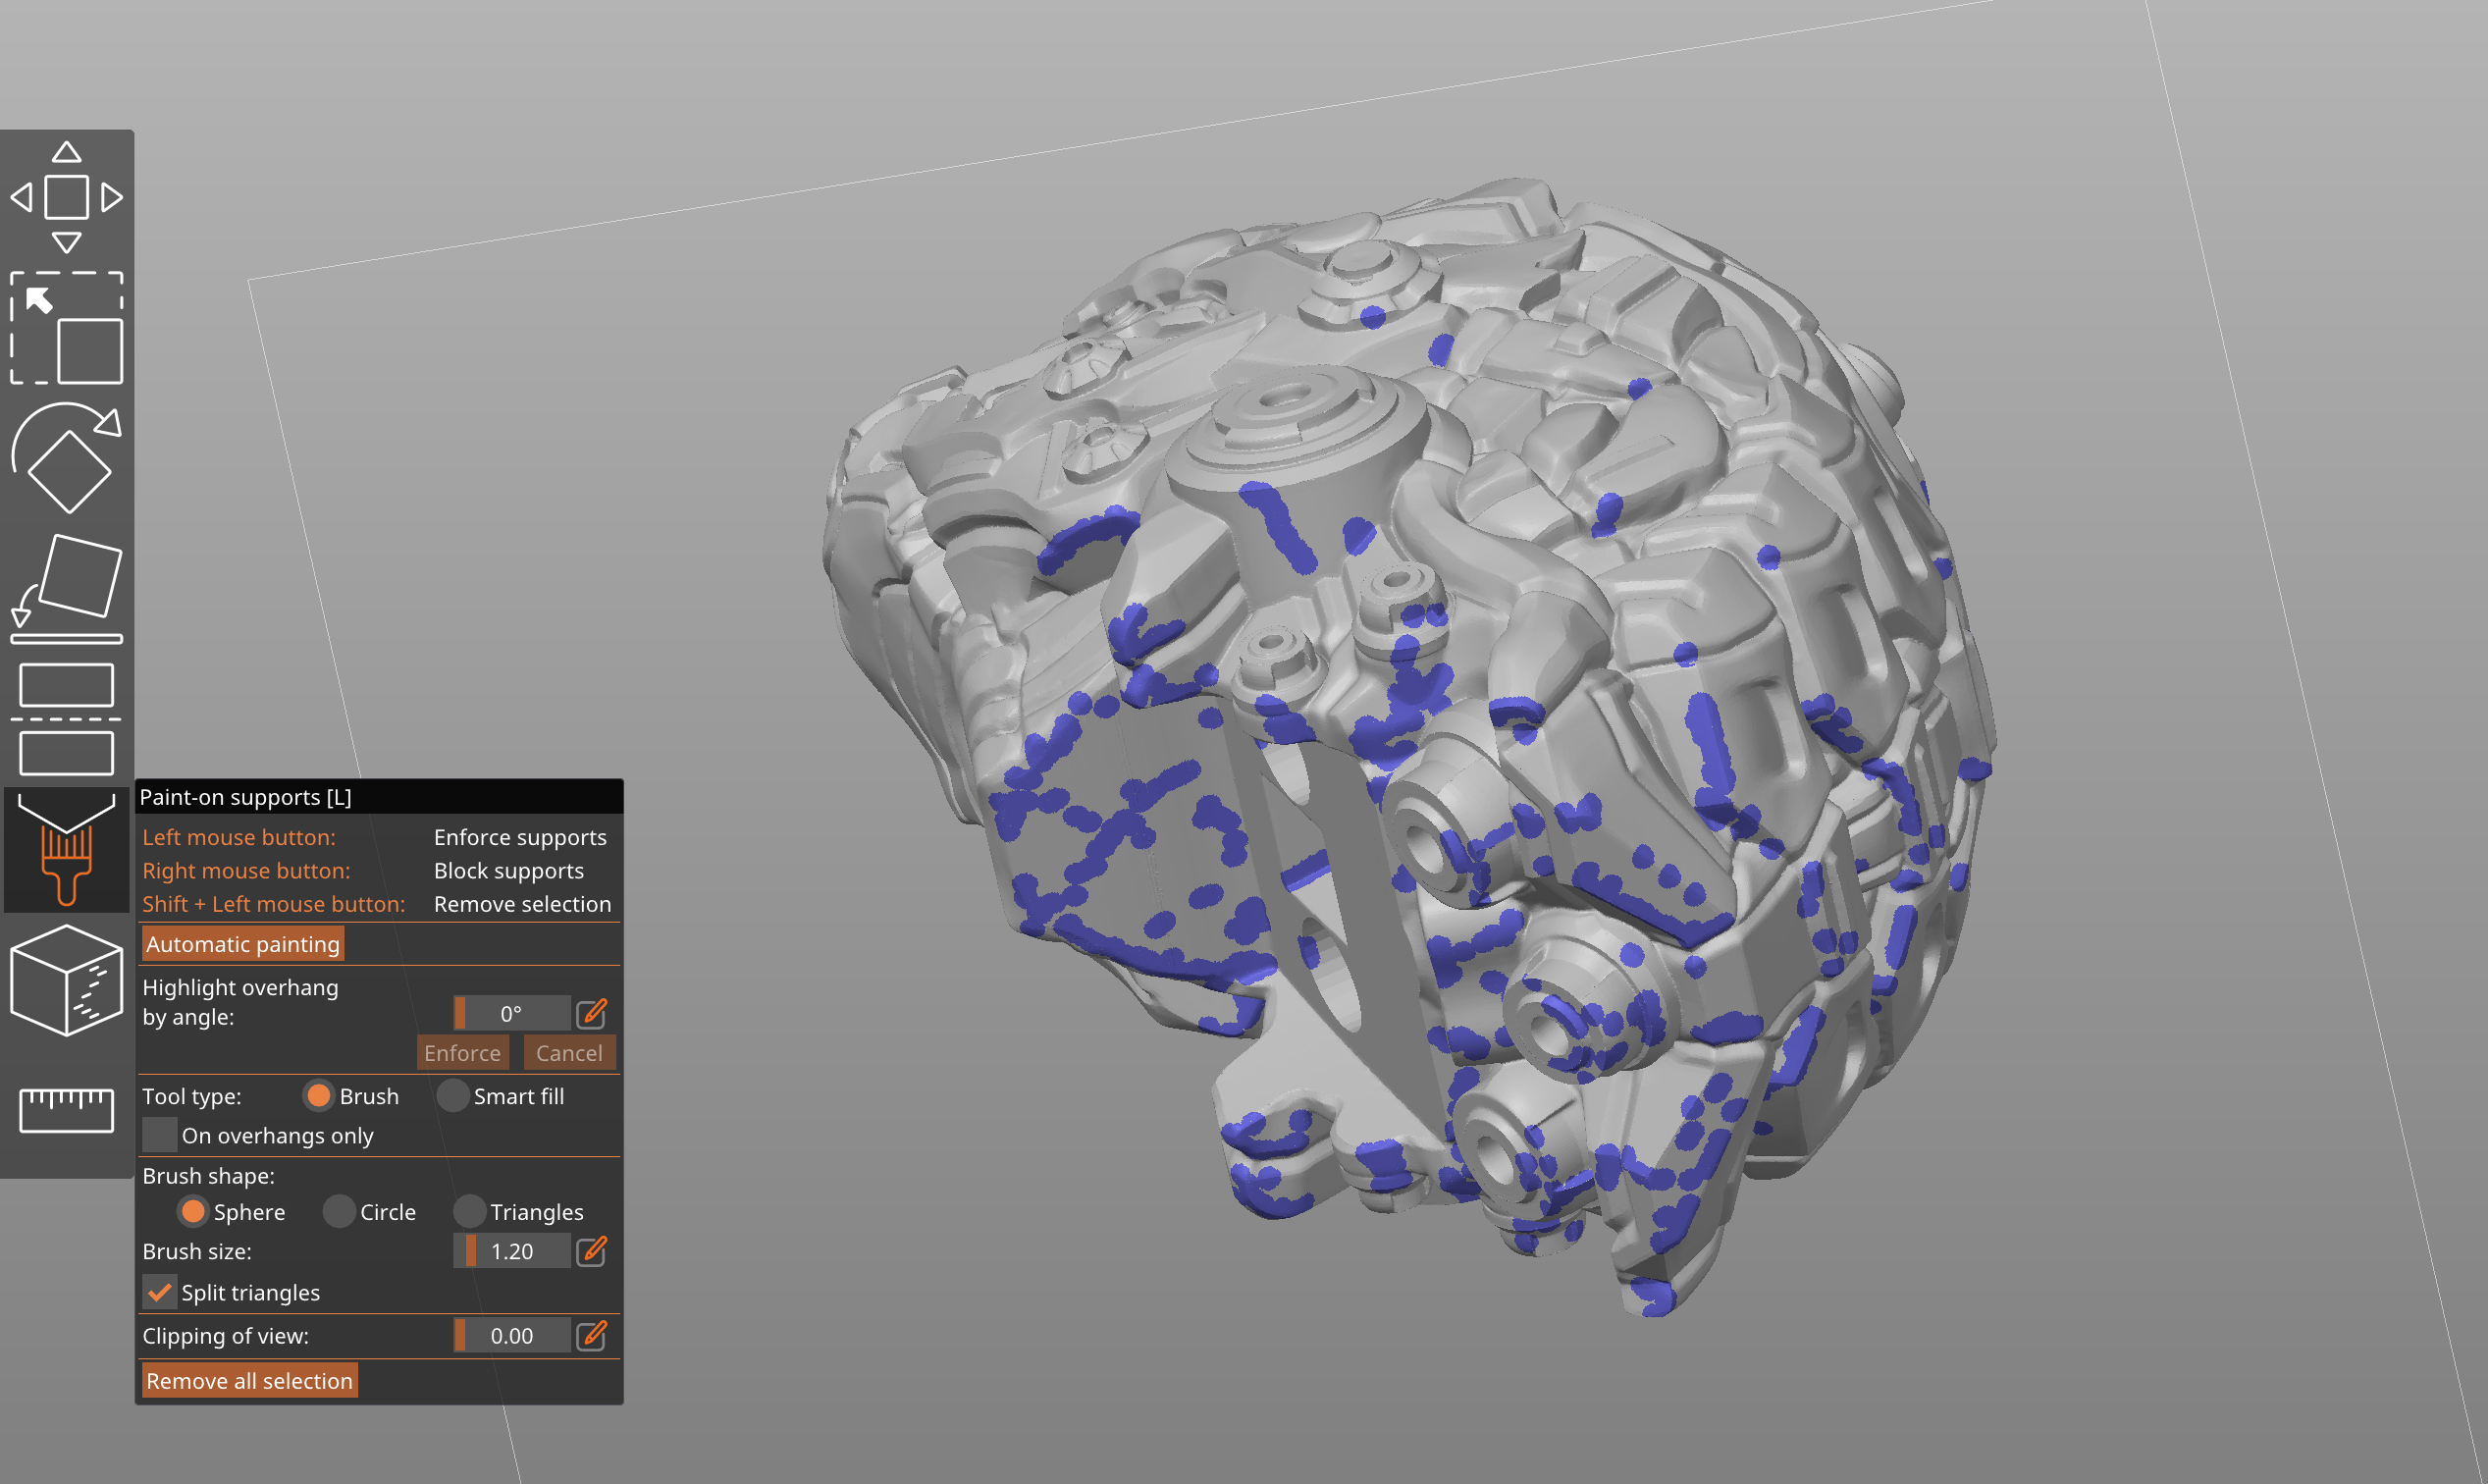
Our state-of-the-art algorithm that powers this tool inspects the print extrusion by extrusion, considering a multitude of factors such as the center of mass, weight of the supported part, bed movement, potential extruder collision, bed adhesion, material, and bridging. The result is a more efficient placement of supports. For instance, bridges are supported only by regularly spaced pillars instead of their entire length.
The tool is also automatically activated during slicing, to give you a warning if a print needs supports. As expert users may find such a warning obtrusive, the warning can be disabled in the preferences. Note that when you simply enable “Supports everywhere” this new algorithm is not currently being used for the support generation. You have to open the Paint-on supports tool and use Automatic painting, then select supports “For support enforcers only”.
Text embossing tool
The new Text tool lets you insert, manipulate, and edit text as a 3D object. This provides a convenient way to customize models and add elements such as notes, signs, or serial numbers directly in the slicer.
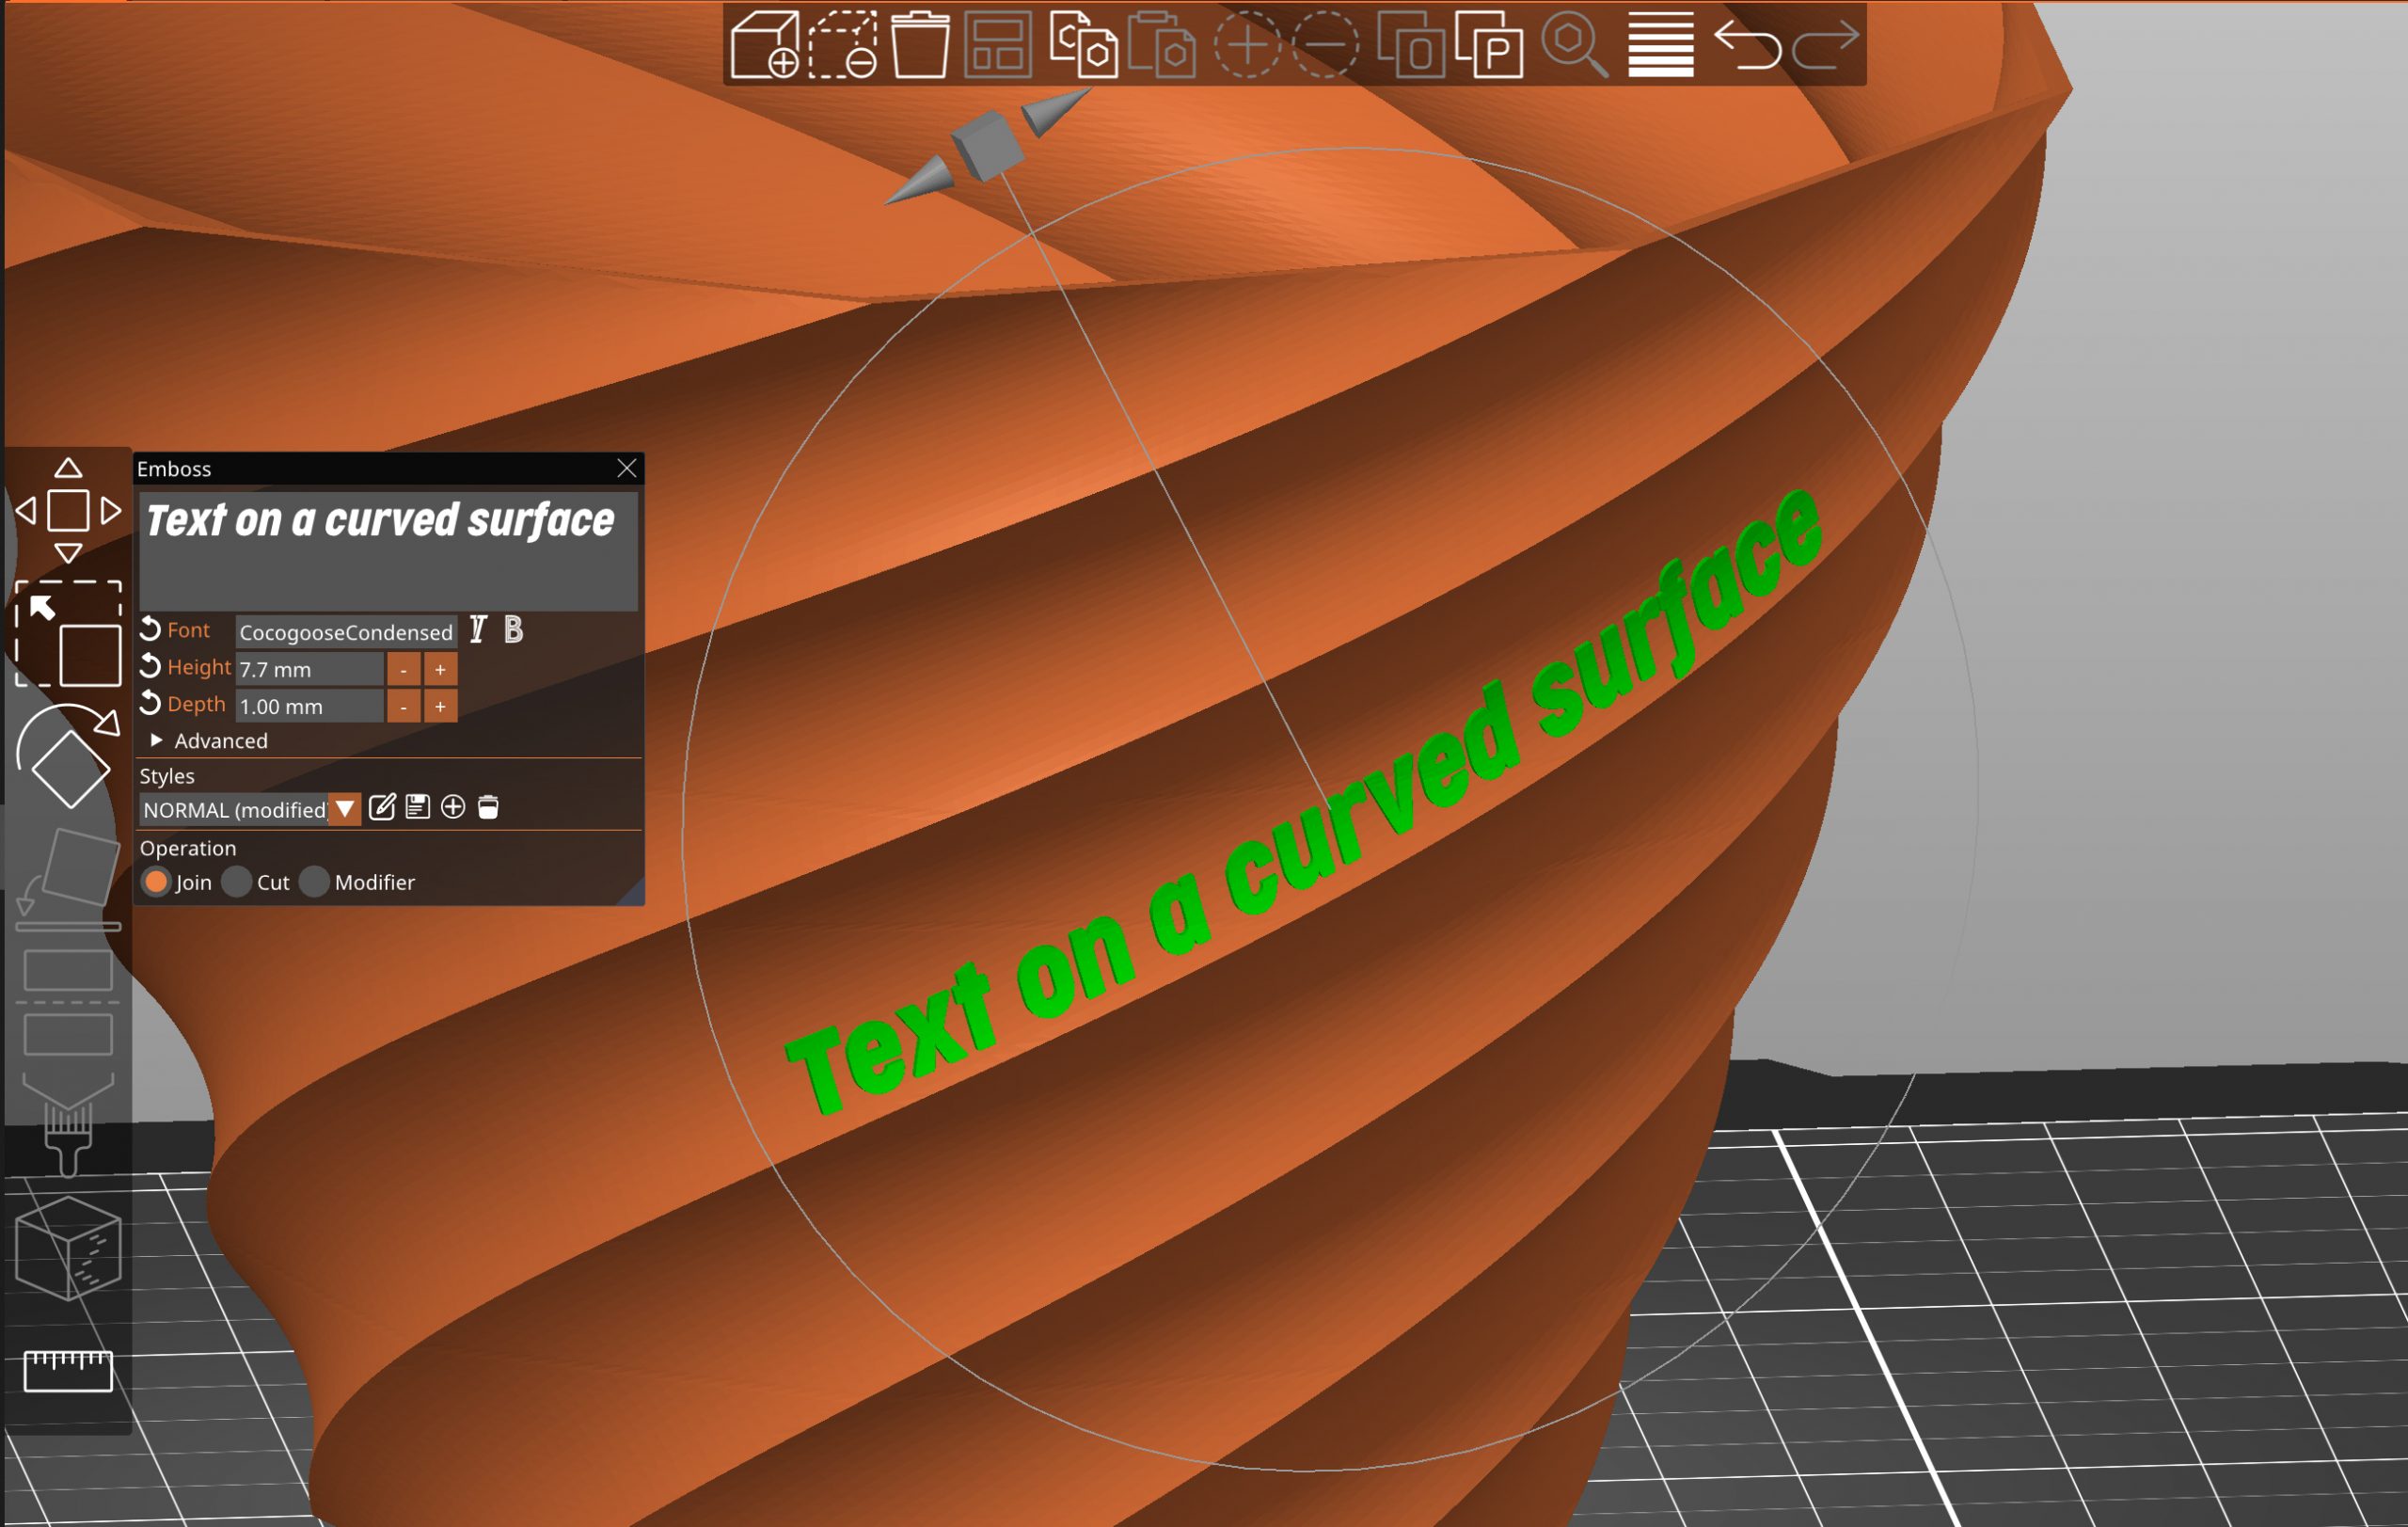 Model – 9 Sided Twisted Planter by DubMFG
Texts can be embossed, debossed, or even used as a modifier. However, the true game-changer is the ability to make the text follow curved surfaces with just a single click! To change the text position, you can simply drag it on the object’s surface. The text editor automatically imports the font library installed on your device (all TrueType fonts should work).
Even after closing the Text tool, the text remains fully editable. The same goes for re-opening 3MF project files. You can also create and save text styles to reuse them in future projects.
Improved Cut tool
The Planar Cut tool has been available in PrusaSlicer for a long time. It is handy for preprocessing huge models that don’t fit the build volume or which are too complicated to print in one piece. With this release, we are extending its functionality.
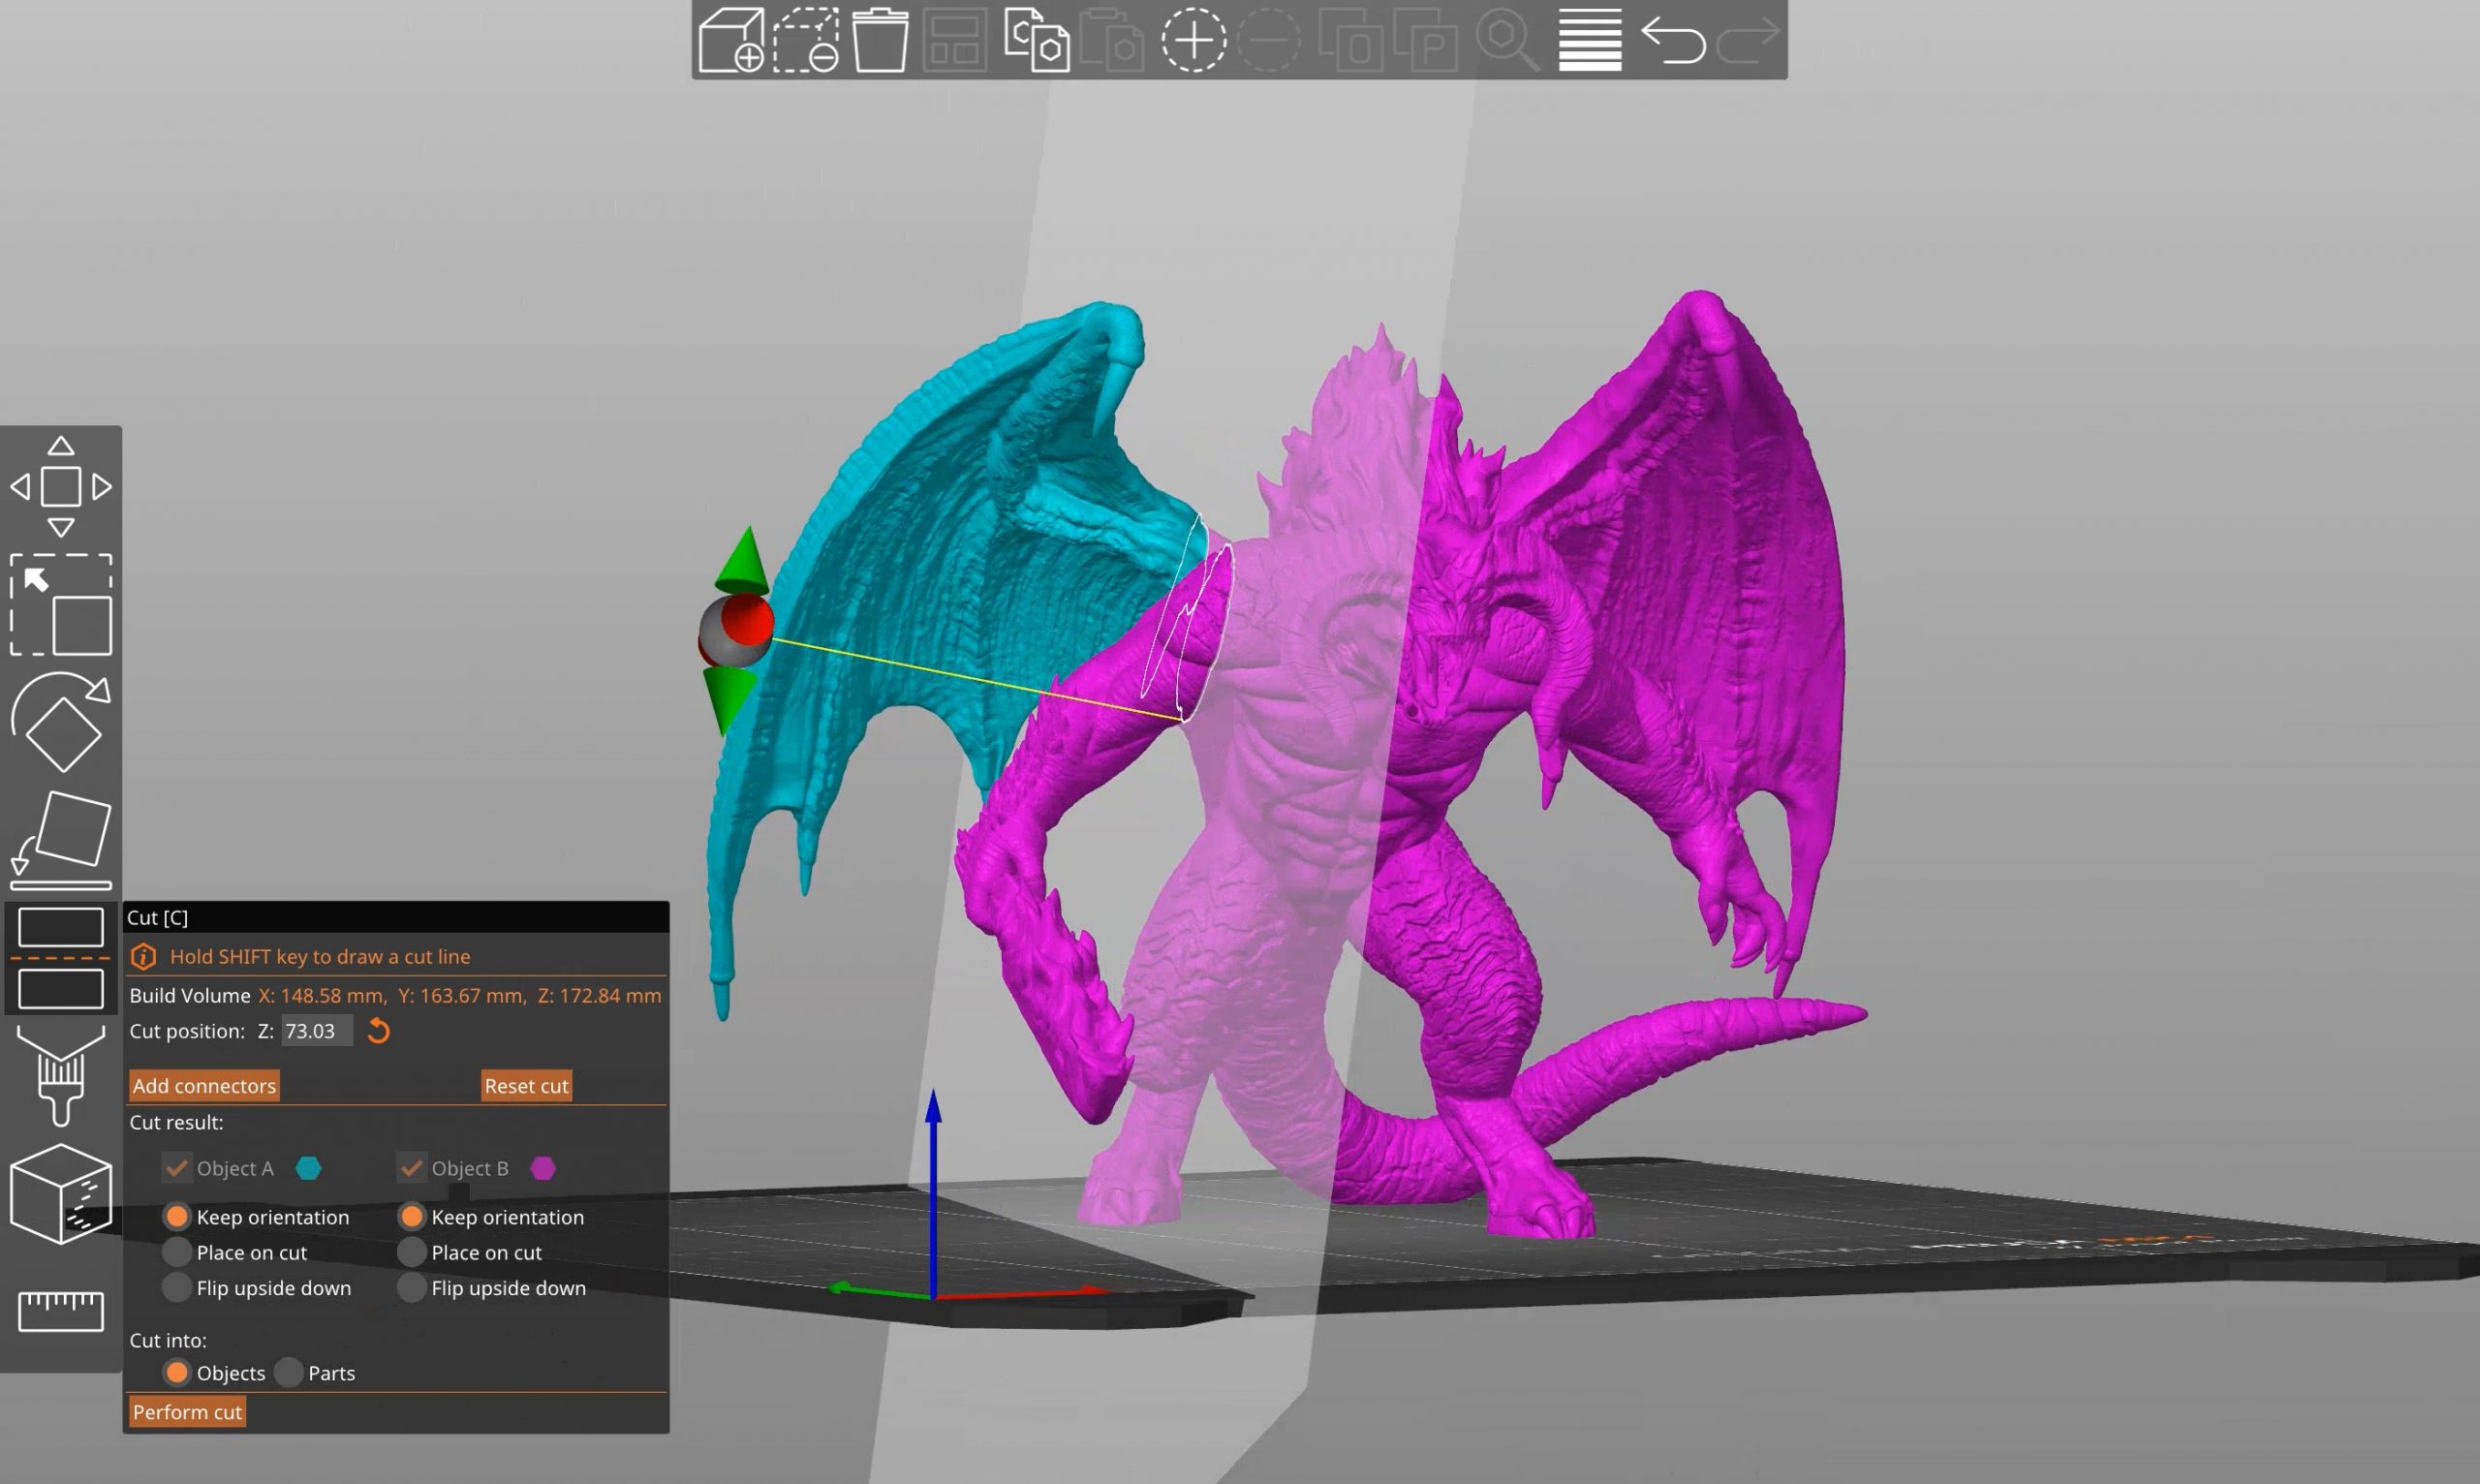 Model – Balrog Figure by Fotis Mint
You can newly cut the model at any angle. Defining the precise cutting angle can be done both by a 3D gizmo or by simply drawing a cutting plane by dragging the left mouse button while holding down the Shift key. If the cutting plane intersects the model in several different regions, you can select which parts to cut and which to keep connected by right-clicking on them.
You can select if the cut part should be placed on the bed with the newly created flat surface. You can also choose to keep the alignment of the parts, for example, for printing with a multi-tool printer.
Adding connectors and dowel pins
We understand how important it is to assemble the final parts together with an emphasis on precision and simplicity. That’s why we added an option to define various types of connectors. You can control the depth, size, and tolerances of each connector and the negative hole.
Measurement tool
The measurement tool is another feature long demanded by our community. You can now easily measure distances between vertices, edges, and planes. However, the tool also features a smart geometry detection algorithm that recognizes circles and their diameters, even on fairly low-poly models.
If you select two edges, two planes, or an edge and a plane, which are not parallel, you can measure the angle between them. You can also measure the distance between the centers of two holes.
Apart from measuring sizes and angles, the tool also gives you a convenient option for uniformly scale objects to a desired size, without having to do any calculations on the side.
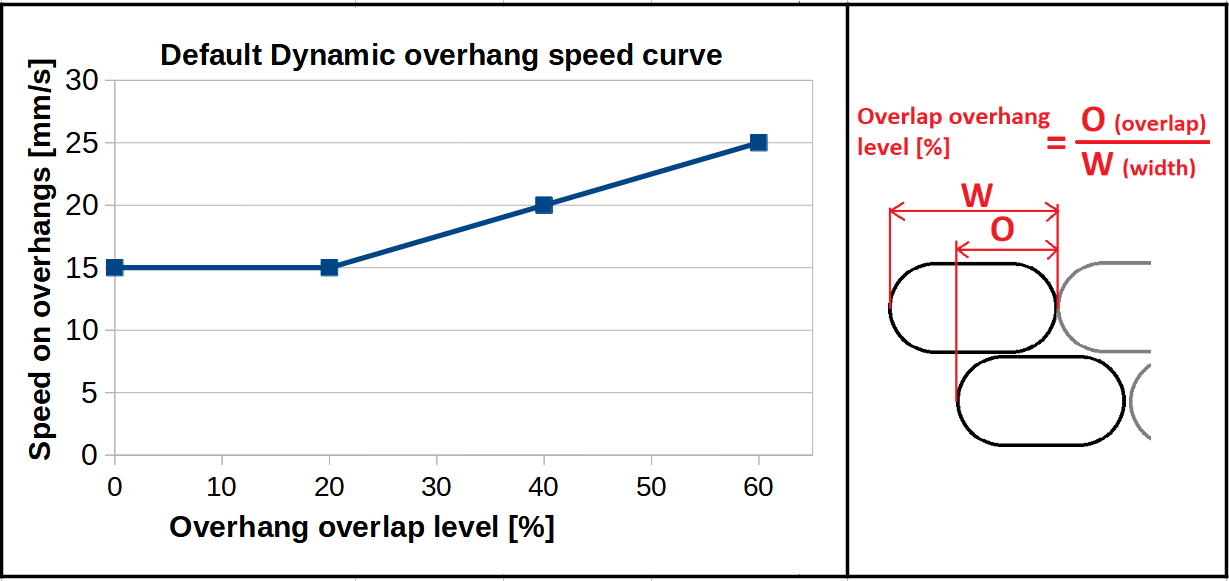
Dynamic overhang speed (and dynamic fan speed on overhangs)
This is a feature we came up with during the testing of our Input Shaper firmware for the MK4. As the name suggests, it lets you slow down the print speed when printing overhangs, which enables better cooling when it’s needed. The algorithm calculates extrusion overlap with the previous layer and applies speed calculated from the overhang slowdown function.
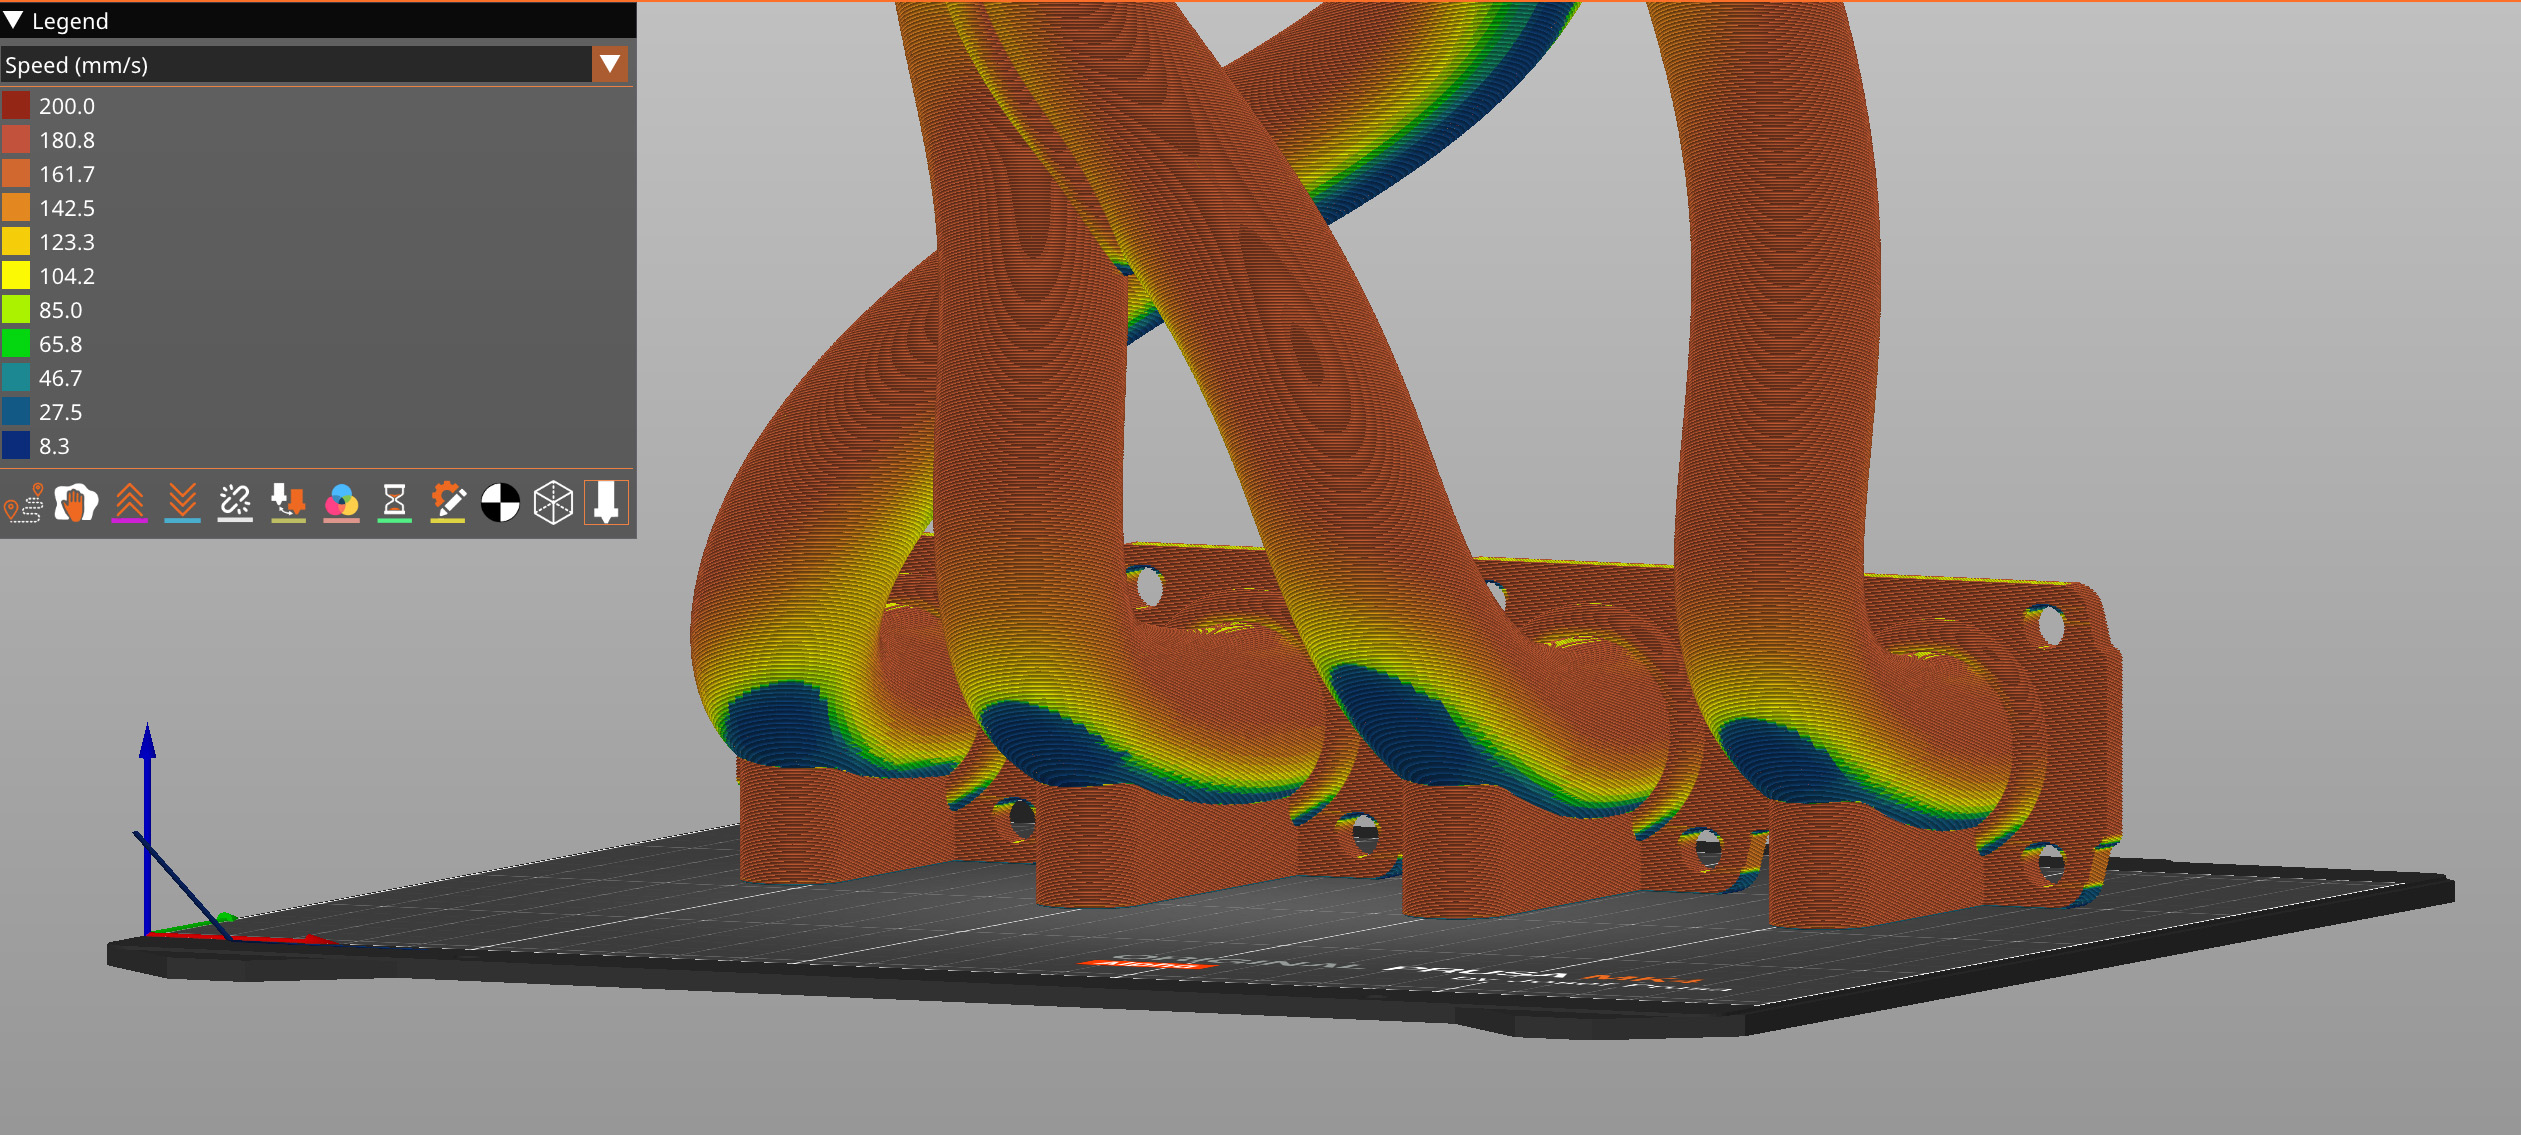
Users can control the shape of the overhang slowdown function via four input points – each point has an extrusion overlap value expressed as a percentage of the full width, and desired speed on such overlap. The speeds in between the control points are calculated via linear interpolation.
Similarly, users can create custom fan speed curves, so that extreme overhangs get increased cooling. Of course, with some polymers, too much cooling will negatively impact the mechanical properties.
Extending sparse infill
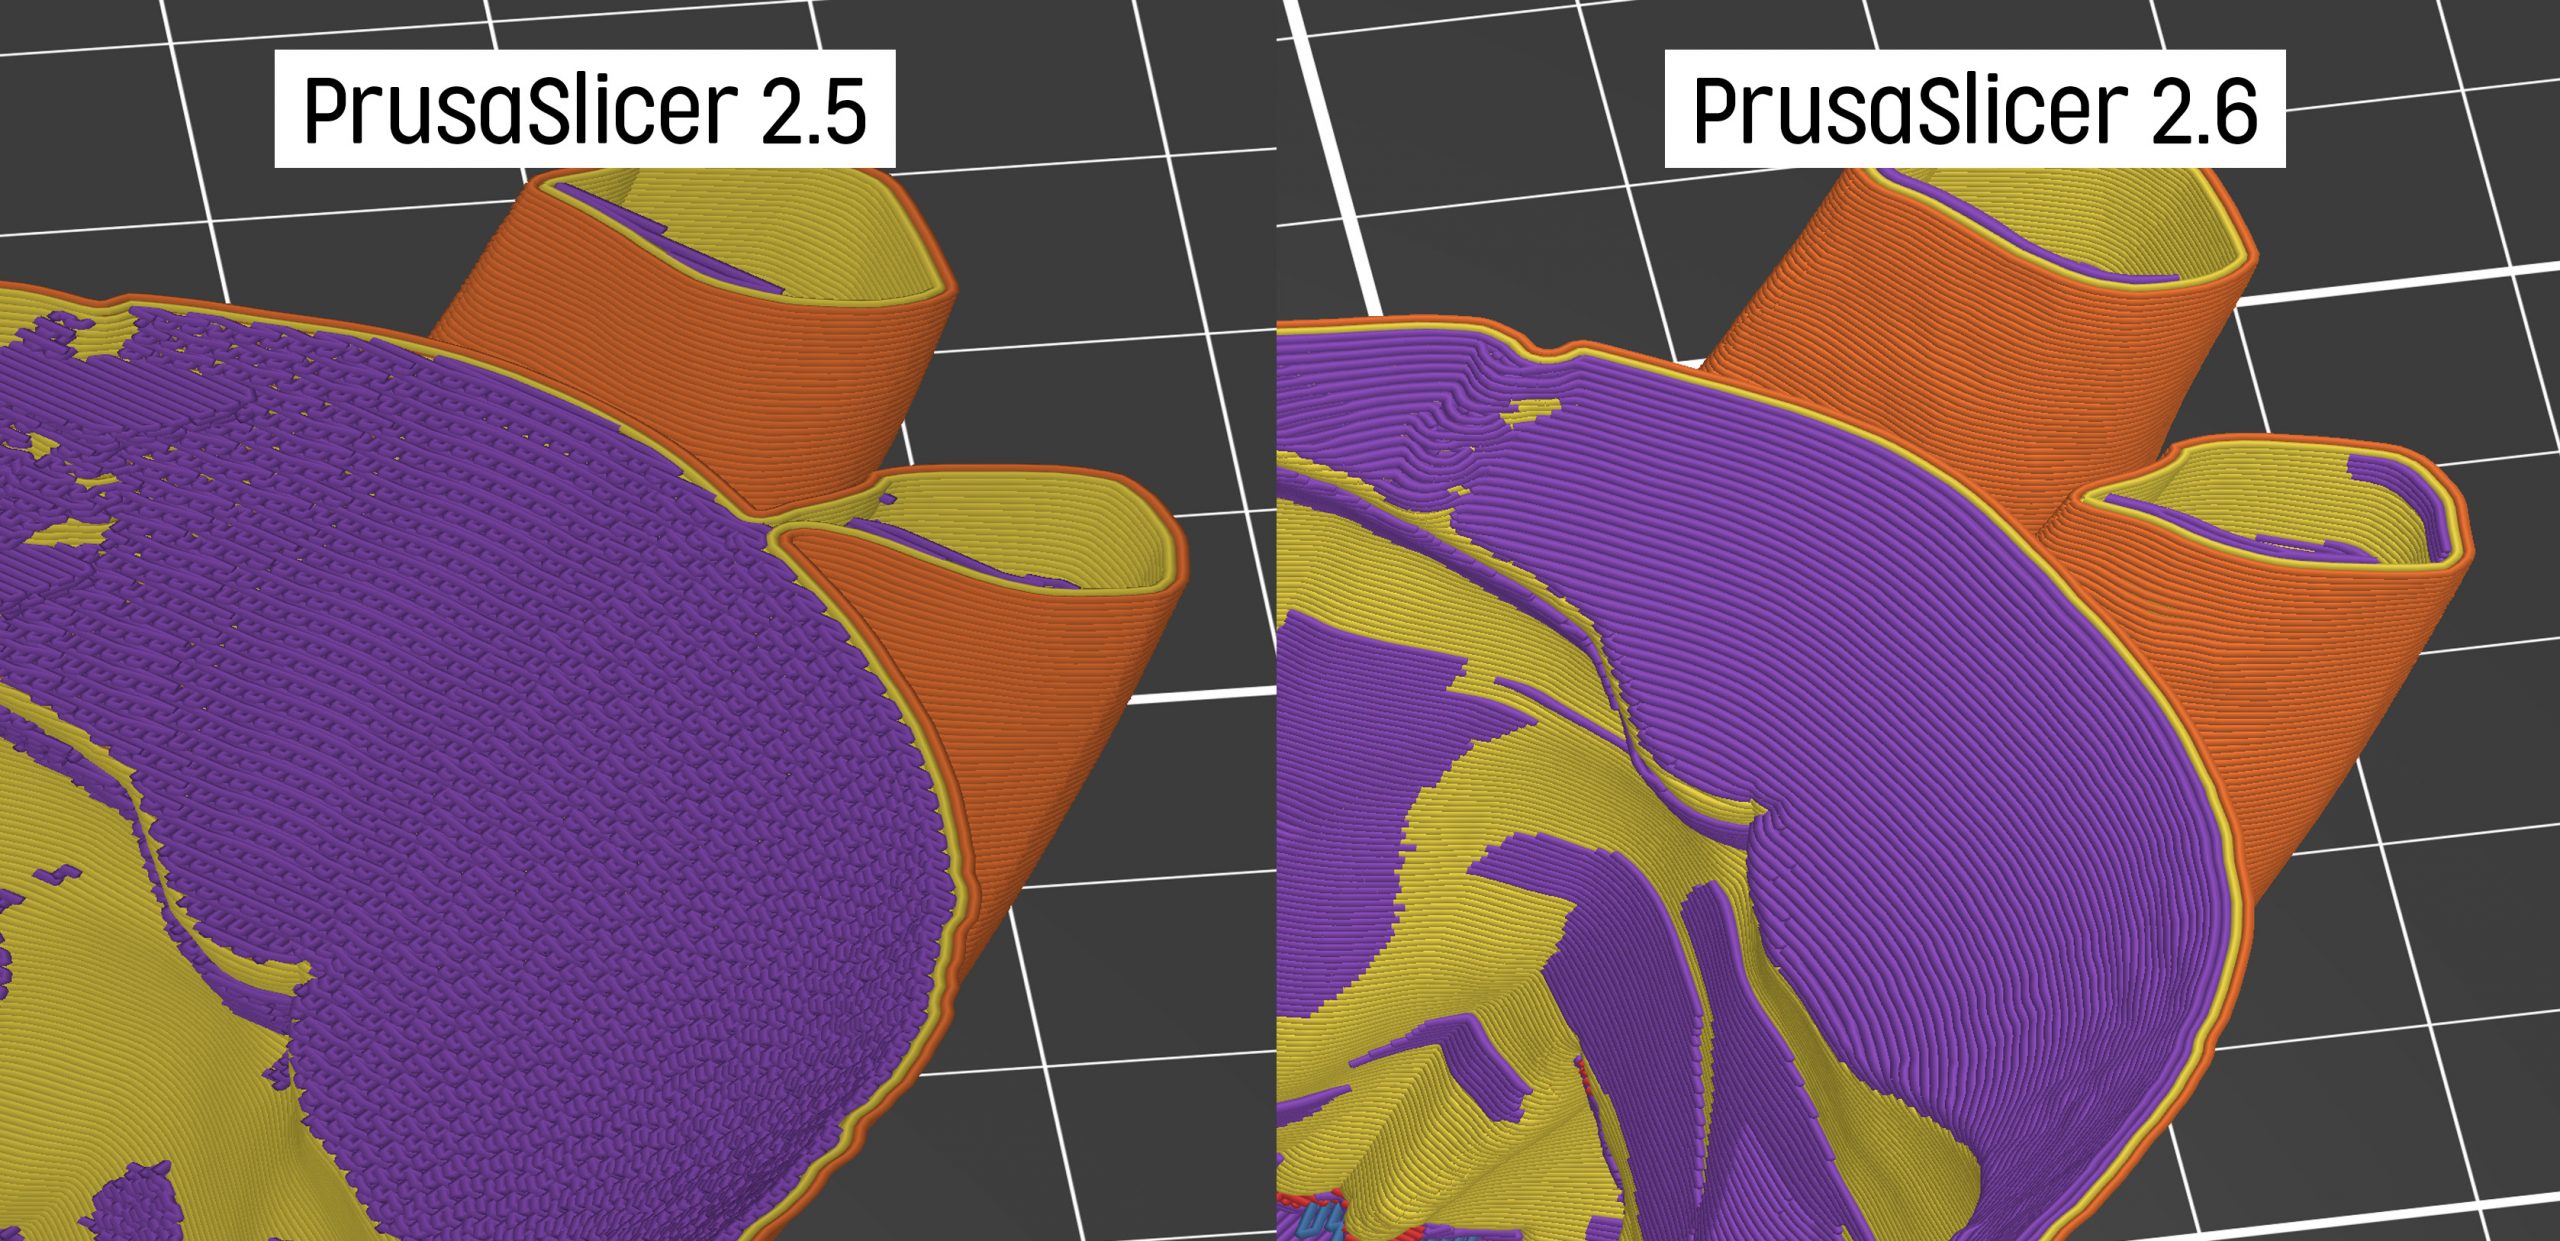
A long-standing issue was connected to bridging solid infill printed over sparse infill. The shape of such infill islands was only determined by what was above, and the infill lines were often inadequately supported as a result, leading to mid-air extrusions and possibly failed prints. PrusaSlicer now extends the lines of the bridge infill so that their ends are supported by the sparse infill on the layer below. The bridge infill is now always using ‘Thick bridges’. The new algorithm works for all infill types. The comparison image below shows exactly the same model (a cube with a counterbored hole in the top face).
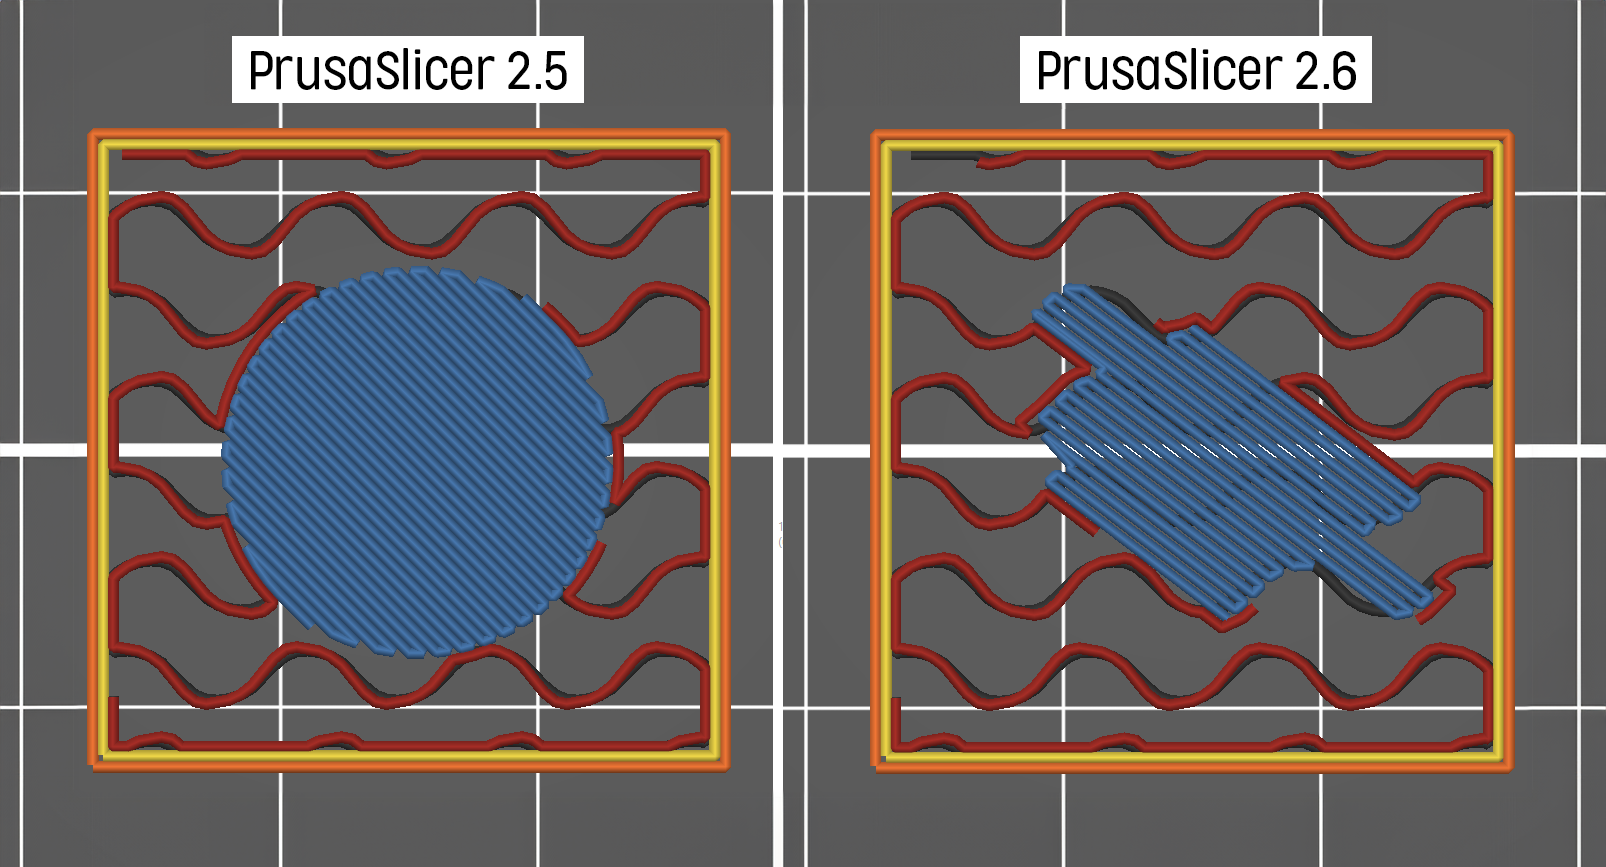
This change made it possible to use fewer top solid layers, since even the first top layer is now much more reliable, and it also allows for decreasing the expansion of the bridging layers. This saves a lot of print time and material consumption.
Automatic anchoring of bridging infill
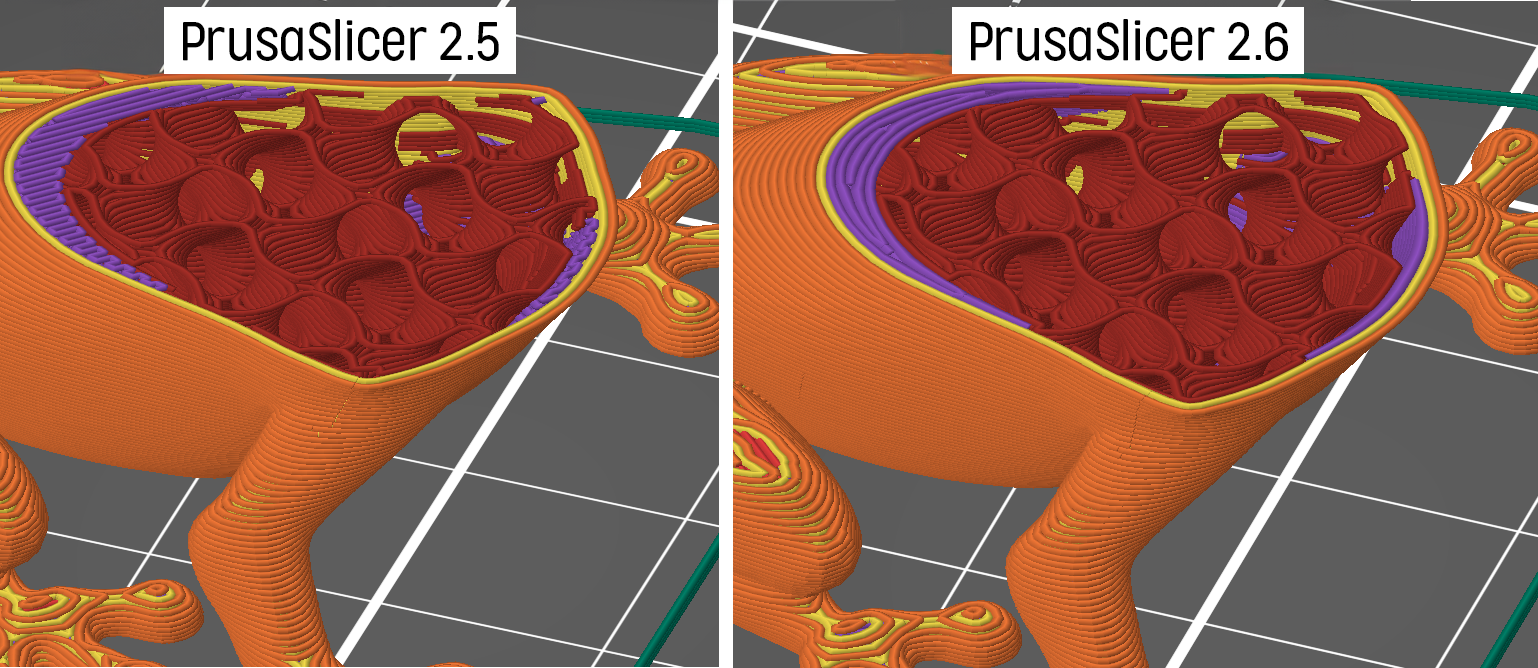
PrusaSlicer now detects areas where internal bridges require anchoring to perimeters and enhances it by adding an extra line touching the perimeters in the previous layer. This addition provides support and enhances structural stability for the bridges.
We have also improved the handling of internal bridges when using Lightning infill. It expands the Lightning infill around bridged surfaces, ensuring improved anchoring for a greater number of bridges.
Improved Ensure vertical shell thickness
The problem and its history are as follows: When printing sloping surfaces, the resulting wall gets thinner (for obvious geometrical reasons). In the case that the slope is very steep, this effect can even produce holes in these walls. Original Slic3r applied rectilinear infill to fill in these gaps, PrusaSlicer added an extra logic to Ensure vertical shell thickness, which was trying to ensure that the shell would not be thinner than a vertical wall would be.
Starting with this version, PrusaSlicer automatically detects regions where the rectilinear lines are very short (which causes vibrations and surface artifacts near overhangs) and fills the areas with concentric infill instead. The calculation of the areas is also reworked, so the material is only added where it is really needed. The new algorithm implemented in PrusaSlicer 2.6 is significantly better than either of the two old algorithms, so we completely removed the switch “Ensure vertical shell thickness”. Models with sloped surfaces sliced using the new algorithm in PrusaSlicer 2.6 often achieve 10-15% shorter print times without any compromise in print quality.
Avoid crossing curled overhangs
Extruded filament near steep overhangs has the tendency to lift up. If the nozzle travels over these areas at high speed and hits the print (if the lifting is higher than the Z lift), it can result in skipped steps or breaking part of the print off.
The new Avoid crossing curled overhangs function uses our algorithm for estimating extrusion quality, which accounts mainly for its curvature and overlaps with the previous layer. From these data, we derive the possible curling of filament (plus the need for supports and dynamic overhang slowdown). It then plans the travels in such a way that it avoids regions with a high probability of curled filament.
Exporting STL object with boolean operations
The ‘Export as STL/OBJ’ function is now able to subtract negative meshes. Note that the algorithm may fail on non-manifold geometries (e.g., those containing self-intersection, etc). In that case, the user is notified, and only positive volumes are exported.

Multi-tool / multi-extruder slicing
Assigning tool heads to different features
If you’re using a printer with multiple tool heads or extruders, you can now select which tool should be selected to print:
- Perimeters
- Infill
- Solid infill
- Support material
- Wipe tower’s external perimeters
Idle temperature
Users can now set idle temperature for tools, which are not being used for extended periods of time. This prevents both oozing of the filament from the nozzle and the degradation of the polymer inside the nozzle.
Stabilizing cone
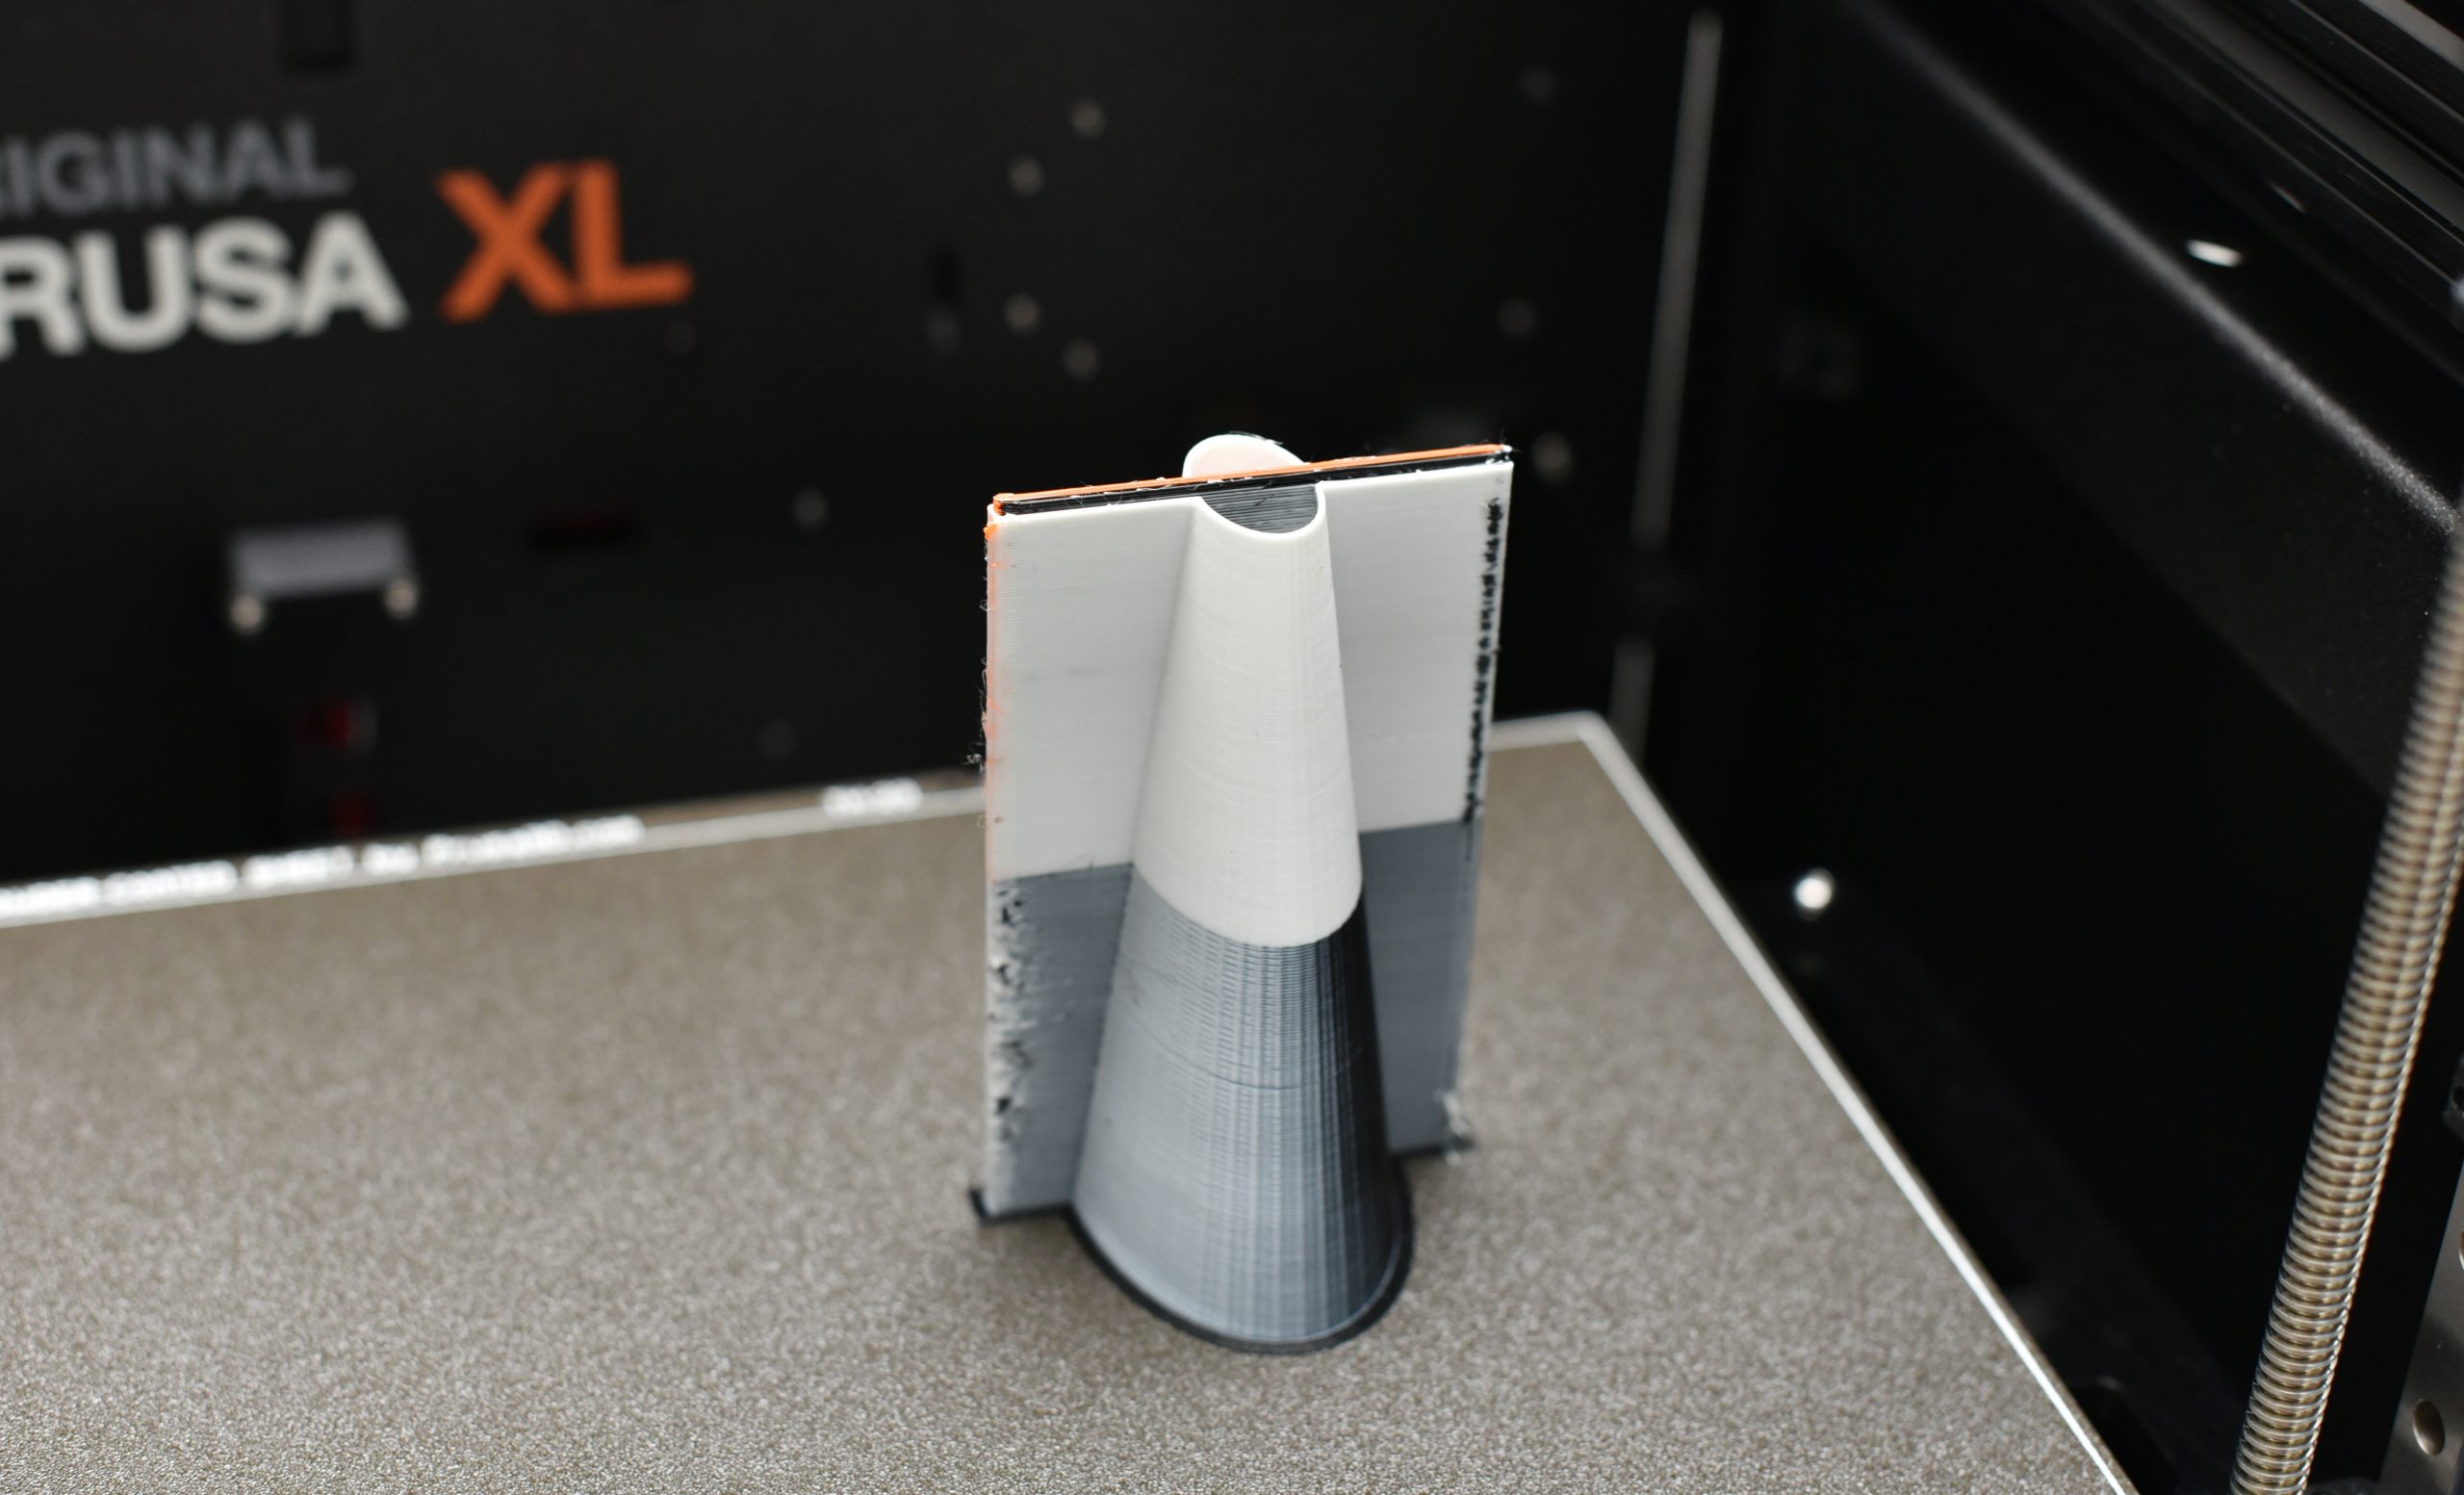
The wipe tower can optionally be printed with a “stabilization cone”, which prevents it from toppling over. This feature is especially useful when the wipe/priming tower is very small in footprint, but can reach great heights, as on the Original Prusa XL.
The apex angle of the cone is adjustable in Print Settings-Multiple Extruders-Wipe tower. Setting the value to zero disables the cone.
One-click import from Printables.com
The new downloader feature enables the user to easily access and download models directly from Printables.com. By clicking on the PrusaSlicer logo on Printables.com, a new instance of the PrusaSlicer will open and the selected model will be saved to the user’s folder. Users can register for the Downloader tool and select the target folder through the Config Wizard or the Preferences menu.
Template filament profiles
We have added an additional profile that defines most of the commonly used filament materials and brands. It is possible to use these with any 3D printer. However, these universal templates, created and tuned with Original Prusa printers, may not offer optimal performance when compared to profiles specifically fine-tuned for your printer model.
Generally speaking, we don’t recommend printing with these profiles directly. They serve as an excellent starting point if you’re in the process of creating filament profiles for your printer model (if there isn’t one built-in PrusaSlicer already).
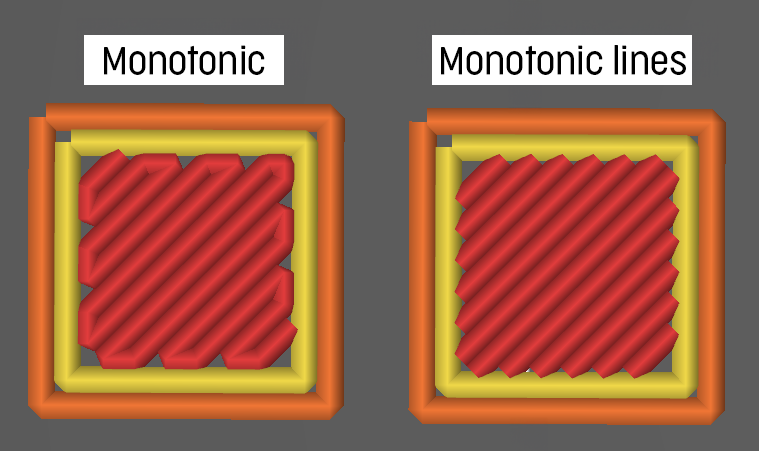
Monotonic lines infill
The new Monotonic lines infill is very similar to Monotonic, except that adjacent lines are not connected. This allows for smaller perimeter/infill overlap and results in better filling of the top/bottom layer, less over-extrusion, and better dimensional accuracy.
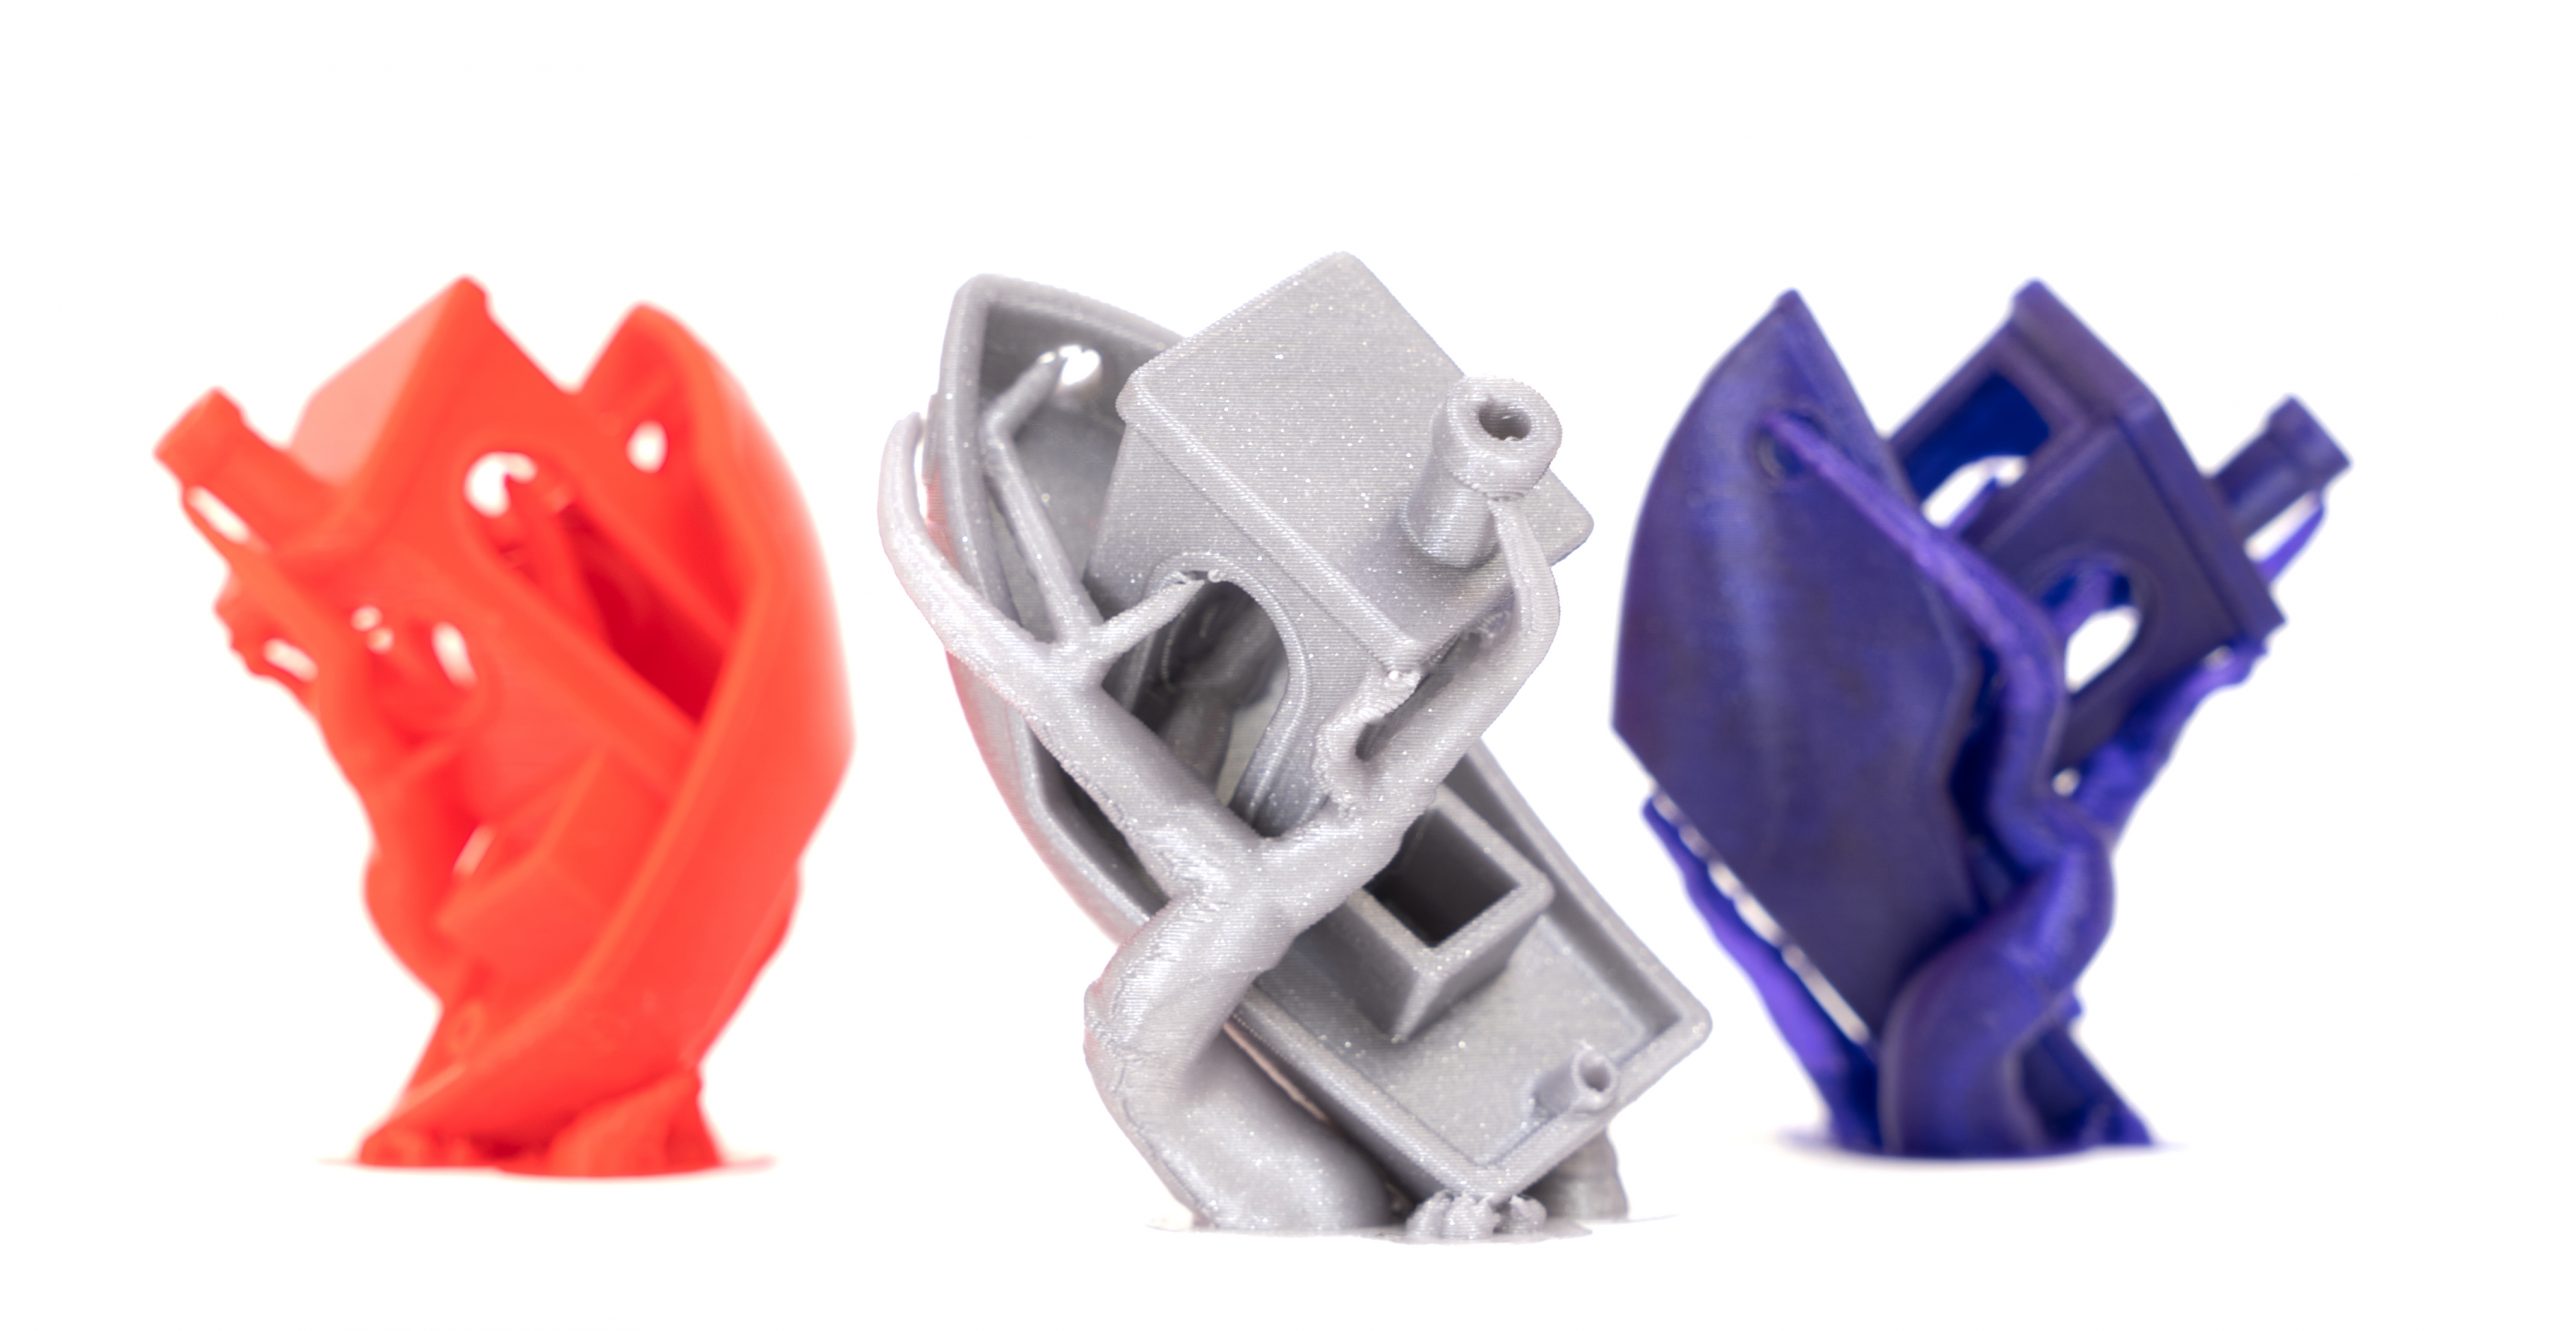
New experimental supports for SLA
To join the Organic supports fever, PrusaSlicer’s SLA algorithms now contain a new, experimental support generation strategy that builds tree-like supports similar to that introduced in FDM mode. As a side-result of our time spent on tree supports in general, this strategy is inspired by the paper “Clever Support: Efficient Support Structure Generation for Digital Fabrication“. The new strategy is called “branching supports” to differentiate from the previous strategy which is still the default. The biggest advantage of these new supports is their ability to save print material. Their ability to avoid the model body is also much improved compared to the default support strategy.
Adding new printer profiles
Vendor profile index files (.idx) are now downloaded as one zip file. This allows several changes – new printers and new vendors can be released without releasing a new PrusaSlicer version. Resources like printer thumbnails or printer bed models can also be updated without releasing a new PrusaSlicer version.
Other new features
- G-Code thumbnails can now be exported in JPG and QOI formats
- SLA hollowing is now up to 10x faster
- SLA time estimate is now more accurate for the Original Prusa SL1S Speed
- New and updated 3rd party printer profiles
- Arrange’ and ‘Fill bed with instances’ functions now take into account skirt and brim
- More intuitive Klipper firmware support
- Opening 3MF files now gives the option to import the geometry only
- New “PrusaConnect” host type with pre-filled URL
- It is newly possible to set acceleration separately for external perimeters, solid infill and top solid infill
- ‘Set Number of Instances’ now works when multiple objects are selected
The PrusaSlicer documentation is continually being updated to reflect the changes in this release.
If you’d like to read the full list of changes, check the changelog of each version on our GitHub. We have a variety of features in the development, which were not ready in time for this release. We will likely introduce them in a smaller, 2.6.1 release. As always, if you have any questions or suggestions for improvements, don’t hesitate to share them with us. Happy printing!
Complete objects/sequential printing finally deserves some TLC also. Autoarrange could sort them by height and arange the order from front right to back left ( even taking into consideration the horizontal rods at least for Prusa printers). Pretty please..?
I absolutely agree! Would love to see this happen!
Totally agree, automatic arrangement of parts in sequential mode would be wonderful.
It would be great.
In Netfabb it is called Nesting. and is preatty good but hell expensive.
This is a great idea!
like printing first the objects that have more chance to fail so you don’t waste time and plastic on the first layer before you detect the failure
I love my prusa printers and what prusa slicer has done to make slicing so much faster (not slicing time but material profiles and printer optimized print profiles)
I really really hope other sla /dlp printers will be supported. For bigger resin prints I can not use my sl1s printer. Here it would be awesome to load in my elegoo saturn 2 and continue the workflow I know. I do know there are workarounds, but native support would be awesome.
Well done! Is there any way to support the PrusaSlicer development team with a financial donation similar to KiCAD? There should be some optional DONATE button for users/companies who only use PrusaSlicer on other printers and still want to support it anyway.
I feel compelled to say thank you as well. Lots of cool features and convenience improvements. I am really excited about the connectors and dowel pins! Seems really easy!
I sold my mk3 to order the mk4, so my problem is that I can’t print anything while I wait for my new one to arrive. This upgrade and
illuminating blog post is not helping my patience… Thanks a lot!
Was hoping to read an explanation of why organic supports are incompatible with variable later height. Different objects can have different variable layers from each other or not carry, so why couldn’t the supports just be an object with constant later height? Was very disappointed to not be able to use both. Variable layers improve both quality and speed for so many of my prints.
Would love to see organic support for variable layer height. They have taken my enjoyment of printing to a whole different level.
(Sorry for the glass-screen typos. s/r “layer” for “later,” “vary” for “carry”.)
Thanks for this release with so many awesome features!
If you find the time, please add a ‘report’ button to blog post comments, as there usually are a few spam posts.
Good!
Please enable export supports as stl!!!! Please!!!
Prusa Slicer 2.6 has lots of features, but has turned some of my slicing updates into a mess. Using Concentric top fill on 2.4 and 2.5, gave the outer raised rim of a disk (an Astrolabe “Mater” part) with near concentric rings, undulating slightly with the notched outer perimeter. Yes what I needed as a base for lettering printed on top. But 2.6 creates a zig-zag pattern that is totally unacceptable for my final text printing. What happened to Concentric fill???
Nice support update, but organic supports do not generate interface at the bottom when «Support on all sites» is selected. This is very useful when you want to print complex structures like proteins.
In some cases the base of the organic supports are printed in the air.
Colorful and covered with a strong gloss. It can keep the color more surface. Learn the retro bowl unblocked dance moves, unlock new characters and upgrades, and enjoy.
As nice as these new feature these are, this is yet another failure to introduce a simple feature of material expansion/contraction due to temperature. Seriously, it is a simple percentage modification to the size of the model, percentage wise, on how much it expands or contracts during cooling after printing. Each filament is different.
Can we PLEASE have this option… and no the X/Y expansion option is NOT a valid option as it misses the Z axis, and it is a measurement of the end model, not a fraction of the whole.
I'm glad you taught me this; I'll definitely put it to good use. If you're looking for another great site that gives free ways to have fun, you should check out <a href="https://run3ds.com/">run 3</a>.
Seems like they're tracking everything. Hope it makes the site work better.
https://motorcyclegames.org
Describe the scene and the <a href="https://palix.ai/png-maker">AI PNG maker</a> generates the PNG.