


The changes in new versions of PrusaSlicer are usually either whole new functions or iterative improvements to the existing tools. But this time, there is at least one fundamental change to how the core slicing works. Such drastic changes take a lot of time and effort to develop. Luckily, we’re not alone in this! We want to express our thanks to the entire open-source community, namely the Ultimaker Cura team led by Jaime van Kessel, as two major features in this release were originally developed by them, and to Open CASCADE for the STEP file support. Improvements like this are really showing the power of open-source development.
Before we go deep into what’s new, here’s an overview of all the new features:
- New perimeter generator Arachne
- STEP file format support
- Lightning infill
- Improved seam placement based on the visibility
- Pressure equalizer
- New printer and material profiles
- Many bugfixes and smaller improvements
Arachne perimeter generator
For years, the strategy PrusaSlicer used when generating perimeters was to offset the contour of the object with an extrusion line of constant width. This caused issues in various cases, especially when printing thin walls, text, or logos.
The developers of Cura recently implemented a new strategy named Arachne based on the paper [Kuipers et al., 2020]. The Arachne generator produces perimeter loops and gap fills with varying extrusion width. Simply put, it automatically makes perimeters wider or thinner as needed. This is a major change! Before, it was nearly impossible to create a wall that would fit 2 perimeters exactly. And now? As long as the wall thickness is close enough to 2 perimeters, PrusaSlicer will take care of the rest.
The new approach produces nicer-looking prints with fewer artifacts. There is a significant reduction in gap fill, small extrusions used to fill gaps between perimeters, which also results in a reduction of print time.
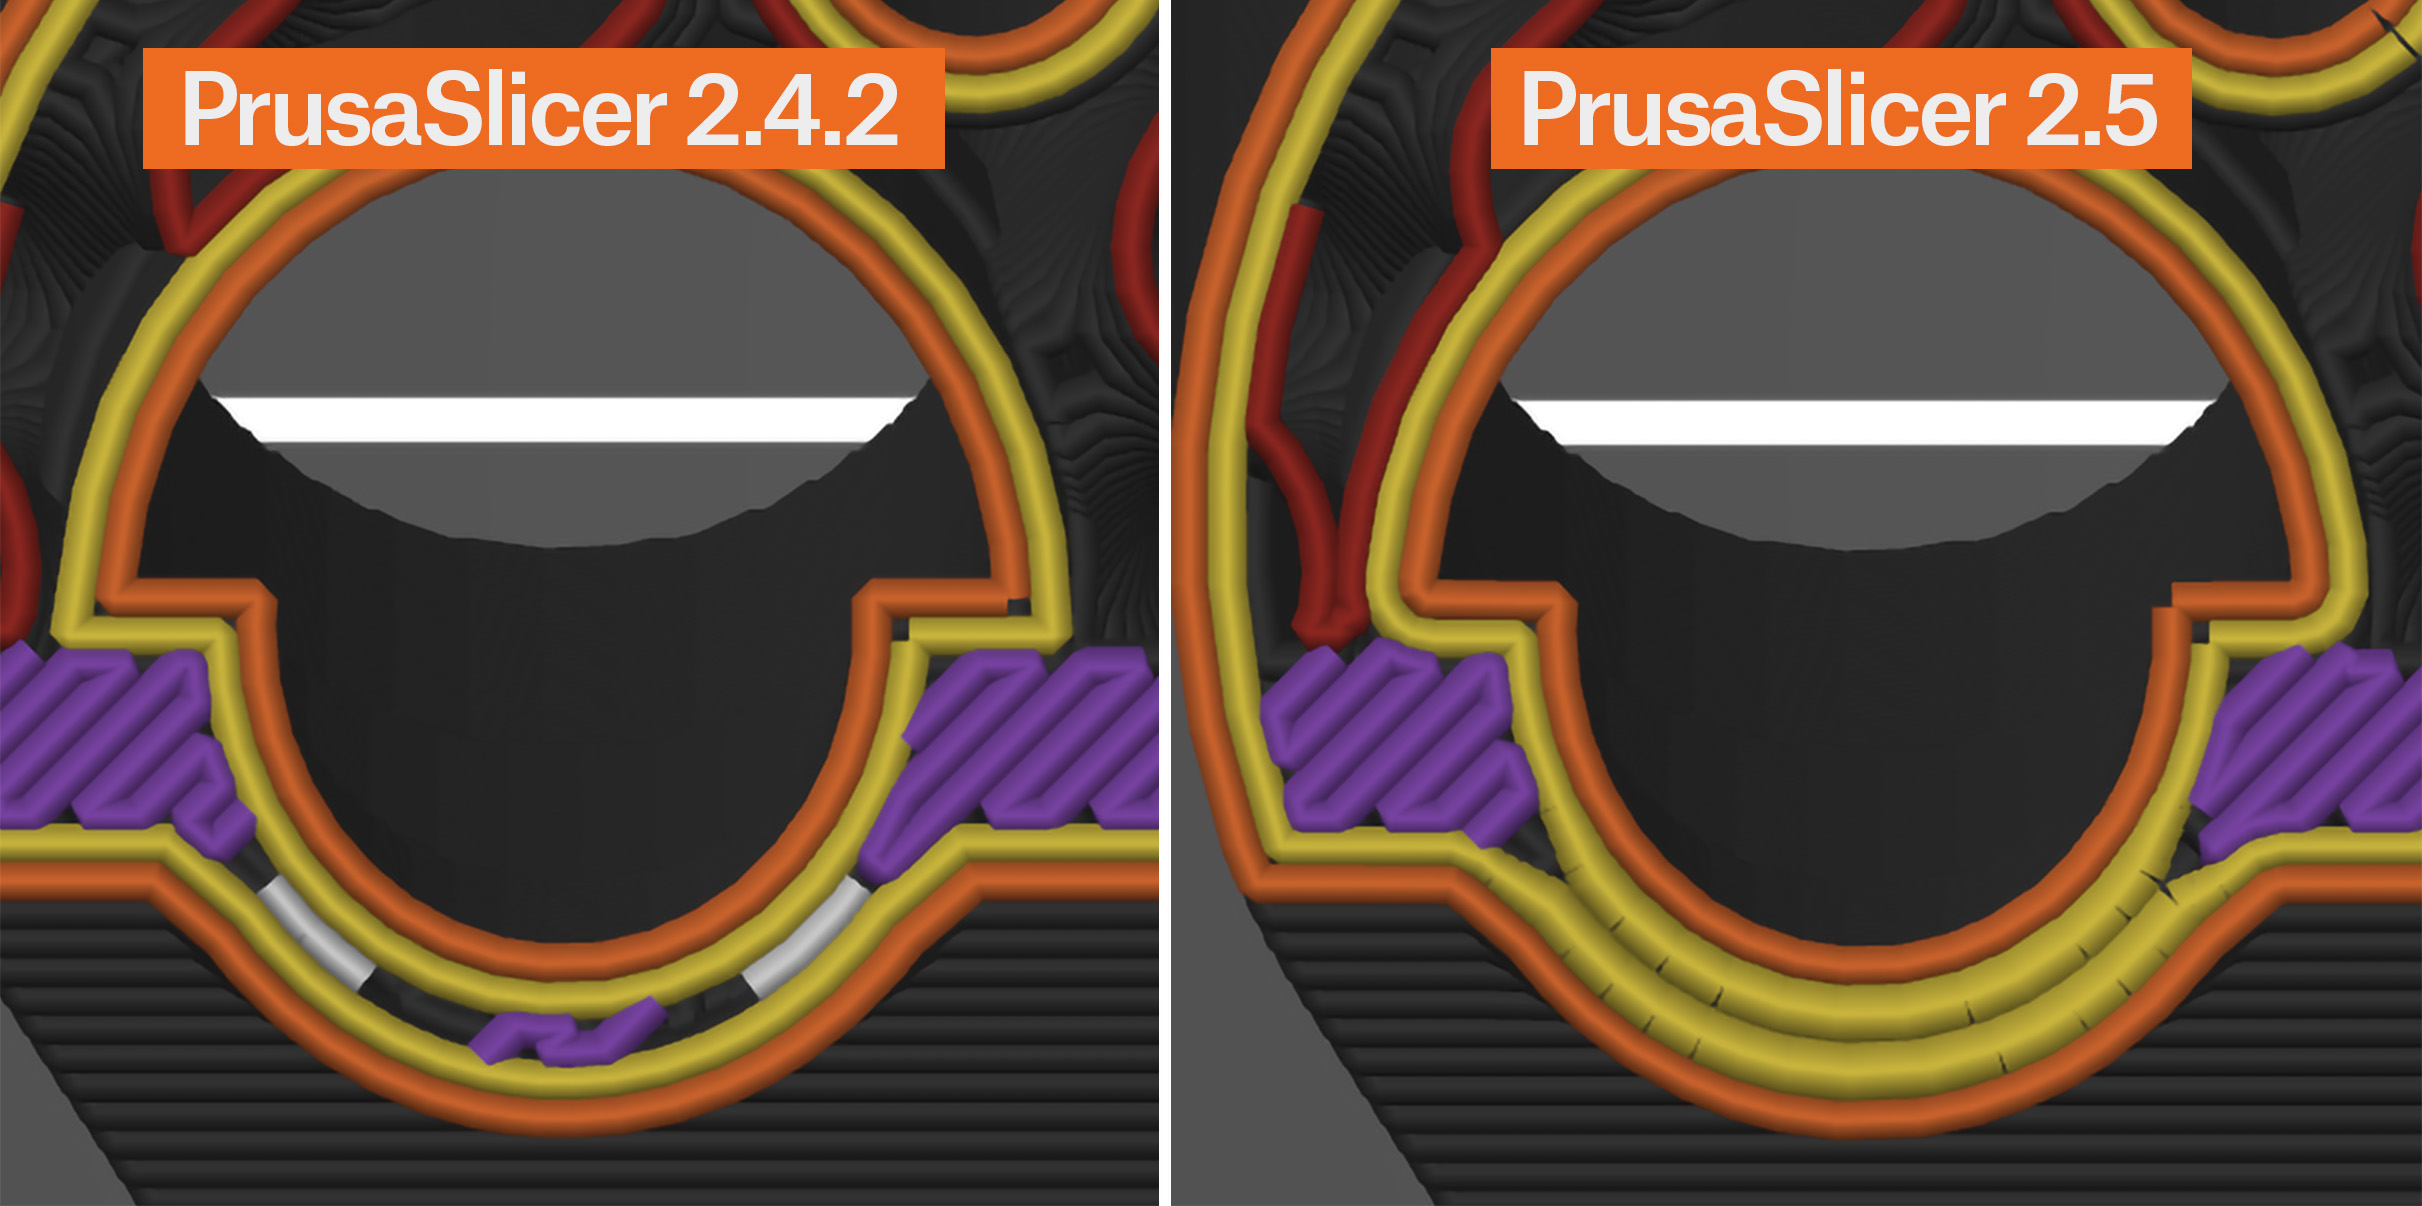
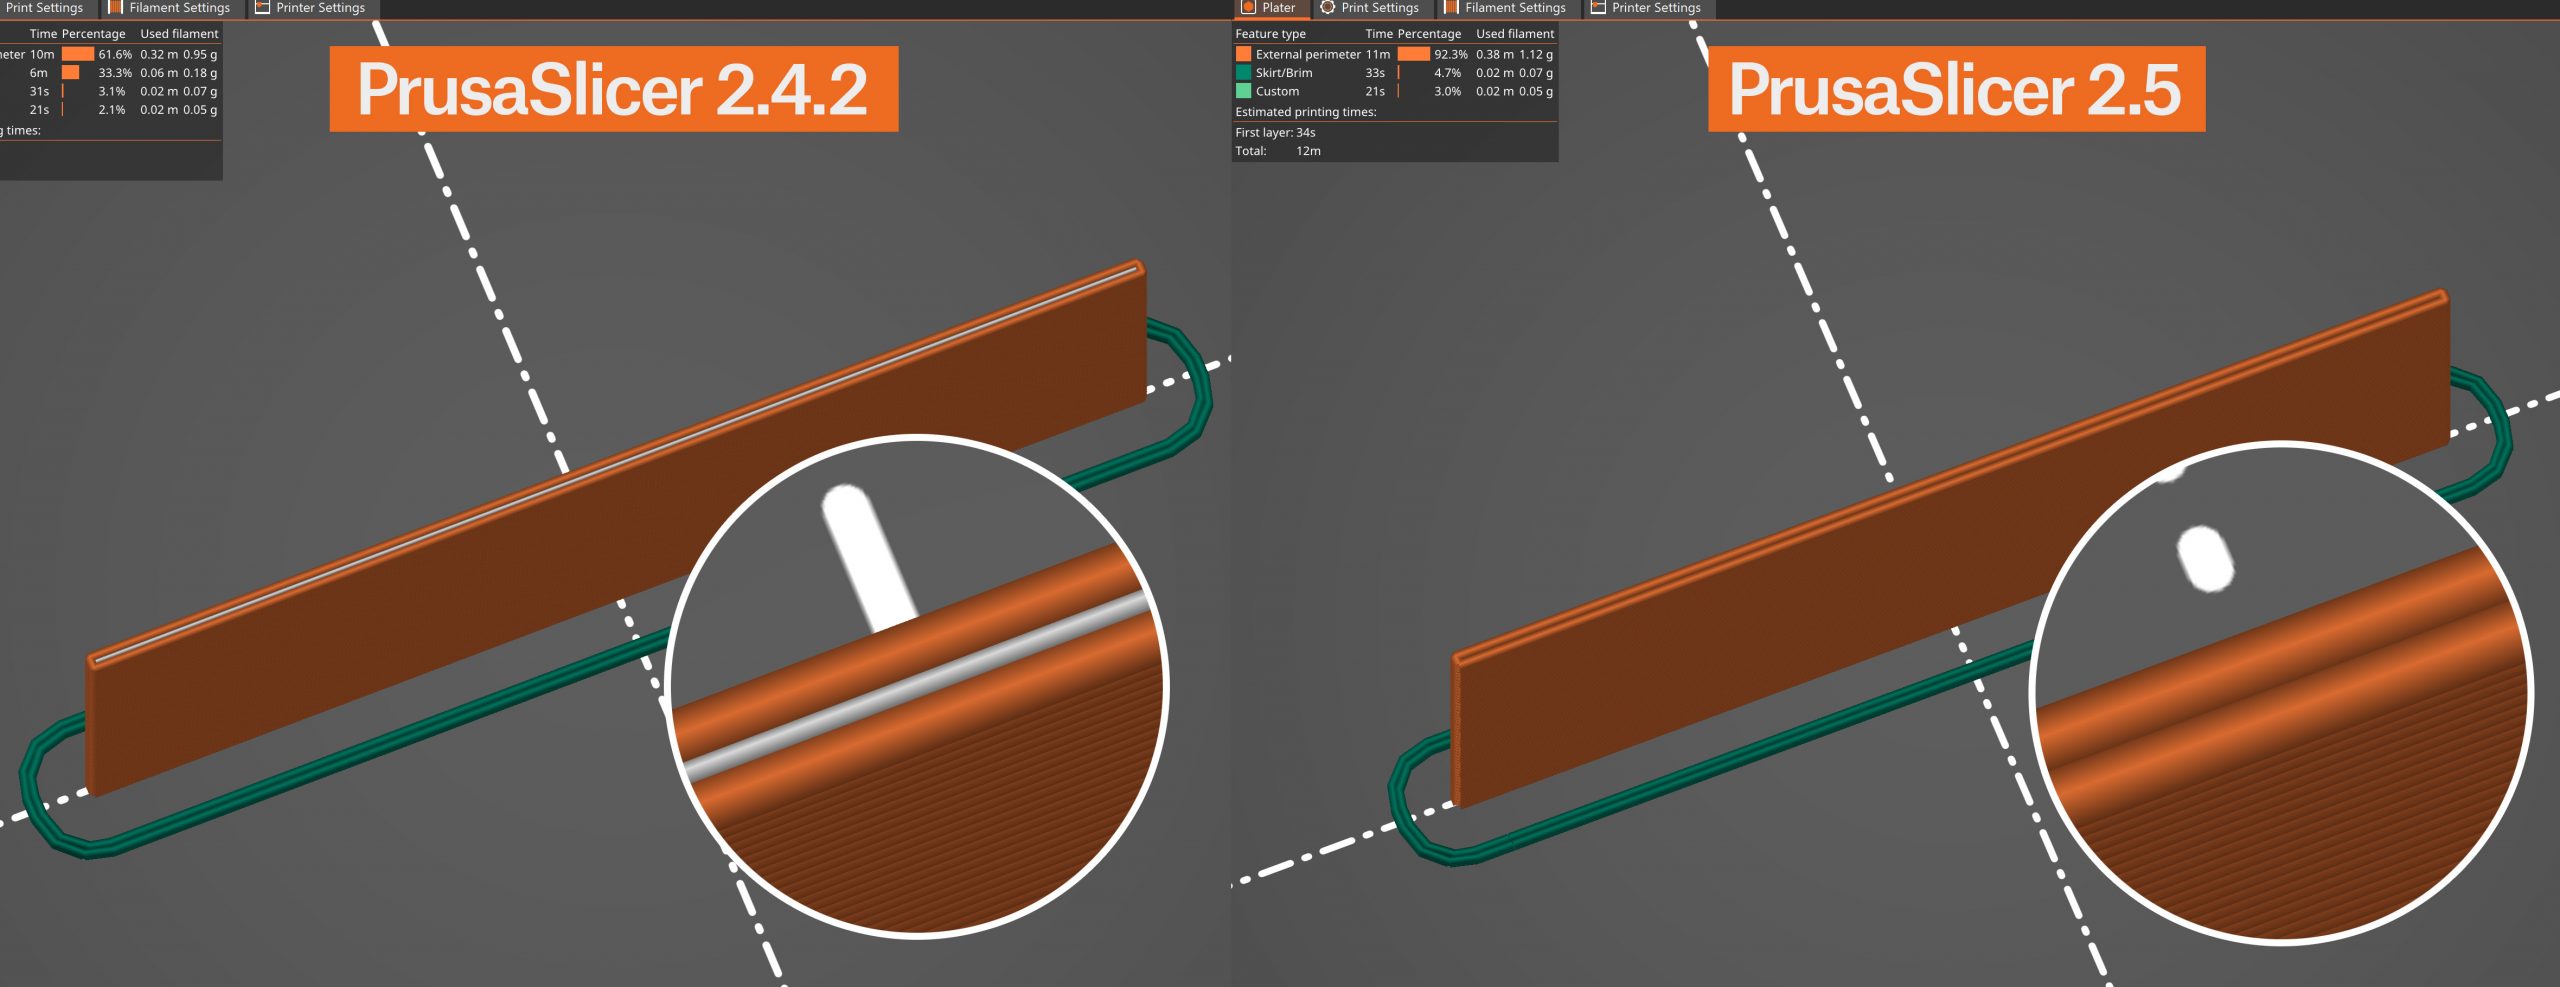
Classic perimeter generator in PrusaSlicer 2.4.2 vs Arachne perimeter generator in PrusaSlicer 2.5
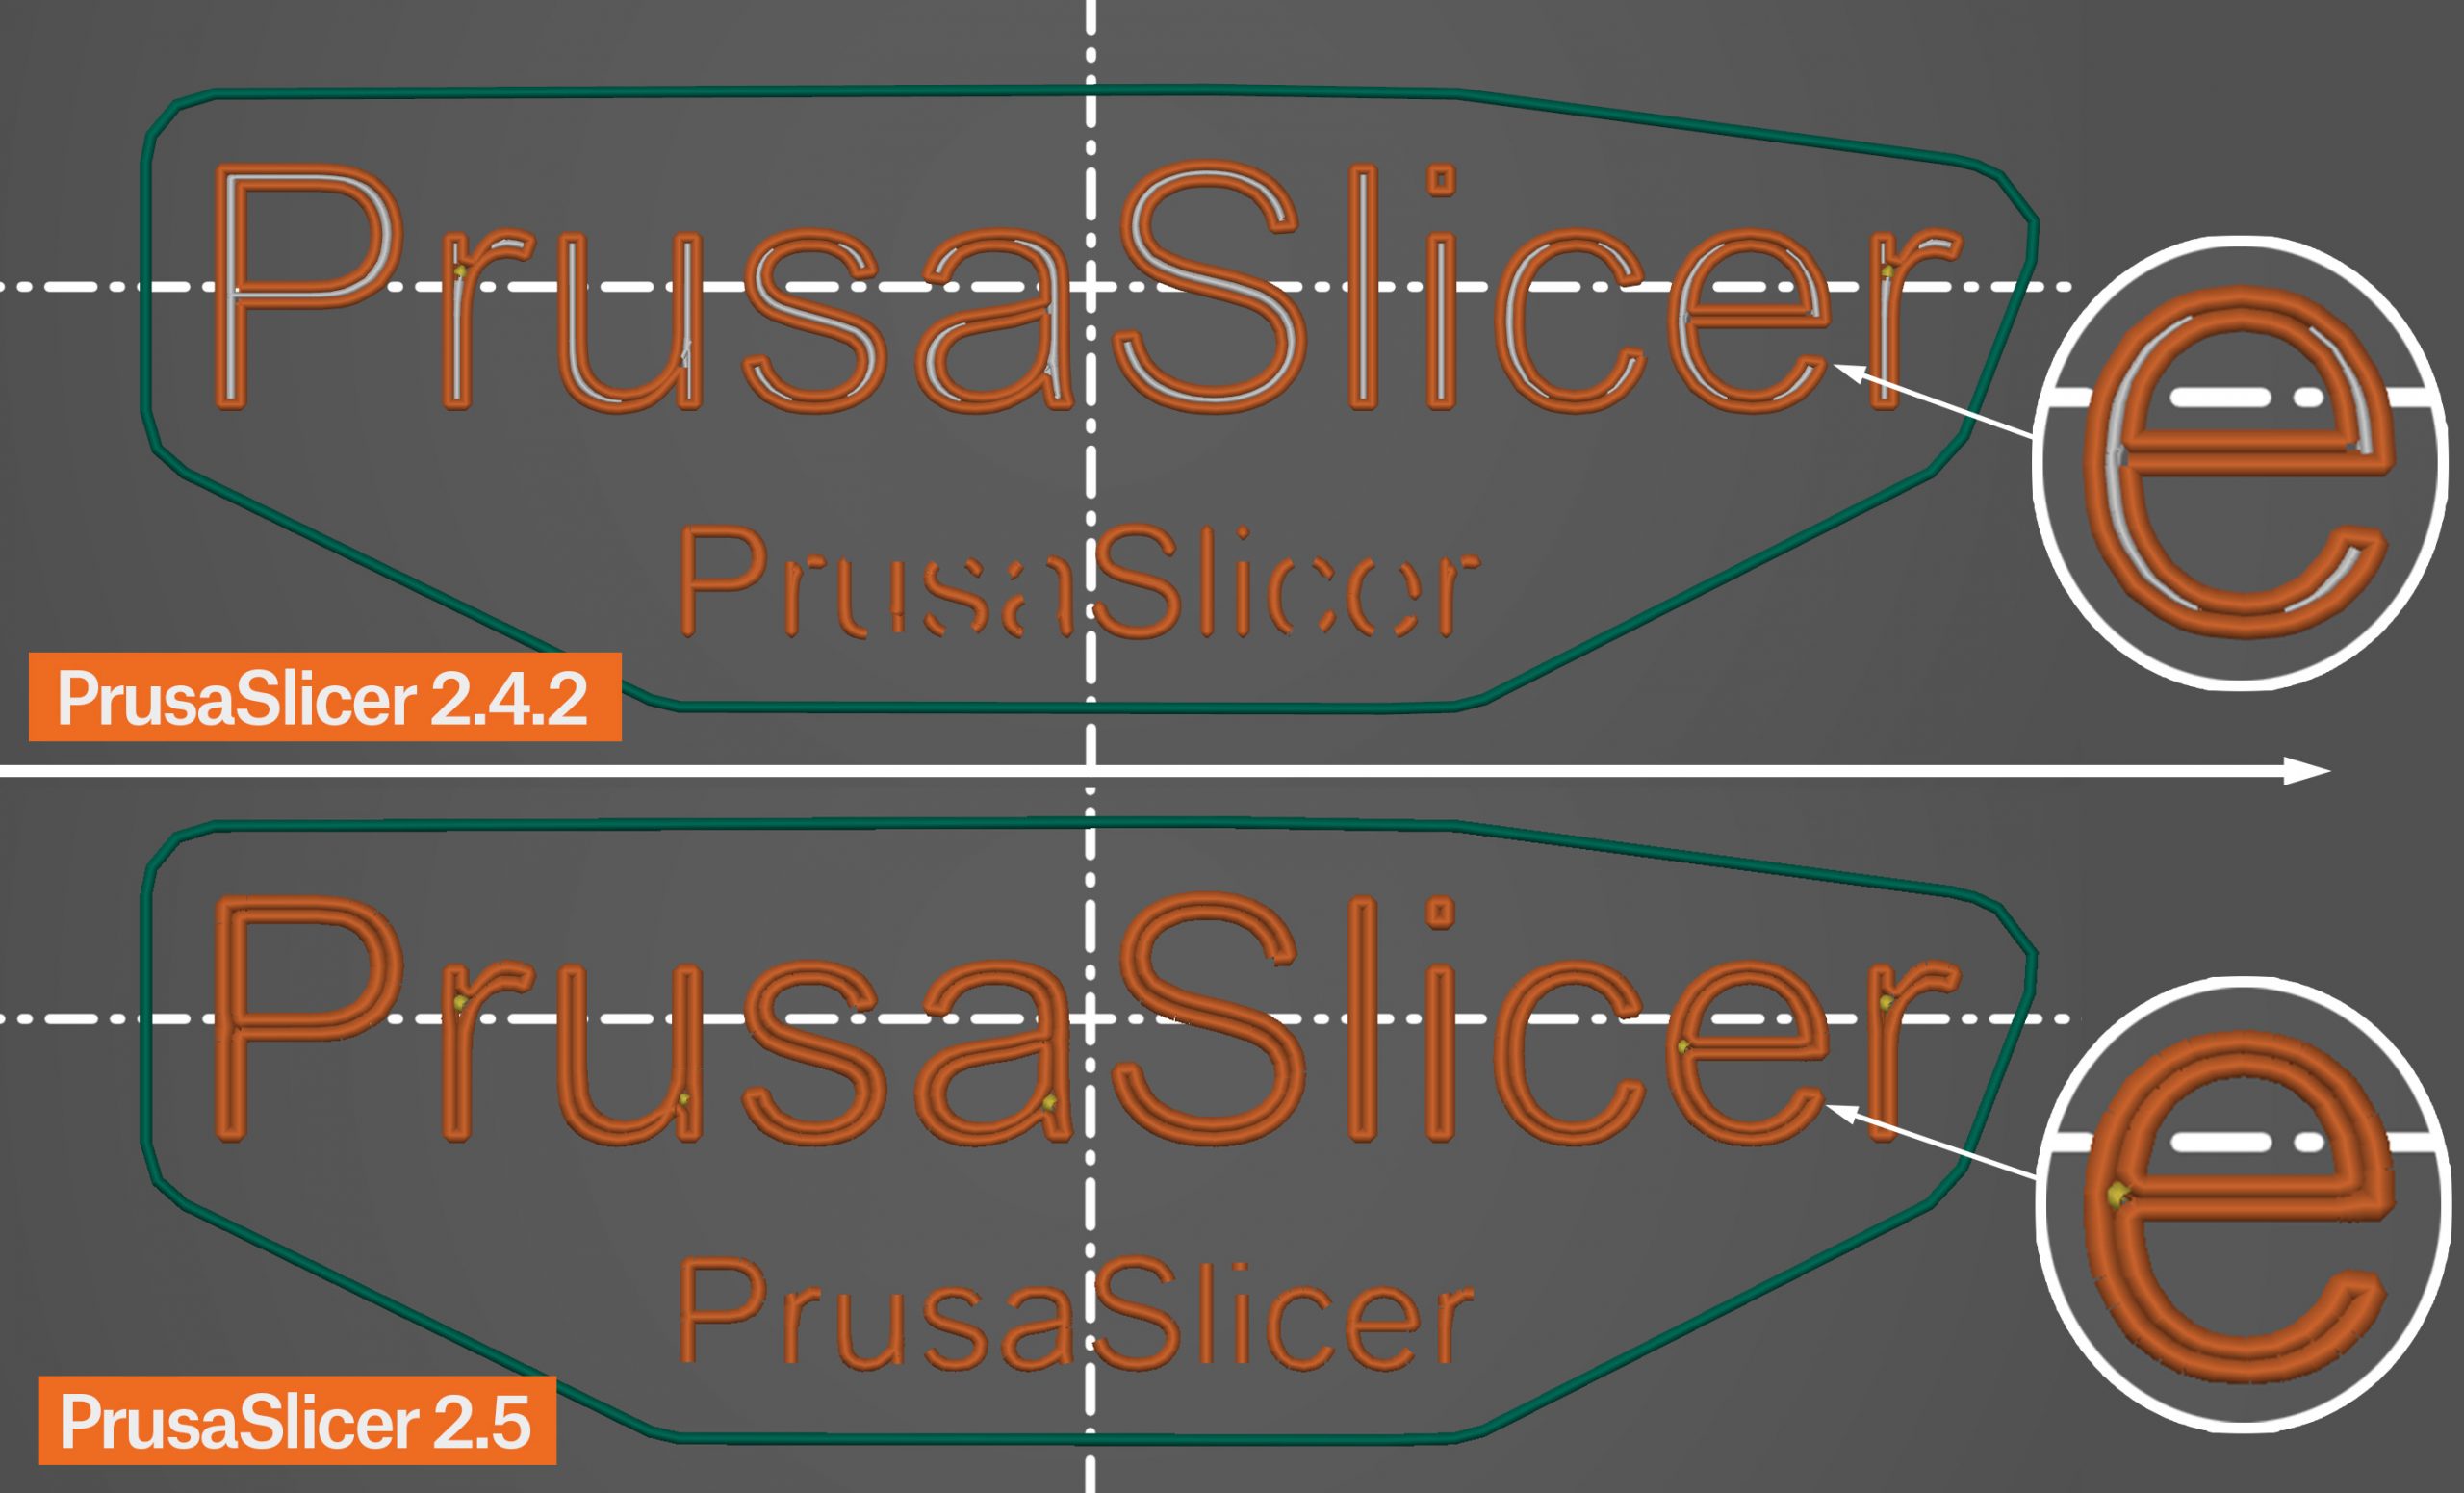
One field where the Arachne perimeter generator really shows its power is when printing texts or small logos. Drawing fonts with constant line width is obviously quite difficult. The new perimeter generator doesn’t have this limitation and produces much cleaner texts even at a smaller scale.
We have decided to set the Arachne perimeter generator as the new default option. If you want to use the old perimeter generator, you can switch to it in the Print settings – Layers and perimeters – Perimeter generator settings.
The Detect Thin walls feature is disabled when the Arachne perimeter generator is selected as it’s not needed since Arachne always tries to adapt the extrusion width to thin lines.
Step file format support
Starting with this release, PrusaSlicer is able to import STEP files. This CAD file format is interoperable among most CAD programs and it is an ISO standard supported by programs such as Fusion 360, FreeCAD, SolidWorks, Inventor, AutoCAD, CATIA, and many more.
This seemingly small addition could have large consequences. By being able to import STEP files directly, we expect a growing number of people to use STEP when sharing the design online instead of an STL, which is notoriously difficult to edit. On the other hand, STEP files can be edited quite easily, allowing for quick customizations and remixing. Businesses that do print on demand can skip converting STEP files from the customer to STLs, saving precious time.
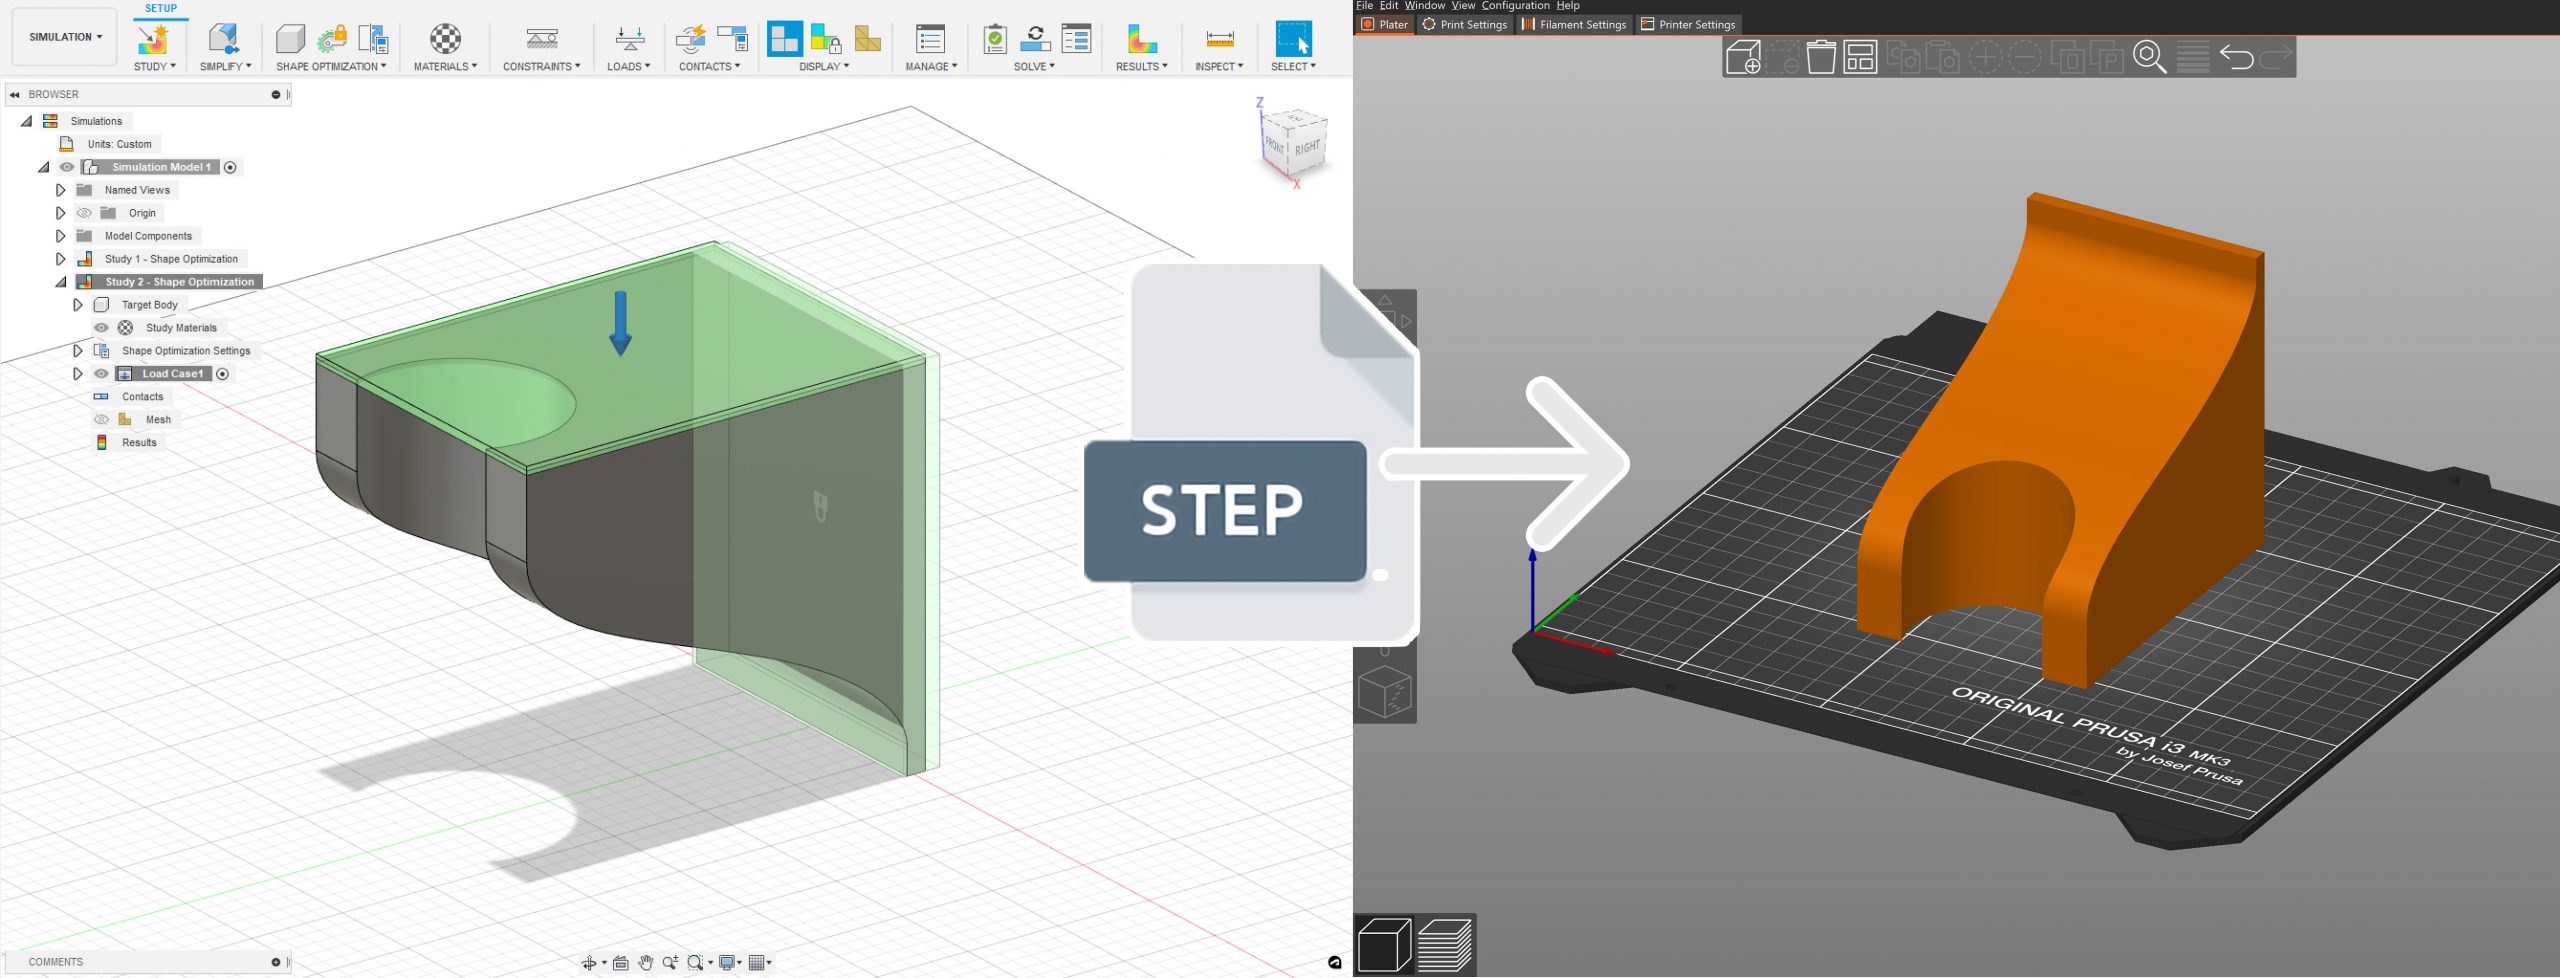
Right now we are tessellating the model on import (converting it to a triangle mesh), so the model is then sliced just like any other mesh and not analytically. The conversion is fully automatic (the level of detail is not customizable). We use the Open CASCADE Technology (OCCT) development platform to read the STEP files, so big thanks go to them for keeping it open-source. It is a CAD kernel also used e.g. by FreeCAD or KiCad. The import implementation itself was ported from BambuStudio, thanks go to them as well.
Lightning infill
Infill serves a dual purpose – to provide structural rigidity and to support top surfaces. In case structural rigidity is not needed, a lot of material and printing time is saved with the new Lightning infill, which is optimized to support the top surfaces only. The lighting infill generates a branching structure that gets progressively denser towards the top surfaces to support them reliably.
The lighting infill is based on paper [Tricard et al., 2019]. Like the Arachne perimeter generator, we have ported the Lightning infill from Cura, thanks again for keeping Cura open source.

PrusaSlicer already had an infill with similar behavior called the Support cubic infill. However, the Lightning infill saves even more material. The following table compares the print time and filament consumption when printing the famous tree frog at a 400% scale.
| Infill type | Print time [min] | Filament total [g] | Filament infill [g] | Filament saved on ifill |
|---|---|---|---|---|
| Gyroid 15% | 1104 | 204 | 114 | 0% |
| Support Cubic 15% | 792 | 152 | 62 | 46% |
| Lightning 15% | 840 | 111 | 20 | 82% |
Pressure equalizer
An FDM 3D printer consists of a motion system and an extrusion system. While the motion system loves to accelerate and decelerate smoothly to reduce vibrations, the extruder loves to extrude at a constant rate for the best extrusion consistency. That means, unfortunately, that the optimal conditions of the motion system and extruder are in conflict.
Bowden-style extruders are especially sensitive to pressure fluctuations, due to the slack in the Bowden tube, they are not able to reproduce rapid changes in extrusion rate reliably. The Pressure equalizer smooths sudden changes in speed between two features (e.g. between printing infill and perimeters) and reduces print artifacts caused by rapid extruder pressure fluctuations.
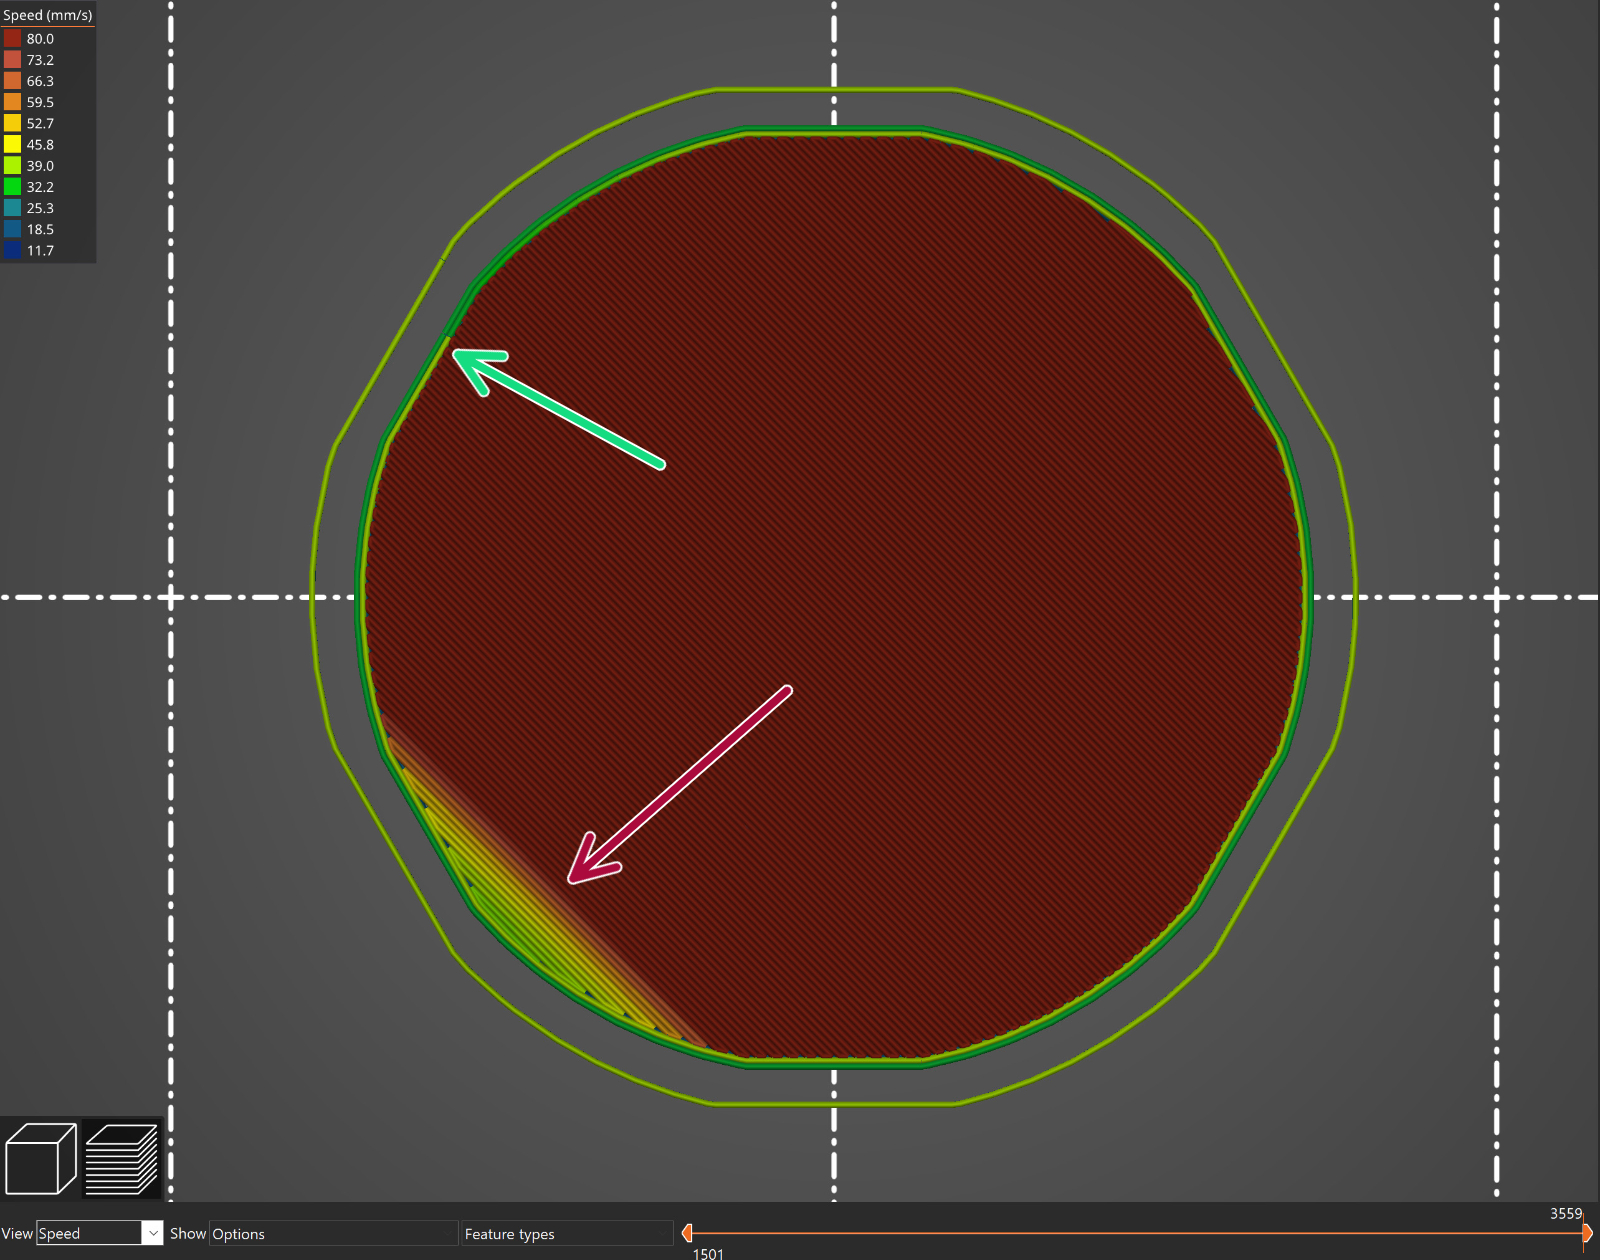
Before moving from a faster internal perimeter to a slower external perimeter, the pressure equalizer slows down gradually at the end of the internal perimeter to reach the extrusion rate of the external perimeter. Similarly, when moving from the external perimeter to the infill, the start of the infill is slowed down to the external perimeter speed and accelerated gradually.
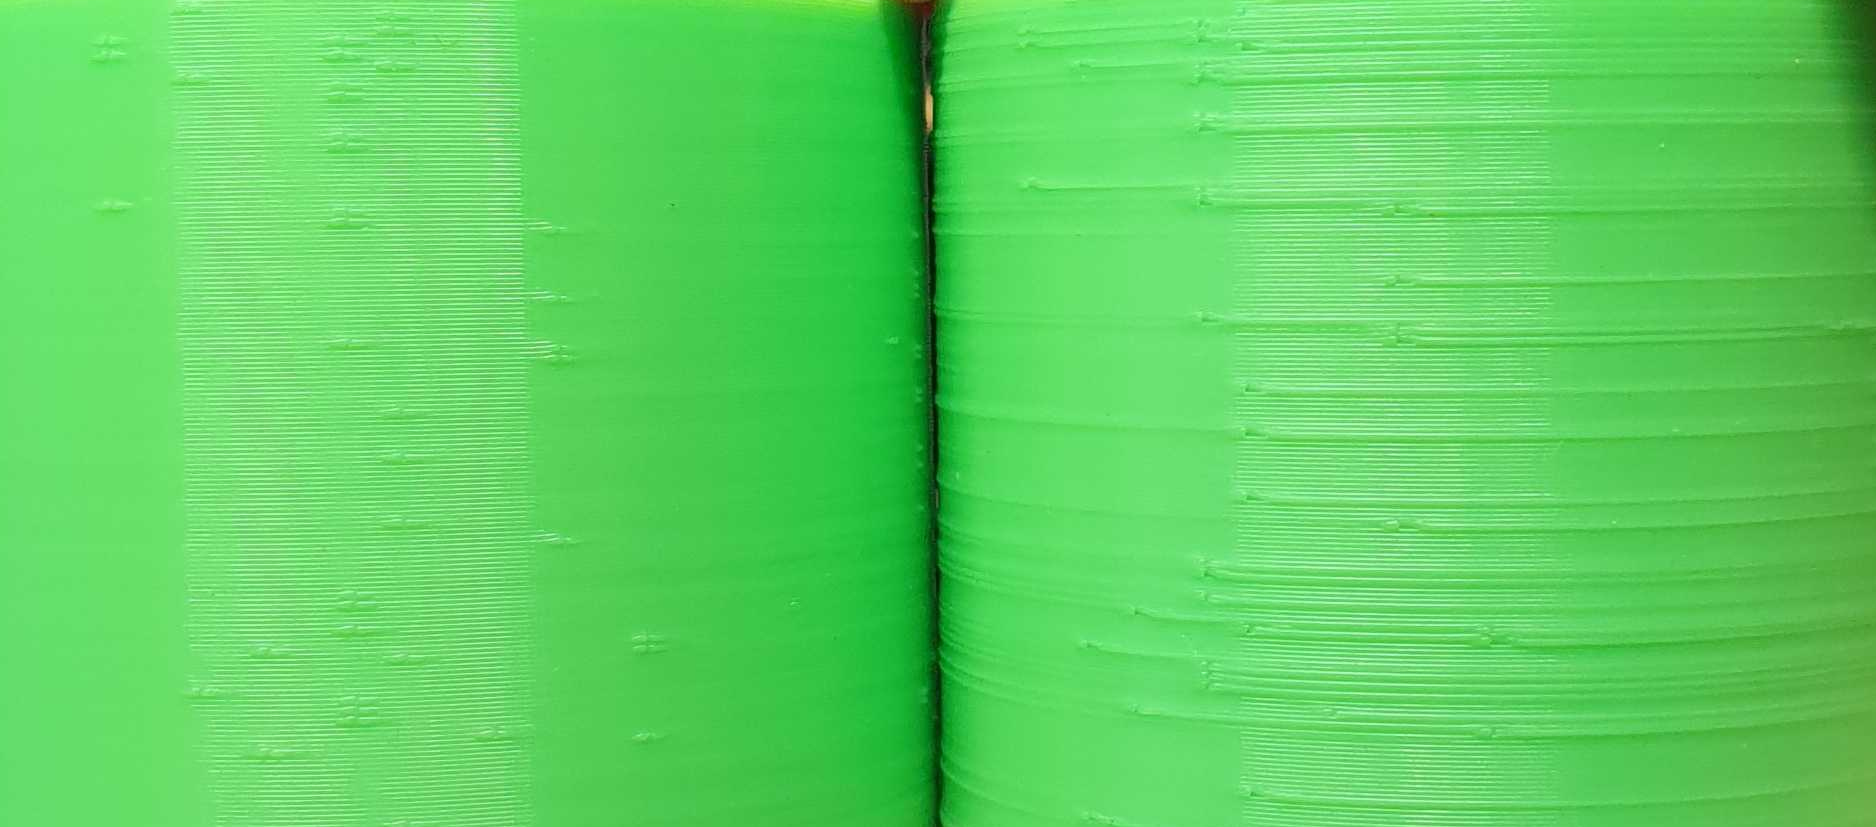
The print on the right shows bulges on external perimeters due to excess extruder pressure on a Bowden-style printer, while the bulges are mitigated in the left print thanks to the pressure equalizer
Improved seam placement based on the visibility
Unless you’re printing in the Spiral vase mode, each perimeter loop has to start and end somewhere. Furthermore, the printer has to stop extruding for a brief moment when the print head moves up to the next layer. This start/endpoint creates a potentially visible vertical seam on the side of the object.
Starting with this version, the seam placement algorithm prefers regions that are not visible from the outside of the model at all or that are occluded from most directions. The new visibility algorithm is applied for seams set to Nearest or Aligned. In addition, when paint-on seams are used and ‘Aligned’ is set, the resulting seam line attempts to find a sharp corner in the painted area and snap to it, leading to smoother lines along the sharp edge. Previous versions did not detect the sharp edge in this scenario.
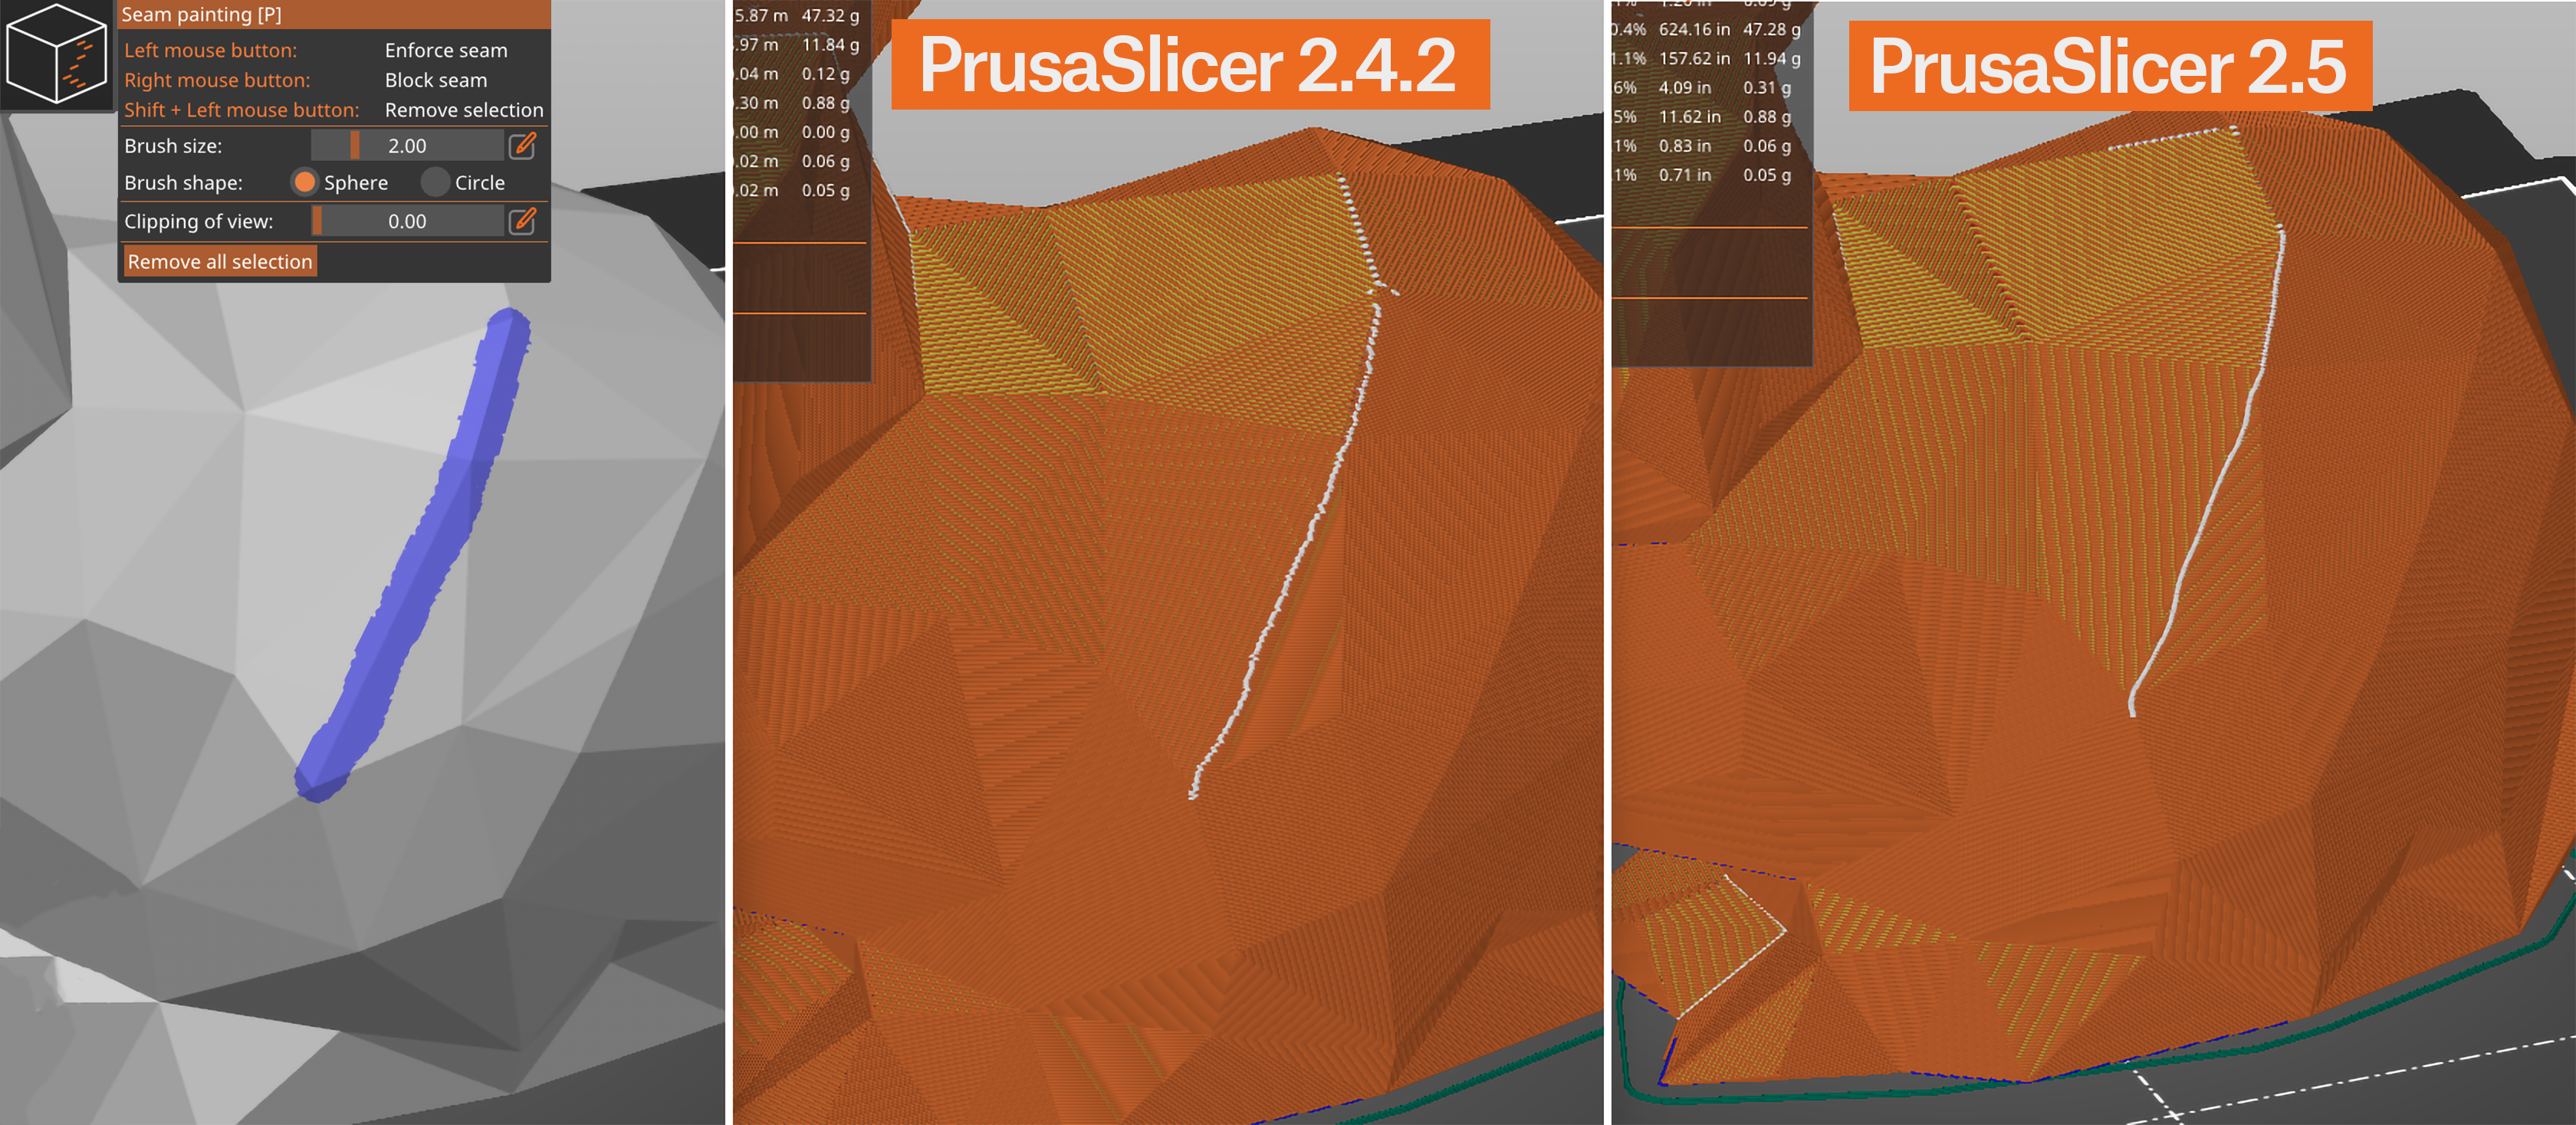
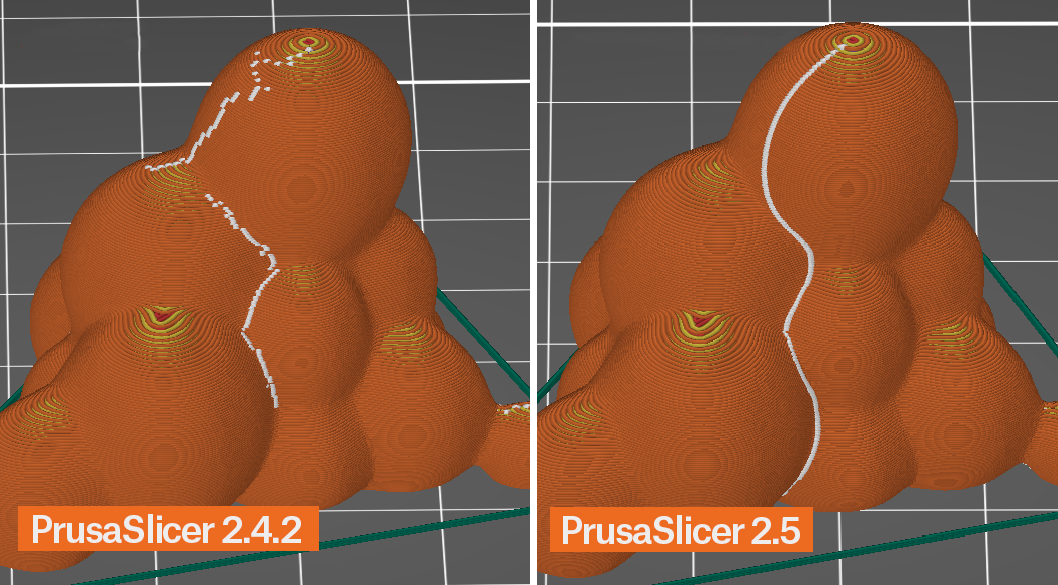
Also, the new algorithm strives to produce possibly long and smooth seams on smooth surfaces, while the old algorithm often produced disconnected random bits on such surfaces.
For multi-material or multi-part objects where a slice is split into multiple regions with each region having its own perimeter, the seams are newly hidden inside the object between the regions.
Other new features
- G-Code thumbnails can now be exported in JPG and QOI formats
- SLA hollowing is now up to 10x faster
- SLA time estimate is now more accurate for the Original Prusa SL1S Speed
- New and updated 3rd party printer profiles
The PrusaSlicer documentation has already been updated to reflect most of the changes in this release.
If you’d like to read the full list of changes, check the changelog of each version on our GitHub. We are focusing on shortening the development cycle, so you can enjoy new versions of PrusaSlicer more often. As a result, some new features didn’t make it into this release, because they were not ready in time, you will see them in the next version 2.6. As always, if you have any questions or suggestions for improvements, don’t hesitate to share them with us. Happy printing!
Pressure equaliser looks particularly interesting. Does it only take effect between feature changes, or does it account for acceleration like a pseudo linear advance/pressure advance?
Greetings, PRUSA team!
Please confirm that I will receive my PRUSA XL, which I preordered in February 2022, within December.
Since my organization operates with annual budget allocations and we would like to purchase it on the budget of 2022, it is for professional use
Well done Prusa Team! This is awesome!
Three thumbs up for Open Source from the A-Printer Team. 👍👍👍
Well done Prusa devs!
good job 👍
It’s live! I have been using 2.5 alpha for the perimeter generation and it’s great. It’s now much easier to tune the thickness of my Joycon rails (it’s around 0.6 which gets tricky on a 0.4 nozzle)
Very nice job! Looking forward to test the new version with the MMU. Thank you guys and keep up the great work.
Are there instructions anywhere on how to install this?
Do I un-install my old version of Prusa Slicer, then install this one? Or will running the 2.5 installer somehow upgrade the old version?
I don’t want to lose all my settings.
when i ran the installer all my custom profiles got moved over.
file>export>config bundle will create a backup just in case as well
These changes are awesome – The seam changes, the STEP file, arcachne, and hey, I’d love to give Lightning infill a change on stuff that won’t be handled or touched. I want to try to switch to a .6mm nozzle primarily using arachne so now it’s time!
Would love to see tree supports. that and the interface are the main things that keep me from fully migrating to PrusaSlicer. I’m doing sorta a 50/50 split right now
Seems to be a really nice update ! Especially for my next print 😉
The revision of the seam generation is HUGE. I can’t stress how thankful I am for this addition and what a difference it has made!!
Great bike race
PrusaSlicer’s latest update hides seams between multi-material regions, improves SLA hollowing speed by 10x, and adds JPG/QOI G-Code thumbnails. SLA time estimates are now more accurate, with updated printer profiles and documentation. Like <a href="https://wordleunlimitedplay.com/">wordle unlimited</a>, the team aims for frequent updates, though some features will debut in version 2.6.