


Update 26th January 2024:
Both internal and external tests with PLA are overwhelmingly positive. We have spent the last couple of weeks fine-tuning PETG, and we are also getting good results. These are the two materials the MMU3 will officially support. If you need to print other polymers, it is likely possible, but we want to clearly state that only PLA and PETG are the materials we have extensively tested and officially support.
MMU3 beta testers
Apart from our internal testing department, we have a team of fantastic external beta testers, who have been testing every step of the development thus far. Many changes made to the MMU3 were based on their feedback. We are now giving them the green light to start posting their experience with the MMU3, so you might start seeing pictures and videos of it online.
MMU3 integration in Prusa Connect
As we continue testing the MMU3 for the MK4, the Prusa Connect team has added new functionality. The MK4 can newly report to Prusa Connect if the MMU3 unit is connected. Prusa Connect is now also able to read the currently active MMU3 slot and display the information in the status bar.
Technical updates and resolved issues
Layer shifts – In our testing, we had problems with random layer shifts. These were quite rare, but since the print cannot be saved if the problem occurs, they were very annoying to encounter. The prints were clean with nothing the nozzle could crash into. The culprit turned out to be a bug in the firmware, occurring only when the MMU unit is connected. We believe we have fixed the problem in our latest internal firmware build. We continue to investigate the issue, to make sure the problem is completely eliminated.
Spool holders – The spool holders and filament buffer remain the only components where we are still doing significant changes. Our tests show that on the MK4, where the length of the unloaded filament is slightly longer compared to the MK3S+, filament tension in the buffer and from the spool holders impacts reliability. We are testing different setups to see which work the best.
Enhancements to printed parts – Over the last period of testing, we have made several improvements to the printed parts. We are now printing the production version of these parts, but further testing is necessary to ensure they function without causing any new issues.
Wear of the Nextruder main plate – Lastly, we are investigating wear of a part which guides the filament from the drive gears into the nozzle tube. The wear is caused by repeated loads and unloads of filament. Without the MMU, this wear is insignificant. However, a single MMU print can have thousands of filament loads and unloads, increasing the wear rate. Once this part wears out, the printer is unable to properly push filament into the nozzle. We’re testing different materials and manufacturing methods for this part to maximize its lifespan while maintaining functionality. It’s possible this part will be treated as a consumable, requiring replacement every few months.
Shipping date estimate
We are committed to ensuring the MMU3 for the MK4 is a reliable and effective upgrade and we’re doing everything we can to begin shipping it by the end of March. Thank you for your patience.
Original article:
The Original Prusa MMU3 is our efficient solution for the MK3S+ and MK4, enabling these single-nozzle 3D printers to print using up to 5 filaments. While the MMU3 for the MK3S+ has been out for more than three months and is receiving excellent feedback, we keep postponing the MK4 variant further away. In this development diary, we’d like to talk about the technical problems we’ve encountered, how we’ve solved them, and what’s left to figure out before we can start shipping the production units.
Reliability of the MMU3 for the MK3S+
The primary reason for creating a successor to our MMU2S was to enhance its reliability and ease of use without the need for lengthy fine-tuning and calibrations. We’ve been shipping the MMU3 upgrade for the MK3S+ for over three months now (since July) and we’re thrilled to see that the reliability observed in both our internal and external beta testing is also manifesting in customer experiences. Achieving huge 70+ hour 5 color prints with zero interventions is exactly what we were aiming for.
 https://x.com/BobKarnes/status/1696715184449237273
Naturally, we want the MMU3 for the MK4 to be just as reliable and efficient, if not even more. However, we’re having a hard time matching the MK3S+ performance. Why?
Understanding MMU3’s reliability drop on the MK4
Both MK3 and MK4 use the identical MMU3 unit – there’s no difference between them. So one has to wonder, if the MMU3 works fine on the MK3S+, why is it not working just as well on the MK4? The differences between them are in the print heads. Each printer uses an entirely different extrusion and hotend system. They are also based on a different motherboard and firmware architecture of the printer itself.
When we first announced the MMU3 in March 2023, we had everything ready and working reliably with both the MK3S+ and the MK4. We were putting together units for external beta testers and we expected the production units to start shipping in late June. The only problem at the time was our manufacturing capacity. However, as soon as summer came and the ambient temperatures in all our test farms increased by 6 to 10 degrees Celsius, we started encountering a drop in reliability of the MMU3 on the MK4 (but not on the MK3S+). This was caused primarily by thin strings of filament that started to accumulate near the drive gears.
On the MK3S+, these strings would also appear, but to a much lesser degree. Plus, the extruder on the MK3S+ has a fairly open design and the filament path is completely straight, so we did not see any problems with them in our testing. On the MK4, however, these wisps of filament appeared much more frequently and caused a lot of issues with repeat loads and unloads.
 An extreme case of the filament string forming on the tip
Troubleshooting the cause of these thin strings of filament led us down a rabbit hole of investigating what changed and researching ways to make the tips perfect again. We were changing nozzles, print and ambient temperatures, and speeds. The result of this complex research is a new logic for filament changes.
Completely new filament change strategy – elimination of strings
First, let me summarize how the filament change works on the MMU3 with the MK3S+.
- The print head moves above the wipe tower
- Quick ramming – rapidly extruding a tiny bit of filament to form a nice tip
- The filament is unloaded all the way back to the MMU unit
- The selector moves to the new position and loads the filament into the print head
- The print head starts extruding into the wipe tower/infill/wipe object and the color of the extruded filament gradually changes
In this process, the nozzle is full of the previously used filament until step 5. When we use this process on the MK4, the retraction in step 3 causes a tiny amount of the melted filament to be pulled out, which creates this problematic thin wisp of plastic. In step 5, the new filament needs to push all of the melted plastic out. So step 5 is also where the majority of the waste is generated.
To eliminate the tiny wisps or strings of filament on the MK4, we created a whole new strategy for changing the filament, specifically designed for the Nextruder geometry. It is loosely similar to how a cold pull is performed.
- The print head moves above the wipe tower
- Rapid ramming happens: the printer is moving at top speed and all of the melted filament is pushed from the nozzle into the wipe tower. The rapid extrusion also cools down the nozzle a bit.
- “Stamping” – by now, only partially heated filament is quickly pressed against the nozzle’s inside to improve the shape of the tip (a negative of the nozzle).
- The selector moves to the new position and loads the filament into the print head
- A tiny extrusion is made into the wipe tower to stabilize the flow, but the color is almost immediately clean

This way, there is little to no melted plastic in the nozzle after step 3, so we can achieve nice tips of filaments with the MK4’s Nextruder, even in highly elevated ambient temperatures. We are continually testing this in a special climate-controlled test chamber, which can run a small print farm. We spent months perfecting this new filament change routine, cataloging the effect every small difference has on the tip of the filament.
 The tip of the filament with the new unload strategy
A welcome side-effect of this new strategy is a reduction in waste. Most of it now happens in the ramming stage (step 2), but since there is very little color mixing, the overall waste is reduced.
Getting this new strategy dialed in was a long and tedious process, as every change needs at least 2-3 days of nonstop printing on the entire MMU print farm to get a reasonable sample of reliability increase or decrease. It took us until late August to get to a point where we were happy with the tips that this procedure generated in various ambient temperatures. And our developers are still cautious about calling it the “final version” of the filament change procedure on the MK4. For example, we would like to test a much larger sample of filament colors and filament brands.

You may wonder why we are sticking to the hard way of producing the stringless tips. Two main reasons. First, this system allows us to unload most of the material from the hotend and re-use it for the next time this color is needed. And second, as the nozzle is basically clean before the next material loading, there is much less inter mixing compared to filament joining or cutting it and leaving the rest in the extruder. It reduces both waste and time dramatically.
Of course, the ideal solution is to have completely separate tool heads, such as the Original Prusa XL. With that kind of setup, the need to empty the nozzle of the previous color for each filament change is completely eliminated. The efficient wipe tower on the MMU3 is the next best thing, allowing our single-nozzle 3D printers to print with up to 5 filaments.
Current problems of MMU3 on the MK4
With the new loading procedure in place, the reliability of the MMU3 on the MK4 increased significantly. But as it happens with major changes like this, changing one thing affects other parts of the system and things that were working perfectly need fine-tuning again.
The MMU3 can do upwards of 2,000 filament changes in big prints and all of them have to happen perfectly. Just a couple of failed filament changes are enough to be really annoying, even if the error is recoverable most of the time (the LCD will show you what went wrong and how to fix it).
 Stress test of the MMU3 on the MK4 – 5 color print – 1500 filament changes
For example, we discovered that the filament sensor now triggers at a slightly different time with the new filament tips. This caused holes in the wipe tower and sometimes even the print. A similar thing happened when we enabled Input Shaping, Precise Stepping and Pressure Advance (that’s where the numerical error turned out to be) and started printing the Wipe tower at high speeds. We have now adjusted the algorithm and fixed both of these issues.

These are the three remaining things to solve – they are the most common causes of print problems. About 15% of the errors are caused by incorrect sensing of the filament entering the print head. Just like on the MK3S+, we have developed an alternative version of the printed parts around the filament sensor to solve this on the MK4. Rather than detecting the filament simply entering the area above the drive gears, the new lever is actuated by the filament pushing the idler doors slightly open. So the hall sensor is only triggered when the filament actually enters the drive gears. We are still iterating this part until we eliminate the problem, or at least make it extremely rare in occurrence.
 With the new printed part, the lever is actuated by the filament entering the drive gear and pushing the idler doors open
Another slightly less common problem is the filament sensor on the MMU3 unit itself not triggering correctly. Since this sensor is working perfectly with the MK3S+, the problem is most likely caused by tiny pieces of debris still being sometimes generated by filament loads – this may cause the FINDA ball to get stuck on unload.
The most common issue right now (roughly 50% of all fails) is caused by the filament not going smoothly through the extruder and into the metal filament guide (the “tube” connected to the nozzle). This can manifest in several ways, such as the filament getting stuck on the edge of the tube. We are working on both mechanical and firmware solutions, e.g., an automatic filament reload that is initiated when the printer detects this situation occurred.
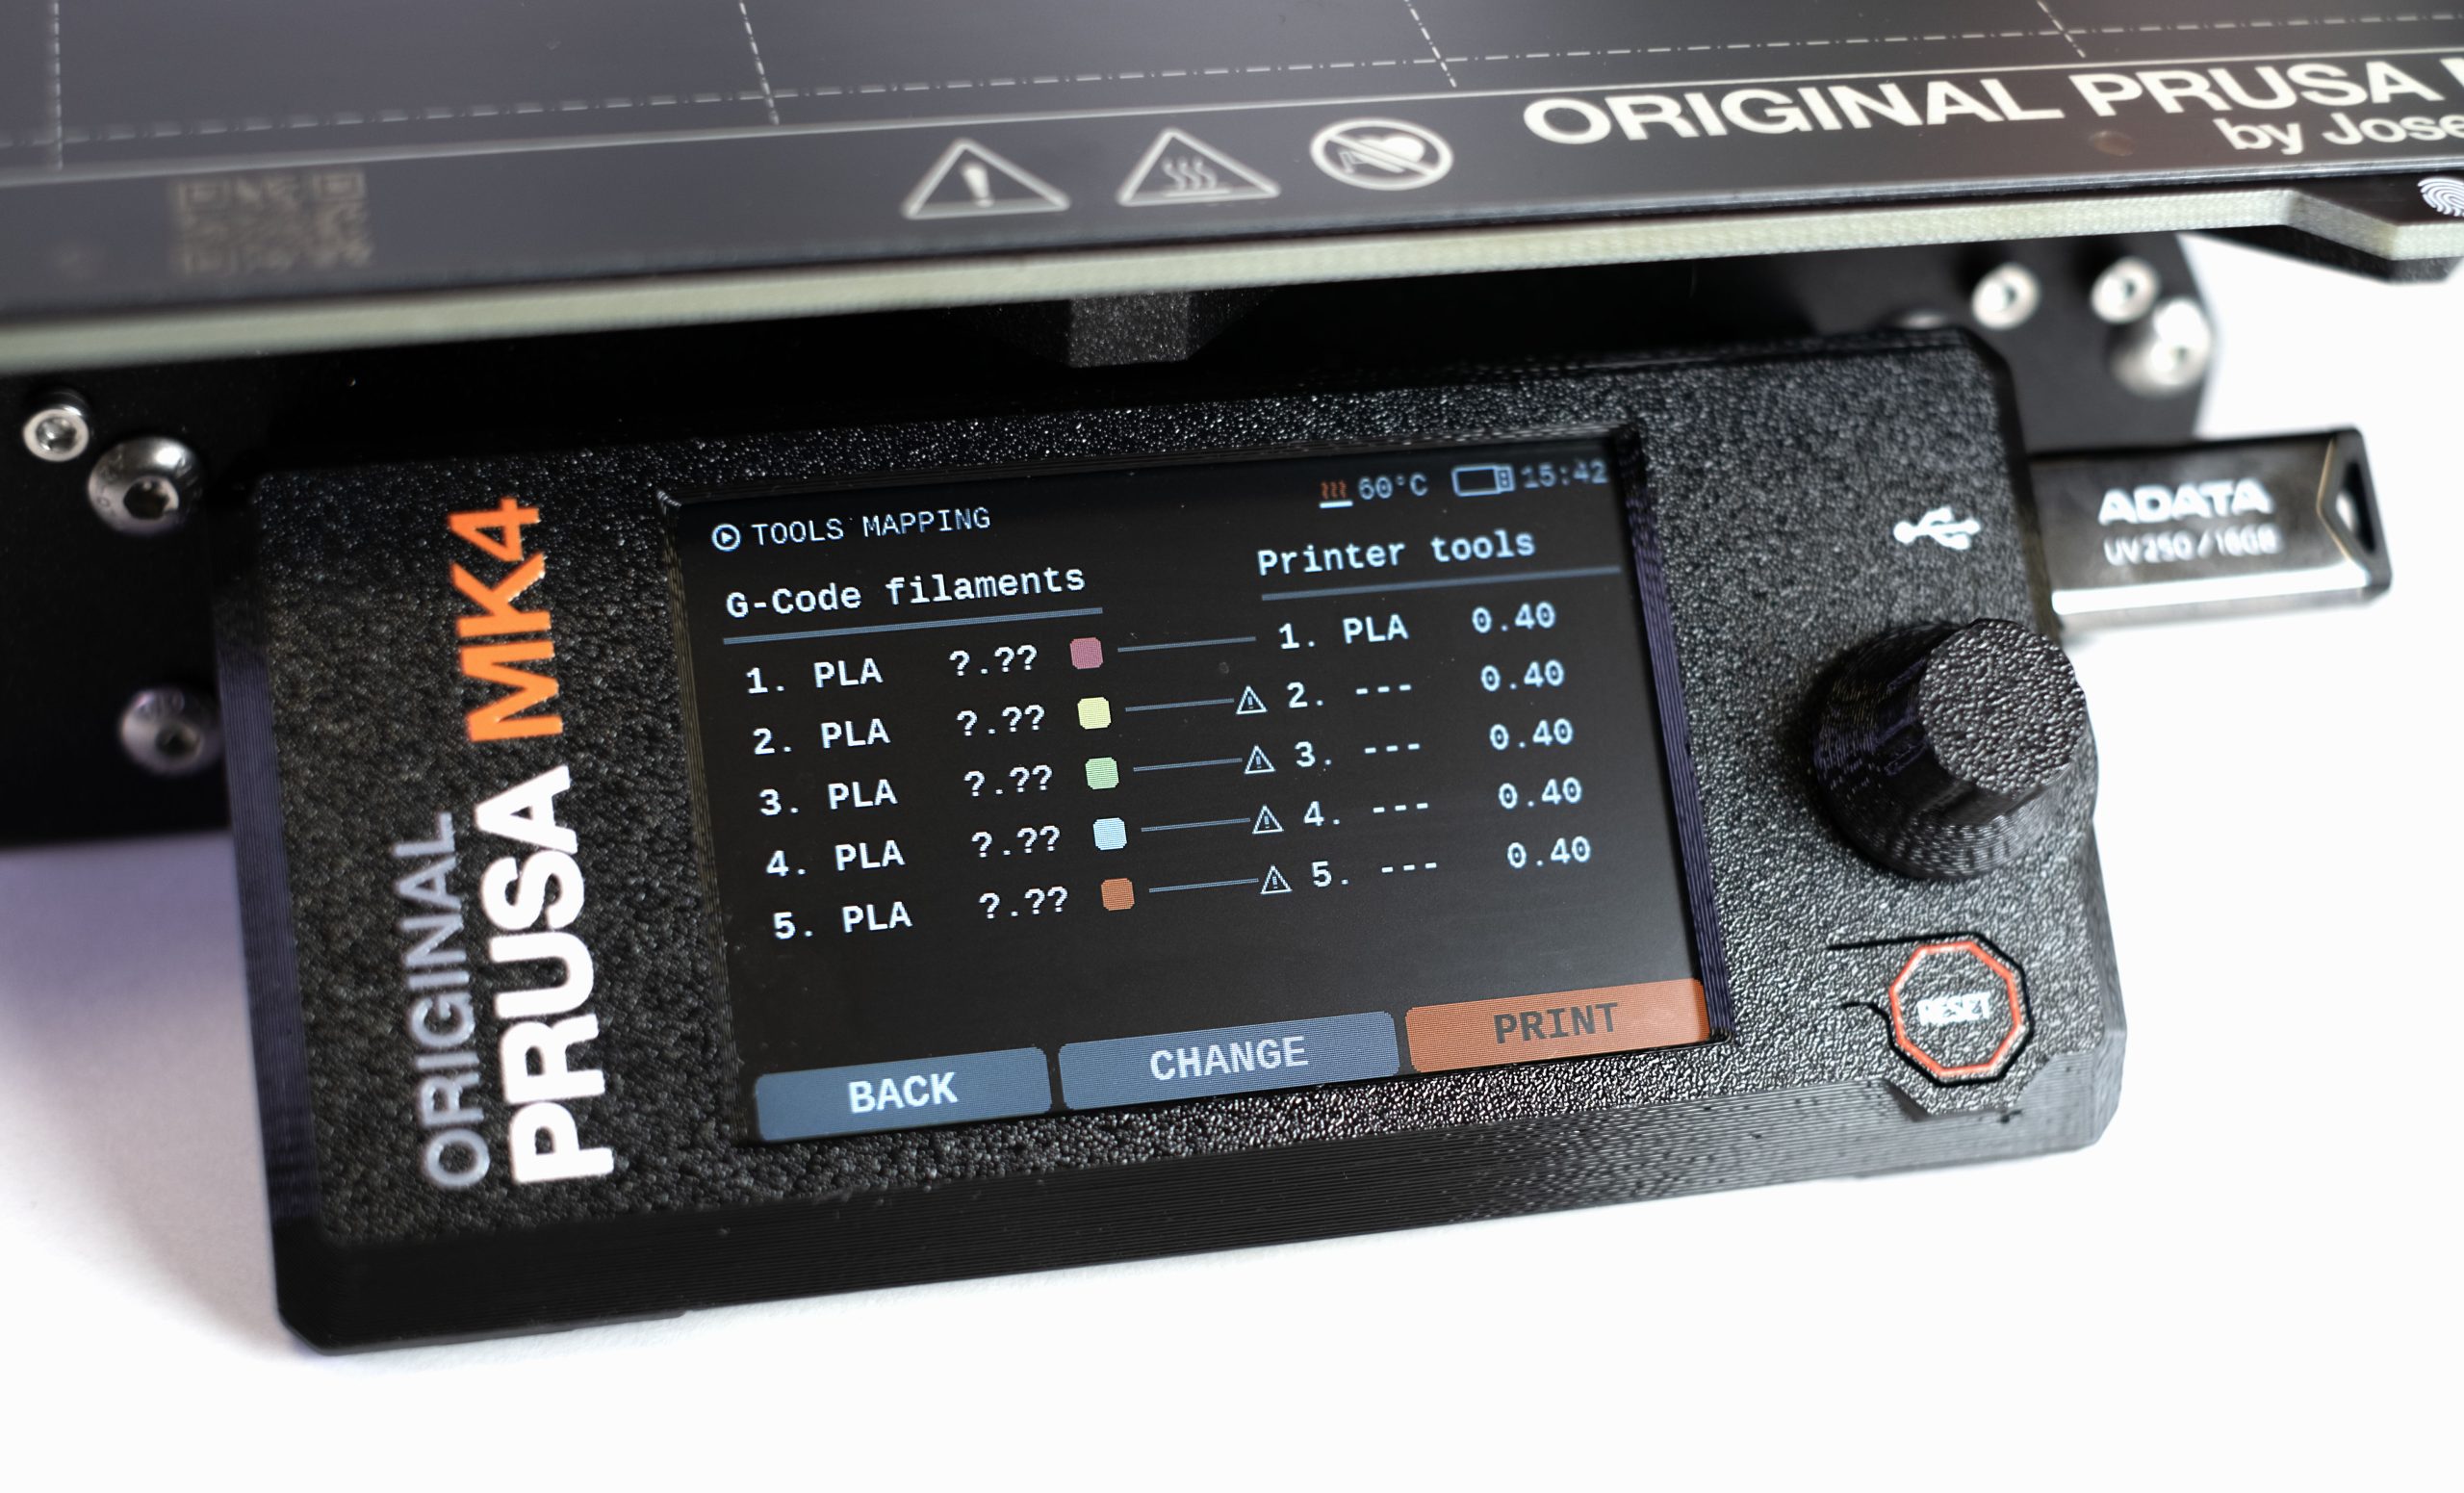 If you’ve changed your spool setup after slicing the file, the new pre-print screen lets you remap colors, set up spool-join, or reload different materials
When will we ship it?
Repeated delays are frustrating for you, our customers, and our team. With that said, we have decided to not start shipping the MMU3 for the MK4 until we’re sure the reliability is hitting the goals we set. It is extremely hard to estimate when this will happen.
It’s quite possible our testers will confirm that the latest changes solved the listed issues – and we will be ready to start shipping within a couple of weeks. But there is also the possibility that the solution won’t be sufficient and we will need even more time to get everything right. We honestly don’t know, and at this point, we rather say it out loud this way than give you a random estimate.
We would like to apologize for not shipping the MMU3 for the MK4 on time! I’m sure you’re curious about what’s going to happen with existing orders – please check the box below for detailed info.
As a gesture of appreciation for your continued patience, we’ll send you an email with a $50 voucher next week. This applies to all MMU3 for the MK4 orders. The voucher can be applied to your future orders. Of course, you have the option to cancel your order at any time, without any fees or other charges. You can re-order it later, the only downside is losing your spot in the queue. Orders of the MMU2S to MMU3 upgrade for MK4 will get a $15 voucher (the same proportional value in regards to the respective product’s price).
If your order includes MMU3 for the MK4 together with other items, we will send you an email next week, giving you the option to split the order. If you choose to do so, we’ll send you all the other items in your order first, with no shipping charge. Once the MMU3 unit is ready, we’ll ship it to you separately.
You will also receive the $50 voucher. The vouchers will be sent to all customers who made the order before Friday, October 27, 2023, 16:00 CEST (10 AM EST).
We will keep you updated both with the good news and shipping being ready, but also in the case of ongoing troubleshooting and further development.
Thanks for the option to split the order 🙏
Thanks for the extensive update and especially for the option to split the order. I'm glad the rest of my order is coming now, the MMU3 will come when it's ready.
Will MK3s get the stamping style tip-forming too?
Good question. I was thinking exacly the same
Ideally every Prusa model would perform this step when unloading filament or changing filament between layers as in a multi-color print on a single filament printer.
Thank you for updating us with the truth! The option to split the order is a good choice, as well as the 50$ voucher. Thanks again!
It's nice dealing with a company and team that really cares !
Thanks Prusa. Reliability is important but customer satisfaction too. The MMU3 for MK4 shall release once it is really ready and running like a swiss clockwork. Great compromise you've figured out and thanks for the update, I appreciate it.
Definitely appreciate the update. To be fair with some constructive criticism, I feel convinced Prusa is committed to delivering good products, and that is no small praise in any competitive industry, but I think communicating with customers is something that could be improved somewhat. And just a little more with a bit more consistency would probably go a long way.
This post was fantastic. Thank you very much!
Thanks for the transparancy. I'm happy to wait a bit longer for something dramatically more reliable than the MMU2, which never seemed to work correctly for me in the stock configuration. I'm super curious whether this new method of swaps is compatible with more exotic materials like ninjaflex without wisps. I'm also very hopeful that if the process is particularly temperature-sensitive for different filament types that the firmware on launch will account for multi-material prints done using entirely different filament types and adapt accordingly based on the sliced file temps per-hotend!
Thanks for the update and your honesty!
Glad to see that you are able to make it less wasteful. I'm curious though. Doesn't the selector of a cutter on it? Mostly for if the filament doesn't get fully retracted for some reason, but couldn't you have used that to cut the tip intentionally?
Thanks for the update! Will this new ramming procedure make its way to the Mk3S and/or MMU2S family eventually? If it reduces waste it would definitely be a nice upgrade for those printers as well.
Assuming the new tip-forming will also allow forming better tips at higher print temps, this would be a game-changer on the MK3S+ as we are currently resticted to printing e.g. Prusament PETG at 230C when using the MMU profiles, and not the optimal 250C as in the standard (single) profile.
This update is something I was looking for – some status on what's going on, what are the issues, and progress on them. Would like to see something similar with higher frequency.
These technical updates are the best, thanks for sharing!
Thank you for the update and your openness to sharing. I have a question regarding the MMU3 fixes:
Is it possible that there would need to be a design change to the MK4 in order for the existing filament loading issue to be resolved?
The answer to this would determine if early adopters want the MK4 now, or a MK4 later with design changes.
Thank you for the comprehensive update. Prusa is truly a research company. The MK4 is a great machine and I am confident that when it is tuned to the MMU3 it will be amazing. I will certainly be keeping my place in the queue but I will take up the offer of the split shipment.
This release is very welcome news. It shows Prusa caring for the customers.
Although I have been hanging out for the MMU3/Mk4 for a while I would prefer to receive it fully working and reliable than not.
If you need some help with the testing on various filament types just holler out and I'll come running. I have a wide range and more a eclectic mix than some other folks. And I have a working MK3S/MMU3 UltiMulti version to compare it with.
Thank you for the detailed update. I now understand better the issues you are facing with the MMU3 for Mk4 and I am happy that you are working hard to solve them before shipping the product. Many less scrupulous companies would not do this. My faith in Prusa has been justified and enhanced.
Why can't you ship the MMU3 unit already? If I understand correctly, the MMU3 works quite reliably with the MK4. You could continue testing and releasing firmware updates. Also, hardware changes in the future might be possible, and people could 3D print those changes at a later time. Furthermore, I'm convinced that the community also has good ideas to address some of the issues. But not shipping the MMU3 unit at all currently takes away our ability to print in color at all. Yes, the MMU2S unit with the MK3S+ wasn't perfect, but at least there was a possibility for multi-color printing. Now, with the MK4, six months after its release, there's still no option. In this regard, the MK4 is worse than its predecessor. In the age of Bambu Lab, this is very unsatisfactory.
Sound to me, that the MMU3/MK4 solution also might apply (in parts) to the stringing issues with the XL.
Thank you for having mentioned me. 😁 I appreciated the courageous, sincere and open statement of the situation, which put quality and reliability first, rather than takings.
I understand very well all the difficulties, since when I developed Dribbling I had to fight even more to find solutions, since changing the printers hardware parts was not an option.
Do not forget to include the possibility to swap between filaments that melt at different temperatures (e.g. PLA & PETG) and change the nozzle temperature accordingly during the filament Wipe / unload / load as I have done in Dribbling.
That is the key to use as example PLA as interface support material for PETG.
Thanks for the MMU4 development update, much appreciated and I understand the technical challenges the MK4 has introduced. I have a MK3S that I just updated to MK4 and I'm truly impressed with it, running test prints with it now. Looking forward to updating m MMU2S to a MMU3 and getting multicolor print support back.
I appreciate the update and the option to split my order. I’d rather the MMU3 ship when it’s ready than ship before it’s ready.
Looks like nextruder was not the best design from the beggining.
I wish that mk4+ will have different extruder mechanizm and revo…
Great work. But I think the MMU3 should be good enough for shipping. The community will help with finetuning (of course there will be some bitching). As I understand it is all a matter of SW and remodeled plastic parts. Therefore you can patch it step by step.
Simply ask your customer if they want it as it is today and if they are willing to improve or change things later.
Meanwhile I'm very unhappy. Starting the Order of the MK4 in April and expecting a MMU3 sometime in summer. If the MMU2 would be compatible I would have no issue at all. But I do miss the option printing with special support.
My shipping is now postponed to February. Ongoing frustration. I realy lost my confidence in Prusa tech development.
Please: ship what you have and let the community do your job.
Like the old Zenith Radio company would say "Quality goes in before the name goes on".
I am more than happy to wait for your team to put their name on the MMU3 for the MK4.
And thank you for the credit, that is very thoughtful of you. Can we use it for Gummies?
Thank you for the voucher and the possibility to split the order. Ship the MMU when it’s ready, it will be a perfect christmas gift for me😁
At this point I wonder: how will it behave inside the Original Prusa Enclosure, given the higher temperatures?
Thank you for the update and the transparency. It's very encouraging to see that you've learned from the past and are always working to do better going forward. I'm sure it's hard to not get excited and maybe announce something a bit too early, but your choice to not ship it until it is thoroughly vetted is definitely the right approach.
I appreciate the voucher and I'm eagerly anticipating the eventual MMU release. The Mk4 is an awesome printer, the attention to detail is very evident, and it will be even better with the MMU addition!
Could the new power board be sold now? The new firmware for MMU3 could really use it.
> The most common issue right now (roughly 50% of all fails) is caused by the filament not going smoothly through the extruder and into the metal filament guide (the “tube” connected to the nozzle).
I have run into this problem when loading by hand.
I feel it's more likely to happen if the bottom thumb screw is not tightened correctly such that the filament guide sort of "hinges" on the top screw and can become a bit offset at the very top.
How do you resolve this problem? I am having constant fails when changing filament by hand on MK4. Filament gets stuck at top of tube so new filament won’t load. And then massive blobs with and without wipe tower. Print head hits blobs and throws everything off. I’ve spent hours on with tech support with no workable solution. Was hoping the MMU would solve the problem. Any ideas?
For the wipe tower blob issue, have a look here: https://forum.prusa3d.com/forum/postid/562228/
Thank you for the honest update. As products are always great from you, communication isn't.
I was exited when I read this post. And I see al those comments. But then I realize, that nobody from Prusa takes the time to read this here. Not one single question or comment has been answered.
Team Prusa, please wake up!
Thanks for the transparency and the details!
Anyone got the email so far regarding the voucher or the shipping?
I'm waiting for it, haven't yet.
Not yet. 11/3/23
Me neither. 🙂
Received mine about 3 hours ago.
Bonsoir
J'ai la chance 😉 d'avoir encore une MK3S+ avec une MMU3 qui a tardé à m'être livrée.
Avec du PLA pas de problème, mais le PETG me fait de longs filaments dont s'accommode cependant la MMU3 avec reprise du chargement, 1 ou 2 fois dans le pire des cas. Mais c'est rare. Cela impose de nettoyer fréquemment la petite cave sous la zone de choix du filament.
Bravo de toute façon pour ce superbe matériel.
dont s'accommode et non : ne s'accommode
Thanks for the update,
Habe den i3 Mk3s+ zu MK3.9 umgerüstet, dazu die MMUS2 zu MMU3 umgerüstet, als ich die Bestellung machte wurde mir nicht gesagt dass es Probleme mit den Teilen gibt.Ich bin schon etwas enttäuscht nicht mit der MMU3 auf dem MK3.9 drucken zu können.Und Wer kann mir sagen ob ich das alles noch Mal umrüsten muß.Es war ja nicht gerade wenig Zeit, die Teile für die Upgrades zu drucken.
It is now the end of "next week." No email. Lesson learned. 1 per order for everything I buy from prusa.
Email arrived yesterday (3-11-23).
Not yet with the voucher. The voucher is coming next week.
Take your time guys no need to hurry
Thanks for the detailed update. Amazing stuff.
Thank you for taking to the time to keep us updated. My faith was very shaken in Prusa after my bad experience for the i3mk3s+ to i3mk4 upgrade being delayed 6 months without any good explanation as to why… I would have like to have known what the problems were, or the status of the progress, but nothing meaning was offered. Keeping your loyal customers in the dark is a great disrespect to those of us who backed you, believed in you and proselytized on your behalf over the years. This sort of post is the antithesis of that, and is greatly appreciated. I'm confused as to why you offer $50 for this delay, but not the other, but I'll put to good use none the less. Thank you.
A very large part of what makes Prusa (as a company) so great is how community minded it is. This gesture allows the community in and allows us to feel like a part of the process. You did right here… very, very right. Of course I'm anxious to get my mmu3, but by all means, take the time to get it right. You do right again by us by ensuring a good experience with the MMU3.
Thank you.
I agree don't ship till it's solid and flawless. I'd rather wait. The detailed update was interesting. Keep up the communication especially if more work is required.
Here in N. America, and especially Canada, the available filaments at reasonable prices are not in the list of filaments in the slicer. I encourage Prusa to also test the MMU with filaments widely available here. Spool3d dot ca, Amazon house brand, and Overture brand on amazon are choices I've used at least.
I agree with JAnger, get it solid and flawless, I will wait as well. Please keep us posted on progress.
Well, I thought that the definition of the "Diary" is that it is more or less updated daily. this is just a single blog post about the progress. I don't mind waiting for the MMU but I would like to know whats going on – It doesn't have to be daily update, but maybe once or twice a week – even if there is no progress.
Also I don't like that I read about the delays from this blog post. I haven't got single message about delays from Prusa since ordering on November 26th.
This blog post also mention that I suppose to receive at least two e-mails last week. One with $50 voucher and one with split delivery option, but I still haven't got any message and it's November 7. I can understand development delays, but if you can't even fulfill a promise of sending e-mail within a week – that's not a great prognosis.
I agree with Tomek's comments.
Customer communication is in great need of improvement.
Just a small update. My order was October 26 not November 26. I also think that Prusa could benefit from some sort of beta program. Instead of splitting the order in two and send me my filaments in first shipment and then sending MMU3 in the second package. They could send filaments and current version of MMU3 in one package – so I could test it and share my experience and problems – and if there is any additional hardware needed for the final version they could send it in the second package. The total shipping cost for Prusa is the same as for the split order, and they will earn free beta tester.
My concern is that if there are changes to the hardware of the MK4 that are needed to accommodate the MMU3 how will this be achieved? Will you also send update kits with all MMU3 kits? Or are hardware changes on the MK4 are this stage not an option?
Love your honest feedback on the MMU Problems, but for the time being you lost me to BambuLab. The wait for the MK4 including MMU3 was simply too long. The MMU2 on my Former MK3s was an ok experience, Not more…
Maybe i Return to Prusa once really reliable multicolor is possible, until the i Stick to my X1C with 16 colors
I've been contemplating various ways to reduce filament waste even more, such as purging filament directly into a silicone mold that forms it into usable 1.75mm filament. That project is going to take a while and is probably doomed to fail. But I just thought of another trick: You could push a high-temperature-resistant filament material down into the nozzle to do the initial purge instead of using meltable print material. It would use up one of the slots of the MMU, but it would be one effective way to clear out the old material without using up several centimeters of printing filament.
I ordered my Prusa MK4 together with the MMU3 on Sept-8th.
I received the voucher now as of Nov-10th.
However, I still didn't receive the email to spilt my order and hence I am still waiting for this printer. Prusa…you are really not doing well on customer service & communication.
The idea with the voucher and the split is great, but yet I can't split as you haven't given me the possibility to do so. Chatting with your customer support last week they told me they can't get that done for me and I should wait for the email…that didn't arrive until now.
Really bad experience….
I ordered my Prusa MK4 with the MMU3.
I received the voucher as promised but have yet to receive the email to spilt my order. Is this still going to be an option?
Update: I have received both the voucher and split order emails.
Thank you for making a split order possible. Furthermore I appreciate the transparency and wanting to deliver a perfect product and getting the bugs worked out of the MMU3 problems found for the MK4. Can't rush perfection.
Also in the same boat as others that bought them in a single order. Got the voucher on Nov. 10 but still no email to split the order.
Hey Guys,
Im pretty sure everyone in the team is working really hard to make the MMU3 a reality, but it would be great if we can get an update atleast twice a month. Me personally ordered this for my office use after much comparison with the bambu lab printer and the whole team is eagerly waiting for this addon to come through just like all the 3d printing nerds here I expect. So it would be much appreciated if we can get an update regarding the status and atleast a tentative shipping date.
I received none of the mails (Split / Voucher). After contacting live chat, Jerry sent my voucher and asked me if I wanted to split or wait. So I suggest to do so if your's hasn't arrived yet.
I also want to point that maybe I haven't received it because the order wasn't inicially of the MK4 + MMU3, but first the MK4 and days later I added the MMU3 (before this post was posted). Everything I added was on stock.
– 08 October 2023 – First Order of the MK4 Kit
– 10 October 2023 – Edited order (1st), added PLA filament
– 25 October 2023 – Edited order (2nd), added MMU3 for the MK4 (Changed Shipping method because of package weight)
– 26 October 2023 – Edited order (3rd), added Nozzle brass.
You should release the new unload procedure in MK4 firmware so users around the world in different conditions and using different filament could report back if they see strings when they change filament.
Holding back a product because it's not ready for the market is ALWAYS the best option. Sure people might be upset but it's the better play in the longterm. Thanks for the communication and the updates, but more importantly the hard work to resolve the issues.
Follow translate with Google.
È passato quasi un mese da questo articolo e non si vedono novità.Ho upgradato MMU2S a MMU3 per MK3S+ e che la usavo in modo singolo e poche volte in multimode .Ora sono passato da MK3s+ A MK3.9 e mi trovo benissimo, ma adesso ho la MMU3 ferma e inutilizzata, non la posso nemmeno usare in single mode, cosa che sarebbe possibile a quanto ne so anche con i problemi che voi evidenziate.Sarebbe utile almeno mettere in vendita i pezzi che servono a far funzionare la MMU3 con al MK4 o la MK3.9 per chi al usa prevalentemente in single mode.Grazie per l'eventuale attenzione.
It's been almost a month since this article and there's nothing new.
I upgraded MMU2S to MMU3 for MK3S+ and I used it in single mode and a few times in multimode.
Now I've gone from MK3s+ to MK3.9 and I'm fine, but now I have the MMU3 stopped and unused, I can't even use it in single mode, which would be possible as far as I know even with the problems you highlight.
It would be useful to at least put on sale the parts needed to make the MMU3 work with the MK4 or the MK3.9 for those who mainly use it in single mode.
Thanks for any attention.
Mikolas, any updates?
Thanks!
Hi,
It's been a month since the post, I'm sure people would be grateful for an update please.
Hello,
the last update on MMU3 for the MK4 is dated October 27, 2023.
What progress has been made?
Please let us know the current state of development. Thanks!
Ja, auch ich habe den i3 MK3S+ zu MK3.9 umgerüstet, auch die MMUS2 zu MMU3
umgerüstet, leider gibt es kein ADAPTERKABEL für die MMU3, keinen Plan wie es zu verdraten wäre, und so weiter. Ich muss schon sagen ich hebe zu voreilig die MMU3 bestellt, habe nicht gelesen dass die MMU3 nur mit i3 MK3S+ derzeit zu verwenden ist.
Bin schon satt, jetzt zu Weihnachten nicht mehrfärbig damit drucken zu können.
So I got the email about the voucher, but never got a voucher, nor did they even explain how that would materialize? Something in an email? Attached to my account? No clue.
The MK4 upgrade has shown up but no sense in even doing the build without the MMU3, as all my prints are MMU based.
So now I have a box with an MK4 upgrade sitting utterly worthless to me because there’s no corresponding MMU3 to go with it.
Meanwhile Prusa’s got my roughly $1K in MK4 upgrade, MMU2 Upgrade, spare parts for the MK4, new bearings and other stuff that have zero return until they get some solution for the MK4 variant of the MMU2.
It’s now looking like what, a minimum of another 3 months before we’ll even begin to see a shipping MMU2->3 upgrade?
The real pisser is I did the whole MK3->4 and MMU2->3 upgrade as a stopgap for the 5 head MK4 which ordered the first week of January 2021.
Due to the never ended XL delays, I added the MK4 and MMU2->3 upgrades, in June, as my 3S/MMU2 has started to get flaky reliability wise (after hundreds of zero issue prints it can’t reliably load filaments through the selector, and I’ve changed out the PTFE’s on MMU2 and the extruder as well but it’s not helped).
So now the XL is looking like March at best and more likely May before I’ll see that, and who knows when we’ll see the MMU3, which will finally make the MK4 usable, as right now that upgrade box is little more than a $1k paperweight without a usable MMU3l
Is it possible a MMU will be comming for the MINI+?
Hi,
so what is the latest status? Since you displayed a MK4 printing with MMU3 on the SMMRF livestream, does it mean we are close to a release now?
Hello,
please let us know about the latest development status of MMU3 for MK4! Thank you!
It seems there is no further update from Prusa. Not even one official reply here to one of the comments.
I was running the Mk3S+with MMU2 with some issues.
Like many here, I've ordered the Mk4 and the MMU3 to overcome them.
But after waiting many months… it's maybe time to put the Mk4 on ebay and walk away. 🙁
Honestly if I knew that the multicolor kit would be so delayed I would have gotten a bamboo printer months ago. I currently have an mk4 just sitting around doing nothing with what seems to be no end in sight..
Thanks for the communication but this really sucks.
I agree with Brian: it sucks!
It really is about time for an update! After all, MMU3 for MK4 that you still have in development/troubleshooting has already been paid for by us!
Can we have an update a shipping update please ?
I have to agree – the original blog post was wonderful… but now radio silence? Can we hear about the progress please?
I'm pretty sure all customers want to know how the MM3 for MK4 is doing.
Please give us, your backers and loyal customers, an update. It doesn't have to be a long text with photos, just a few lines about what has happened since 11-27-2023. We would appreciate it very much!
It's a pity that companies from China provide a better CRM than a European company that I prefer to support. Please wake up!
Would be nice to get another update. It's 7 weeks since this update and there's been complete radio silence.
I really don't mind the wait if it's for a good product, but it would be nice to know how long we still need to wait, or at least know when we'll get updated so we don't need to come back to this blog every few weeks to see if we've missed an update. I don't think a monthly "Hey this is what we've done, this is how it looks" would be too much to ask.
Especially given that the Bambu Lab A1 Combo just released which is just 250 euro more expensive for multimaterial printing, and comes with an entire new printer. Starting to wonder if cancelling might be the better path.
Should I consider purchasing a Bambu Lab A1 and retire the MK4? I had hoped Prusa would provide regular updates.
I’m honestly thinking the same thing, sell my MK4’s and buy 3 x A1’s all with MMU’s.
I think the MMU3 for MK4 problem must be a lot worse than Prusa are saying (or not saying)…. Possibly extruder related and a redesign on the way…. as soon as they can work out the cheapest solution.
As soon as Bambu Labs release an XL that ships immediately…. Game Over
Absolutely, I would like an XL at some point, I will most likely wait for the bambu version.
Well as of 12-16-2023 the website says:
"MMU3 for the MK4 is in the testing process and should be available in late August."
It doesn't say WHICH August! 🙂
https://www.prusa3d.com/product/original-prusa-mmu3-upgrade-kit-for-mk4-2/
August??!! The hell?? The order i placed was on July. I bet there are many more who placed the orders before me. It was a choice between bambu and prusa. Just went forward witht this only because of the want to support the team. Now i just feel it was all a waste. Atleast they can give their best solution as of now for the ppl who already ordered and then give future updates when available. now this is just a dissapointment.
When I'm looking at the page it shows
"Versandtermin wird später bekannt gegeben"
"The start of the shipping to be announced later."
on top where we choose wich Variant…
Maybe they should correct the Productdescribtion!?! because this part is outdated.
Can we please get another update?
i think it's time for a status update.
we've been waiting for months now for our orders to be shipped and deserve some information.
thx!
Yep, we want a status update for Christmas! Or should we order a Palette 3 Pro instead?
It is quite obvious that PRUSA has massive problems with the MMU3 for the MK4.
We customers are not being told the plain truth. It is being delayed as long as possible.
I think PRUSA will have to develop a completely new Nextruder in order to guarantee the desired quality. We are certainly not talking about a delay of months, but of one to two years. I recommend anyone who wants to print in color with the MK4 Printer to consider switching to Bambu Lab.
Prusa's information policy is a disaster and extremely customer-unfriendly. It's a shame that customers who want to support a European company are trampled underfoot like this.
The natives are getting restless.
My MMU3 for MK4 order states "Expected to ship between 2/16/2024 and 2/22/2024".
If this information is indicative, would you not also care to inform all customers of this expected shipment date?
Please by all means don't ship before it's robust and ready, but DO keep us informed. And most important of all: use ISO dates. Humanity demands it.
My MMU3 for MK4 order states "Expected to ship between 12/31/2023 and 1/6/2024".
I´ve ordered it 2 minutes after getting the newsletter.
But i dont believe that it will be shipped until 1/6/2024.
I bought a Bambu AMS which i am testing. Sorry but this information policy of Prusa is very bad.
2024-06-01 is a bit pessimistic isn't it?
My shiment date hasn't moved since last, but I have no faith in it at all. Perhaps a bad decision to stay with the basic MMU2-design? Holding off my MK3->MK4 upgrade until MMU3 business is fixed.
My order including MMU3 was showing as scheduled to ship in June 2024 until a few days ago, when I discovered yesterday that it had disappeared.
I am under the impression that they have corrected the behavior of the system which mechanically presents the date about 6 months later.
Had my MMU3 order split the other week to get the parts that was in stock before it was too late. Arrived timely, as usual.
But now the whole order is marked as "shipped" and was not actually split. No MMU3 was delivered, as expected, but the order line changed to "Deposit for – Original Prusa MMU2S to MMU3 upgrade for MK4" with no delivery date given anymore. Quite skeptical the rest of the order will ship in that state.
So if the ambient temperature is causing problems, why not add a temperature sensor on the MMU circuit board and teach the firmware to alter the way it changes filament based on the temperature?
Experience the convenience of shopping for <a href="https://thepiematrix.com/product-category/binoculars/"><b>Binoculars online india</b></a>. With just a few clicks, you can browse through a diverse collection of binoculars from the comfort of your own home. Compare prices, read customer reviews, and make an informed decision before making your purchase.
From compact and lightweight models for travel to high-powered binoculars for long-distance viewing, you'll find a variety of options to choose from. Enjoy the ease and accessibility of shopping for binoculars online and embark on your next adventure with enhanced vision and clarity.
The filament sensor update is needed for All MK4 units. The new design could catch the filament break at the gears and save a print.
Is Design Of Experiments methodology is being used to test the MMU3 and MK4? DOE is a process for evaluating multiple factors in a process instead of one at a time, saving experimentation time.
no response is also a response.
i think i’ll sell my loved mk4 and switch to a bambulab x1 pro carbon. i’ve been waiting too long without any info.
prusa had always been such a great company. i simply can’t understand why there is no update for all of us who have ordered a mmu3 and have been waiting for months now.
🙁
Right decision, thomers. You definitely won't regret switching tu Bambu Lab.
The latest information on the development status of the MMU3 for the MK4 was released two months ago. Since then, there has been radio silence, even a suspiciously loud silence.
Mr. Prusa, dear Josef, do you really care that little about your customers?
I appreciate walking us through the issues so we can appreciate the situation. I have the MMU2 and have had stringing cause reliability issues in the past, so taking the time to make the MMU3 on the Mark 4 work as reliable as possible is ultimately going to result in the happiest customers. Looking forward to it and the transparency!
Transparent (according to Merriam-Webster Dictionary):
"characterized by visibility or accessibility of information especially concerning business practices"
I have considerable difficulty in recognizing this approach at PRUSA.
Ho Ho Ho,
Xmas just is over and the new year stands in front of the door.
I feel, it is time for an update now @mikolas Szusa.
What Do You think about it?
It's been two months since the last update, 4 months since I paid for the MMU3 for my MK4. I think it's time for an update on this.
Gave up on waiting for an update and purchased an X1C combo.
I can't remember where I read it but someone from Prusa said they would be providing an update before the end of the year. I waited till today and then pulled the trigger. Not holding my breath anymore.
I'll keep using my MK4 for single color applications.
Any news Prusa? Even if it's not ok, could we have an update on the issue? Thanks
…It has been a couple months since this awesomely thorough update which ended with a commitment to keep us updated. ;). Any chance of another update. Even a quickie that doesn't take hours to compose. Thanks!
Do people who ordered through resellers also get the voucher?
"We will keep you updated both with the good news and shipping being ready, but also in the case of ongoing troubleshooting and further development."
Keep your promises!
Sad to see there is no update for the MMU3 yet. I have been coming back everyday and checking this blog only to see more frustrated souls. For all the people who preordered and have been waiting months I feel for you. I am new to 3D printing and I have only been waiting about 3 months for the MMU3 and it just feels as if were being led on but the customer service that I have had up to here has been pretty good for my own experience. I really hope we get some news soon.
To anyone waiting for info, here’s the dribbles we’ve gotten. Prusa has a monthly Prusa Live podcast on YouTube and someone always asks the question there. Usually with little to no information. On the last one dated Dec 20 starting at 1:10:26 we get the following conversation.
“What about the uh… there was a question about the MK4 and the MMU3. That is uh active now, is it not? We were showing that off at the Sanjay Memorial RepRap Festival.”
Nicholas: “We were showing it but I’m pretty sure they’re are not shipping for sure to anyone yet. So that one is for sure further along than the XL enclosure like we bring it to events because we can get it working but I don’t know how far along they are with like this is rock solid this is as rock solid as it is on the MK3 and we can just start shipping it to everyone. So I’m sure whenever that is ready we will update you. The last update was the big book article. I remember seeing all the tips in the developer testing room. Like they printed so many things, just thousands and thousands of reloads to get the tips nice. So the tips are now excellent. Actually I do remember a note from the last meeting and it was that they are now testing PETG. So PLA I think is basically done but PETG not yet. So that’s definitely been happening.”
Link here: https://www.youtube.com/live/b5FlcVrWn2c?si=hCmU2Xwg4F4ohdxh
I’ve been actively following the MK4/MMU3 progress as well. I haven’t purchased one yet, as I’m waiting for reviews. But reviews can’t happen until this thing ships. It’s a shame they don’t see why people want more information from the YouTube Prusa Live Podcasts. Anyways, I’d probably tune in there two weeks from now and see if we get an update again.
Thank you for taking the time giving us this update!
Happy to hear a total transparency from the Prusa developers
So difficult to hear these days
I'm curious to see the tests on MMU3
Ordered on July 27th and no estimation for a delivery date yet, but fully paid. Lat information ist dated late October. The let us standing in the rain… I thought about buying an XL (5 tools) – postponed for the moment if not forever.
I can live with delays when being reasonable updated – which is not the case. Thinking now about alternatives…. Bambulab, Voron or Ratrig, probably with tool changer…
If one wants to make my decision easier: PrusaMK4 with Printerbox – reliably printer, love it, but can not be used as intended because of missing multi-material option…. Anyone interested?
Ho effettuato l' ordine il 01/09/2023 e penso che ormai sia tempo di aggiornarci sulla situazione, capisco tutto ma questo silenzio è davvero insopportabile per chi come me ha effettuato il pagamento da mesi. Credo che sia giusto dire qualcosa anche se magari si è ancora in alto mare. Se avessi saputo che passava tutto questo tempo non avrei aggiornato subito la mia MK3s+ a MK4, ora mi ritrovo con dei lavori da fare che non posso finire senza MMu e non so nemmeno se passerà un altra settimana o altri 5 mesi……..almeno aggiornateci
ogni tanto!!!!!!!!!!
How about an update? It has been over two months. There must be something you can communicate?
"We will keep you updated both with the good news and shipping being ready, but also in the case of ongoing troubleshooting and further development." Go on then, keep me updated. I ordered mine almost 6 months ago.
"Wax on, wax off"
– Patience, Grasshopper
2 months have come and gone since this blog post, and I note that Prusa Support do not see fit to add current information to that contained in the article. Good to see cohesiveness, but….
It's surely unexpected that the Mk4 would have more trouble with the MMU3 than does the MK3S version. And even more unexpected that the correction should be taking such a long time.
I have recently upgraded my Mk3S to Mk4, but in the process had to disconnect the MMU3 I had working on the MK3S+, because the wiring does not fit. And I also have the full MMU kit for Mk4 on order. So, I am wanting the wiring kit to connect a MK3S+ MMU3 to a MK4 as well. Such a pity that extra wiring wasn't and isn't offered in the eShop.
So, I suggest this needs to be updated, and perhaps you might foreshadow a release date this time, which is surely closer.
The MK4 was sold by Prusa with the MMU3 to be available for purchase from Prusa a few weeks later. It seems that Prusa has deliberately and knowingly misled customers about the MMU3 availability to sell the newly developed MK4 product line.
Furthermore, Prusa's main explanation for the MMU3 failures being largely related to extreme ambient temperature swings is weak at best. If this were truly the case, placing the MMU3/MK4 in a controlled temperature environment would allow the MMU3/MK4 to operate normally. Thus allowing the vast majority of MK4 owners to utilize the MMU3 at their own discretion knowing that a controlled temperature environment must be implemented for proper MMU3/MK4 operation. Instead Prusa has chosen to delay the release of the MMU3 for the MK4 over 6 months with no release date annouced or predicted.
I think it's time for another (meaningful) update on the MMU3 for MK4 issue. I've been waiting since July 27th for mine and their only sorry, but not sorry gift is $50? Come on now. I absolutely love my MK4, but if I would have known it would take this long I may have purchased the XL.
Come on Prusa, you're better than this.
Just chiming in here, been checking this regularly. Update would be very nice Prusa
Can anyone confirm what the differences, if any, between the MMU3 for the MK3s and MK4 are?
The main difference is that the MMU3 for the MK3S is available for delivery…
This never-changing article is becoming my most-visited, most-disappointing destination on the Internet.
What a disappointing experience! I ordered an MK4 kit plus MMU3/MK4 upgrade on the Black Friday sale in November. The order was worth 1000€, paid in advance. But I was really looking forward for the MK4.
One week ago I had to find out myself that my order was on hold because of the MMU3 problems. I kindly asked the support to split my order, in the hope to get my MK4 kit now, and the MMU3 sometimes later. Nothing has happened though.
I just cancelled my full order now. My MK3 is still good enough, and will certainly be even better once I rip out this MMU2 sh** that is giving me a headache all the time.
I like to support European companies, especially with an open source policy, but this experience was truly disappointing.
Our difference is that I ordered and received MK4 and after ordered and received MMU3(when they advertised as compatible with MK4, before updating their web-site). I have the MK4, I have the MMU3 assembled, I just hope once they solve their issues with firmware and extruder approach, there will be a package to get us up and running.
I sold my MK3S+, kept the MMU2s and bought the MK4.
I need a running MMU for PLA only…..
So no official news since End of october is very disappointing for me…..
I did the MMU2S>MMU3 upgrade on my MK3S+ and i was impressed by the improved version.
Afterwards did the upgrade from MK3S+ to MK3.9 not standing still at that moment that i wouldn't be able to use the MMU3 until i can order the remaining parts for this. but reading and folowing this blog… i'll have to be patient apparently.
Hello, how long do you have to wait until the mmo3 for the MK4 is ready for shipping?
Any update on when this might start to ship? Also, if I have an MMU3, an MK3S and the upgrade kit to go to the MK4 can I just plug the MMU3 into the MK4 and it will work (ie a beta setup) or do I need a bunch of non-printable parts to make it work?
Dear Prusa Team. I Think its Time to give us some Updates about the MMU3
I purchased a MK4 upgrade kit along with the MMU3 upgrade. Really wish I had seen this forum post before I upgraded my MK3s. Prusa can you please release the MMU3 for MK4 firmware as a "Beta" of some sort? I only print multicolor PLA and really need the functionality back without performing a complete downgrade on my printer.
Same here
Guys,
i asked for an updaten on Dec 31st 2023.
Another twoi weeks.
PLEASE PLEASE do not turn into the behaviour of other well know componanies who NEVER come back on community questions other than you place a ticket.
PLEASE keep my believe and trust in you upright and valid, ok?
LET US PLEASE KNOW ANYTHING..
I ordered the i3MKi3S toi MNK4 kit AND the MMU2 ti MK4-MMU3 upgrade and i fortunately – just because the lack of time – did not do anything on the upgrade, Else I would have lost so far.
It is highly unlikely they will reveal anything here. See my post from Jan 4th, which contains the latest info we have to the public.
Prusa Live YouTube streams happen on Wednesdays, so it'll likely be either this week (Jan 17th) or next (Jan 24th). If you want answers, it's best to drop in there and ask until your face turns blue. AFAIK, it's the only place we've gotten new info.
Thanks for the adsvice!
Woulkd you be so kind to leave a link so that one can join the life forum?
Thanks most kindly for your January 4 article and for posting this more recent link to it.
I am also watching eagerly for progress on the MMU3 for MK4.
I ordered, received and built an MK4 to replace my old MK2S+ to and MK4 with enclosure and I love the results thus far. Like you, I am also awaiting MMU3 release before I order.
Also it's not OK to ask for a full payment in advance, and then hold the order for an indefinite amount of time. Next time it would be fair to charge the money on delivery, or ask for a 10% deposit in advance. It's not a crowdfunding project at last, but you're selling a product.
Any update?
Haha… You'd think so but… Seems like we will hit 90 days with no real update and further it seems like Prusa just doesn't care at all about it.
For Prusa, it is completely irrelevant what we write here, what we wish for or rightly demand.
As long as no spam links are posted, this forum will not be moderated.
Prusa has massive problems, not only with the MMU3 for the MK4. Unfortunately, customers are being left behind. This will probably have a very negative impact on further development of the company.
I advise everyone to cancel their order for the MMU3.
Bambu Lab offers a better and functional alternative.
No information update will be published here for the foreseeable future.
i'm afraid you're right.
i left my MMU3 order from 2023/07 open, but ordered a bambulab x1 pro carbon in the meantime. seriously thinking about completely switching sides.
whilst i can live with an extended waiting period, i'm absolutely not willing to accept the complete lack of information from prusa.
this is very disrespectful against us customers who have already paid a lot for the product.
Well, it's a big shame!
More than 6 months after the promise, still no outlook.
ridiculous €50 voucher that doesn't do anything because the shop has been almost sold out for weeks.
Prusa can't even manage to produce filament anymore, how can that continue?
Lastly, having the ignorance to leave the thousands of people who paid €350 hanging like that. Probably well over 10,000 MMU3 orders = 3.5 million cash flow without anything in return
It's funny that the big market competitor now has at least an unintentionally opensource fork, so you can at least put the final old and good argument for Prusa on R.I.P.
This is so true.
I've had enough of this…. As I sit back and look at the beautiful prints my friends are producing on their X1C and AMS, I look at my MK4 and wonder what went wrong with Prusa.
I just wanted a new shiny 3D printer that just worked like my MK3S+, but was quicker…. after months of waiting for my MMU3 and comparing my friends printers, I fully regret my (2) MK4 purchases.
Unfortunately for me, that new shiny 3D printer that just works is available right now… but its not on Prusa's website…
I'm with you Joe. The ONLY reason I bought the MK4 is because of the MMU they promised to go along with it. I "upgraded" from a Creality that I could never get to print correctly. If I could go back, I would have never ordered this printer at all.
Could we maybe get an update?
Why is this still being sold at full price when you guys seem to have no clue as to when you'll start shipping them?
Almost all your filaments are out of stock yet those can't be bought when they're out of stock…
I placed an order in Nov for almost $2000, and it included an MMU3. The entire order is being held up by the MMU3, even though the whole thing was paid for months ago and the rest of the order could ship. Makes no sense to me, but customer service won't split the order. It's not how any other retailer I'm aware of works, and definitely has me eyeing the cancel order button for the whole thing.
You guys have a point. The stock level at the Prûsa store smells insolvency. I don't think they scramble to finish development of marginal products at this stage. If you have expensive pre-paid orders on hold, I'd suggest making sure your payment processor has some kind of insurance.
On reddit user "arslaniqbal70" posted this on 01-16-2024:
"Ordered MK4 + MMU3 yesterday. Went on to chat with the team, and they mentioned extensive testing going on and hope to have good news by the end of this month."
( https://www.reddit.com/r/prusa3d/comments/18vu7j1/comment/ki8gmy3/ )
I would like to believe Prusa's announcements, but my confidence in their statements tends towards zero. Prusa has lied to us too often. They "hope" to have good news by the end of this month is deliberately worded as vaguely as possible.
I'm hoping for a miracle, but I'm not expecting anything. Prusa, please make sure your nose doesn't get longer than Pinocchio's.
Today might be the day fellas. Let's hope for some good news
Come on Prusa. It's been almost 3 months since your last update. Don't you think it's time for another one?
Got an update by email today, lots of info on progress, problems and new estimated delivery (end of march). While it's positive to get an update, and to hear that they're committed to release a working MMU product (this time around), it's apparent there was no pre-study to speak of done on the MMU3 readiness for the MK4 before it was launched.
Back to waiting. Guess I'll do the MK3->MK4 rebuild anyways in the mean time.
Any chance of seeing the details?
An update has been prepended to the article. The email includes an additional picture but is otherwise identical (picture showcases a red-white-black sneaker from a well known brand, 3D printed, presumably with the MMU3).
The nextruder main plate is a printable part. If you have a spool of prusament or even generic PETG then you can print a new one even with the worn out part still installed in the printer. You would just have to manually load the filament first to ensure it's loaded correctly. So that's nice.
However, I would like a better solution. It's not the most convienent part to replace. Though not the worst. I'm sure you can use a more wear resistant printable material than PETG. Ship the most wear resistant part you can with the MMU3, and if I do need to replace it with a home printed one then I can.
Canceling my order hurts my soul because I am a great friend of the open source community. I am also prepared to wait a long time for the delivery of a product. But I cannot support your business practices. You don't seem to care about the customers who don't switch to Bambu lab. Otherwise you would give regular updates on the development of the MMU3 for the MK4. Instead, you take forever, postpone and postpone and do not respond to customer inquiries. You are more expensive than average. This should not happen. I really regret my purchase of the MK4. I will sell it and switch to Bambu Lab. Sorry prusa, but you could have avoided this.
Thanks for the update, that was last-minute!
" It’s possible this part will be treated as a consumable, requiring replacement every few months."
Look like you should have this part cast in metal, I mean….. The right thing to do by your customers is to have the part cast in metal.
The oops this is a flaw in design, lets just say its consumable is a cop out solution.
If you do right by your loyal customers, they will come back to shop. If you don't, you wont have to worry about them in the future.
That is what we all expect from Prusa, and their constant emphasis on a solid quality product requires just that, not something half-baked like the need to keep reliability up by changing a non-consumable part every few months.
I guess they'll redesign the main plate to reduce wear, perhaps printing it in a more durable material than PETG. Metal will be too expensive. It would unfortunately also most probably kill input shaping as they skimped on the accelerometer on the loveboard.
HEADS UP
If you ordered other items, and split your order, Prusa is trying to keep **all** the shipping. Despite the fact that they charged more to have the MMU3 shipped. In today's shipping cost, it would be an $18 difference in shipping between the items alone and the items plus the MMU3.
When I brought this up to chat — no joke — they stated, "I believe you have received a $50 voucher on top oft he option to split the order"
Escalating to email support; next will be my credit card company.
I used to love Prusa, but they're really dropped the ball.
My calculations (admittedly might be wrong) show it was $25 extra to have the MMU3 shipped. My invoice is for $324.53 — $329 – $25.53 for shipping – $30 pre-existing credit.
This company is so frustrating now.
Dear Prusa3D Team,
I just wanted to take a moment to express my appreciation for your hard work on the development of MMU3. I understand that great things take time, and I'm more than willing to wait for the next two months for the completion of this project.
However, regular updates on the progress would be greatly appreciated. It's always exciting to see the journey of a project and not just the end result.
Keep up the good work!
I have been printing with a highly modified spool slack technique on my MMU3 on a MK3s for a few years now. I keep thinking Prusa will come up with something better buy it looks like they haven't so maybe I should post mine. It is made up some of the Prusa parts and some modified.
Where should I post my design?
Hi,
I am a bit puzzled by the following comment:
"we want to clearly state that only PLA and PETG are the materials we have extensively tested and officially support".
What about BVOH and PVA for soluble supports?
One of the (main) purpose of having a MMU is to be able to use soluble supports. It was even advertised like that and when I bought mine a few years ago and I remember a statement by Prusa on the fact BVOH and PVA were tested and worked with the MMU (it is still stated like that on the BVOH Verbatim eshop page).
If BVOH and PVA are not tested/supported by the MMU3 this is a loss and a drawback compared to MMU2 and users should be made aware.
Thanks
Face it, Prusa is now just a bunch of liars. Probably on the bink of bankruptcy based on thestock levels in the online store. Just check out how many items in the store are "out of stock". SUch a shame, they had good potential, but this latest MMU3 situation is just ridiculous.
While I'm happy to finally have a date (hopefully sticking to it to this time) I think I'm switching to bambu. I love my mk4 and I used my mk2 for 1000s of hours of print time but this has soured my experience so bad and I lost of bit of money waiting for this MMU3. Wish you would have gave more frequent updates. Hopefully you do better in the future. I still plan on using my mk4 MMU3 but will look elsewhere for new stuff in the future if this practice continues.
I really hope that PVA/BVOH filament will work with the MMU3/MK4. Otherwise, I fear the MK4 was not the right printer to buy. With the discontinuation of the MK3 series, the only option for using soluble supports will be the XL, if I'm not mistaken. If that's the case, I should have saved the money so I could have bought an XL instead. (Yes, it is much more expensive, but you get a lot for the money, so I wouldn't mind *that* much.)
In any case, knowing Prusa, I expect them to continue working on the problem and add/improve support for soluble filaments in the future. Fingers crossed.
An official statement about soluble filament support would be greatly appreciated!
Now that the MMU3 to xBuddy cable is listed for sale, what else is required to get the MMU3 working with the MK4 (xBuddy)?
https://www.prusa3d.com/en/product/mmu3-printer-cable-xbuddy/
When will the 3D printed part of the connection cable passage between the MMU3 and the xBuddy card be released?
Daniel
The MK4 upgrade is really, really good. I've not had any problems. I'm sure the MMU3 upgrade will be the same quality. I just can't wait.
It has been more than a month since the last update of this post. I would like to see more frequent updates from Prusa Research. Any tiny bit of new information will make the wait more bearable.
An update has been posted on Prusa's shipping information page:
"Update 8th March: At the beginning of March, we completed the development of the production version of the MMU3 for the MK4, and we shipped the final units to external beta testers for the last round of testing. This round will end in mid-March, and we do not anticipate any significant findings or changes. We will begin shipping the first MMU3 units for the MK4 by the end of March. In the first half of April, we will also start shipping the MMU2->MMU3 upgrades for the MK4."
https://help.prusa3d.com/article/shipping-information_2297
I have a MK4 and I bought an MMU3 when you advertised as compatible with MK4(before updating your web-site), I mounted but I understand you need to re-design the extruder approach for MK4 and the firmware. When you have the MMU3 ready for MK4, besides firmware upgrade would be there a package for the extruder parts?
Same! A detailed instruction for upgrading from the MMU3 for the MK3S+ to the MMU3 for MK4 would be helpful.
It's a major blow that only PLA and PETG are to be officially supported. One wonders what the testers were doing over the last 9 months. Why not test ASA, PC Blend, PVB, PVA, HIPS, BVOH? My own use-case for the MMU3 involves using it to print objects with dissimilar-material supports, including solubles. Because so many of them make a mess and cling to the object too much, making them difficult to remove and cause damage to the object. No everyone can justify the price of an XL Model, and certainly not in a small commercial operation.
Hello, I own a MK3S MMU3, and I bought the MK4 upgrade, thinking my MMU3 unit would work on the MK4.
I just saw that it was not.
So, I would like to know if somebody is able to propose a guide of the peices I have to print, the pieces I have to buy, and the process to upgrade my printer (which is now only a MK4 without MMU3).
It would be great for me, especially because I am a professional 3D printer who is sometimes asked for color printed pieces.
Thank in advance,
Same situation here. I bought the MMU3 first, installed it on the MK3S+, and then bought the MK4 upgrade – which is still sitting in the corner. Will they clarify which steps one has to take to get the MMU3/MK4 starting from MMU3/MKS3+?
Soooo…. Its March 25 and it was said shipping of MMU3/Mk4 would start at the end of March. But we see no update confirming that date. Is there a big queue of units to be sent out, or will all the orders ship on one day ?
Then We have the open question of those who built MMU3 for Mk3S+ and then upgraded their MK3S+ to a mk4. The wiring kit that's needed is available for ordering (I got mine), but what about plastic or hardware parts needed for the Nextruder. Are they a "print yourself" item or are they somehow to be made available for purchase too ? If its print yourself, when will the model files be released, and what material must be used.?
So, lots of questions, surely it's time now for an update information release to answer all the questions and keep everyone happy.
I was just told by support the shipping has been moved to April. I suggested they update the blog more than every 3 months. I suspect in April, we'll be told May.
So I reached out to the support that told me that printed parts will be released by the start of the production. Since the parts aren't online yet they haven't even started with the production. I guess that will result in another delay. Maybe it will arrive someday…
So that March thing came and went.
Looking forward to an update.
As stated in this update, we started shipping the MMU3 units last week. We've posted small update on Twitter when first units left the factory. 😉
I purchased the MMU3 to go with my MK3S+ and then upgraded my S+ to an MK4. I was surprised to find out that the MK4 will not work with the MMU3 as it states on the purchase page. I read the blog…today is the last day of March. Am I missing something???
I also see in the MMU3 upgrade that there are instructions for using it with the MK4, but the printable parts are not available. (I have purchased the cable to connect the MMU3 to the Buddy box.)
So, um, the end of March is now in the past..
I've been reading bits and pieces elsewhere and I'd love to see a major new blog entry about MMU3 and MK4. What were all the design decisions around the new nextruder assembly and filament sensor? What does the O-ring do? Was filament dust getting places it shouldn't have gone? Will the new main plate and other parts ship standard with newer MK4s in the future? Will you keep making the main plate with MJF, or is that temporary before you get them injection molded? And, of course, can't wait for a table to appear in the shipping info page so I can guess when my MMU3 might ship.
It is now April 2. Online you claim to start shipping by the end of March……
Are MMU3s for MK4s shipping? Or did you mean March 2025?
I have all the parts to get my MK3 to an MK4 but have been holding off for 4 months as I want to update my MMU as well. Getting a little frustrated……
So, i have just contacted Prusa and they have answered some of our questions:
The new MJF main plate for the moment is only for the MMU3 – for the MK4 there will still be the regular PETG main plate until further notice
we started shipping the first units last week. we will observe the trend of the shipments for a week or so, then we should be able to calculate and publish the lead time.
The new print files for the MMU3 + MK4 are not published yet and spare parts are always publish some time after the full units ship
And again you fucked your customers!
You are really great in promising things you are not able to hold!
There was a reply above, stating they started shipping last week, If this is true, a short update in this blog and also in the shop item description for the MMU3 MK4 update would be highly appreciated.
I still own a MK3S+ and upgraded my MMU2S to MMU3 and i am amazed how flawless multicolor printing is working now. But i found no information what to do, if i do the MK3S+ to MK4 upgrade now. Do i have to buy the MMU3 upgrade for MK4 also? Or are there some self-print parts to change? Please provide also an upgrade path for this situation.
Waiting to hear about upgrade parts for my MMU3 that I got for my i3 MK3S+ that has now been upgraded to a MK4. What will I need? Cable purchased and installed. Shows needs firmware update, will do that tonight and see. Anything else, or do I have to purchase a MMU3 specifically for my"MK4"now?
According to the agent in the chat, the parts for the MMU to MK4 will be available next week. I found the release candidate firmware on Github, but the new MK4 update says there non PETG parts (no other description) for the Nextruder.
The MK4 MMU3's are shipping. I received the shipment email and tracking information 2 days ago.
When do you ordered your MMU3?
Now that MMU3's are shipping what's the update on the Nextruder main plate? Is that a consumable piece?
Same situation here, seems like there is more than only the main plate… Idler must be changed too.
see building steps in the manual:
https://help.prusa3d.com/guide/9a-mk4-nextruder-mod_683106#684159
"Update 2nd April 2024: We sent the first MMU3 units to customers during the last week of March 2024. We are currently working on a shipping table for all current orders. We will update this article with the table by the end of this week."
Welp, that last part is now officially a lie…
I guess we can be happy that they at least started shipping…
As Mikolas answered me above, they're now shipping 'new' MMU3 units since March, but not yet upgrades, which I believe most of us are waiting for.
So according to the shipping information page, they're about to start shipping the upgrade kits on 2024-04-15. See this page for shipping estimates depending on order dates:
https://help.prusa3d.com/article/shipping-information_2297
I cannot find any information on how they've solved the outstanding issues mentioned in the last update. Anyone?
any packages out there yet for nextruder upgrade on MK3.9/4 with new parts for filament detection on MMU3? the parts are downloadable, but they recommend pc like material
Dear Prusa,
The only profile available in Prusaslicer for MK4/MMU3 is still the 0.4 nozzle. No single mode, no other nozzles, just PLA and PETG allowed. This is not multi-material, it is just multi-colour.
Can you give any estimate of when this will improve?
I bought an MK4 upgrade for my MKS3+/MMU3 six months ago already. When will it make sense to install it?
You don't need single mode anymore. Just slice it with regular MK4 profile (non-MMU), printer will recognize it and let you choose the slot to print with.
Thanks for the info, I was not aware of that!
To be sure: this means that I can use one of the just-MK4 profiles to slice with the allowed nozzle sizes (for example I have 0.25 and 0.6), and I can slice in MMU mode with the 0.4 nozzle.
Still, I cannot slice in MMU mode with the 0.25 or 0.6 nozzle (i.e. I cannot have multicolour with those nozzles), which used to be possible with MKS3+/MMU.
So, I printed the parts with PCCF. then ordered the longer screws, then ordered the small magnet, now I am concerned about the o-ring. I have one that is close, but until I get the magnets in two days I won't be certain. I am beginning to think I should not have gone away from the MK3s+ and MMU3. I like the MK4, but the hassle with the MMU, and lack of information is changing my view of Prusa. (This blog is still stuck on January!)
Finally! I guess my sourced parts will become backups.
Hi guys, just a short question about how the handling is if you like to print with the MMU3 attached on the MK4.
Is that correct that you can swap the print profile to the MK4 Version with IS as example. Then slice and send to the printer. Will the MK4 ask you which Filament path on the MMU3 you like to use or how is the procedure ? Thanks for your reply on this.