Time for another update. We are happily growing to fulfill all the orders as soon as possible. We now have 220 people and by the beginning of April we should have the lead time for MK3s close to zero! 7799 is already shipped, I am thrilled. You can already build and use MK3 in English, Czech, Italian, Polish, Spanish, German and French as we translated assembly instructions and handbooks. With upcoming Japanese, the MK3 will truly be an international printer. We are also getting ready to launch our own inhouse manufactured filament, but more on that in a later article 😉
MK3
We have a new firmware 3.1.2. It fixes and improves a few more things over 3.1.1 which already had an extensive amount of fixes and usability tweaks I wrote about in Original Prusa i3 MK3 after 2 months article. You definitely want to upgrade to the latest firmware now! Upgrading is quite easy – just follow this guide…
We found a bug that caused under extrusion when using low layer heights (50 and 100 um) or tiny details together with extrusion multiplier (we use it in our drivers package). A rounding error while calculating the extruder flow was the culprit.
The second improvement is precise homing. Homing X and Y axes with Trinamic StallGuard can be inaccurate in the precision we need. Re-homing when crash or power panic is detecting can cause an offset of the layers in the print which many people explain as “layer shift”. We found a way around this with a quick calibration. After the upgrade to 3.1.2 firmware, the self-test will run automatically to enable this feature.
Upcoming firmware 3.2.0 RC1 approx. in the second week of March will reintroduce Linear Advance and it will also bring linearity correction for the MK3 extruder. The idea behind it is that stepper motor with micro stepping doesn’t always move linearly but pulsates as it moves between the steps. This can create sort of moire effect on the object surface. New Trinamic drivers we use on the MK3 can be adjusted to compensate this effect.
We updated a few printable parts and tweaked assembly manual. I would suggest to reprint (in PETG or ABS) and upgrade the heatbed cable cover and remove the spiral wrap. Other changes are nice to have but if you already have a fully assembled and working printer I do not think it is worth it as they just make for an easier assembly.
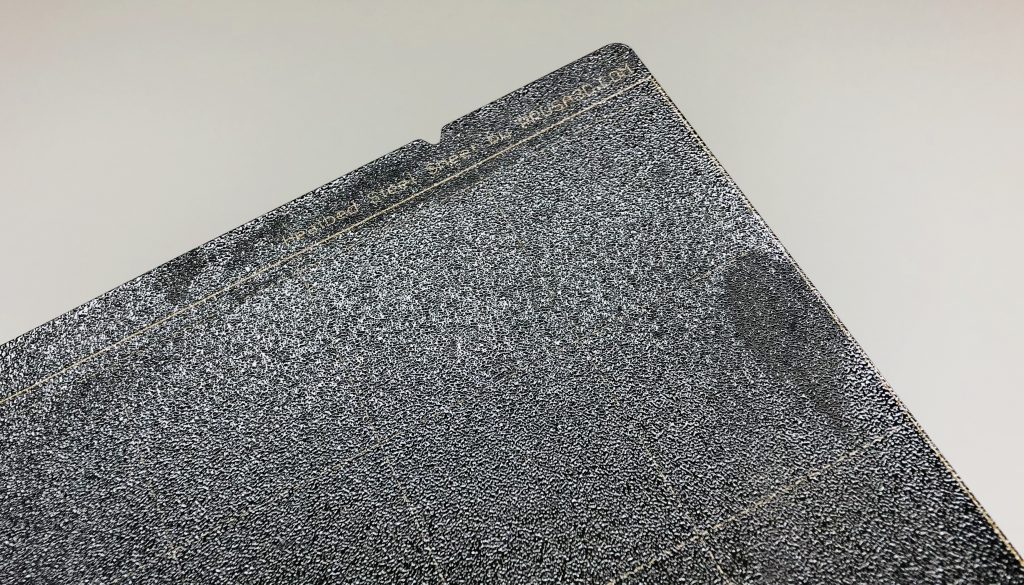
Powder coated steel sheets
We still have mixed luck, the yield is very small to even think about using it for all of our production. That means MK2.5 and MK3 upgrade kits are going out with Smooth PEI and same deal with $10 and free shipping voucher for sheets when they are available. I don’t want to promise any dates again, as we got burned two times already, but it will be at least a month.
For new orders you have to select which sheet version you want. Smooth with faster shipping or textured with additional delay. No vouchers will be issued for new orders.
MK3 upgrades
Starts shipping on 5th of March.
MK2.5 upgrades
Starts shipping on 5th of March.
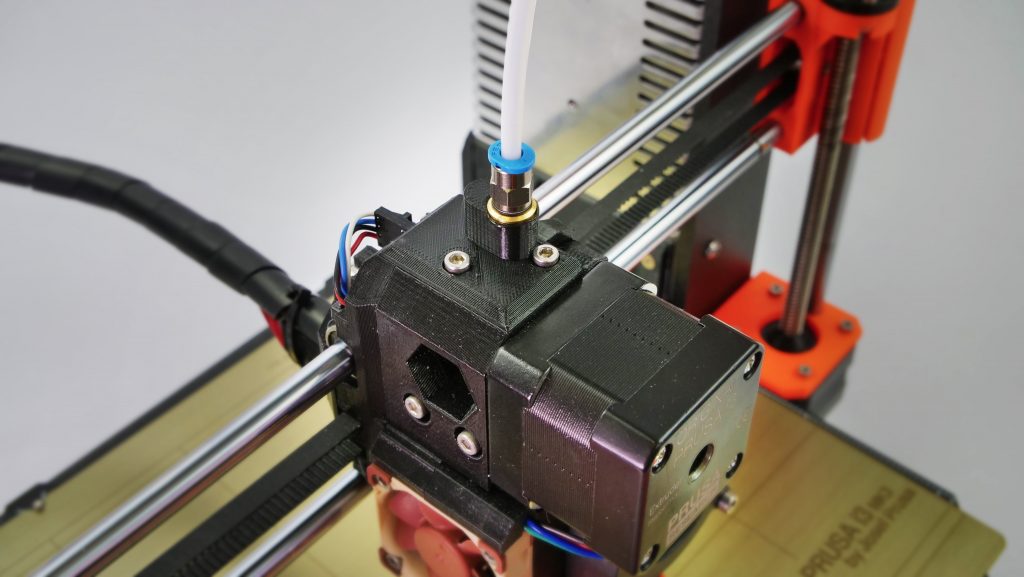
We received a bad batch of the heatbed PCBs and doing rework on those caused additional delay. I am very sorry for the delay, we used the time to tweak MK3 firmware which is a base for MK2.5 one. There’s a long backlog of them but we expect to ship them all by the end of May. One more note, there was an option to choose a color during the order but as only the extruder body and the x-carriage get reprinted, all the upgrades are shipped with black PETG. The extruder body requires black material to block infrared light from reaching the filament sensor.
Multi Material 2.0 for MK3 and MK2.5
I have some bad news you will actually really like.
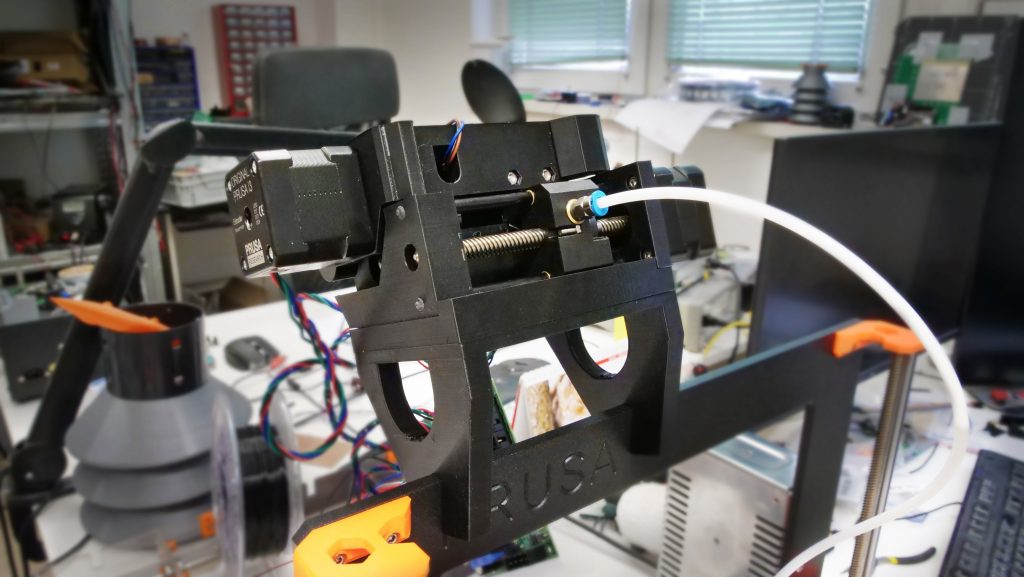
In short, the new Multi Material upgrade is delayed until the beginning of May. We ported the same Multi Material as we have for MK2, but we were actually developing an alternative system which we like a lot more and I chose to use that one instead. We, however, need a little bit more time for manufacturing some of the parts.
- It is not a bowden anymore! but a hybrid system with actual extruder motor directly at the X carriage.
- Can print 5 materials instead of just 4.
- Removes the Y splitter from the old multimaterial where many people experienced jams.
- It is much simpler and it is not as filament quality picky!
- It can be quickly mounted and dismounted from the printer if you want to use the MMU just occasionally.
- It is cheaper. All current orders will get a voucher for the difference or partial refund and existing orders of Multi Material upgrade kit – from MK2 to MK2.5/MK3 will receive version 2.0 even that it will be more expensive. We’ll announce new prices during next week.
If you ordered MK3 and MK3 MMU together already, you can ask for a free split of the order so you can use your MK3 asap.
Slic3r PE
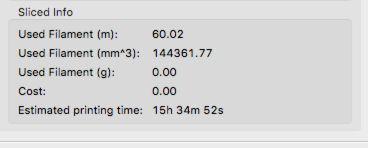
We have new drivers with Slic3r PE 1.39.1 which brings very accurate print time estimation. In our tests, the average error was way below 5%. After you export G-code, print time estimate will appear in the bottom right infobox.
We are also adding settings for MK3 with 0.25mm and 0.6mm nozzles.
We are also finishing a rewrite of the MMU smart wipe tower which will enable using the waste material as an infill 😉
Happy printing!


Are there any advantages to the textured plates? I don’t mind waiting but if they have the same performance I won’t bother waiting.
I’ve been printing happily with the PEI covered plate on mk3, and with a PEI covered buildplate on mk2. I’m quite satisfied with the performance.
However…
As I see it, there are a few differences with the textured plates:
1.. Small defects in the plate becomes hidden (this is cosmetic)
If I understand it correctly, then the structure of the first layer becomes more or less hidden. Also scratches in the PEI sheet, which are clearly visible in prints from a smooth PEI sheet will be more hidden.
2. First layer adhesion
Due to the structured surface, the material will have more to grip onto, thus requiring less special handling of special materials. The removable build plate should still make it easy to remove prints with the flexing.
3. Using tools on the build plate
Even if you resort to using tools on the build plate and scratch it, scratches should not have too great impact on adhesion, due to the fact that the tool won’t scratch the whole build plate, only the top of the structured plate.
Other than those, I don’t think I’ve heard about other differences, although in my opinion, it is enough.
I’ve opted for the PEI sheet covered plate, and it’s doing nicely. I will get a few powder coated textured ones when they become available. I don’t see much reason for getting the smooth coated plate, when I’ve got the PEI sheet covered version, but maybe someone else has an insight into this.
“Powder coating directly on metal makes it very hard to damage this build plate. If a heated nozzle crashed into it, the metal can dissipate the heat. Powder coating also gives the surface a distinct textured look that will be visible on your prints.
The textured surface hides most of the mechanical damage caused by tools. Only the top of the small bumps can be scratched, which will not imprint on the bottom of the model.”
Thanks for the update Joseph. I look forward to receiving my MK2.5 upgrade. I’ve not yet done the MK2S upgrade that I bought a while ago because I thought I’d do it all in one go. I also have the MMU upgrade components built up (again quite a while ago) but not installed because there seemed to be a lot of patience required and I needed to keep my machine working for my design business. I guess the best thing for me to do is put that in a box and hide it away in a cupboard and just order the new version! As soon as you have worked out the pricing, I’ll place a new order. Keep up the good work at Prusa Research – having my Prusa i3 MK2 has been very beneficial to my work and I really appreciate you developing it.
Very best regards,
Adrian
What if we have a MK2S with the MMU? Will the new MMU 2.0 be compatible with the MK2S? Or are we stuck with the jamming issues?
I’d also love to know this!
Nice!
This sounds awesome! I’m looking forward for more details on the MMU 2.0 for MK3; specifically, I’d really like to know some rough information about the dimensions of the upgrade, and if it is possible to mount the filament spools on top of the printer when using the upgrade. I’m designing an enclosure for my MK3 and I’d like to leave enough room in it for the MMU.
“by the beginning of April we should have the lead time for MK3s close to zero” and at the same time you move my ETA from mid of March to beginning of April? I fell a little bit pranked …
Im in the same window. Feel so sad and teased. I just can not wait to get my mk3
Excuse the dumb question, but my printer was supposed to ship the 26, and seam to have been delay. i guess that won’t mean i will have the new part does it ? It seam to short to be able to be.
“Time for another update. We are happily growing to fulfill all the orders as soon as possible. We now have 220 people and by the beginning of April we should have the lead time for MK3s close to zero! 7799 is already shipped, I am thrilled. ”
Great update, but any word on why kit orders have been delayed an additional 2 weeks? I know a lot of people waited months, but two weeks ago I had a March 19th estimated ship date for a MK3 kit, now it’s starting April 2nd.
Sound good for a solution where the change of filament does not include moving back hot filament NICE
Can we have our not working MMU exchanged for free then?
If I were to guess, I’d say the top left stepper motor drives the filament into the single feed tube based on either a series of solenoids, or a simple transmission that is driven by the right stepper motor such that it would only drive one source at a time. The right stepper motor moves the feed tube and the drive gear/transmission so it is in front of the filament source you want (one of five). This gets the filament of choice into the feed tube which gets it to the main extruder motor on the x-axis. I wonder if the upper feed motor can disengage once the extruder motor has “taken over” or if the feeds are somehow synchronized (both push and pull).
Seems like a good idea.
Is it only the wipe tower waste that will be used as infill and not the purge block waste? It might be nice to give the option to use purge block waste as infill or even inner walls or layers.
Waste material as infill is a pretty brilliant idea! Keep up the great work
Will those of us mk2/s owners who invested in the original MMU also get a voucher/ discount on the 2.0 model? I’d really be quite put off if I would have to spend full retail for an upgrade that obviously addresses some of the original design issues. Thanks.
Hey,
I noticed some new / different parts for the new MMU. Are these parts available for download somewhere please? I’m especially interested on that piece for metal connector for PTFE tubing sitting on the top of filament sensor cover…
Many thanks
Parts are usually made available for download a couple of weeks after dispatch starts.
Great to hear about a MMU 2.0. But what does that mean for customers who have preordered the MK2S to MK3 uprgrade along with the MMU upgrade? Will the MMU upgrade be changed also? Or will we be forced to stay with the always-clogging multiplexer setup?
As stated in the article, you will get the new MMU.
Please make estimation time appears before gcode export. I don’t want to export every time I make a change, just to see the estimation time!
This! I do not understand why this can’t be displayed when preslicing an object.
What if we’ve screwed up our spring steel sheet? I’ve torn the PEI on one side, and I’m scared to print on the other lest I screw up both sides and have nothing to print on. I’ve been waiting on the sheets to be orderable, but now it’s even longer delay?
Hi Virgil, there will be a manual, how to change the PEI sheet. No need to order entire steel sheet 😉
So I have a MMU, I have ordered both the MK2.5 and the MMU to MK2.5 Upgrade. If I read correctly I’ll get the MMU2.0.
The question is can I use the MK2.5 hotbed on the old MMU until the MMU2.0 arrives? Does it need something in the firmware or does it work just as a swap
Hi Jonne,
MK2.5 heatbed has a different layout of the calibration points for the XYZ calibration. You have to use MK2.5 firmware otherwise, the calibration won’t pass.
Great news all round!
Loving the look/sound of the new V2 MMU! It seems as though this should solve a lot of the problems people have been having, plus we get to use 5 filaments, PLUS it’s going to be cheaper!! PRUSA brings Xmas early this year! LOL!
Saving at the moment for a MK3, the will save for the MMU!
nearly every thing in my wish list, the only other idea I have is to use part of the purge for support has well as infill, fantastic job Joseph.
How about some more details on the new MMU system? The single photo gives us very little understanding of the new approach, and those of us with an engineering background would appreciate something more concrete.
The new MMU upgrade looks awesome in term of potentiality, especially the idea of using waste material as infill, but, I guess and hope that at this stage it’s a prototype.
Compared to the former solution, which was more space saving (in height) and had a professional (esthetically), this one, in my opinion, looks like an “homemade hack solution”. (Always talking about a compactness and aesthetics factor).
Nevertheless, if this is the only solution, it’s ok too. 🙂
Sounds really good and i also would kike to get details about it
Now as i orderd a mmu month ago
Please Joe give us details how it works with a video clip
Thank you
Peter
“We’ll announce new prices during next week.”
… 3+ weeks later…
How about that announcement :)? +Any additional info available for the new MMU system. IE: dimensions/layout (for enclosure purposes), etc.
Sorry for the delay. We will announce prices for MMU 2.0 after Easter holidays.
With the powder coating you might want to look into some surface activation methods like Pyrosil or corona plasma activation before coating.