


It’s always like a little puzzle to solve: it starts with a 3D object, and then you’re trying to figure out how to rotate it, where to add supports and how to configure the print settings to achieve the best possible results. This process is called slicing and it’s an essential skill to learn if you want to create amazing 3D prints.
Even though both the Original Prusa i3 3D printers and the SL1 are based on the same core concept, additive manufacturing, they produce objects in a different manner. The MK3S and its predecessors extrude melted plastic, while the SL1 cures liquid resin to create solid objects, which are in fact printed upside down. Slicing for the SL1 is different, it uses more supports than FFF/FDM 3D printers, but they are also easier to remove.
Table of contents
- Basic rules
- What affects print times
- Object orientation
- Tree supports and pads
- Manual support editing
- Printing large thin objects
- Slicing geometricaly precise models
- Hollowing 3D objects
- Object Preview
- Practice makes perfect
The basic rules
Before we dive deep into describing every step in detail, let’s take a look at the general rules you should stick to when slicing objects for SLA 3D printers.
- Learn what affects print times
- Object orientation is important
- Add supports – auto-generated or manually placed
- Consider hollowing the object
- Check the object before exporting
What affects print times?
If you own an FFF/FDM 3D printer like our MK3S, you are probably used to the fact that the complexity of the object combined with several other aspects (size, infill, layer height, nozzle diameter etc.) define how much time will be needed to finish the print. Print times of the SL1 are defined by a simple multiplication: number of layers × (exposure time + tilt time). No matter how many (and how complex) objects there are on the print platform, the exposure times are constant throughout the print – with the exception of the first ten layers, which take slightly longer to finish. In other words, printing a tall object will take less time, if you lay it flat on the printing platform. And also, it doesn’t matter whether you place a single object on the platform – or a dozen. The print time will always be the number of layers multiplied by the exposure time of a single layer.
You can also decrease the print time by increasing the layer height – thicker layers will result in a lower number of total layers per object. There’s no need to keep pushing for the lowest layer height numbers – the benefit is surprisingly small when it comes to regular “daily” 3D printing. We recommend sticking to 0.05mm layers for nicely-detailed prints and 0.1mm layers for “draft” quality (which is actually still much better than FFF/FDM 3D printers). Layer heights of 0.035 mm and 0.025 mm are meant for very intricate objects. Not every resin is suitable for every layer height – PrusaSlicer contains a library of tested resins and compatible layer heights. You can check out our selection of resins on our e-shop.
Object orientation
The first step towards a successful print is the object orientation. The SL1 can deal with massive overhangs and parts starting mid-air thanks to strong thin supports, which are easy to remove once the print finishes. So even though you won’t be able to find the perfect object orientation in every single case, the supports will have your back. There are some benefits to good object orientation, though, like shorter printing times (see chapter above).
Also, you might have noticed that SLA prints are often placed at a 45-degree angle. There are several reasons for this – some of them are technology-specific (better anti-aliasing), some of them are purely practical (tilted objects cover a larger area, so the supports under these objects are spread out more evenly). Certain manufacturers are using silicone-based films on the bottom of the tank, which requires the user to avoid printing in the same spot because the film could deteriorate very quickly. The SL1 uses an FEP film, which lasts for a much longer time – it’s still a consumable, though.
Another reason to find an optimal object orientation: we want to avoid large flat horizontal surfaces – the forces required to separate a large flat area from the bottom of the tank are much higher than those required to separate a small layer. You would have to add dozens of supports under such an area. In short: letting the objects grow gradually under an angle is usually the safest way to achieve good-looking prints. It also helps to hide the raster of the exposure screen that could, in certain cases, appear on the object’s surface. However, as you saw in the previous chapter, some objects can be placed directly on the printing platform to achieve better results. Confusing? Not really – it’s all about reviewing every object individually.
Let’s take a look at several examples of object orientation. Getting the orientation right is easy with the new PrusaSlicer 2.0 – you can use the Move, Rotate, Scale and Place on Face tools to position the object quickly and efficiently. Some objects can be moved into such an ideal position, that the supports won’t be necessary.
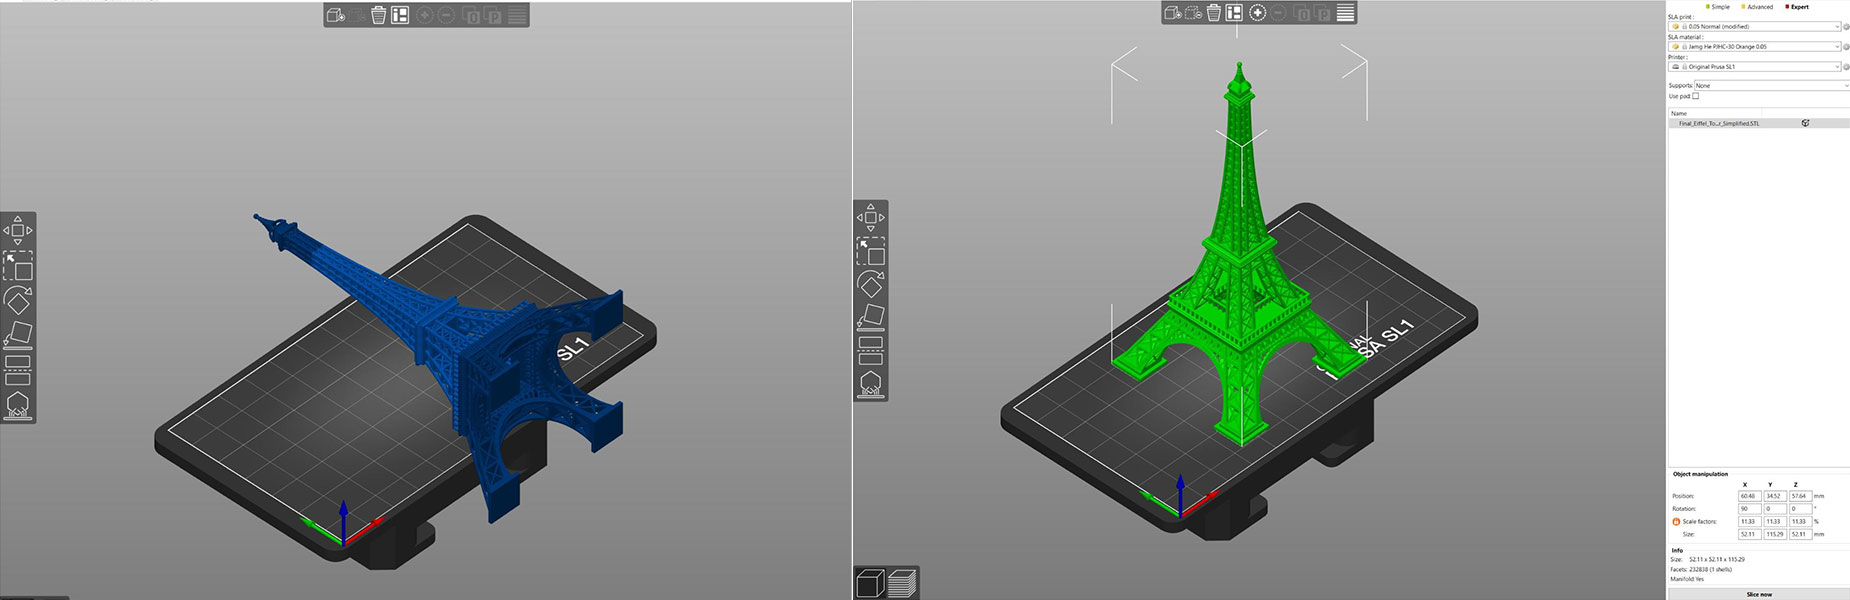
Use Place on Face to quickly place the object on the printing platform
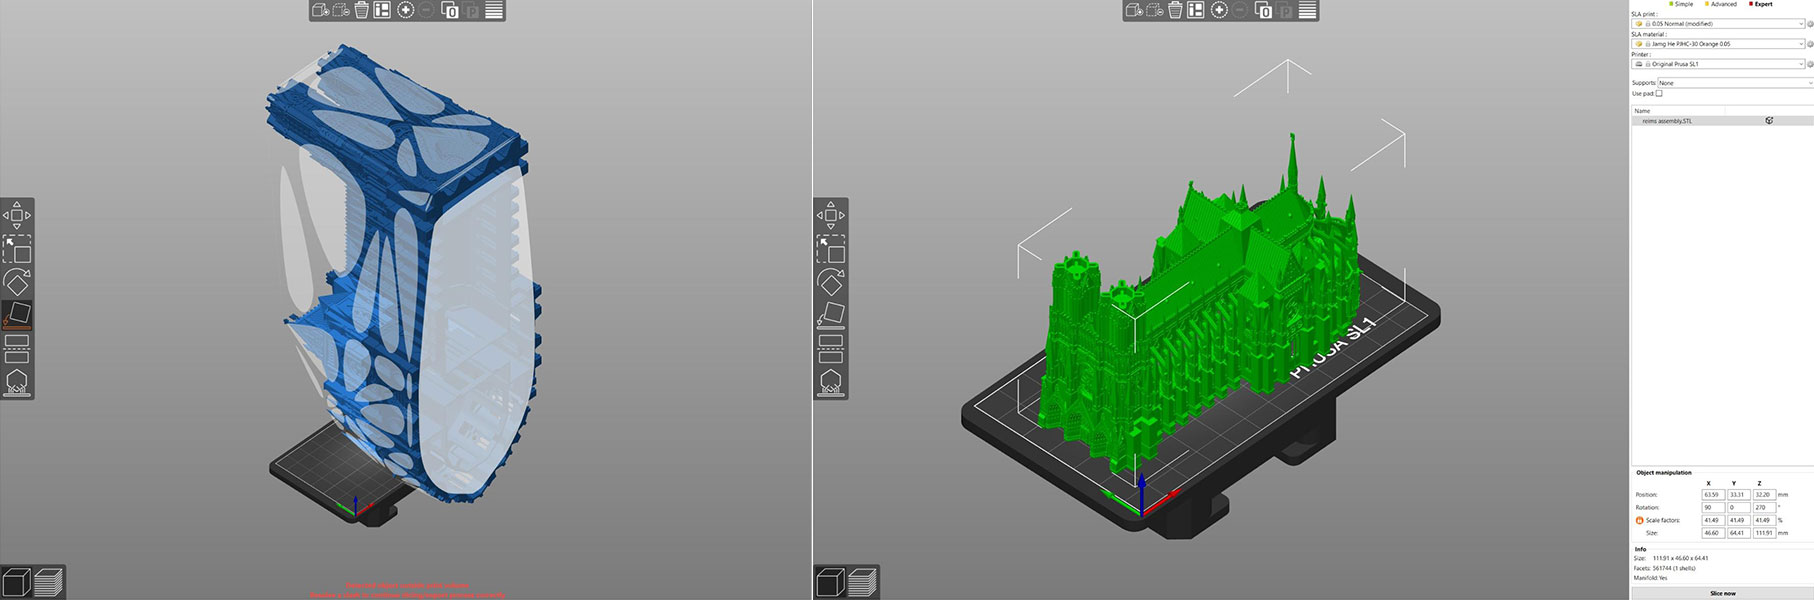
Buildings often need no supports and can be printed directly on the printing platform. Be careful when removing them, though!
However, in the majority of cases, the object will have more than a single correct orientation. This happens usually with jewelry or various statues. The rule of thumb here is to try to rotate the object in a manner that will minimize the number of spots where the object would start in mid-air. We call these spots “islands”. These areas cannot be printed without supports – and since it’s generally better to avoid using supports, we should always try to find a better orientation.
Seems simple enough, doesn’t it? Now, how to deal with objects that require supports?
Tree supports and pads
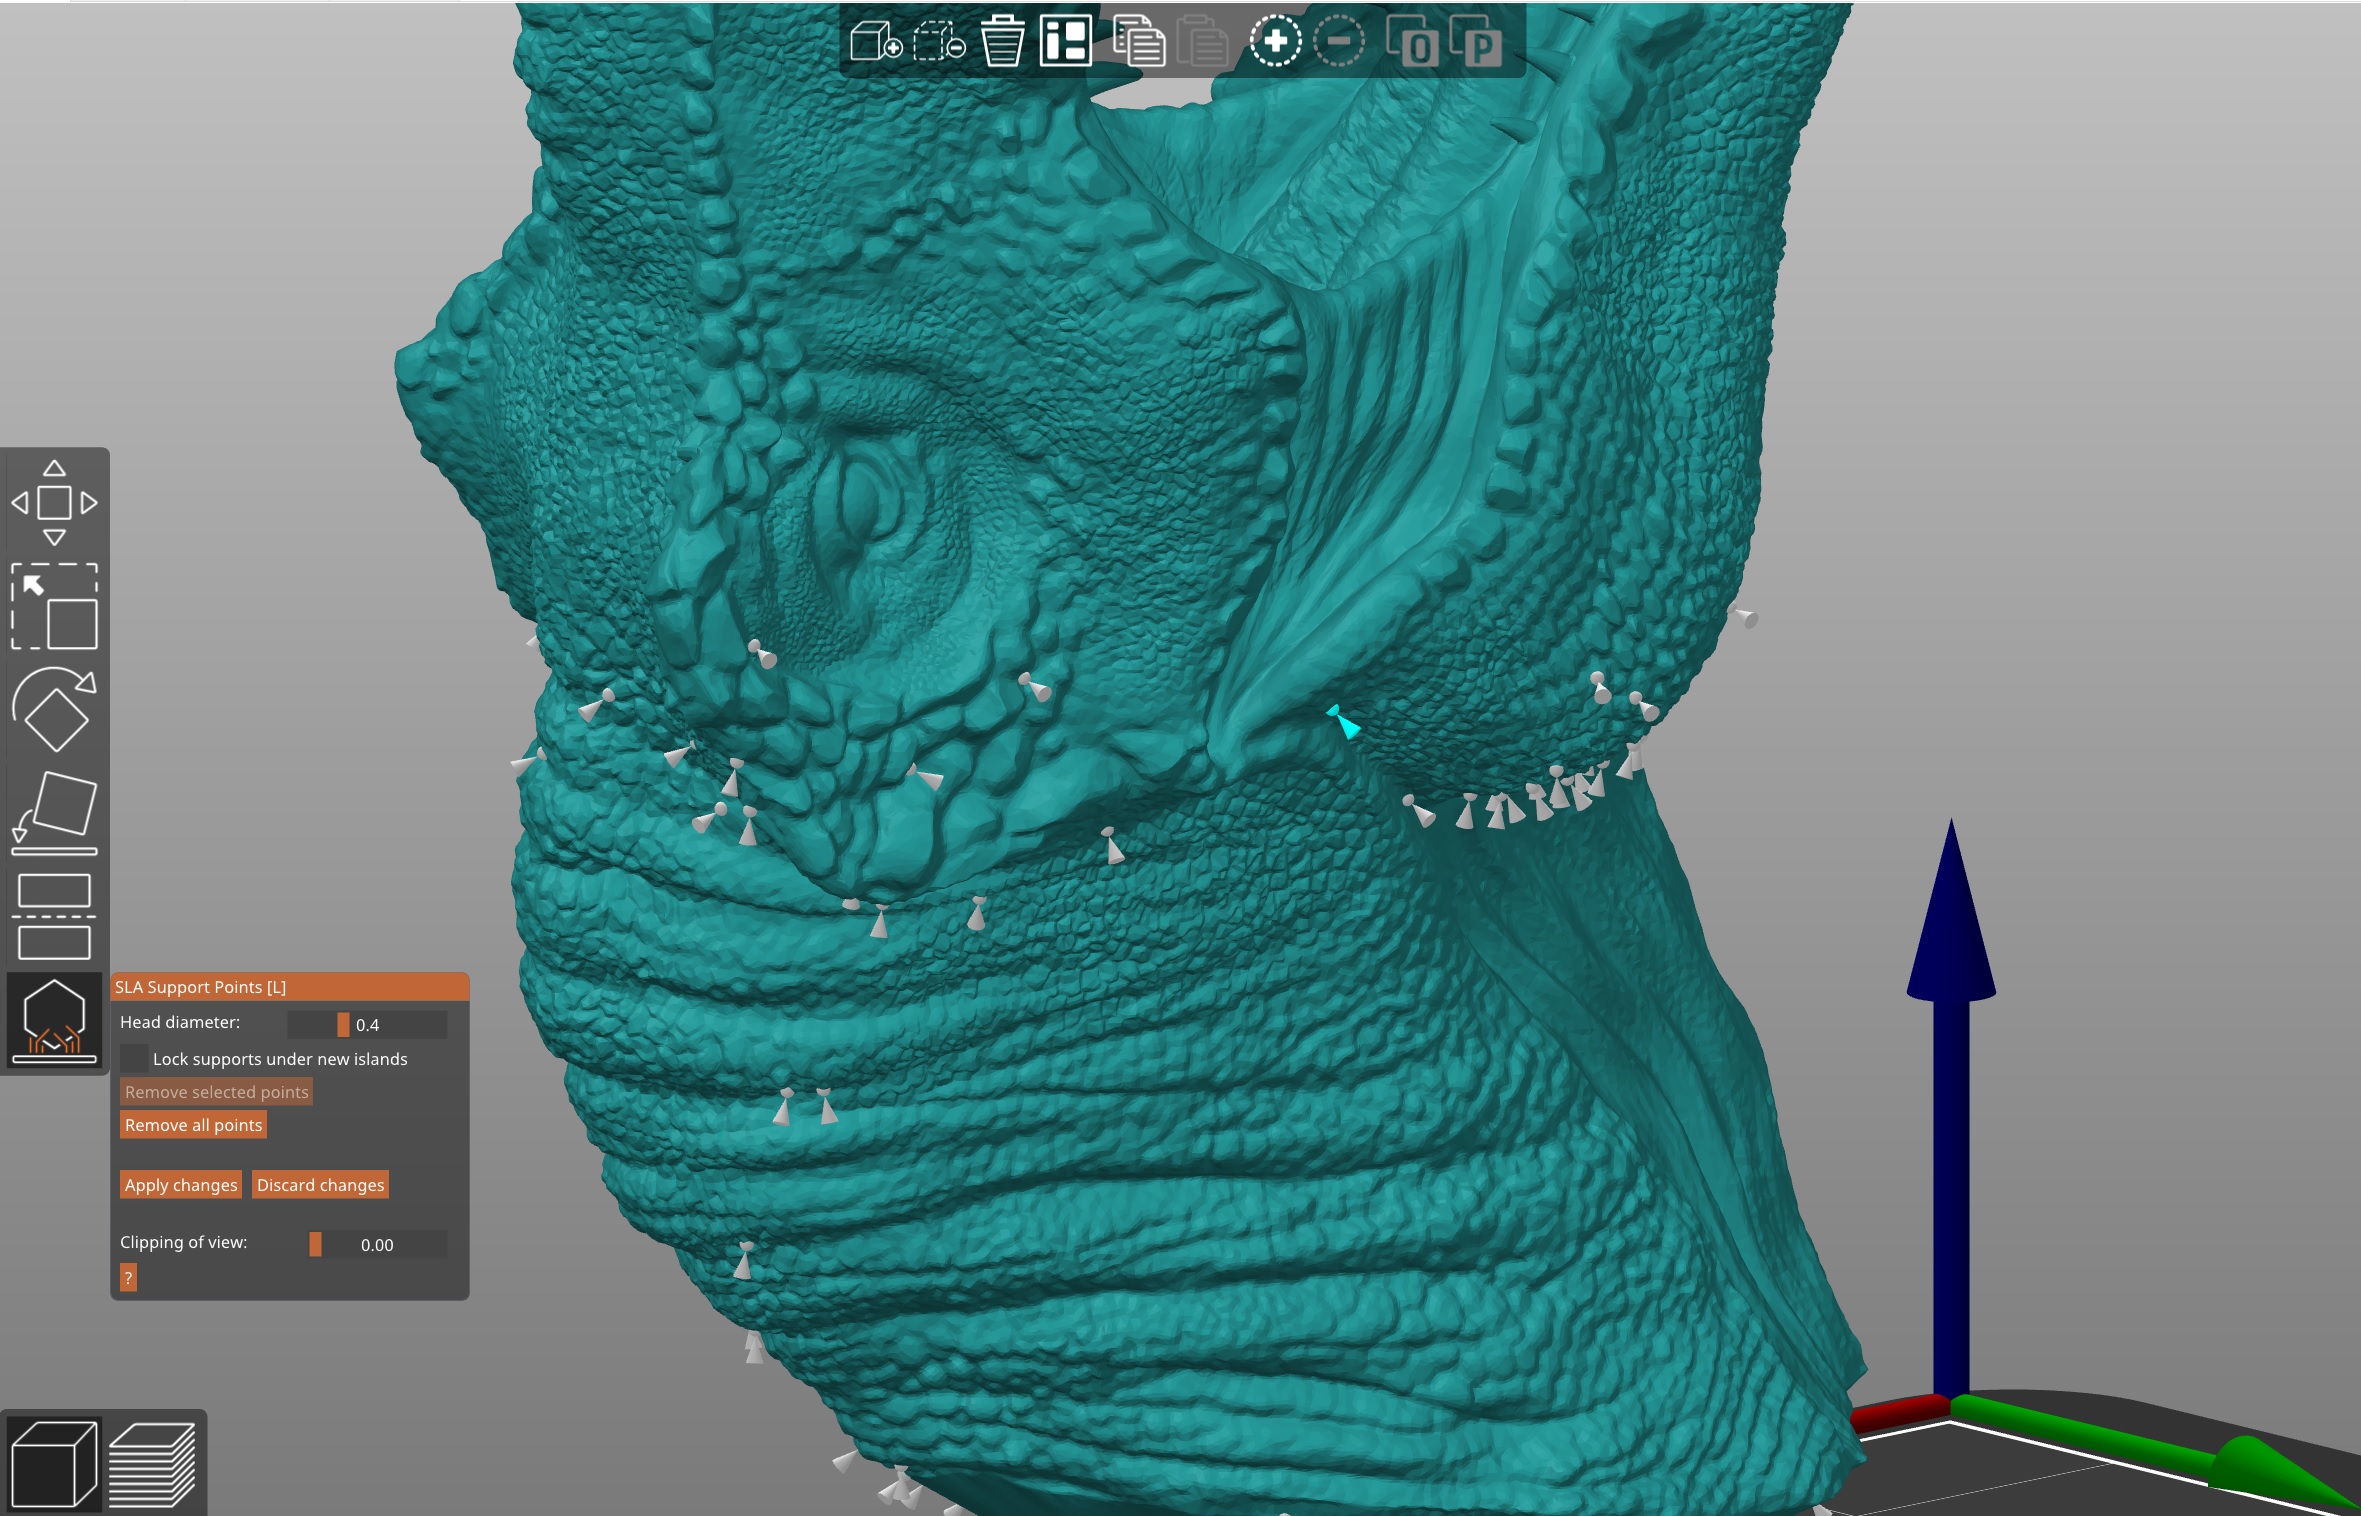
Supports for the SL1 are different than the ones for FFF/FDM 3D printers, such as the Original Prusa i3 MK3S. SLA supports are scaffolding-like structures with very thin tips, which are easy to remove and they leave little to no traces on the printed object’s surface when removed. This also means that an insufficient number of supports can lead to unwanted effects – e.g. heavy objects can detach during the print. Supports go hand in hand with object orientation – by rotating the object to an optimal position, you can minimize the need for supports. Also, keep in mind that bridging with SLA 3D printers is not recommended – the layers above unsupported area will have a tendency to bend, warp and/or separate.
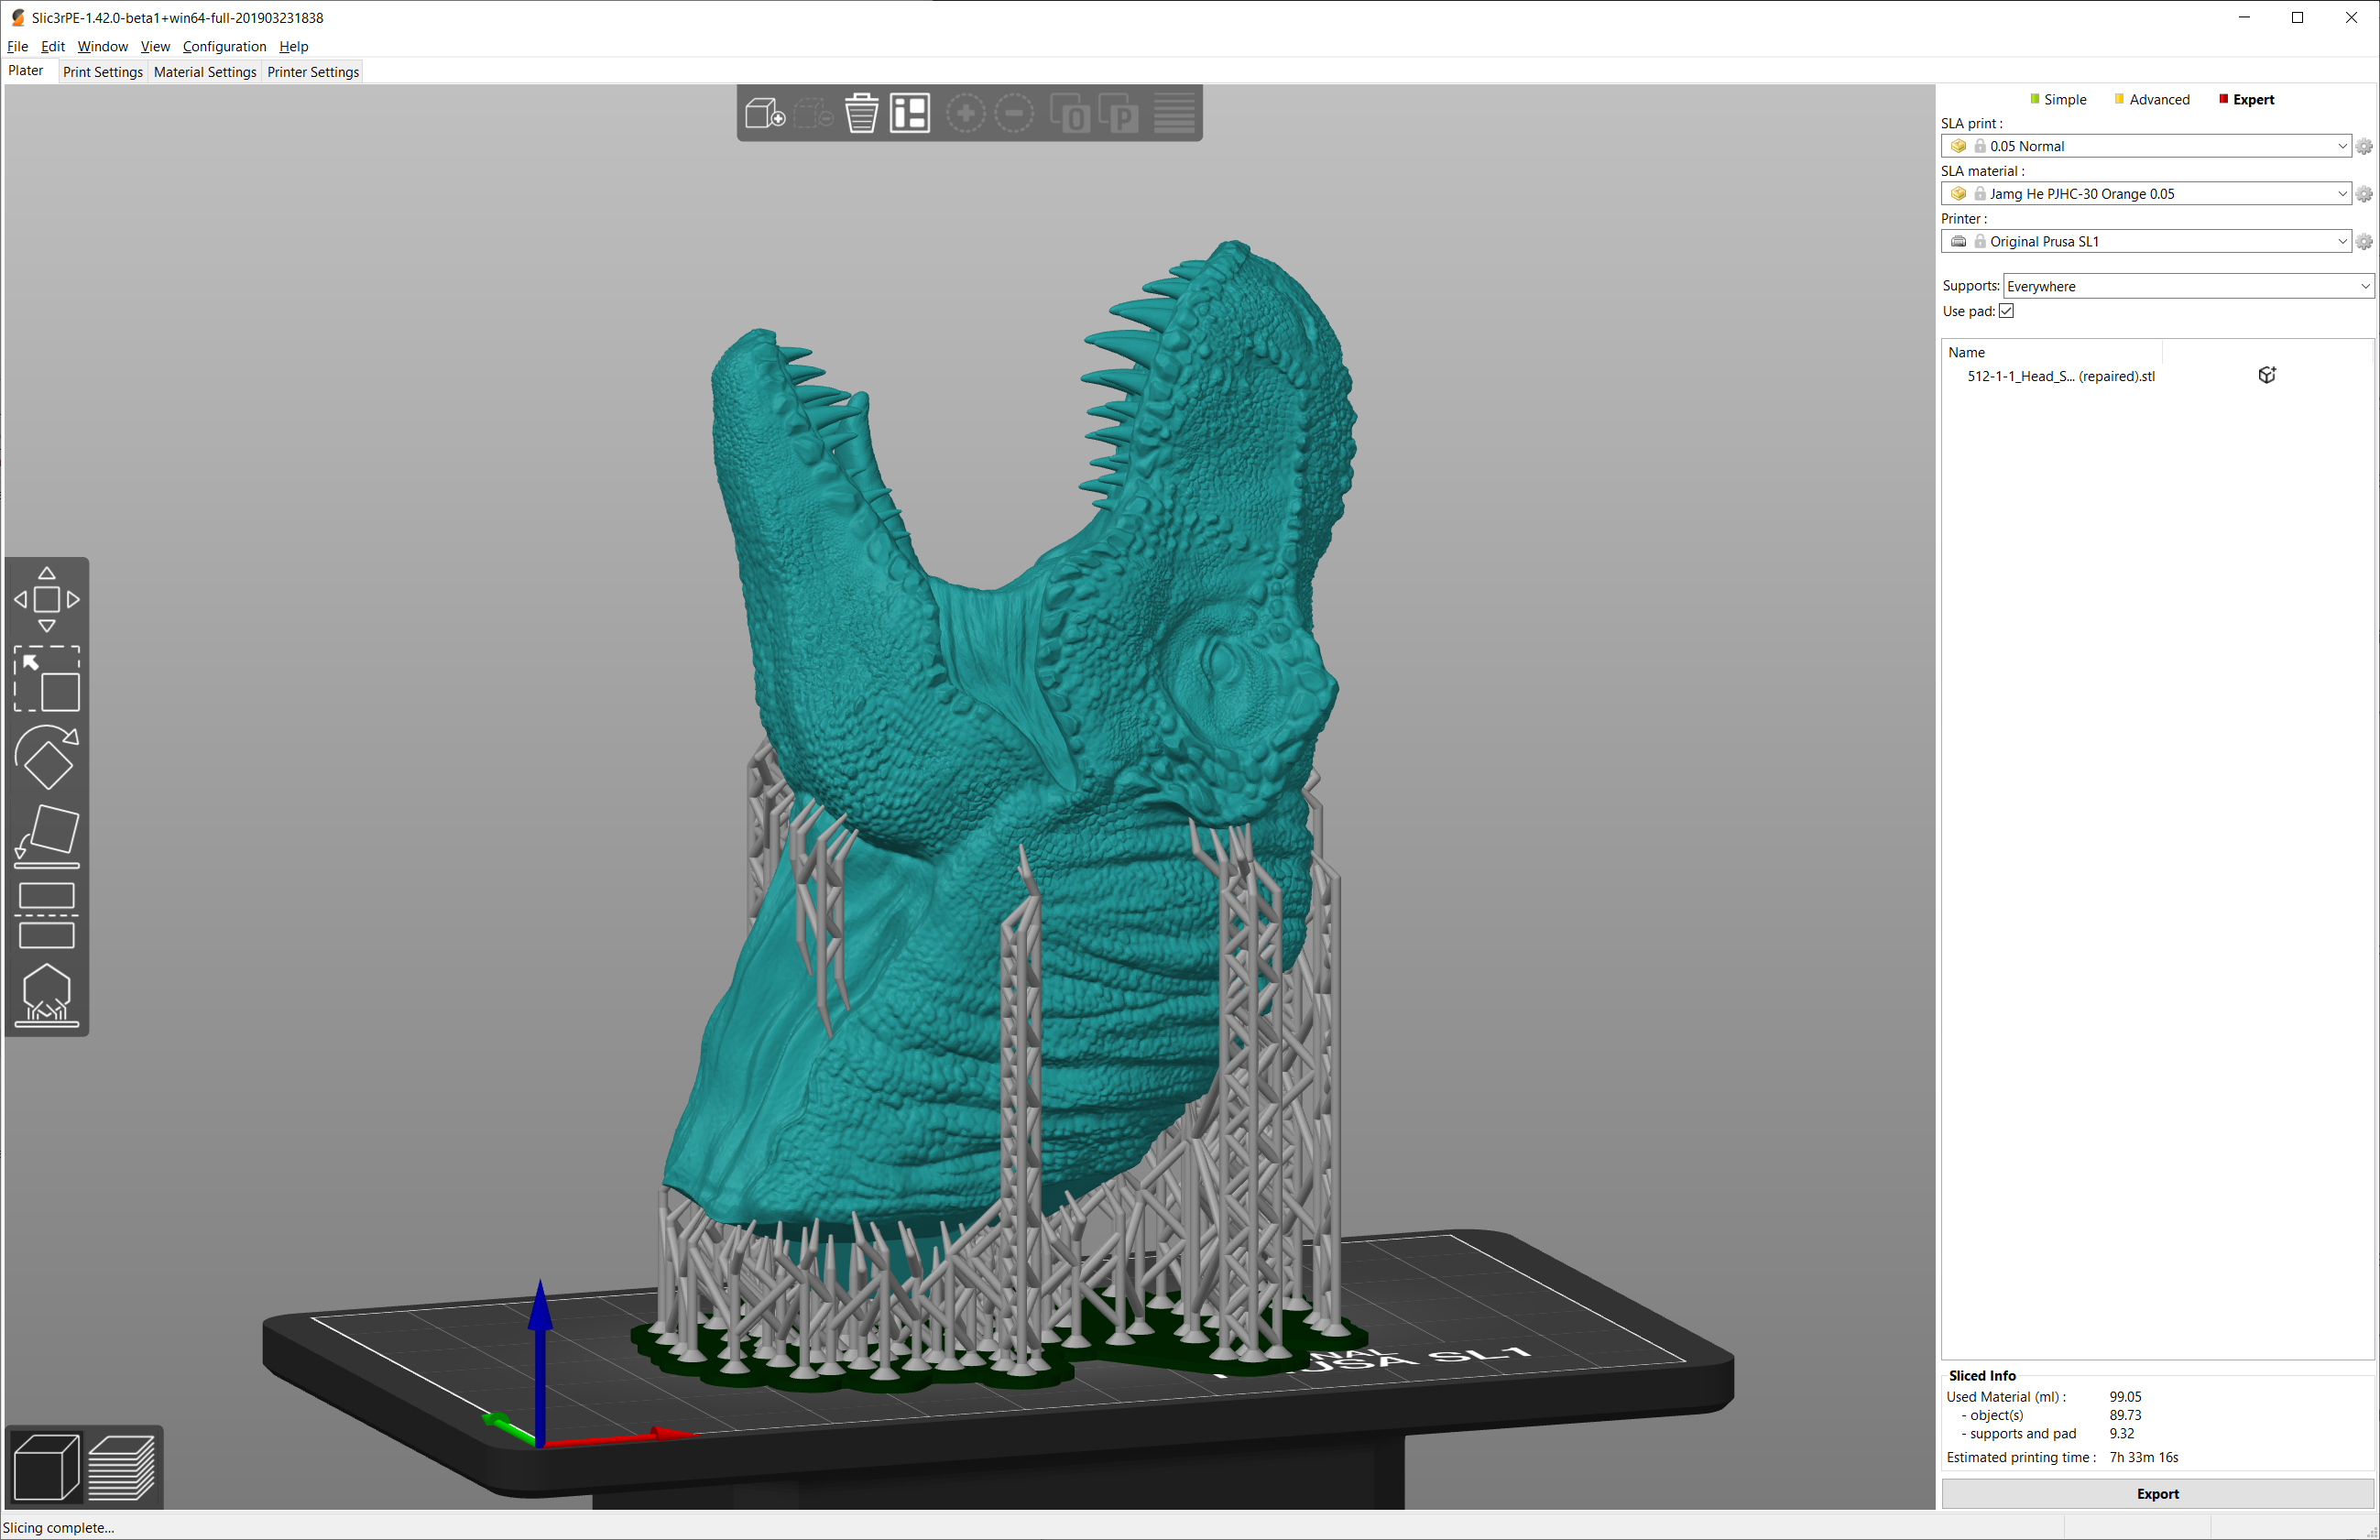
You can get rid of tons of supports if you rotate the object to an optimal position. Teeth on this T-rex head can be printed without supports
Also, keep in mind that removing the supports can leave tiny marks on the surface, so if your object has certain areas that should be completely flawless (an ornament on a piece of jewelry, face of an action figure), try to keep the supports away from them.
PrusaSlicer 2.0 is fully equipped for automatic tree support generation. How does it work?
- Select the object that requires supports
- Click the SLA support points icon
- Choose the support point density and minimal points distance (default values should work fine for a majority of objects)
- Click Auto-generate points and wait until the process is finished
- Use the Preview mode to inspect whether all “islands” are supported – if not, you can manually adjust the supports.
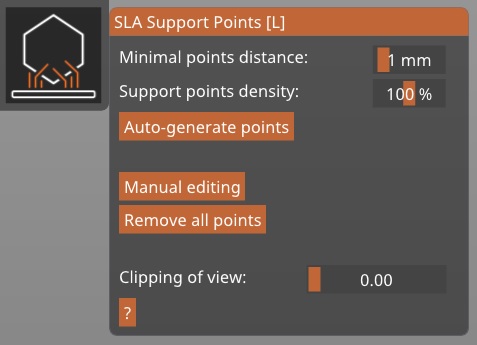
SLA Support menu in PrusaSlicer
Another thing that you should consider using is the pad. The pad (enabled by default) is a large structure at the base of the print, which serves as the foundation for the supports. While it’s possible to have supports printed directly on the aluminum printing platform, the pad will ensure much better stability.
Manual support editing
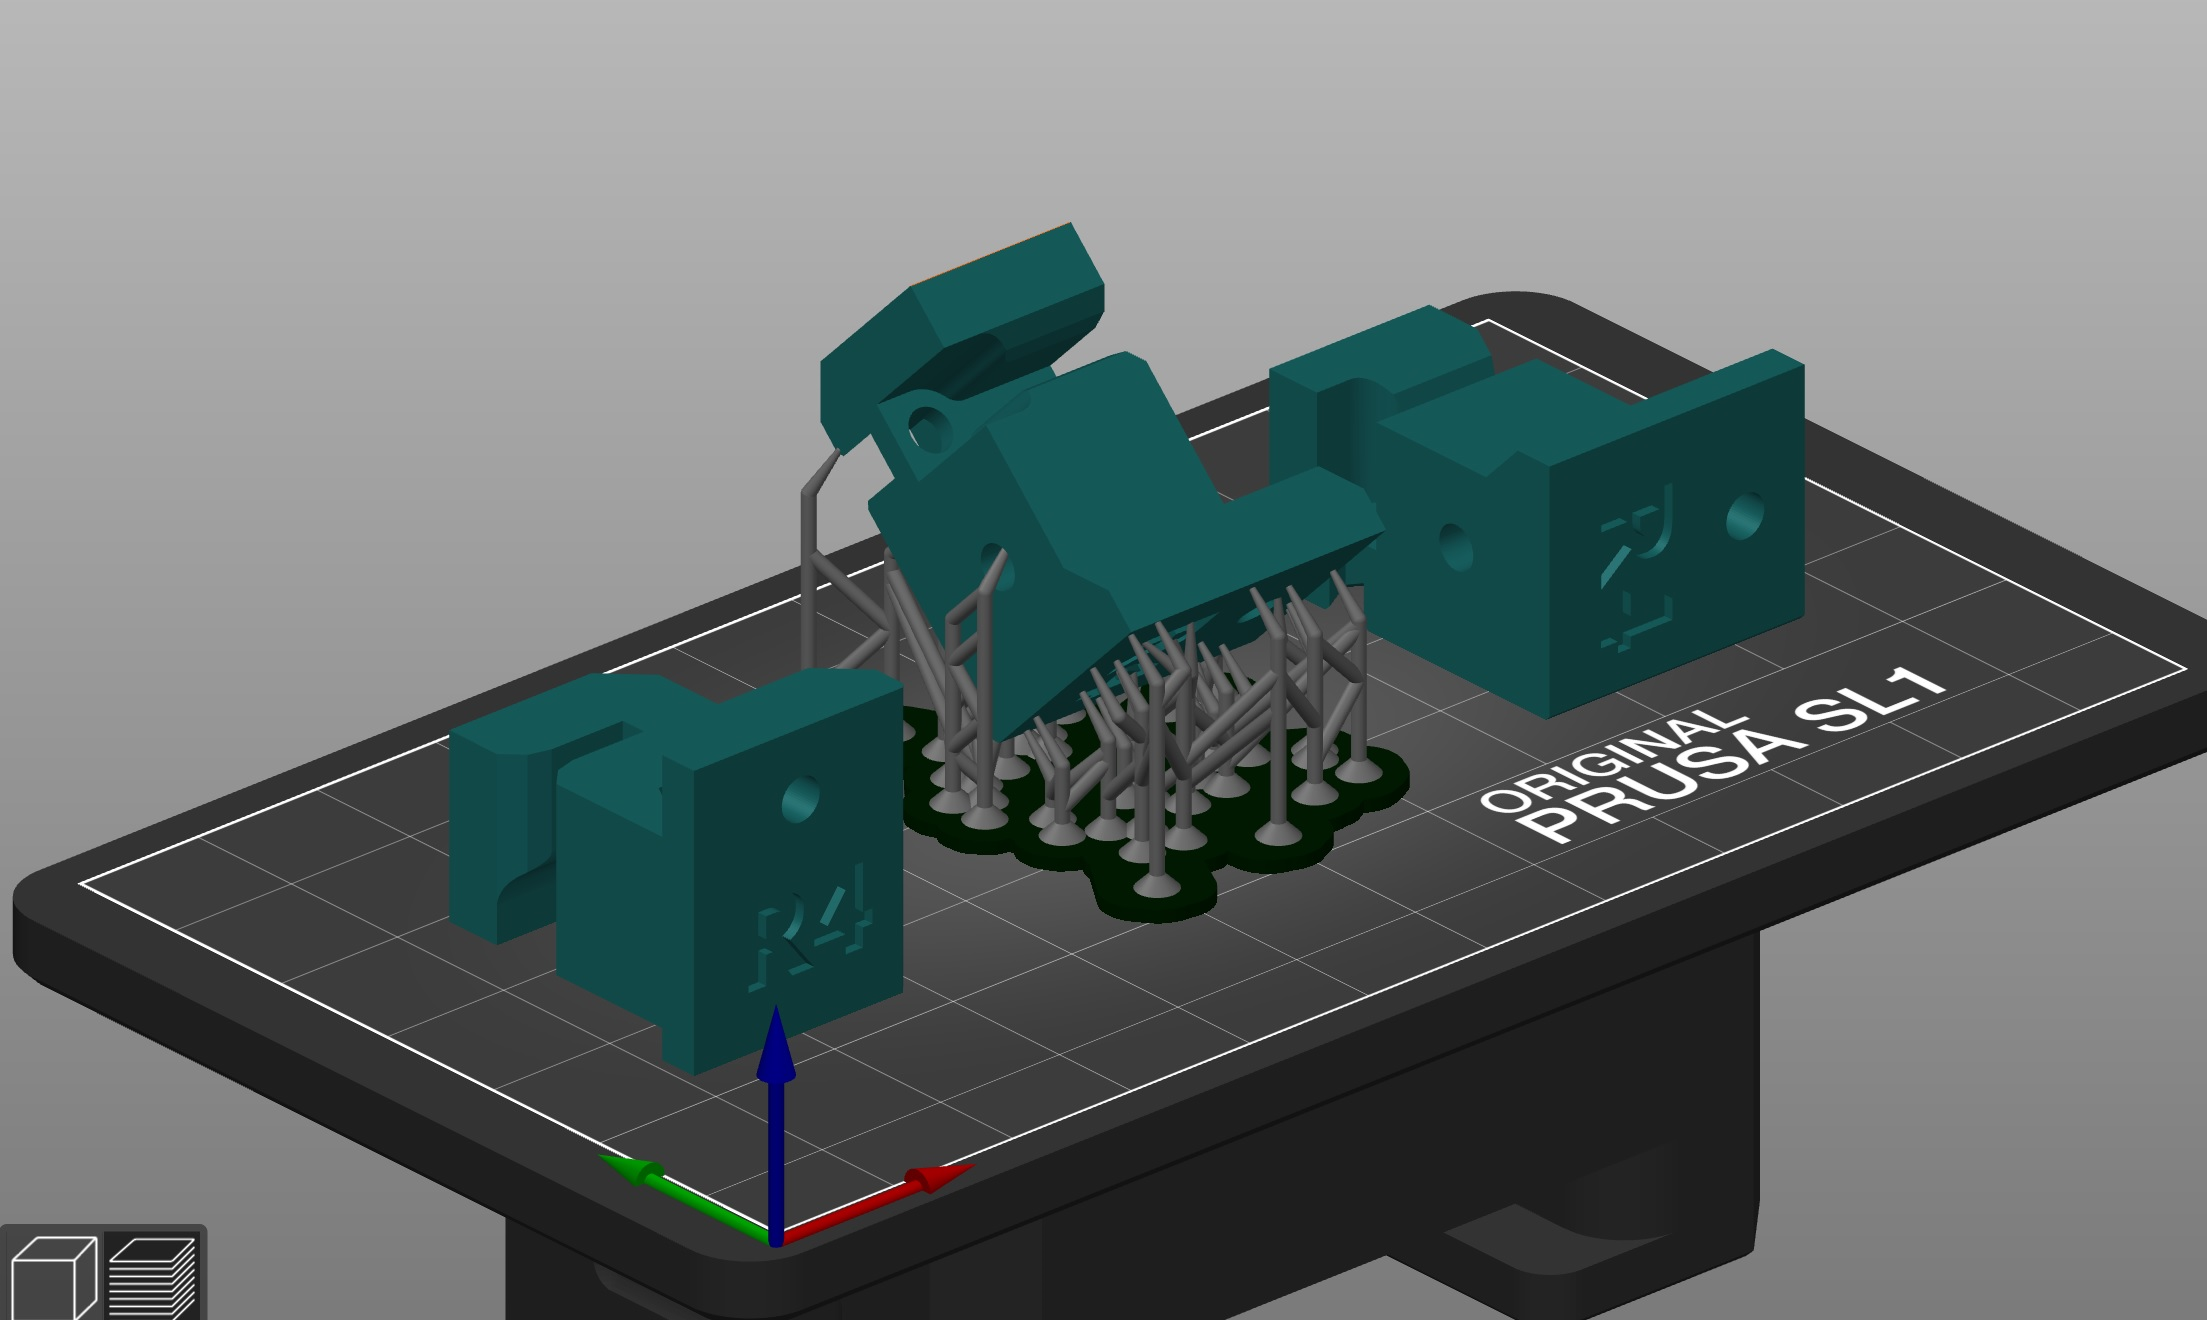
In some cases, the automatic support generation doesn’t deliver a 100% perfect result – this is normal since imported objects can be infinitely complex. We’re constantly improving our support generation subroutines to prevent these situations from happening. Either way, on certain occasions, supports have to be added manually – this can be done even when there are already auto-generated supports in place.

Comparison of automatically generated supports and manually edited supports
Click the Manual editing button. Previously generated supports will temporarily disappear to give you a better overview of the model. Use the left mouse button to add new support points. You can tweak the support thickness in manual editing mode by using the “Head diameter” slider, or you can go to Print settings – Supports and modify the following parameters to increase the thickness of supports:
- Support head front diameter: 0.6 mm
- Support head penetration: 0.6 mm
- Support pillar diameter: 1.3 mm
Useful shortcuts
Shift + Left mouse drag = add multiple points to the selection
CTRL + Left mouse click = add single support point to selection
ALT + Left mouse click = remove single support point from the selection
ALT + Left mouse drag = remove multiple points from selection
CTRL + A = Select all points
CTRL + Mouse Wheel = move the clipping plane
Printing large thin objects
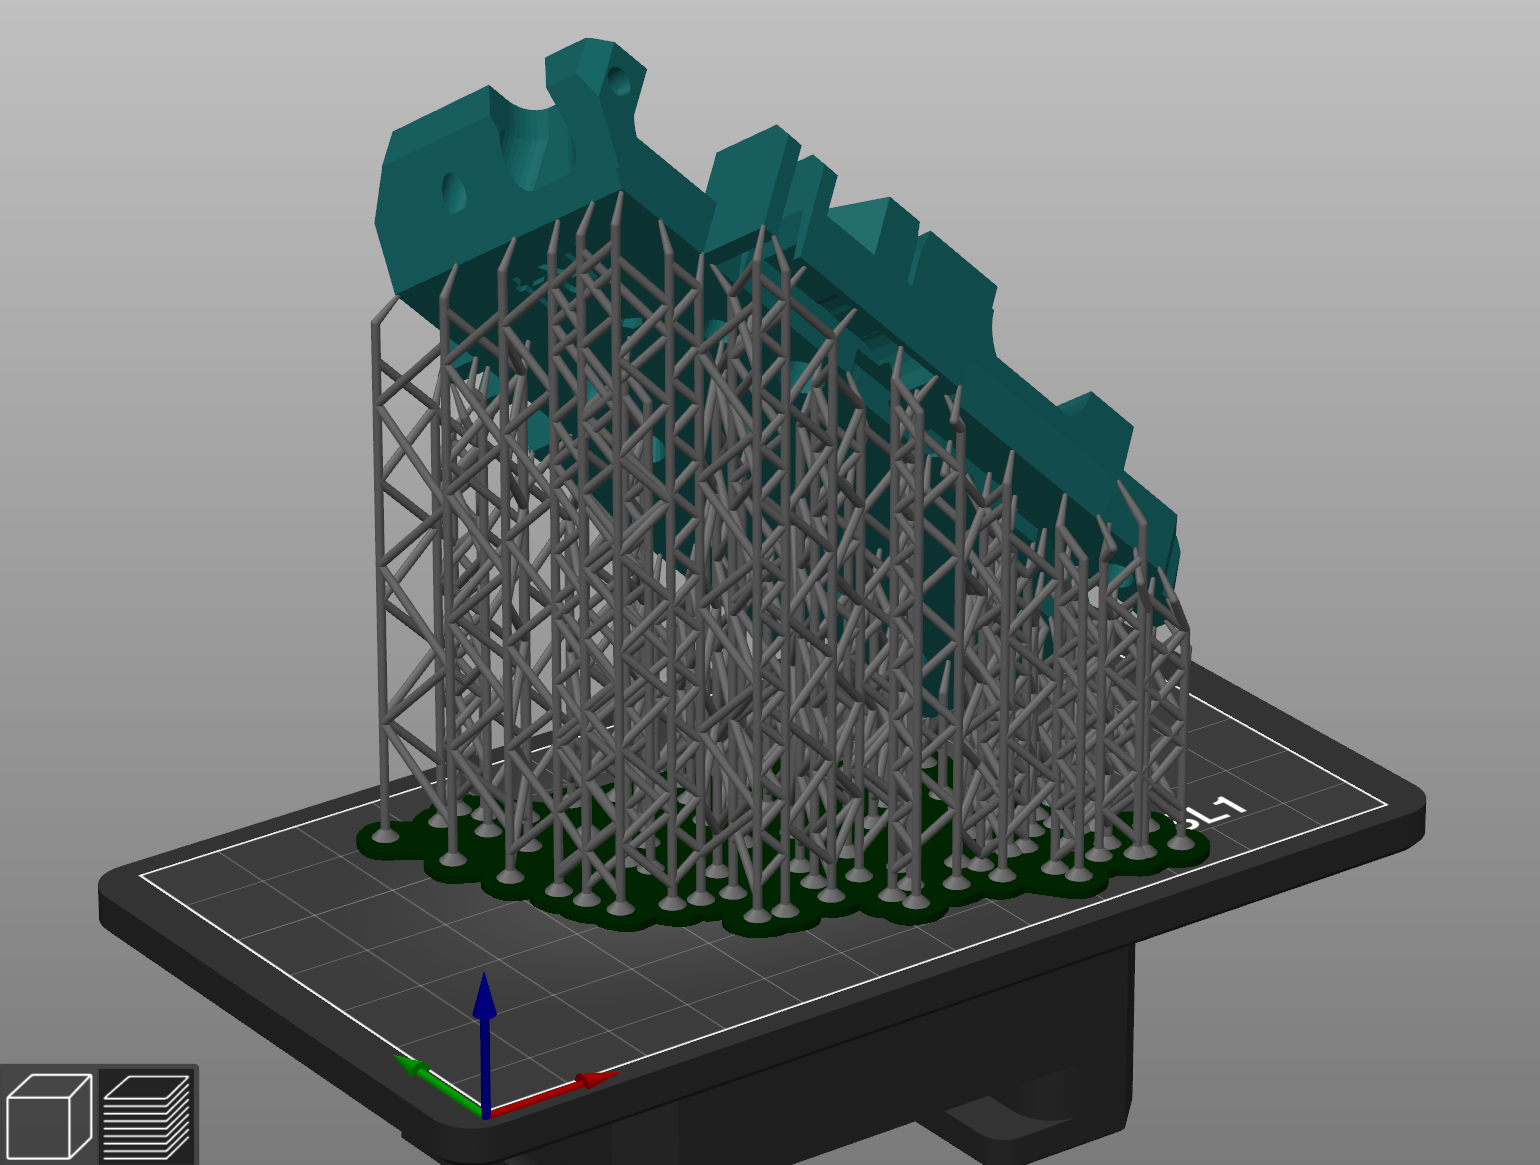
Large thin objects have a tendency to warp because thin walls are flexible. This usually applies to cases, boxes, or even model trains. The solution is to use denser and thicker supports in combination with manual support placement. Generally speaking, FFF/FDM 3D printing technologies are much more suitable for printing large geometrical shapes, such as various Arduino cases and similar objects.
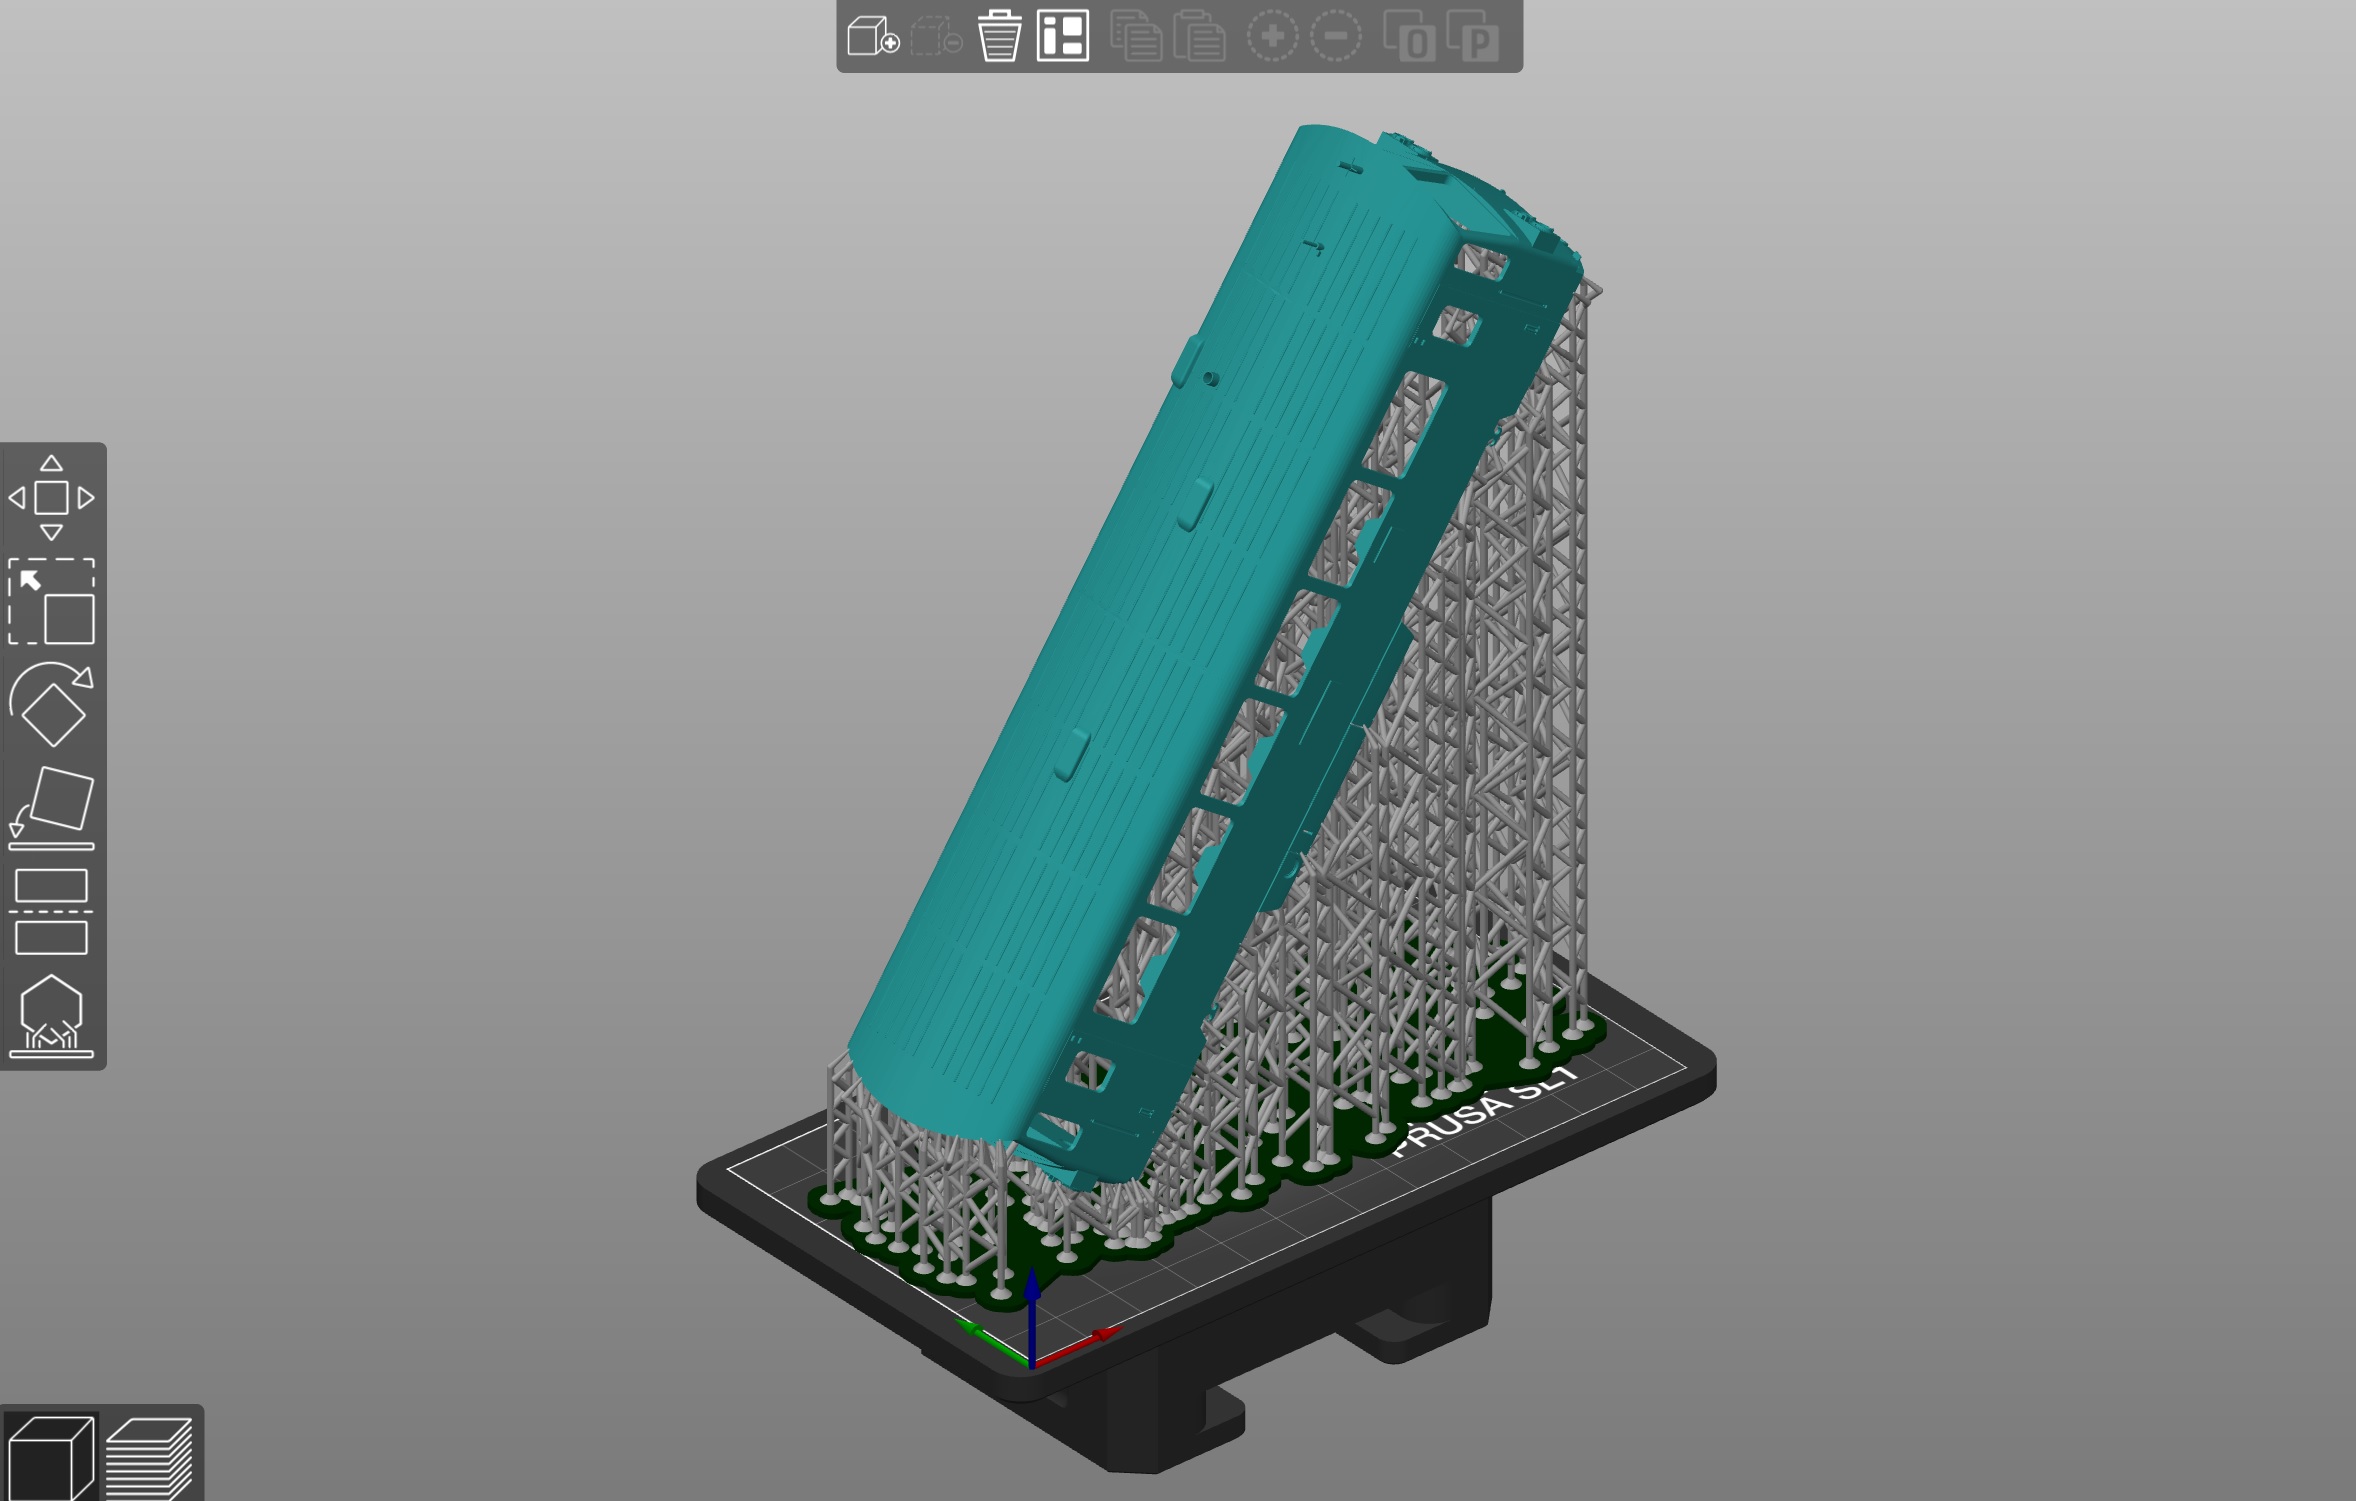
Do not be afraid to add a lot of supports when printing tall objects with thin walls
The 45-degree tilt is especially important with large objects. A large object with a small outline would be supported only by a small number of supports, which could cause trouble later during the print process. The object could easily detach from the supports either by its sheer weight or as a result of peeling forces. We recommend hollowing large objects before you print them – this will decrease the resin consumption along with the weight of the object, which in turn makes the printing process more reliable.
Slicing geometrically precise objects
Mechanical parts, objects that should fit together, joints, pegs, and similar things need to be printed precisely. While SLA 3D printers are more suitable for printing organic shapes, geometric shapes and assembly parts can be printed as well. The key here is to place supports strategically along the edges of the object.
The reason is simple: when printing with liquid resins, the cured material is still relatively soft, which means that the object can bend very slightly during platform movements. Also, most resins have a tendency to shrink a little bit after being cured by UV light, which can result in slightly warped edges of the printed object. Again, a good number of supports is key.
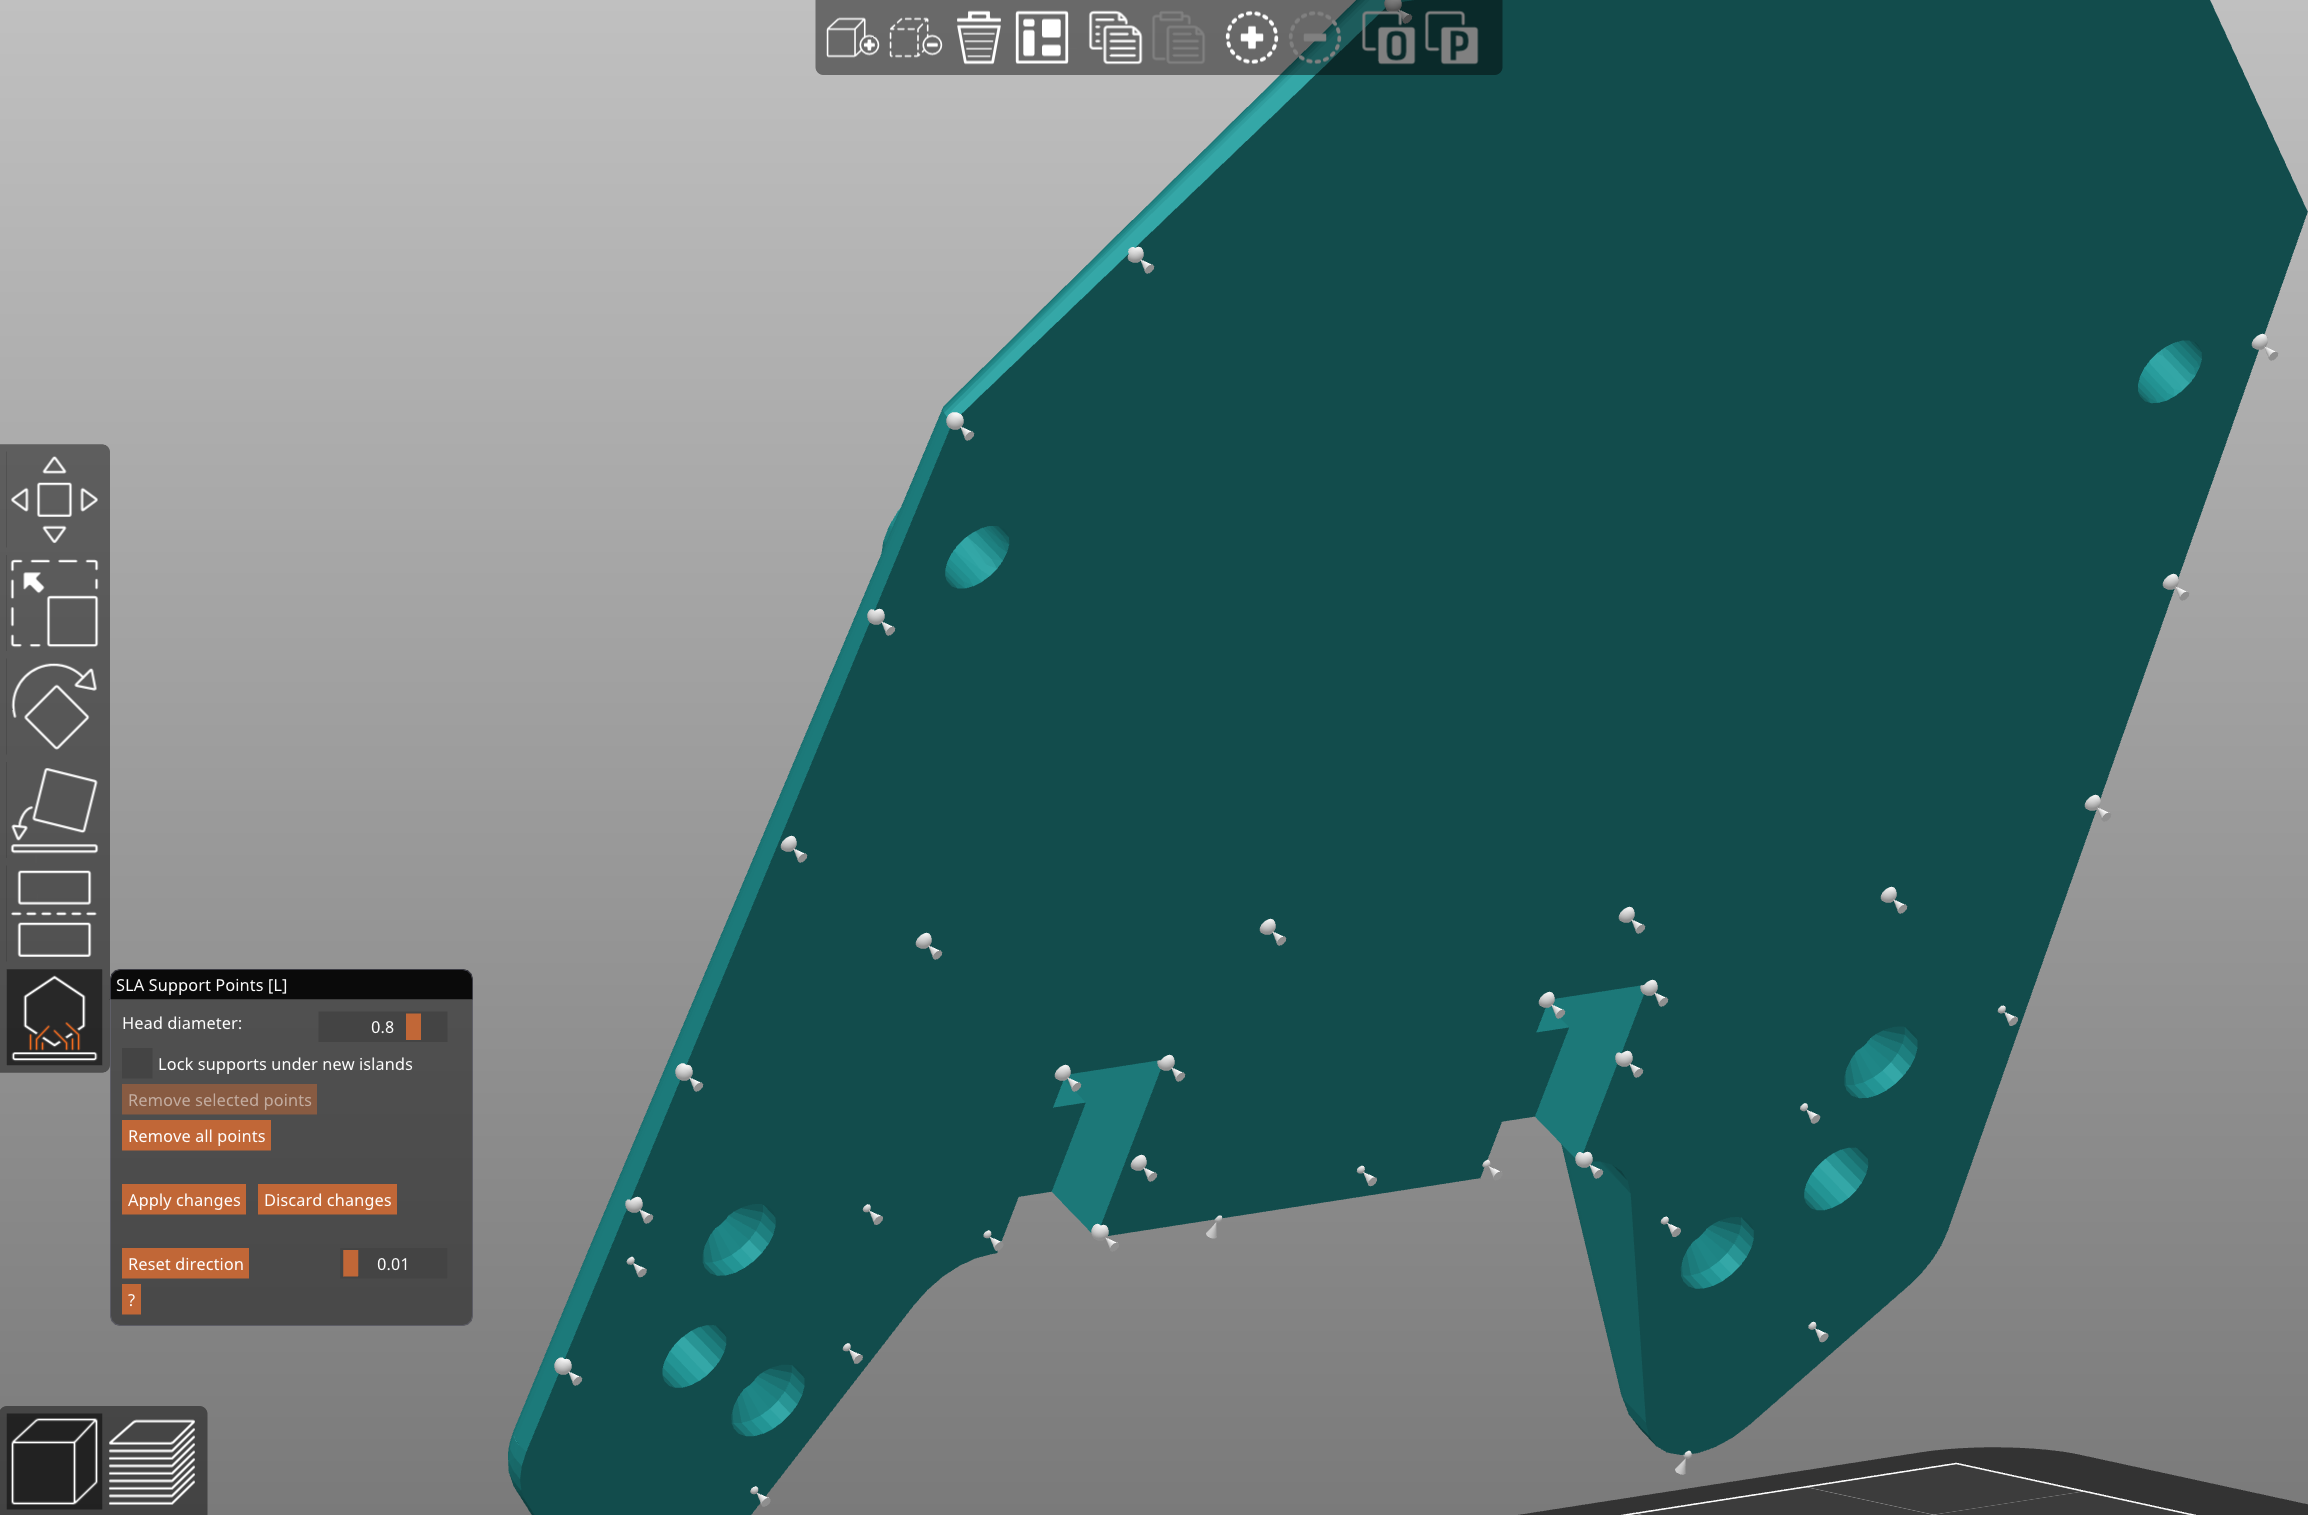
When printing non-organic shapes, use the manual support placement tool to place thicker supports along the edges of the object
Also, remember, when printing objects directly on the platform, the first few layers will usually develop something we call an ‘elephant foot’ – as the first layers are cured, the material will expand a little bit, creating an uneven surface. This is why using the Pad is recommended.
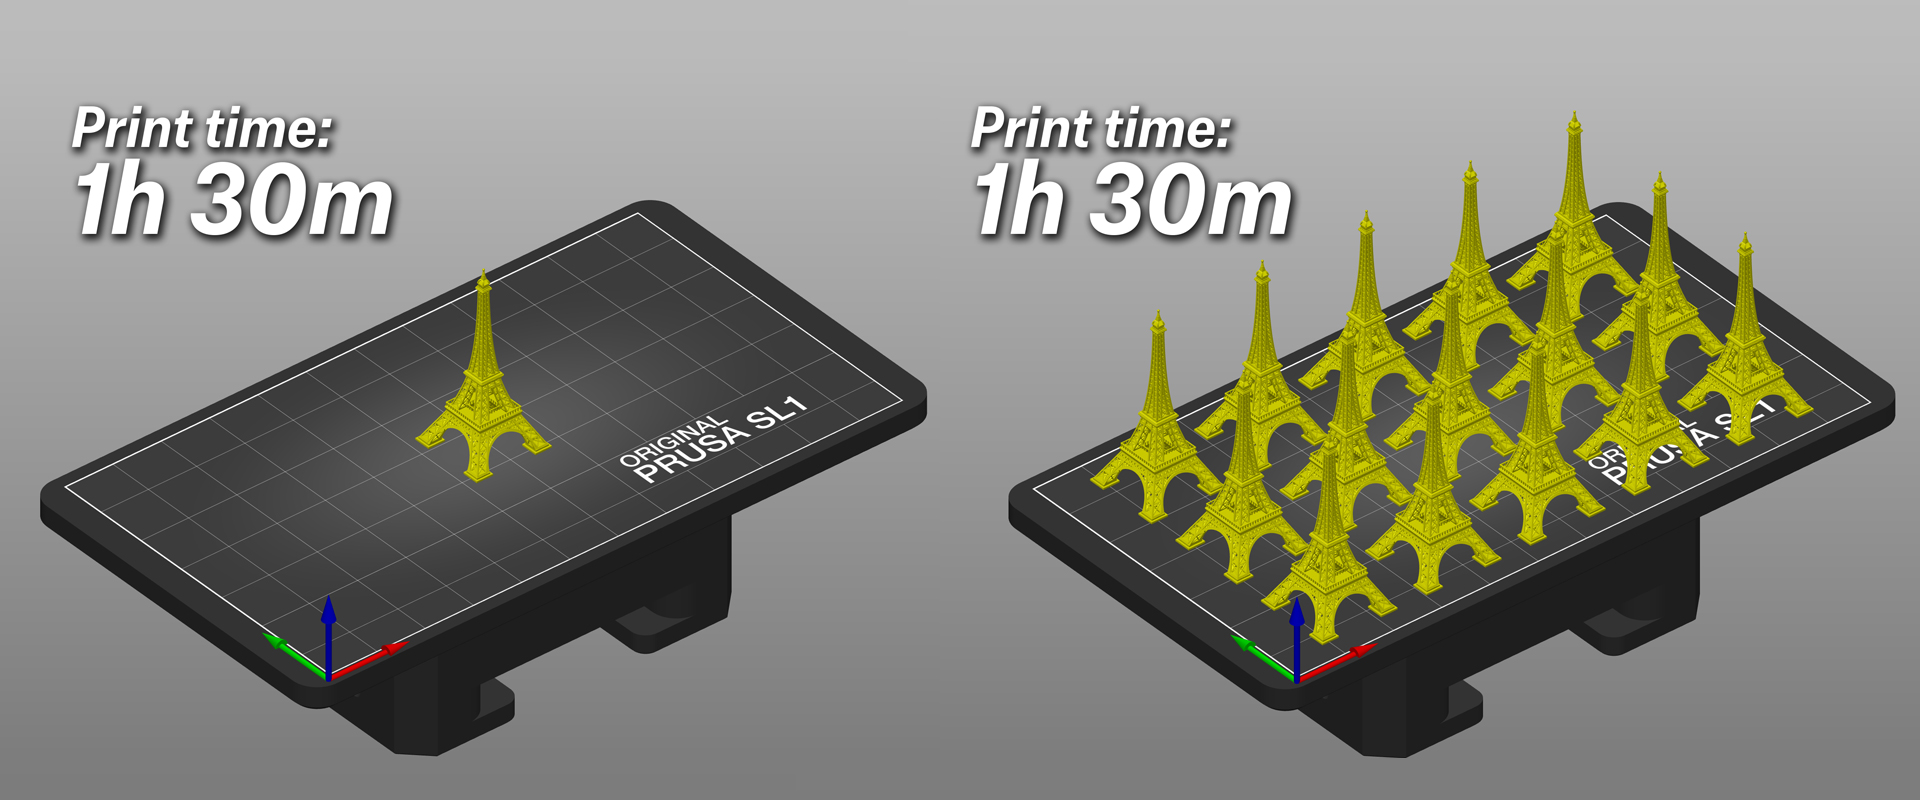
Protip: As already mentioned, the print will always take the same amount of time no matter how many objects there are on the print platform. The total time is defined by the number of layers to solidify. Use this to your advantage: if you have a complex object with tricky orientation, place multiple copies on the print platform and rotate each object in a different direction. This will help you to save time.
Print the object in various rotations at the same time to quickly find the optimal orientation – the printing time will remain the same
Hollowing 3D objects
All objects sliced for the SL1 are completely solid by default. There is no infill pattern like in FFF/FDM 3D printing. Objects printed from liquid resin can be heavy and robust, but the resin consumption is increased, especially when printing large models. This also means that you should add more supports, and/or make them thicker, so they can support the object’s weight.
Hollowing can be done directly in PrusaSlicer – check the documentation for more information.
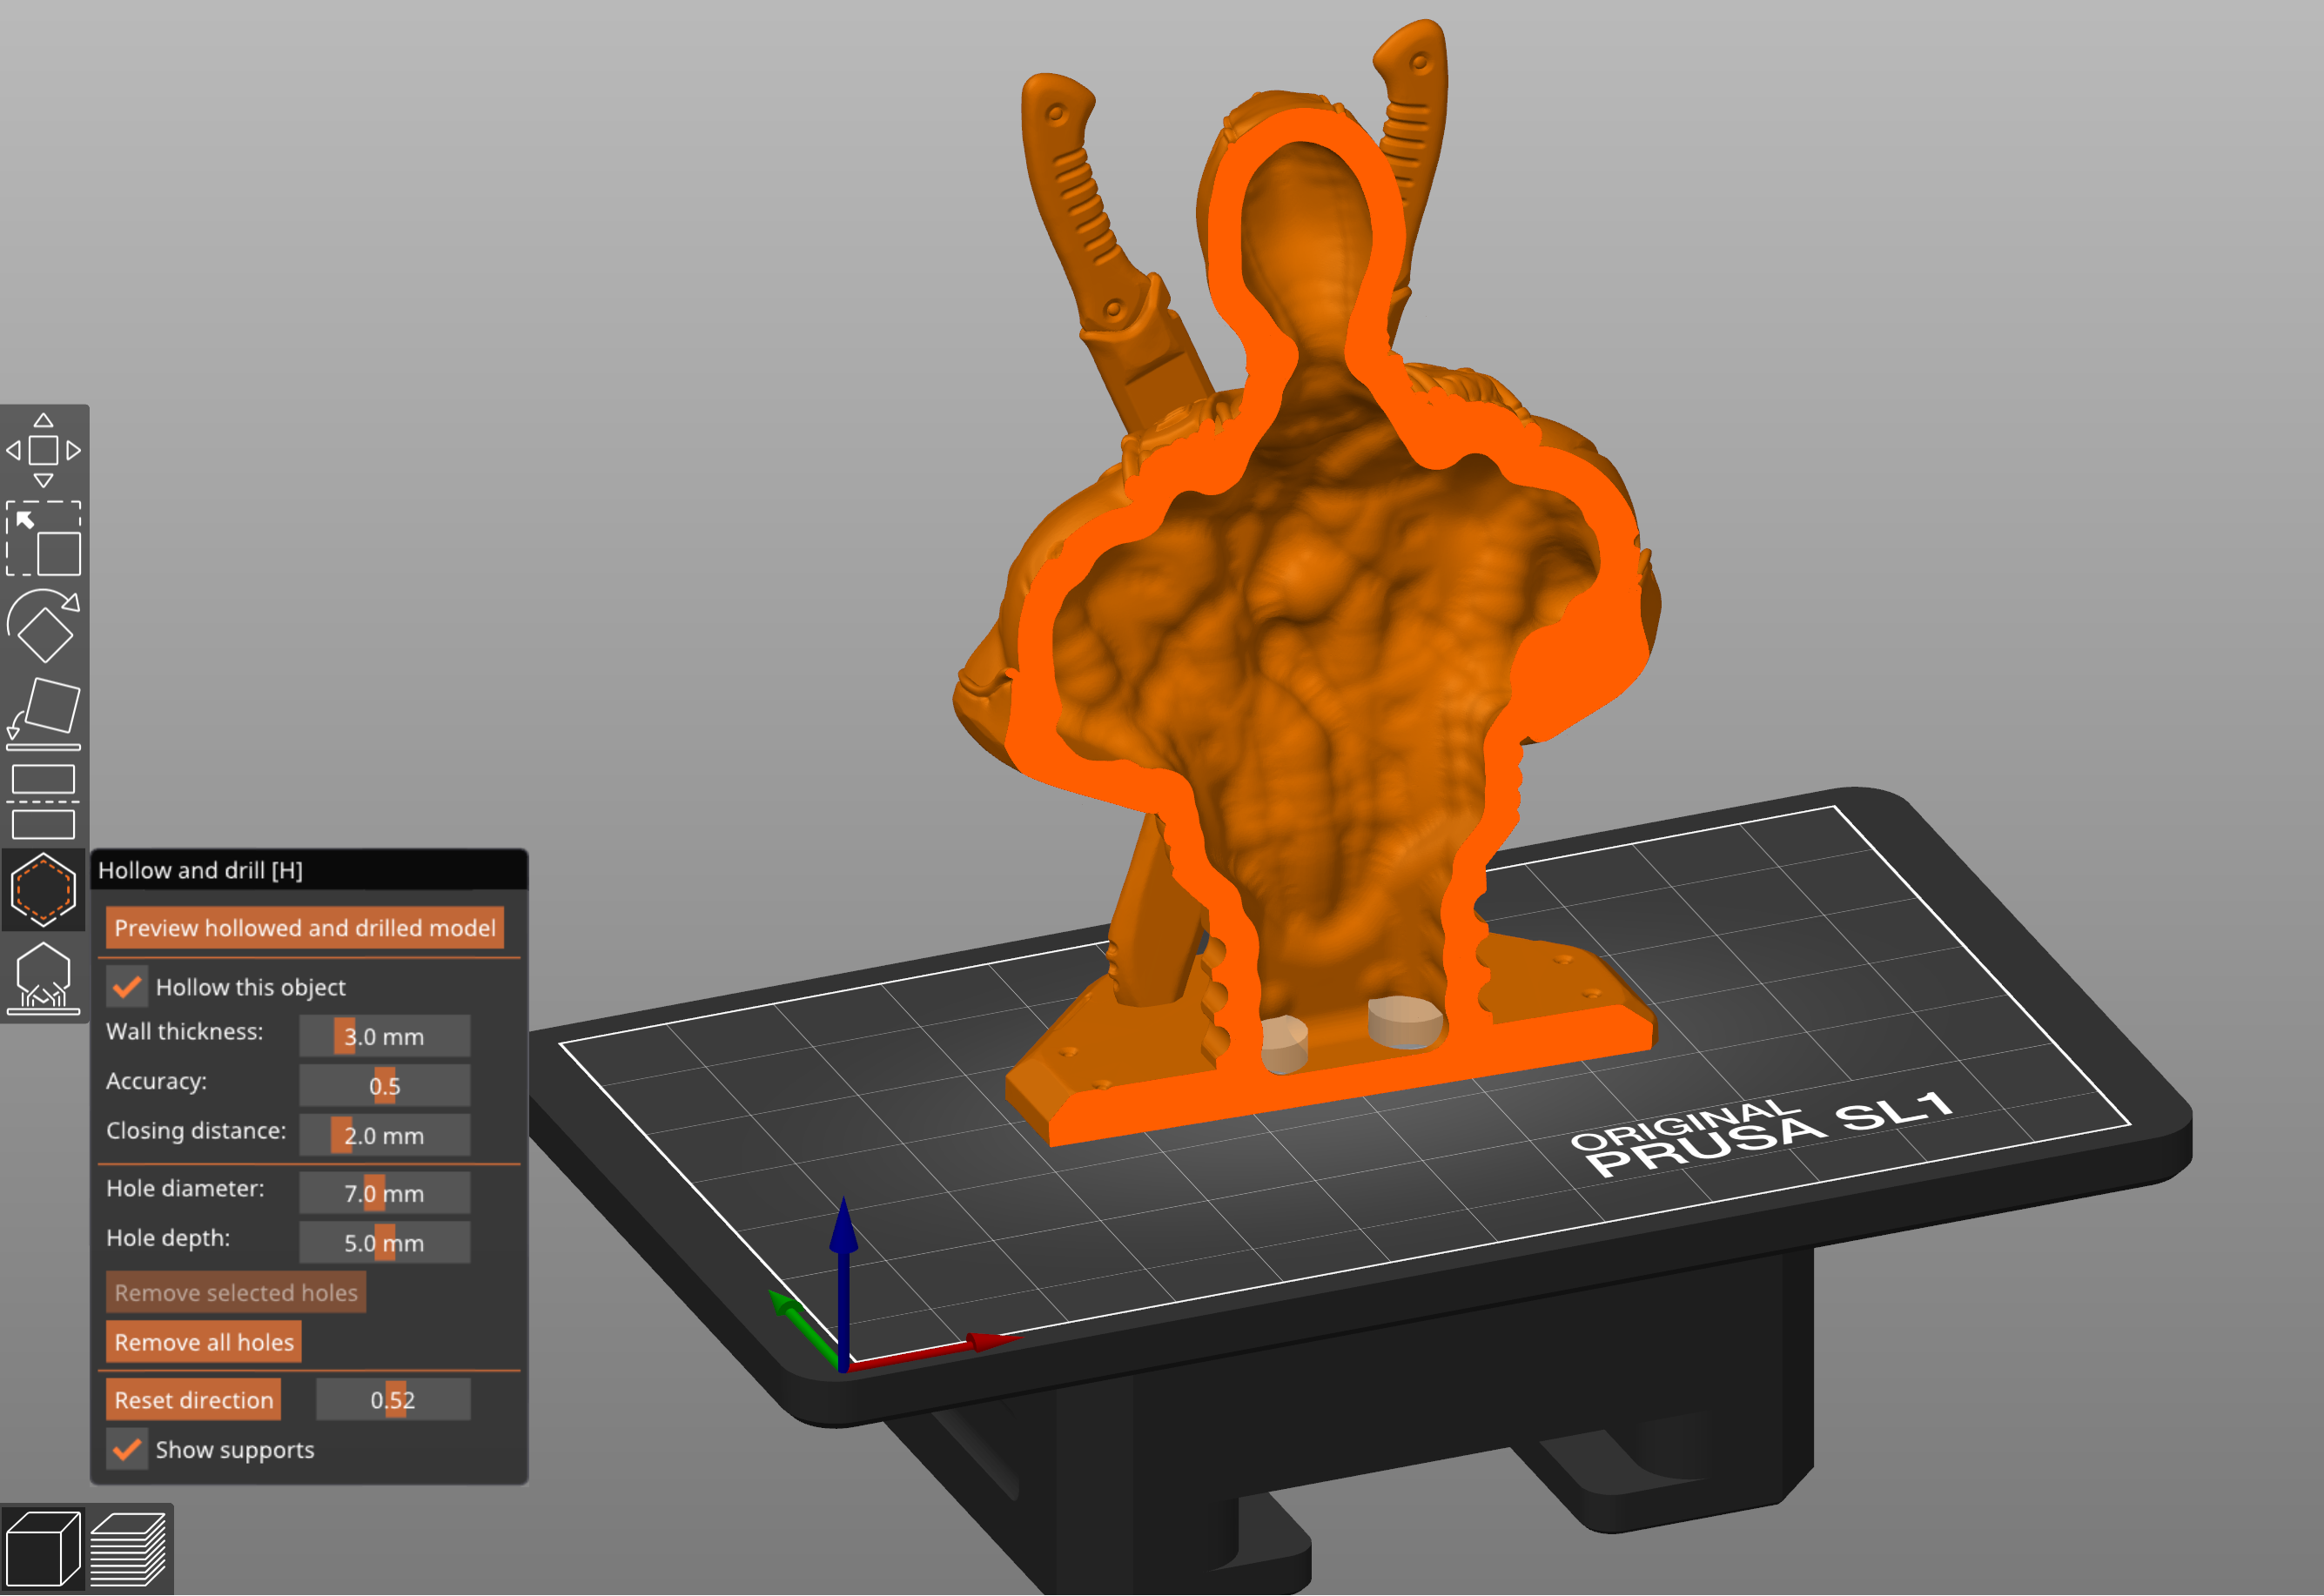
The tricky part comes with the draining holes. You should place two draining holes somewhere on the object, otherwise, the liquid resin will remain trapped inside. If you break it by accident, the resin will leak out. Obviously, one of the holes should be placed on the top part of the object. Remember, objects are printed upside down, so the hole will, in fact, end up being the lowest point of the object and the liquid resin will pour out through it. However, the second hole is required to compensate for the vacuum/suction that could be created inside the hollow space, so it should be on the opposite side of the model. Try to place the holes strategically so the overall look of the printed object is not compromised.
Object preview
Before you export the object as an SL1 file, inspect it in the Preview window carefully. This will take just a minute, and it can save you a lot of trouble. Use the layer preview slider on the right side of the window and start from the first layer. Move the slider and check how the object grows. Are there any parts of the object starting mid-air? Are there long thin stripes supported with only one support? Just go back to editing mode and add a couple of supports, then re-slice the model.

PrusaSlicer preview window will help you spot problematic areas, such as objects out of bounds etc.
It doesn’t require any special skills to notice problematic parts. Check out our troubleshooting page to see the most common issues that may appear during slicing.
Practice makes perfect
If you have never owned a 3D printer, jumping into the slicing process may seem daunting at first, but it’s actually easier than it looks. Of course, it may take a couple of tries before you start to fully understand all of the quirks, but the Preview mode is your best bet for trouble-free printing.
It’s possible to print even rather large objects – use the Cut tool in PrusaSlicer to split large models into smaller parts
Rotate the object, add enough supports, inspect the sliced result in the preview window and if everything looks good, send the SL1 file into the printer. That’s it! By the way, did you know you can do it wirelessly? Check the SL1 Handbook to learn more!
As you improve your skills over time, you will find out that you can play around with object rotation, supports and layers heights to maximize print quality. You will learn how to minimize the number of supports, while still keeping the object firmly attached to the base. Have fun!
You must be logged in to post a comment.