
It has been full 3 years since we started our in-house development of Slic3r, later adding Prusa Edition (PE) to make less confusion with the naming. However, the programs are radically different now, plus, the community keeps using the Slic3r and Slic3r PE interchangeably, creating a lot of confusion, making this an ideal time for renaming the application. Tom Sanladerer using the horrible Slick-three-arrgh pronunciation had nothing to do with it, I promise! 🙂
As of right now, the PrusaSlicer in-house team has 7 people with Vojtech in the lead. Their first big achievement was getting rid of the Perl to speed up the development and build process. Thanks to this, you can already see more forks of the PE Slic3r version. In total, we spent roughly 21,440 man hours on the program, made 5769 commits and 61 releases!
So, this is the start of the new chapter of slicer development in Prusa Research! One of the first things we are bringing in PrusaSlicer 2.0.0 is a completely revamped UI and MSLA slicing, but that’s not all. Dig into the article to find out more details. 😉 But if you can’t wait, you can try the new PrusaSlicer right now – download it in the new Drivers & Apps package. You can also use this direct link to the file or download from Github.
UPDATE: Since the update caused some confusion around transferring profiles, we would like to assure you that PrusaSlicer DOES NOT delete Slic3r PE profiles.
Transferring print profiles/presets
Do you have your customized profiles? Don’t worry about losing them. Profiles can be exported from the old Slic3r PE and imported into PrusaSlicer again.
It’s recommended to export Config bundle from Slic3r PE before you install PrusaSlicer. Open Slic3r PE and select File -> Export Config Bundle… and save the INI file.
Install new Drivers & Apps package (you can also use this direct link to the file) which include new PrusaSlicer. Open PrusaSlicer and select File -> Import -> Import Config Bundle…, select the INI file and your profiles are successfully imported.
If you don’t have Slic3r PE anymore, you can still find the profiles in [Drive]:\Users\[PROFILE_NAME]\AppData\Roaming\Slic3rPE or Slic3rPE-alpha or Slic3rPE-beta (depends on the previous version). There are three sub-folders: filament, print, printer. Copy the contents into matching folders in [Drive]:\Users\[PROFILE_NAME]\AppData\Roaming\PrusaSlicer and restart PrusaSlicer. Your profiles should be available now. On MacOS the path is: [DISK] ▸ Users ▸ [USERNAME] ▸ Library ▸ Application Support ▸ PrusaSlicer.
Table of contents
There are so many new and exciting features, so brace yourselves, this is going to be long!
- Name change from Slic3r PE
- User interface improvements
- Custom supports
- MSLA slicing
- Color change directly in PrusaSlicer
- Perl source code was rewritten to C++
- Project file
- Other new or improved features in no particular order
- PrusaControl is now discontinued
- What’s next?
Name change from Slic3r PE
This update is so huge we thought it’s the perfect time to rename Slic3r PE to PrusaSlicer.
Why?
First of all, the old name was really confusing. Even in our own materials, we often didn’t include the “PE” suffix and the community used Slic3r and Slic3r PE pretty much interchangeably. New users could mistakingly download Slic3r and wonder why it looks different from the screenshots in the 3D Printing Handbook and why it’s not configured for their Prusa printer. Speaking about the original Slic3r: with each update, Slic3r PE was moving further and further away from its original code. We’ve rewritten all of the Perl source code into C++ (more on that later). And especially with this update, there are so many differences that it seemed appropriate to make the name more distinct. Don’t worry, it’s open-source and you’ll find everything on our GitHub. And we’re still proud that our slicer is based on the original project written by Alessandro Ranellucci! We’ll keep merging cool features from upstream Slic3r when possible.
By the way, if you had to read some of the lines in this paragraph twice, then you understand why we thought it would be wise to change the name 🙂
User interface improvements
Slic3r was always known to be powerful and versatile, but some features were difficult to use, if not outright hidden behind obscure menus and dialogs. Our goal with the reworked UI was to expose all the power features while making the UI clear and simple to use at the same time – no easy feat!
Simple / Advanced / Expert modes
To lower the learning curve for beginners, we introduce the Simple mode. Here, the user interface resembles the UI of Prusa Control (which is now obsolete, by the way). Complex features like the modifier meshes are hidden, and only a basic subset of parameters is shown to the user.
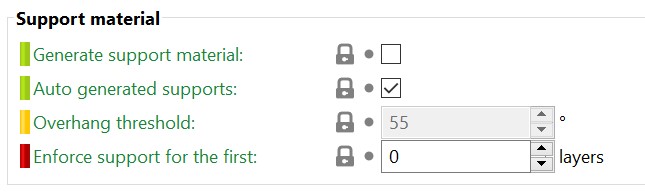
In the “Advanced” mode more parameters are shown, and in the “Expert” mode all the power features of Slic3r are accessible. To make the learning of parameters easier, we color coded them
- Green – safe to be tinkered with by a beginner
- Yellow – advanced user may want to modify these parameters
- Red – expert settings most of which should only be touched if you’re making a profile for a new printer
New toolbars, icons, and shortcuts
Both the top and left toolbars have been re-worked. We’ve re-drawn all of the icons and implemented support for vector icons. So moving forward, all icons will be in vector format with pretty much infinite resolution. All of the tools in the toolbar (and some more) also got handy shortcuts. You can display them in the Help – Keyboard shortcuts window and of course, we have a shortcut for that 🙂 (Shift+?)

Old top toolbar (Slic3r PE 1.41.2)
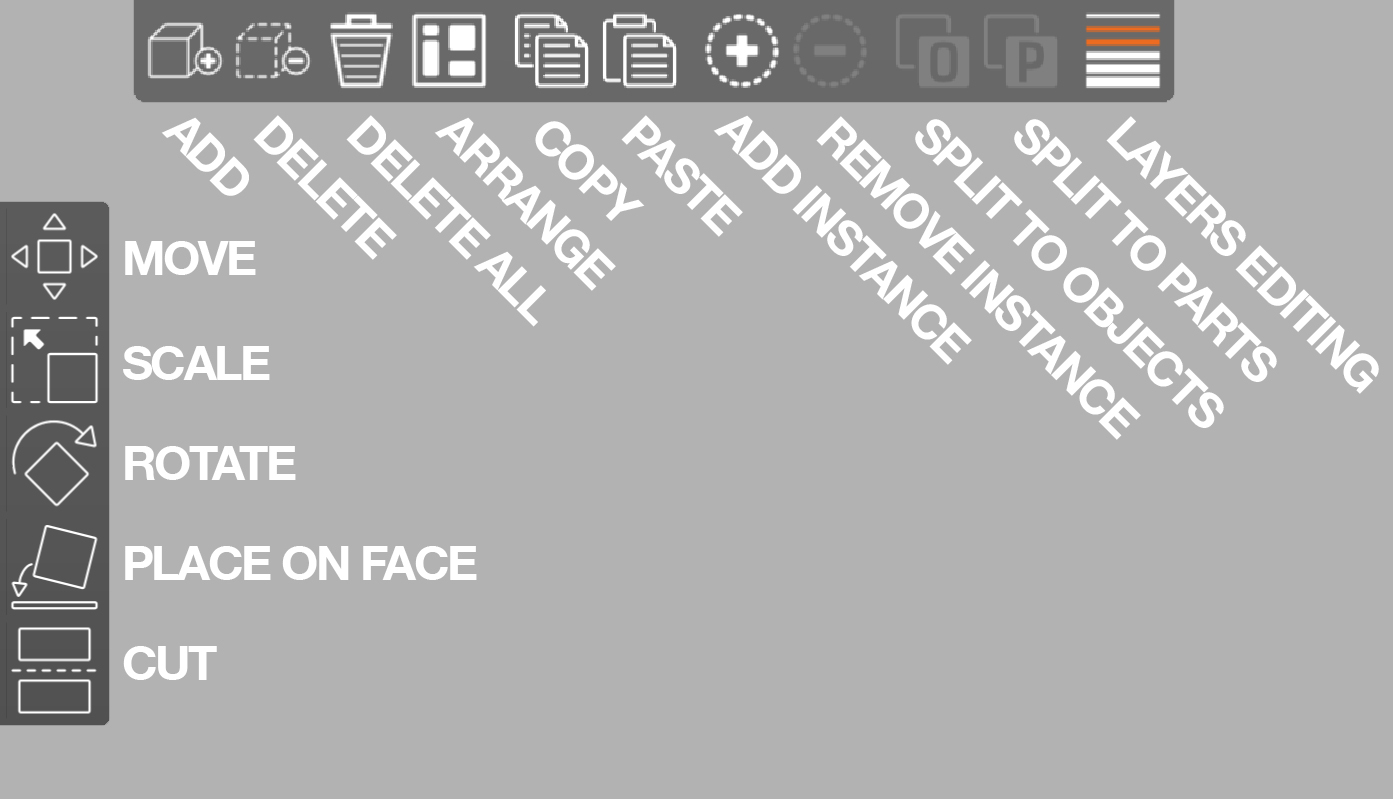 New toolbars (PrusaSlicer)
Everything directly in 3D view
Remember how double-clicking on a model opened up a new window with a 3D preview, where you could add modifier meshes, cut the model in half or change specific settings? Well, all of this can now be done directly in the 3D view!
Also, PrusaSlicer now displays print bed models with textures!
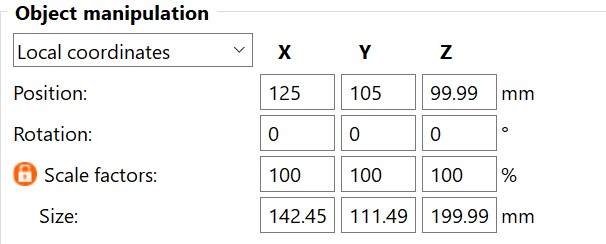
Move, rotate and scale gizmos + object manipulation sidebar
We added new object manipulation gizmos for translation, rotation and scaling along all three axes, anisotropic scaling is supported as well. Rotation gizmos snap to the inner ticks spaced at 45 degrees and to the outer ticks spaced at 5 degrees.
When holding the Shift key, the translation changes with 1mm steps, while scaling changes with 5° steps.
Multiple objects may now be selected by holding down the Shift key, and they can all be manipulated as a group. All objects can now be selected with CTRL+A. Holding Alt and dragging the mouse will deselect objects within a drawn rectangle.
You can choose to view the object manipulation values in either World of Local coordinate system.
Object list, scene hierarchy, and instances
The object list in the right sidebar now displays a hierarchy of objects, their instances, object’s parameters, object’s volumes, and modifier meshes. This way, you can quickly get a clear idea of the project structure and what settings were changed for specific models. The object list is only visible in the Advanced and Expert mode.
An exclamation mark is shown in the object list next to a model containing errors (gaps, cracks, intersecting triangles). Clicking on the exclamation mark icon sends the object to the Netfabb service for repair (works on Windows 10 only).
A model instance can now be set as a separate object through the right-click context menu or by simply drag-and-dropping it away from the parent object in the object list panel. Breaking the link between the parent and instance object lets you, for example, change the scale of the copy.
New instances can now also be created by simple copy & paste (CTRL+C, CTRL+V)

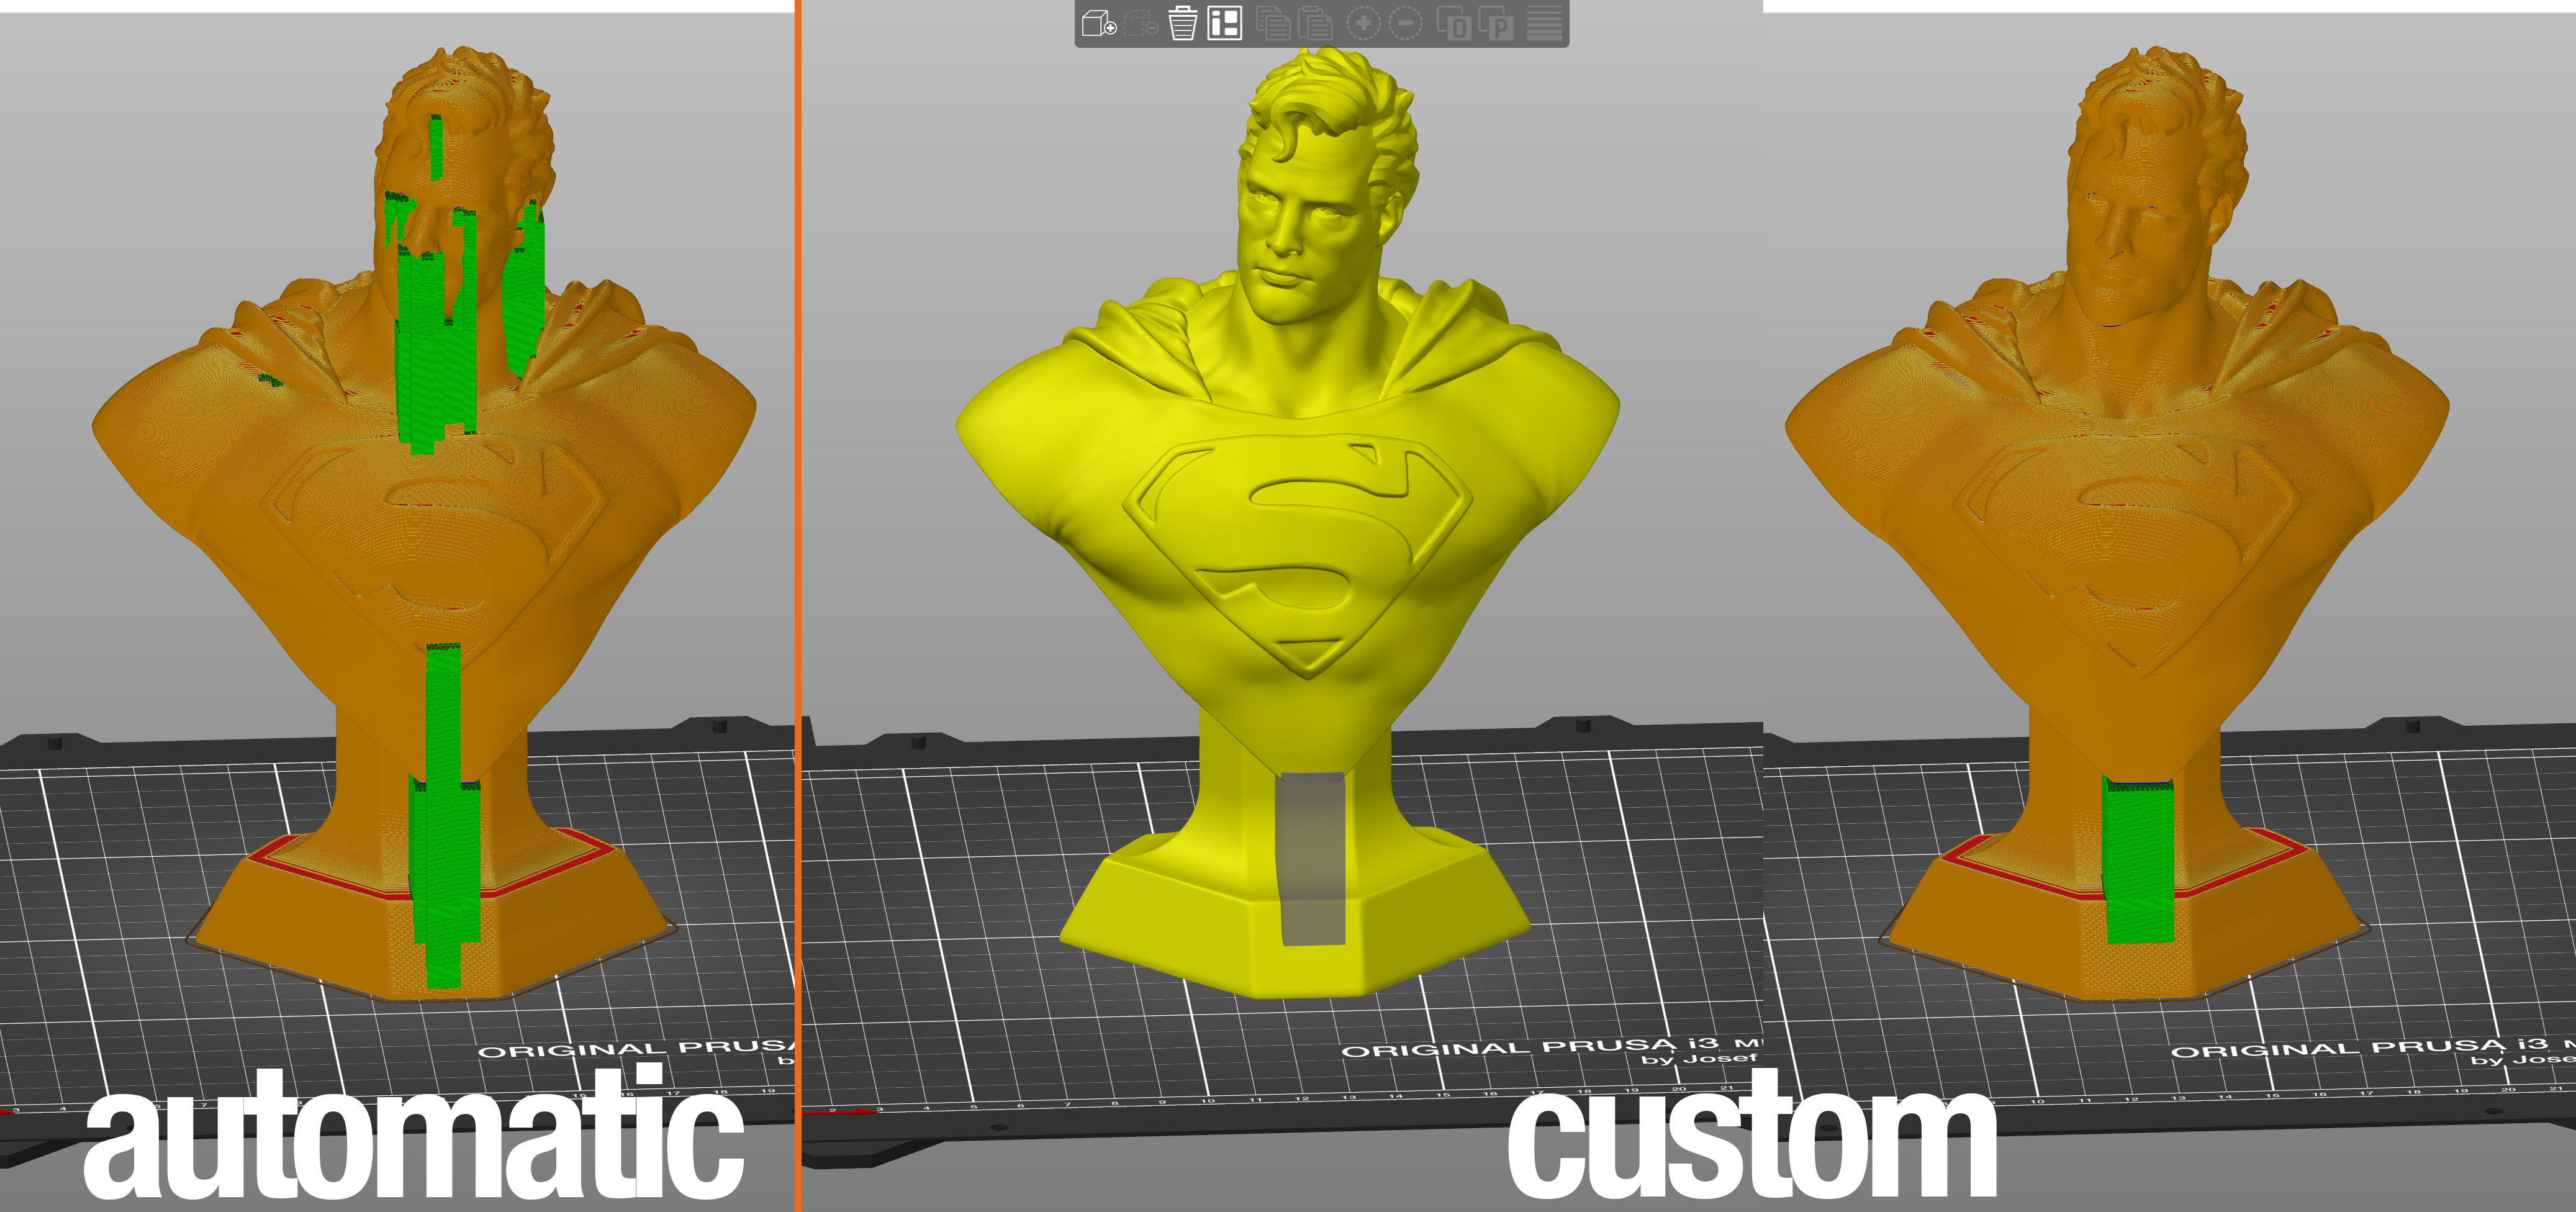
Custom supports
Slic3r has always been rather generous with supports – and for a good reason. It allows even complete beginners to print pretty complex geometry right out of the box. If you use the auto-generated supports, your model will be certainly printable. But with some models, the algorithm may place them in hard to reach places, resulting in tedious removal of support structures from hard-to-reach spaces.
The model context menu (right-click on a model) now lets you create support blockers and enforcers. Support blockers are useful when you’re generally happy with the automatic supports and you simply want to exclude some areas which either don’t need supports or might create really hard to remove supports.
Support enforcers work the opposite way. Turn automatic supports off and select specific parts of your model which will need supports.
MSLA slicing
With the release of our Original Prusa SL1 resin 3D printer, we’ve added masked SLA (MSLA) mode into PrusaSlicer. As far as we know, PrusaSlicer is the first high-quality open-source MSLA slicer available. While it may seem that SLA and FFF slicers are very similar, in reality, the two technologies share just one thing – they work slice by slice. This would honestly deserve its own article, but let’s try to keep things short. To make MSLA slicing work we implemented the following:
- Automatic pad and tree support generation
- Manual editing mode for tree supports
- SLA print, material and printer settings
- Rasterizing layers into PNG images using the Anti-Grain Geometry library
- 3D anti-aliasing
- Layer preview (including camera/object clipping)
- Zipping and sending the archive over the network to the printer
- Firmware uploader
- Accurate print time estimation for the SL1 printer
- Exporting STL file with embedded supports

Color change directly in PrusaSlicer
Prusa Control’s “Color Print” feature has been integrated into PrusaSlicer. You may now insert the M600 “pause for filament change” code at layers which you marked with the layer selection slider in the print preview screen. A preview is displayed instantly so you’ll see exactly how your model will look with color-change. I can’t believe how many times I’ve accidentally set the color change one layer off, so this fast preview is a really handy feature.

Perl source code was rewritten to C++
Slic3r was initially written in a scripting language Perl. Perl is powerful and it certainly sped up the initial Slic3r development. However, these days Perl is being replaced by Python or Ruby and it’s increasingly difficult to find contributors. Debugging Perl / C++ combination is difficult, and there is no Perl binding for the current wxWidgets UI library that Slic3r uses. We had to pay the technical debt and ditch Perl to move forward, which meant to rewrite quite a lot of user interface code from Perl to C++ in one shot. To make the transition faster, we dropped some of Slic3r’s features:
- Printing over a serial line (USB)
- 2D toolpath preview (but you can still orient the camera to look from the top, Shortcut is the “1” key)
These features may be re-implemented in the future.
Project file
File – Save Project now saves a 3MF file containing all objects, settings, modifiers and their parameters. It’s essentially a complete snapshot of PrusaSlicer. When you open a project file on a different computer, it should still produce the same G-code. We chose 3MF over AMF, because it’s a modern format supported by Microsoft 3D Builder and Cura, but we still support AMF import. And yes, this feature was already present since Slic3r PE 1.40, but it was buried in the export menu as “Export plater as 3MF/AMF”.
Other new or improved features in no particular order
- HiDPI support – Correct scaling on high-resolution displays
- Time & material use estimate is now calculated before export
- Background processing – redesigned to work reliably, only those slicing steps that were invalidated by the user action will be re-sliced
- Multi-material improvements – easier assigning of colors and more
- Split top/bottom infill pattern setting – thanks to @supermerill
- Octoprint upload queue – sending to Octoprint would previously block the user interface
- “Slice now” and “Export” buttons merged into a single button
- Shortcut buttons added to the right of profile selection boxes (similar to upstream Slic3r, thanks to @alexrj)
- Command line processing – upstream code by @alexrj and @lordofhyphens
- Support for OctoPrint Cancelobject plugin – thanks to @supermerill
- Anisotropic scaling – hold CTRL and drag one points of the scaling gizmo (not corners) to adjust the scale of the model in one axis
PrusaControl is now discontinued
Due to the sheer number of changes, both in UI and the code itself, PrusaSlicer is perfect for both beginners and advanced users. As a result, PrusaControl (which hasn’t been updated for months) is now obsolete. If you got used to its user interface, we believe the transition from PrusaControl to PrusaSlicer will be quick and smooth. Plus, you will be able to enjoy regular updates of the application and slicing profiles.
What’s next?
Undo / Redo is on the top of our to-do list. However, it’s not easy to implement it efficiently and we’ll take our time to do it right. Hollowing for (M)SLA is a great way to reduce resin use and we hope to implement it soon. And we want to get back to the basics too and optimize the FFF slicer kernel for print time and print quality.
We’ve also set PrusaSlicer as the default application for opening .3MF files in Windows, to make opening these files a bit easier and faster.
So as you can see, our work on our slicer is ongoing and we keep adding new tweaks, fixes or features every day. Slic3r PE has always been a powerful tool, and our aim is to take all these advanced features and make them available and accessible to a wider audience. I hope you like the new design and new things under the hood. So feel free to go ahead and explore the new PrusaSlicer – and don’t forget to share your comments and ideas so we can make it even better!
But enough talk – download the new PrusaSlicer 2.0.0 in the Drivers & Apps package (You can also use this direct link to the file or download from Github.) and let us know how you like it!
Yeah, great, i installed PrusaSlicer, and it unstalled slic3r PE and all my custom profiles are gone….
It mentions in the article what to do if you don’t have Slic3r PE anymore “If you don’t have Slic3r PE anymore, you can still find the profiles in [Drive]:\Users\[PROFILE_NAME]\AppData\Roaming\Slic3rPE or Slic3rPE-alpha or Slic3rPE-beta (depends on the previous version). There are three sub-folders: filament, print, printer. Copy the contents into matching folders in [Drive]:\Users\[PROFILE_NAME]\AppData\Roaming\PrusaSlicer and restart PrusaSlicer. Your profiles should be available now. On MacOS the path is: [DISK] ▸ Users ▸ [USERNAME] ▸ Library ▸ Application Support ▸ PrusaSlicer.”
This info may help you
Thank you for that info. Helped me out of a hair tearing moment!
Hi! I believe that is not actually the case. When I was using the alpha and beta versions, they used a new folder for the configuration, and this is likely the case for PrusaSlicer 2.0 also. So all you need to do is download the 1.41 from GitHub, unzip it, and run it. All your settings should be there. Then you can export a config bundle and import that into the new version. Alternatively I think you could move over the config file but that’s somewhere in appdata on Windows or Library on Mac or some hidden directory on Linux.
Thanks for the Hint, i searched in the AppData-Folder, and i found my profiles.
i copied them from
C:\Users\%USERNAME%\AppData\Roaming\Slic3rPE
to
C:\Users\%USERNAME%\AppData\Roaming\PrusaSlicer
and PusaSlicer got my old profiles.
ADD AUTO-UPDATE
Looks like crab emojis don’t post here lmao
Thanks, Great.
Add the color of each axis to the menu at the bottom right will add readability
I get a “Bad Gateway” when I try and download this.
I just spend 30 minutes looking on how I can print something from PrusaSlicer, it already was a bit hidden in Slic3r PE but now it seems completely gone? There is a Print Host Upload Queue but no way to send something to it? I don’t want to use Octoprint, just print straight to my Prusa.
I get a “Bad Gateway” too
The feature of printing over USB was removed.
Looks great – a welcome update!
Observation: Parametric layer height modification via settings window is gone- this was a very useful and easy understandable function in 1.42.
In Prusa 2.0 it SHOULD be possible to obtain the same result using a modifier – BUT IT DOES NOT WORK. It has no effect on layer height after slicing.
I suspect this is already submitted as an issue on GITHUB.
The curve manipulated layer heights function is also great, but sometimes you would like a distinct change in layerheight for a specific layer interval – then the curve interface is not precise – parametric is preferable.
Keep it up. Very nice update 🙂
Really nice overall. Keyboard shortcuts help should be displayed in a floating window, not a modal dialog (IMHO). Would save time learning new things.
Is there any reason the arrange items on the plate now moves the purge block as well?
@nico.mommaerts
Unfortunately printing directly to the printer was dropped in the perl to c++ conversion. At the moment the three ways to print are: save gcode to SD card and print from SD card, queue through Octoprint (which you have said you don’t want to do), or save the gcode and print that through pronterface.
To quote the blog post above:
——————————-8<——————————-
To make the transition faster, we dropped some of Slic3r’s features:
* Printing over a serial line (USB)
* 2D toolpath preview (but you can still orient the camera to look from the top, Shortcut is the “1” key)
These features may be re-implemented in the future.
Can you add different types of support generation for FDM prints? Tree-like supports? That seems to be the main thing Cura does pretty well.
Hi,
trying to figure out how to change color with my MMU2S from a certain layer height.
Example: want to switch to extruder 2 from 10mm onwards. How to do that in PrusaSlicer?
Thanks for any help,
Hagen
Hi Jo,
good job with the package..
Bug report: Win7 64: Crash after exporting Conf.bundle. The export is successful though.
That’s fast.. already fixed…
Also trying to figure out how to change color based on layer height. The plus you are supposed to press according to the video isn’t showing up.
Re. the removal of being able to print over USB.
That’s like buying a new car with all the latest features, but no wheels. Come on people.
Give us built in WiFi and/or USB printing – both from the latest software.
“Tom Sanladerer using the horrible Slick-three-arrgh pronunciation had nothing to do with it, I promise”
hahaha .. made my day 🙂
I can’t get my Octoprint to work in PrusaSlicer 2.0. It tells me that I need to have Octoprint 1.1.0 or higher, but I am at version1.3.11
Any ideas?
Hi! Did you find a solution to this issue? I have the sam here :/
Printing over WIFI. I have not tried this yet, but, I would assume we can transfer file gcode files easily with a WIFI enabled SD Card.
I have posted this question on Facebook and on Prusaprinters.org. However, no one has answered me.
When I unzipped the Download I got Prusa-Slicer.exe and Prusa-Slicer Console.exe Both look the same and both are v. 2.0 etc. What is the difference? My guess is that Prusa-Slicer is the one to use, because it does not open a dos screen on my win 10-64 bit machine.
Also, it does not install like a typical Windows 10 program. It does not come up in my Start menu or in my Add/Remove Programs list. In the end, I went to the program Prusa-Slicer.exe, in my Download subdirectory, right clicked and pin the program to my Taskbar and my Start menu. I know this is not right. What should I be doing?
It sounds like maybe you didn’t run the installer program, but just copied the executable code to your computer.
If you download the program from Prusa’s website under “Drivers & Apps 2.2.6” and get the 315MB download, I believe that includes a standard Windows installer that will modify your Registry and all that. It also includes a bunch of stuff for Prusa printers. I’d recommend this if you have a Prusa printer.
I personally do what it sounds like you did, and just copy the “PrusaSlicer-2.0.0+win64-201905201652.zip” file at 17.3MB. Then move the unzipped directory where you want to run it from. You can then modify Windows default program settings to have windows run PrusaSlicer when it sees .stl and other 3D files.
Thanks for making such great software and releasing to the community for free! I could not be happier. Really nice user interface and much faster too.
No USB printing anymore? Madness!!!
You can still run Slic3rPE until they add this into PrusaSlicer. I’m running both for a while until I’m satisfied that PrusaSlicer is stable and happy. You could, of course, connect your printer to a Raspberry Pi with OctoPi and run Octoprint and go wireless :-).
Forum thread suggests it won’t be reimplented. Everything else in the new slicer is exciting and I’m looking forward to using it.
Bolting a Pi onto it in order to print? We are trying to encourage more people into the world of 3d printing, keep it simple.
Nice, to use the green-yellow-red colours. 🙁
Do you only work with women? Or do not you know red-green colour blindness?
Design fail for 9% of all men.
Nice release. Very much appreciate the new UI. I have a 4K monitor and your vector graphics are a welcome relief. Before this I was looking at fuzzy text and poorly scaled menus. And the new features are very cool. Thank you!
Just a note about what happened when I first ran the program. Mind you, I did not use the windows installer. I just copied the compiled code from Github and dragged the PrusaSlicer folder over to my Program Files directory.
I first ran the Configuration Wizard and put in the parameters for my printer. I save this and went to look at all the Prusa printer configurations (I don’t have a Prusa printer or the drivers installed) and the program seized up. In fact, my entire Windows machine froze up, couldn’t even ctrl-alt-del to kill the process. In about 5 minutes, Windows caught the error and sent Micro$oft a report then rebooted my machine and all was ok. I reran PrusaSlicer and everything seemed fine but the Prusa Printer configs were gone. I’m fine with this since I was going to delete them anyway. Just wanted to let you know, cause it could freak out a less mature computer user. (I’ve been hacking around since around 1980 🙂
Nice work team!!!!!!! I’d have to say saving G code is SO MUCH FASTER!
LOVE the ability to add custom supports – Blockers and Enforcers.
Big wet kiss to you all!! :~~~~~
The arrangement tool still needs some optimization, it still hangs when sorting 50-60 instances of the same small part.
In PrusaSlicer I can not fix the STL errors in the Macbook version only in the Windows version. Does anyone know how I can solve this problem?
Hello,
I am using Slic3r v1.41.2+win64
The custom profiles are not in these dirs.
Do you mean that it is only upon uninstallation that they get copied in these ? I do not bet on that.
The directories do exist, but are empty in my case. Yet, I have custom profiles.
PrusaResearch.ini is pristine and was not edited by me.
You also seem to forget that AppData is an hidden directory, which will make many people crazy.
Can you answer to the specific question : where are my custom profiles saved ?
This has been the only really annoyance i have had repeatedly with Slic3r PE over the versions.
Yes I can export, but that is not my question.
Hello,
Can we use “Raft” in Prusa Slicer2.0?
I cannot find any function about “Raft” in Pursa Slicer2.0
Print Settings -> Support Material -> Raft Layers
The program works great nut now it seems like it just quits and I have to restart the program it is happening more and more frequently and now it is impossible to get any work done. I have reinstalled and rebooted windows several time to no avail. Please help
Upon starting PrusaSlicer 2.0 after installing, the bed has a square object on it. It is about 6 by 6 cm and .5 cm tall with 2 small triangle cut-outs and 2 triangle extensions on one side. I can highlight and move/rotate it but cannot delete it. I has no name on the right hand side dialog box. ???
The change filament feature is very useful, but I use it more often to insert a nut or nuts than to change filament, so a variation which pauses print and moves the print head but does NOT unload the filament would save me the effort and waste of cutting it square and reloading.
Exactly the same for me. I haven’t yet used the pause feature for changing colour, but I do use it for inserting nuts etc into the prints.
Wunderbar!
I would really love to see prusa slicer to have tree supports. Cura has them and I think they are pretty good. is it a possibility that we may see tree supports in Prusa Slicer in an upcoming release?
I would like to know how to change the extruder number on the fly. For example, after I have all my spools loaded for the MMU2, I might want to print an object where the major color is different between prints. So I would print a sheep with the coat white for the first object, then maybe want the second sheep I print to have a red coat. They are different spools white on extruder 1, Red on Extruder 5. How can I con into Prusaslicer and tell it to change the extruder for those layers? When I right click the object I get a change extruder line, but it only changes the default extruder – not the one assigned to those layers.