


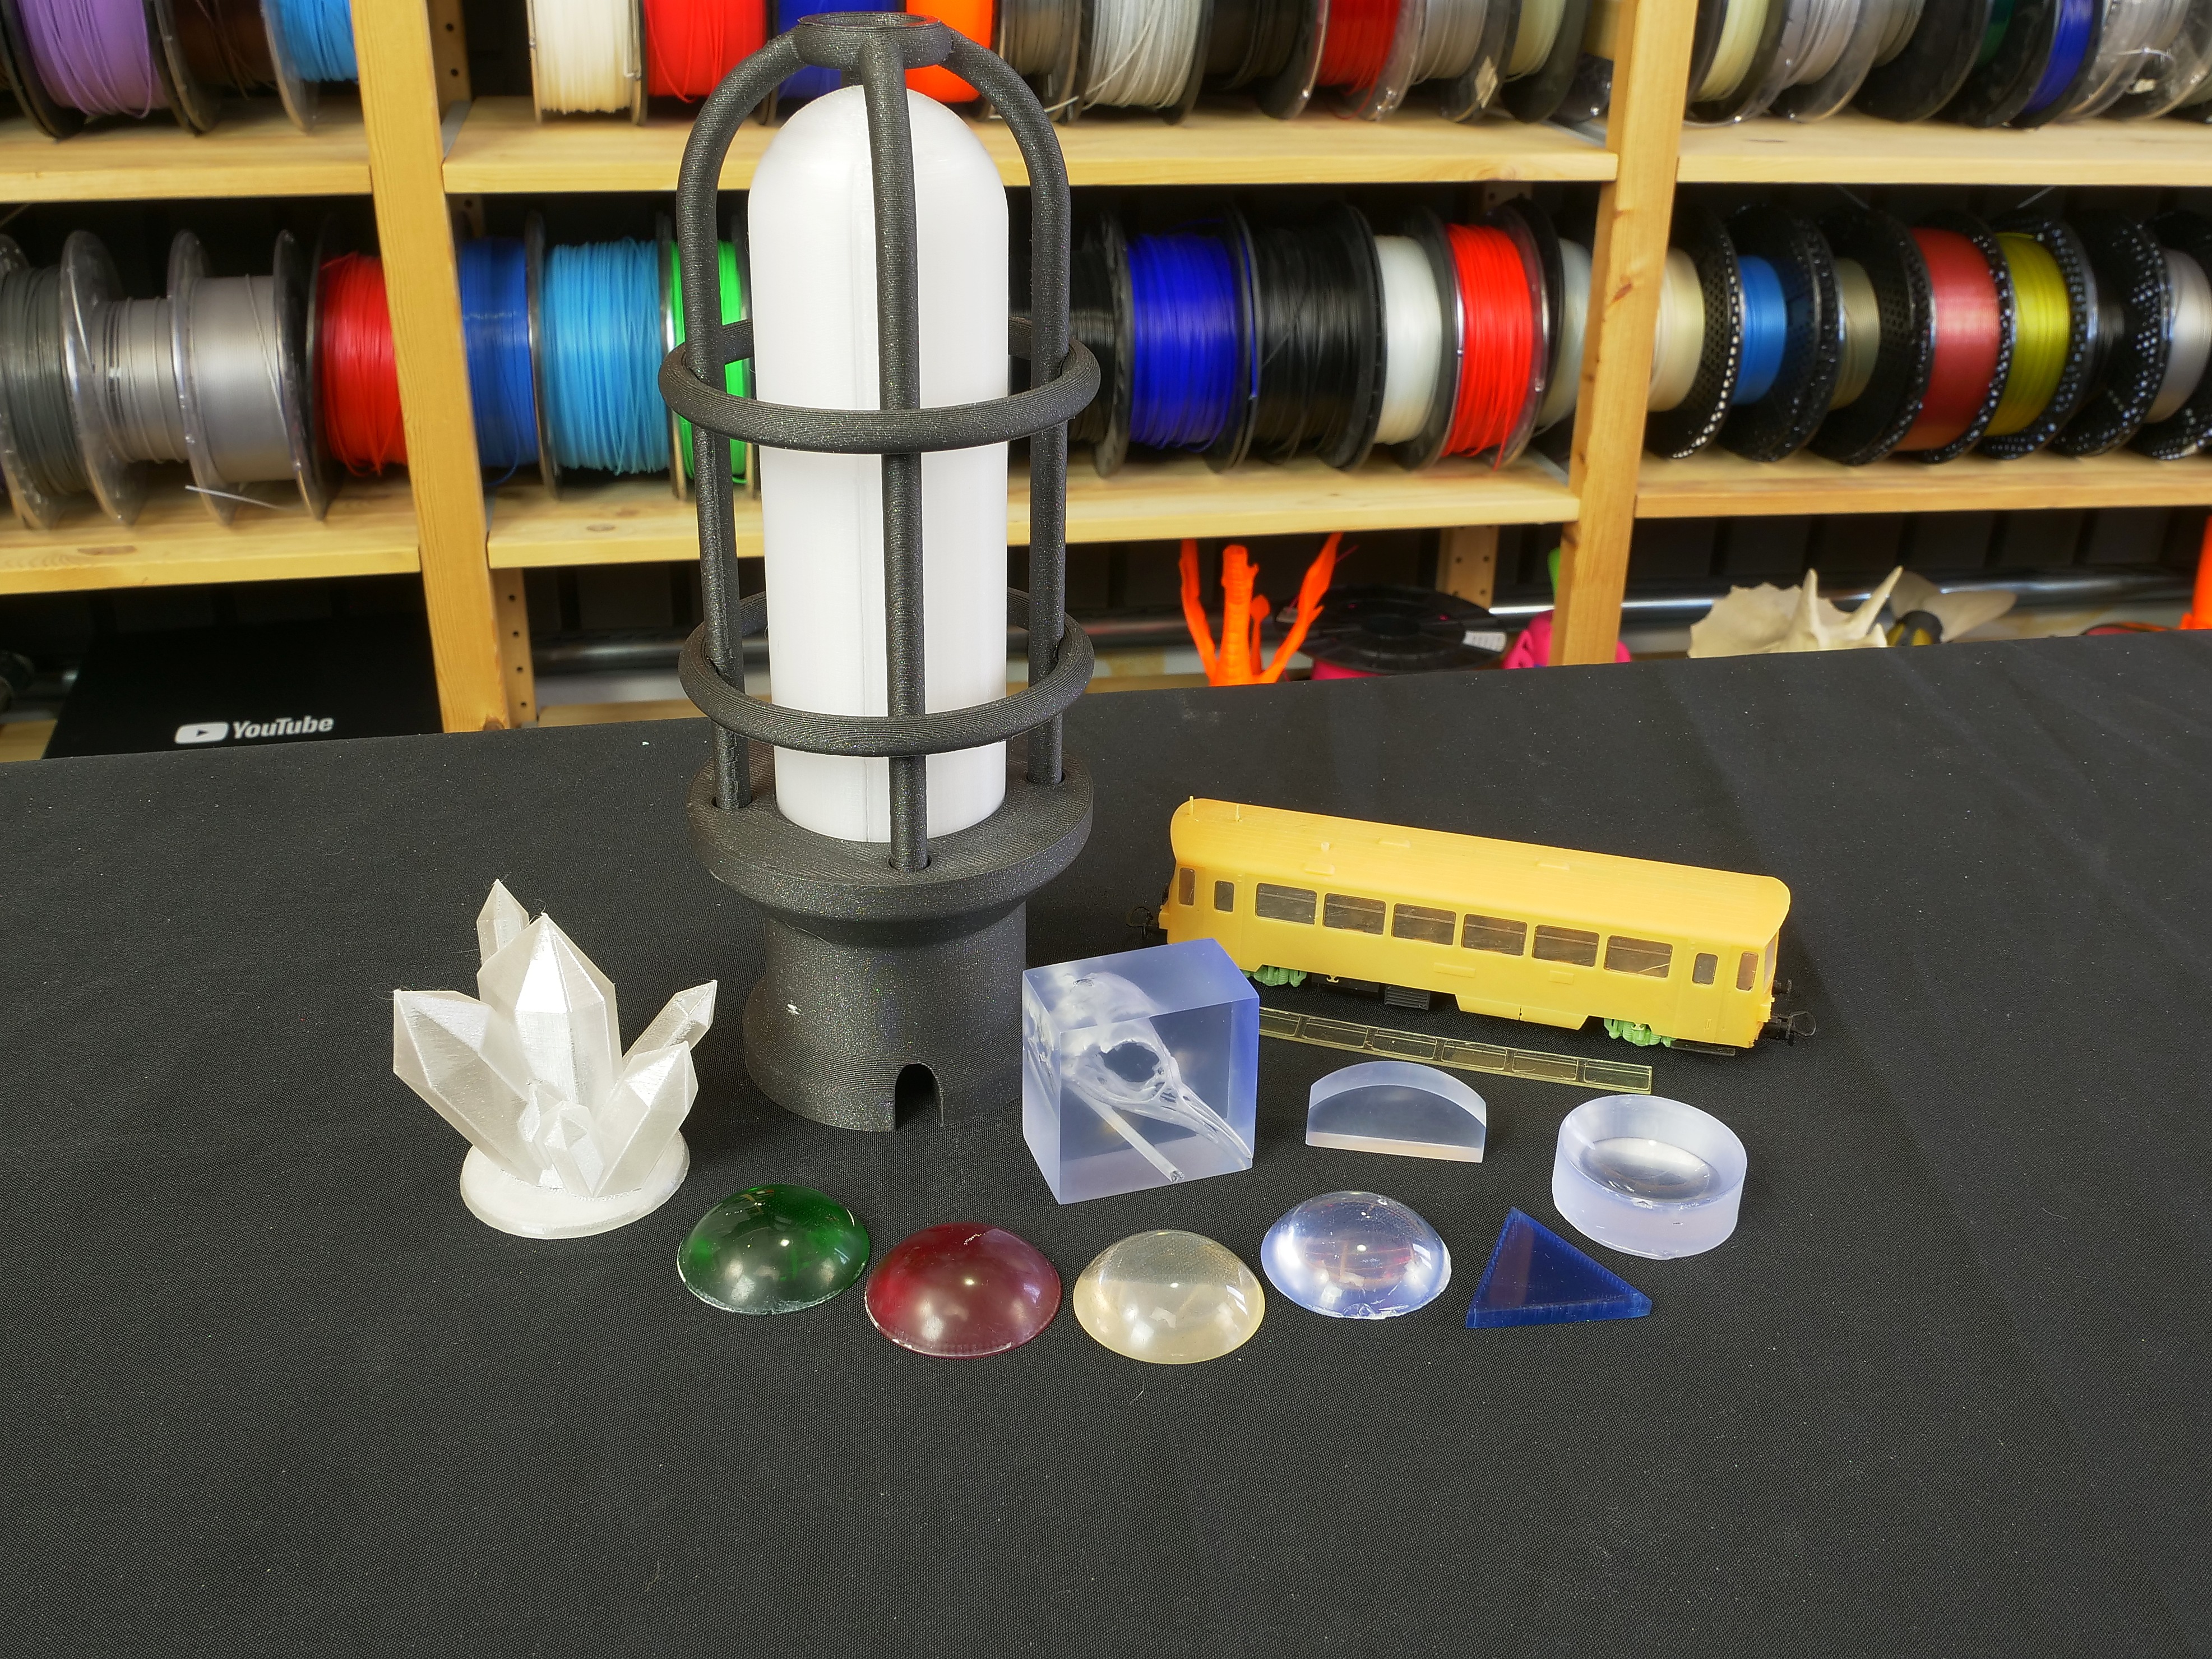
Lenses, crystals for lightsabers (not real ones, though), lampshades and many other useful things can be actually 3D printed using transparent filaments. However, it takes more than just using the correct filament. We’ll show you how to use your Original Prusa MK3S, MINI or even the SL1 to print awesome transparent objects. So let’s dive right in!
The key to printing great looking transparent objects? Correct printing settings and carefully picked materials. Since our FFF 3D printers use filaments and the SL1 prints using resin, we’ll divide this guide into two parts. Let’s take a look at the FFF 3D printers first – we’ll use our Original Prusa i3 MK3S for our examples.
What you need to keep in mind is the fact that when printing with filaments, tiny bubbles remain around extruded plastic. So if you use a transparent filament and print it with generic settings, the results will likely be subpar, because the bubbles will disperse light inside the object making it merely translucent, not transparent. To improve the optical properties of the model, we need to get rid of those bubbles. In other words, we want to print an object with the most dense inner structure possible.
The basic foundation starts with slicing. First, we import the object of choice into PrusaSlicer and set the infill to 100 % with rectilinear pattern. Then, decrease the layer height – we have used 0.05 mm to ensure the extruded plastic will be nicely compressed and fill in all of the gaps. We will be adjusting the Extrusion multiplier (Filament Settings – Filament – Extrusion multiplier), Infill parameters/overlay (Print Settings – Advanced – Infill/perimeters overlap) and Print cooling (Filament Settings – Cooling – Keep the fan always on/off). Slice the object as usual, with one of the suggested material settings (see below).
Now, let’s move onto printing. It really helps to keep your 3D printer well-maintained and correctly calibrated – check out our guides on proper printer maintenance in case some fine-tuning is needed. It’s especially important to have a well-calibrated first layer, because at 0.05 mm layer height, even small bumps will affect the print quality and you might also run into issues with a clogged nozzle. We definitely recommend to check the condition of the nozzle. When printing with well-used and worn nozzles, filament debris inside will create issues during the process. Consider switching to a new nozzle – it’s inexpensive and replacement is quick and easy – just follow our guide here.
As for the materials, our settings are below – however, some individual adjusting might be required.
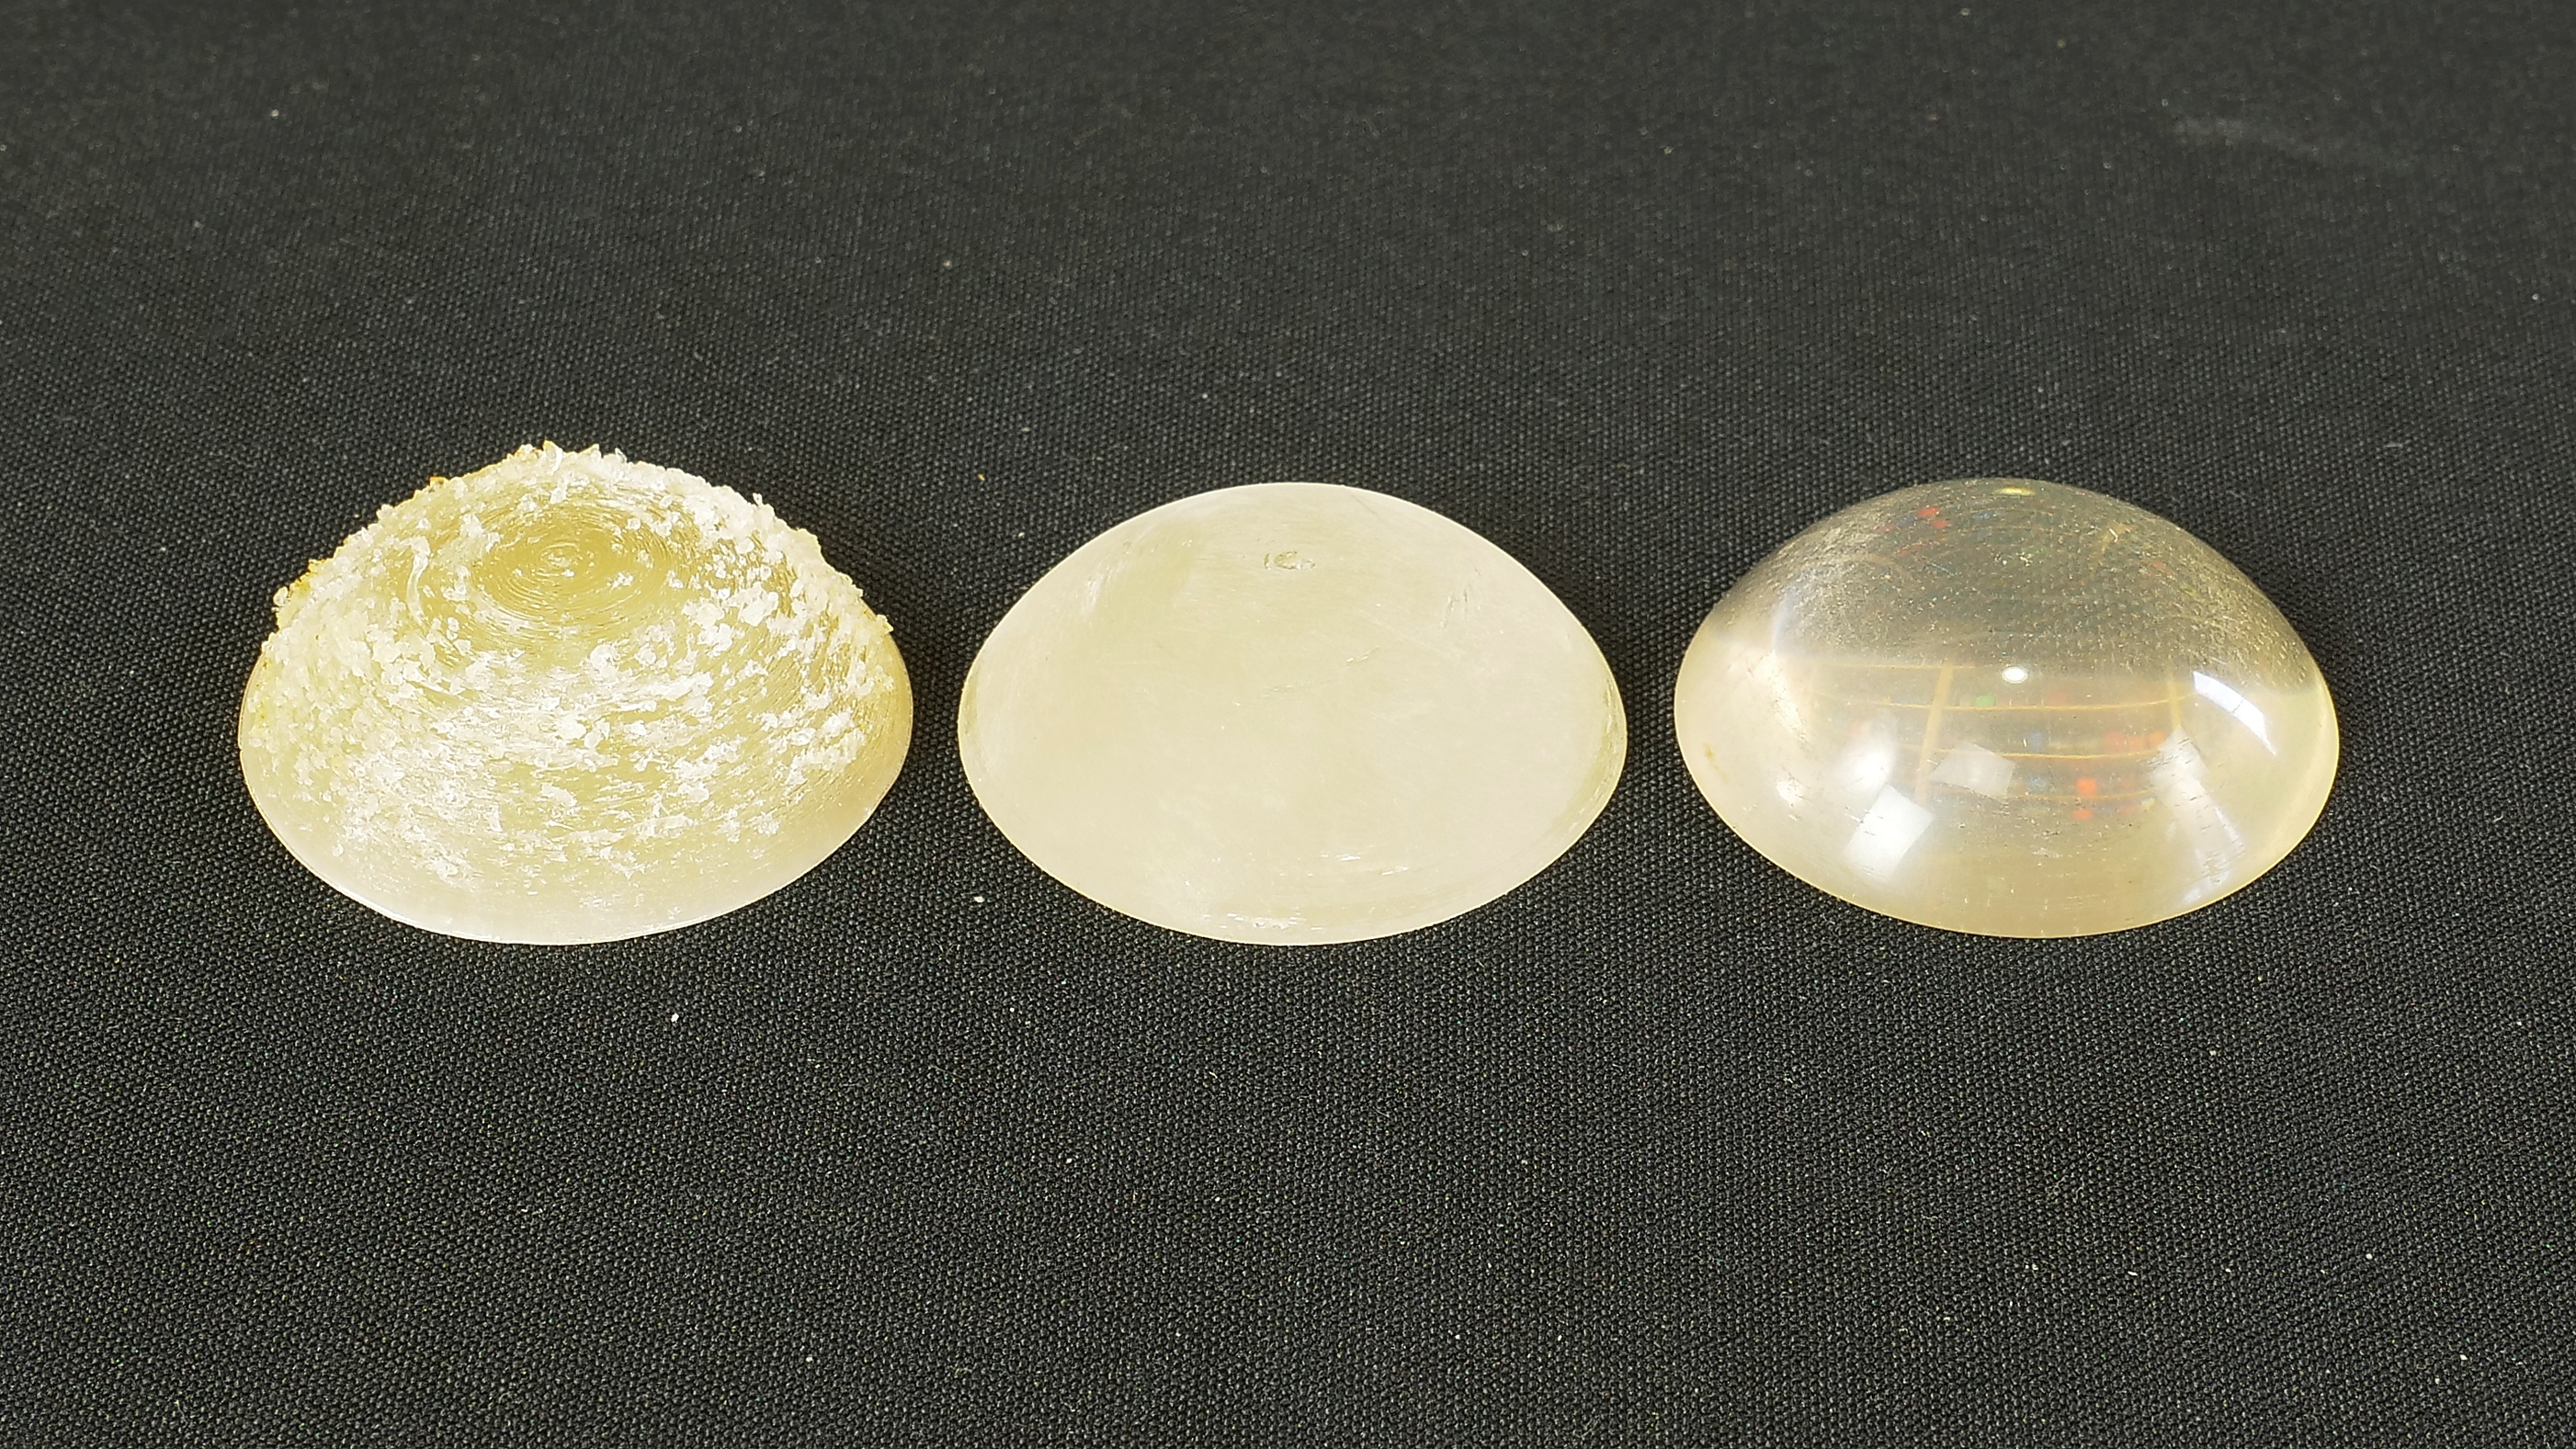
Three stages of an object printed on a FFF 3D printer (from the left: raw 3D printed model, sanded lens, polished lens)
ABS (Filament PM)
Following the steps of Fenneclabs, we tested ABS first. We confirmed that, thanks to its properties, it’s a really good material for printing transparent objects. The best results were achieved with a flow rate of 105 % (adjusted during the print process on the device’s LCD screen) and Infill/perimeters overlap set to 6 %. This setup has a downside, though: the excess material will accumulate on the surface of your model. However, compared to PETG, ABS doesn’t suffer from prolonged exposure to heat and the residue can be easily removed using a sharp knife.
Similar to ABS, PETG is another good option for printing transparent objects. However, when printing with PETG, bits and pieces of burned filament are sometimes left behind the nozzle. To achieve good results, we increased the flow rate to 112 % and set the Infill/perimeters overlap to 5 %. To get a really good infill, you will need to slow down the print speed to a mere 20 % (during the print, go to Tune / Speed). Then, decrease the temperature by 5°C to lower the chance of burning the filament. This allows you to turn the print cooling fan off completely.
PLA Crystal Clear (Fillamentum)
The last filament type we tested was PLA Crystal Clear by Fillamentum. While this filament delivers some very nice results, we found it the least suitable for producing transparent objects. It has a tendency to clog the nozzle and is never completely transparent. The infill is always a bit cloudy or yellowish. We had to increase the flow ratio to a 110 %, Infill/perimeters overlap to 5 % and turn the print cooling fan off.
However, as stated above, this material is not ideal for printing clear/transparent objects. It’s much more suitable for translucent objects. Feel free to experiment with infill, the number of perimeters, layer height or the nozzle diameter to achieve the desired result.
SLA resins
Printing transparent objects with resins is much easier than with filaments. Resins require much less experimentation, tweaking and tinkering. Just select the correct material profile in PrusaSlicer and slice the object as usual. SLA 3D printers produce completely solid objects. There is no infill structure or bubbles that will refract light.
We tested three resins from our eshop: Prusa Transparent Tough, Prusa Trans Red, Prusa Trans Green and also the 3DM Tough Clear. All resins proved to be easy to use and required no additional adjustments of printing settings. When performing post-processing on printed objects, use a layer height of 0,025. Also, keep in mind to add a base with angled edges under the model, because otherwise the printed objects can be slightly more difficult to remove from the printing platform.
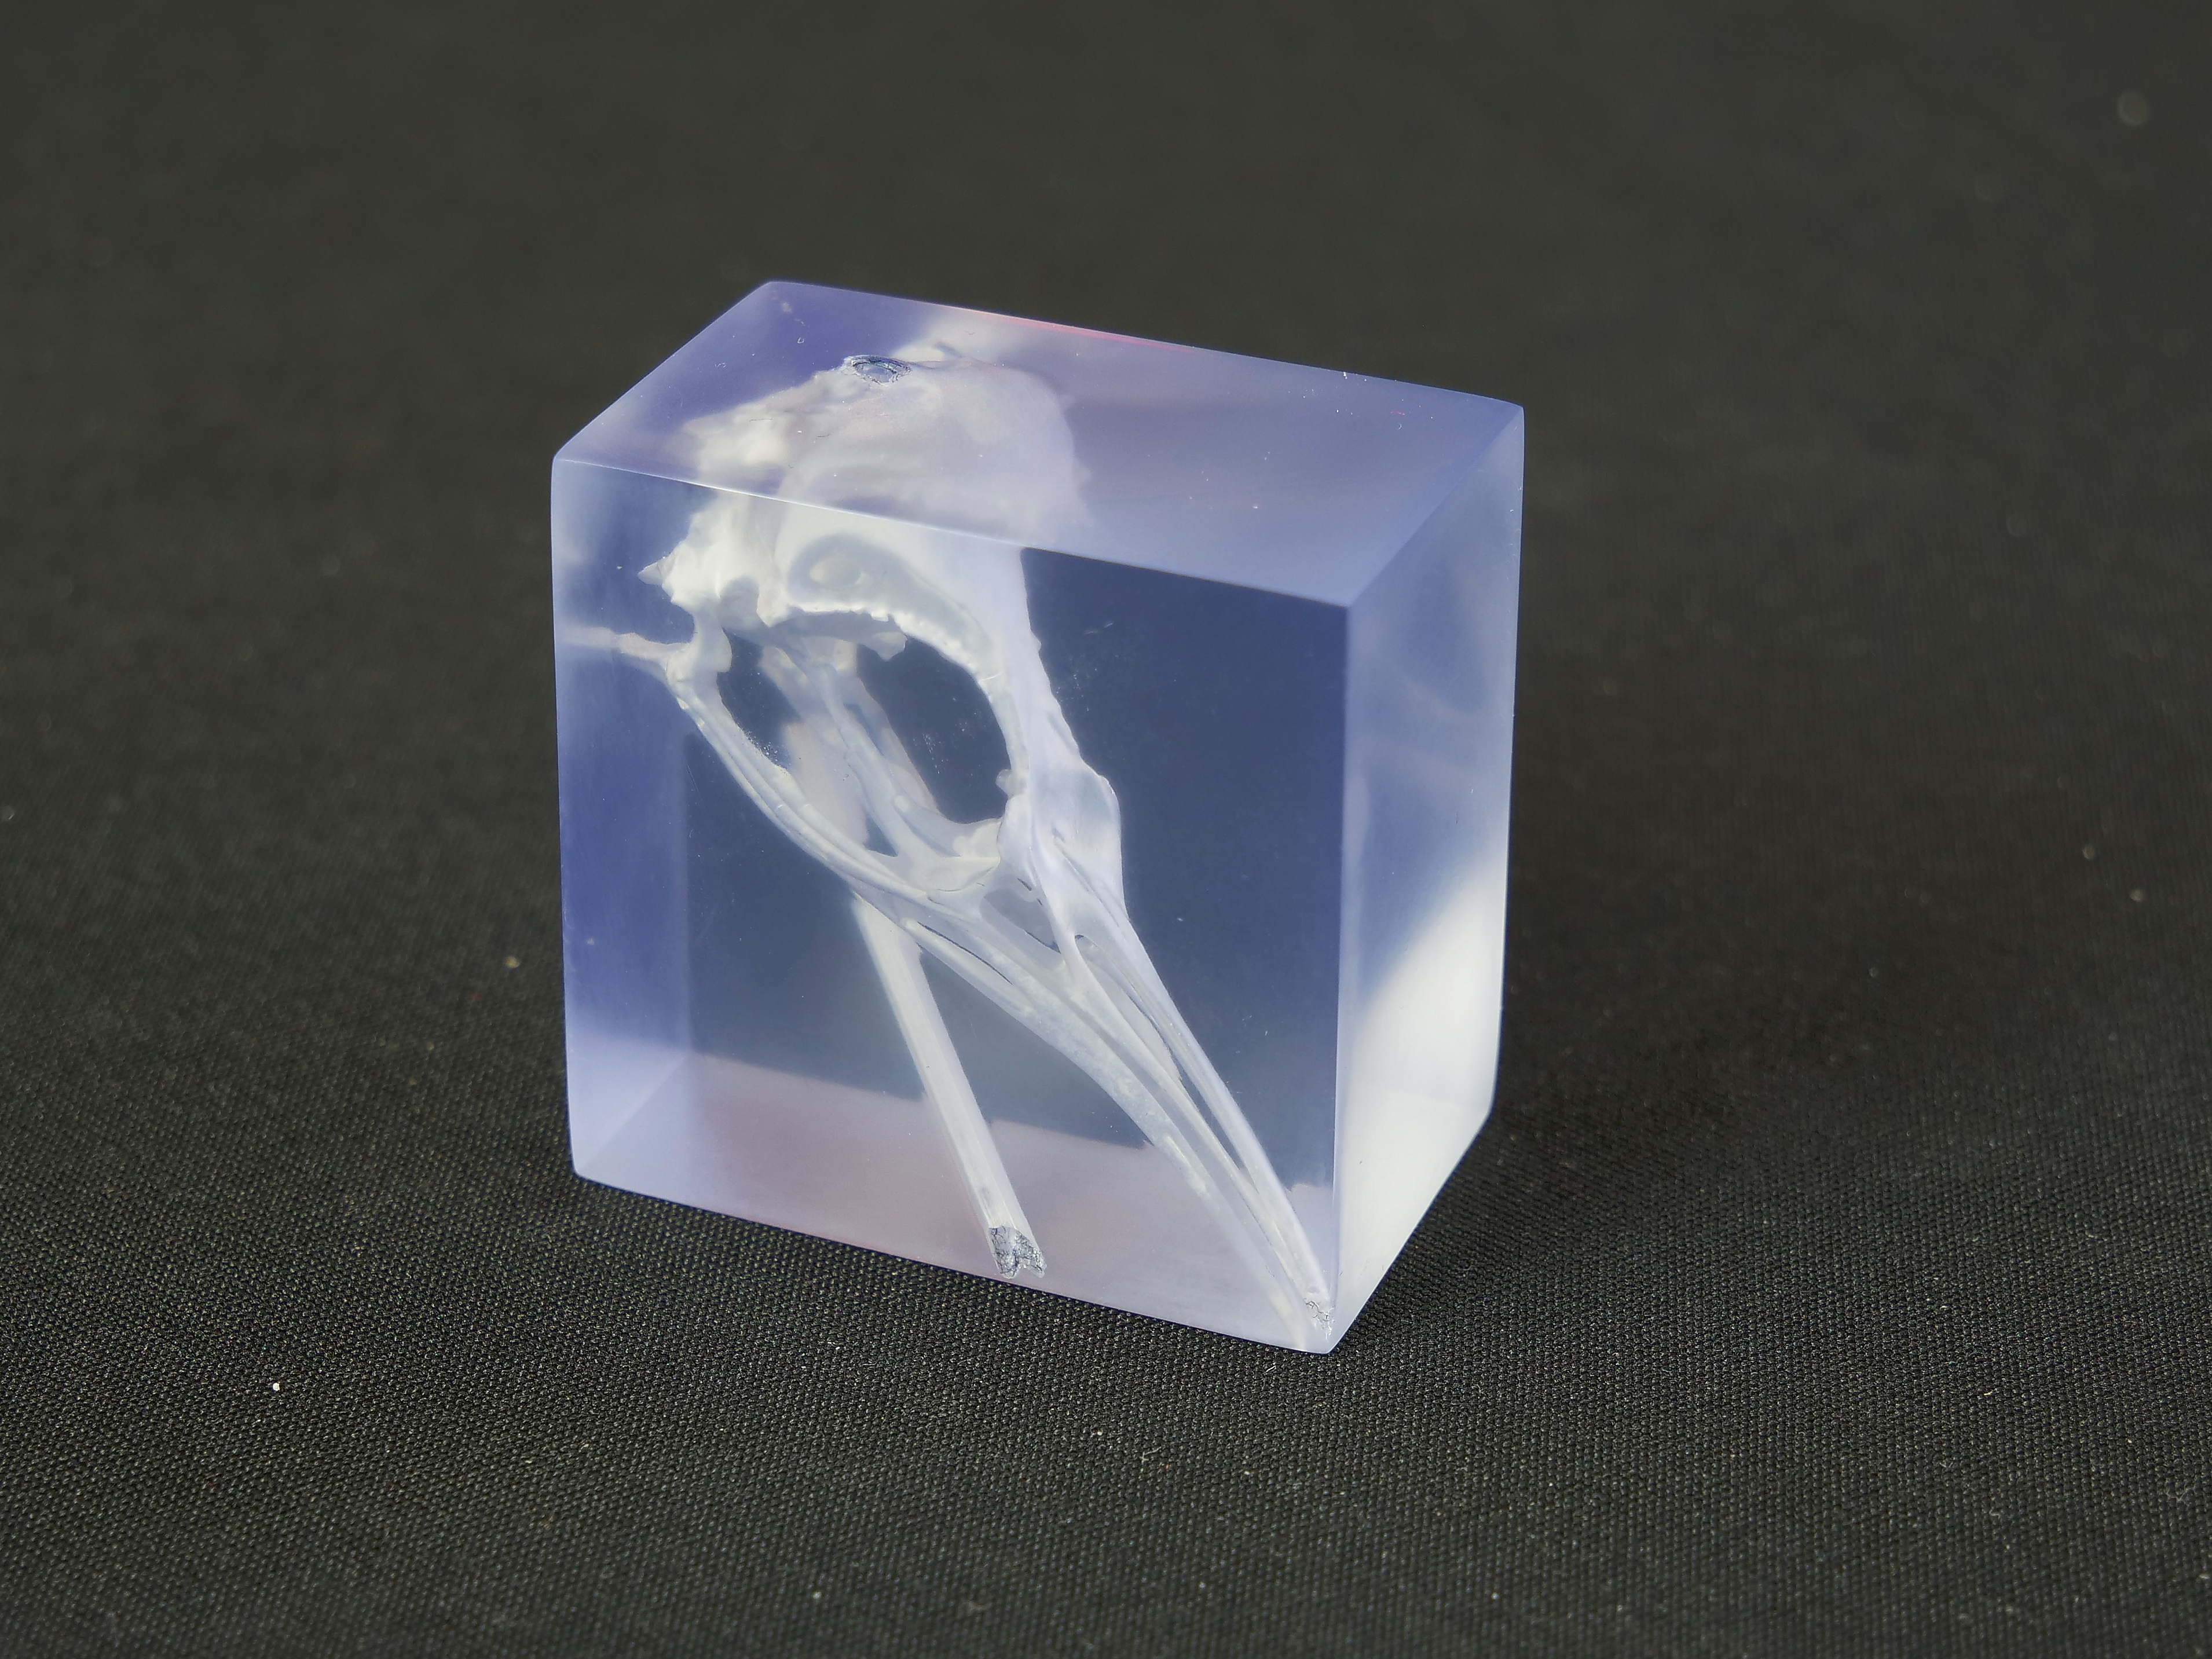
SLA print with 3DM transparent tough resin (inverted model of an emperor penguin skull)
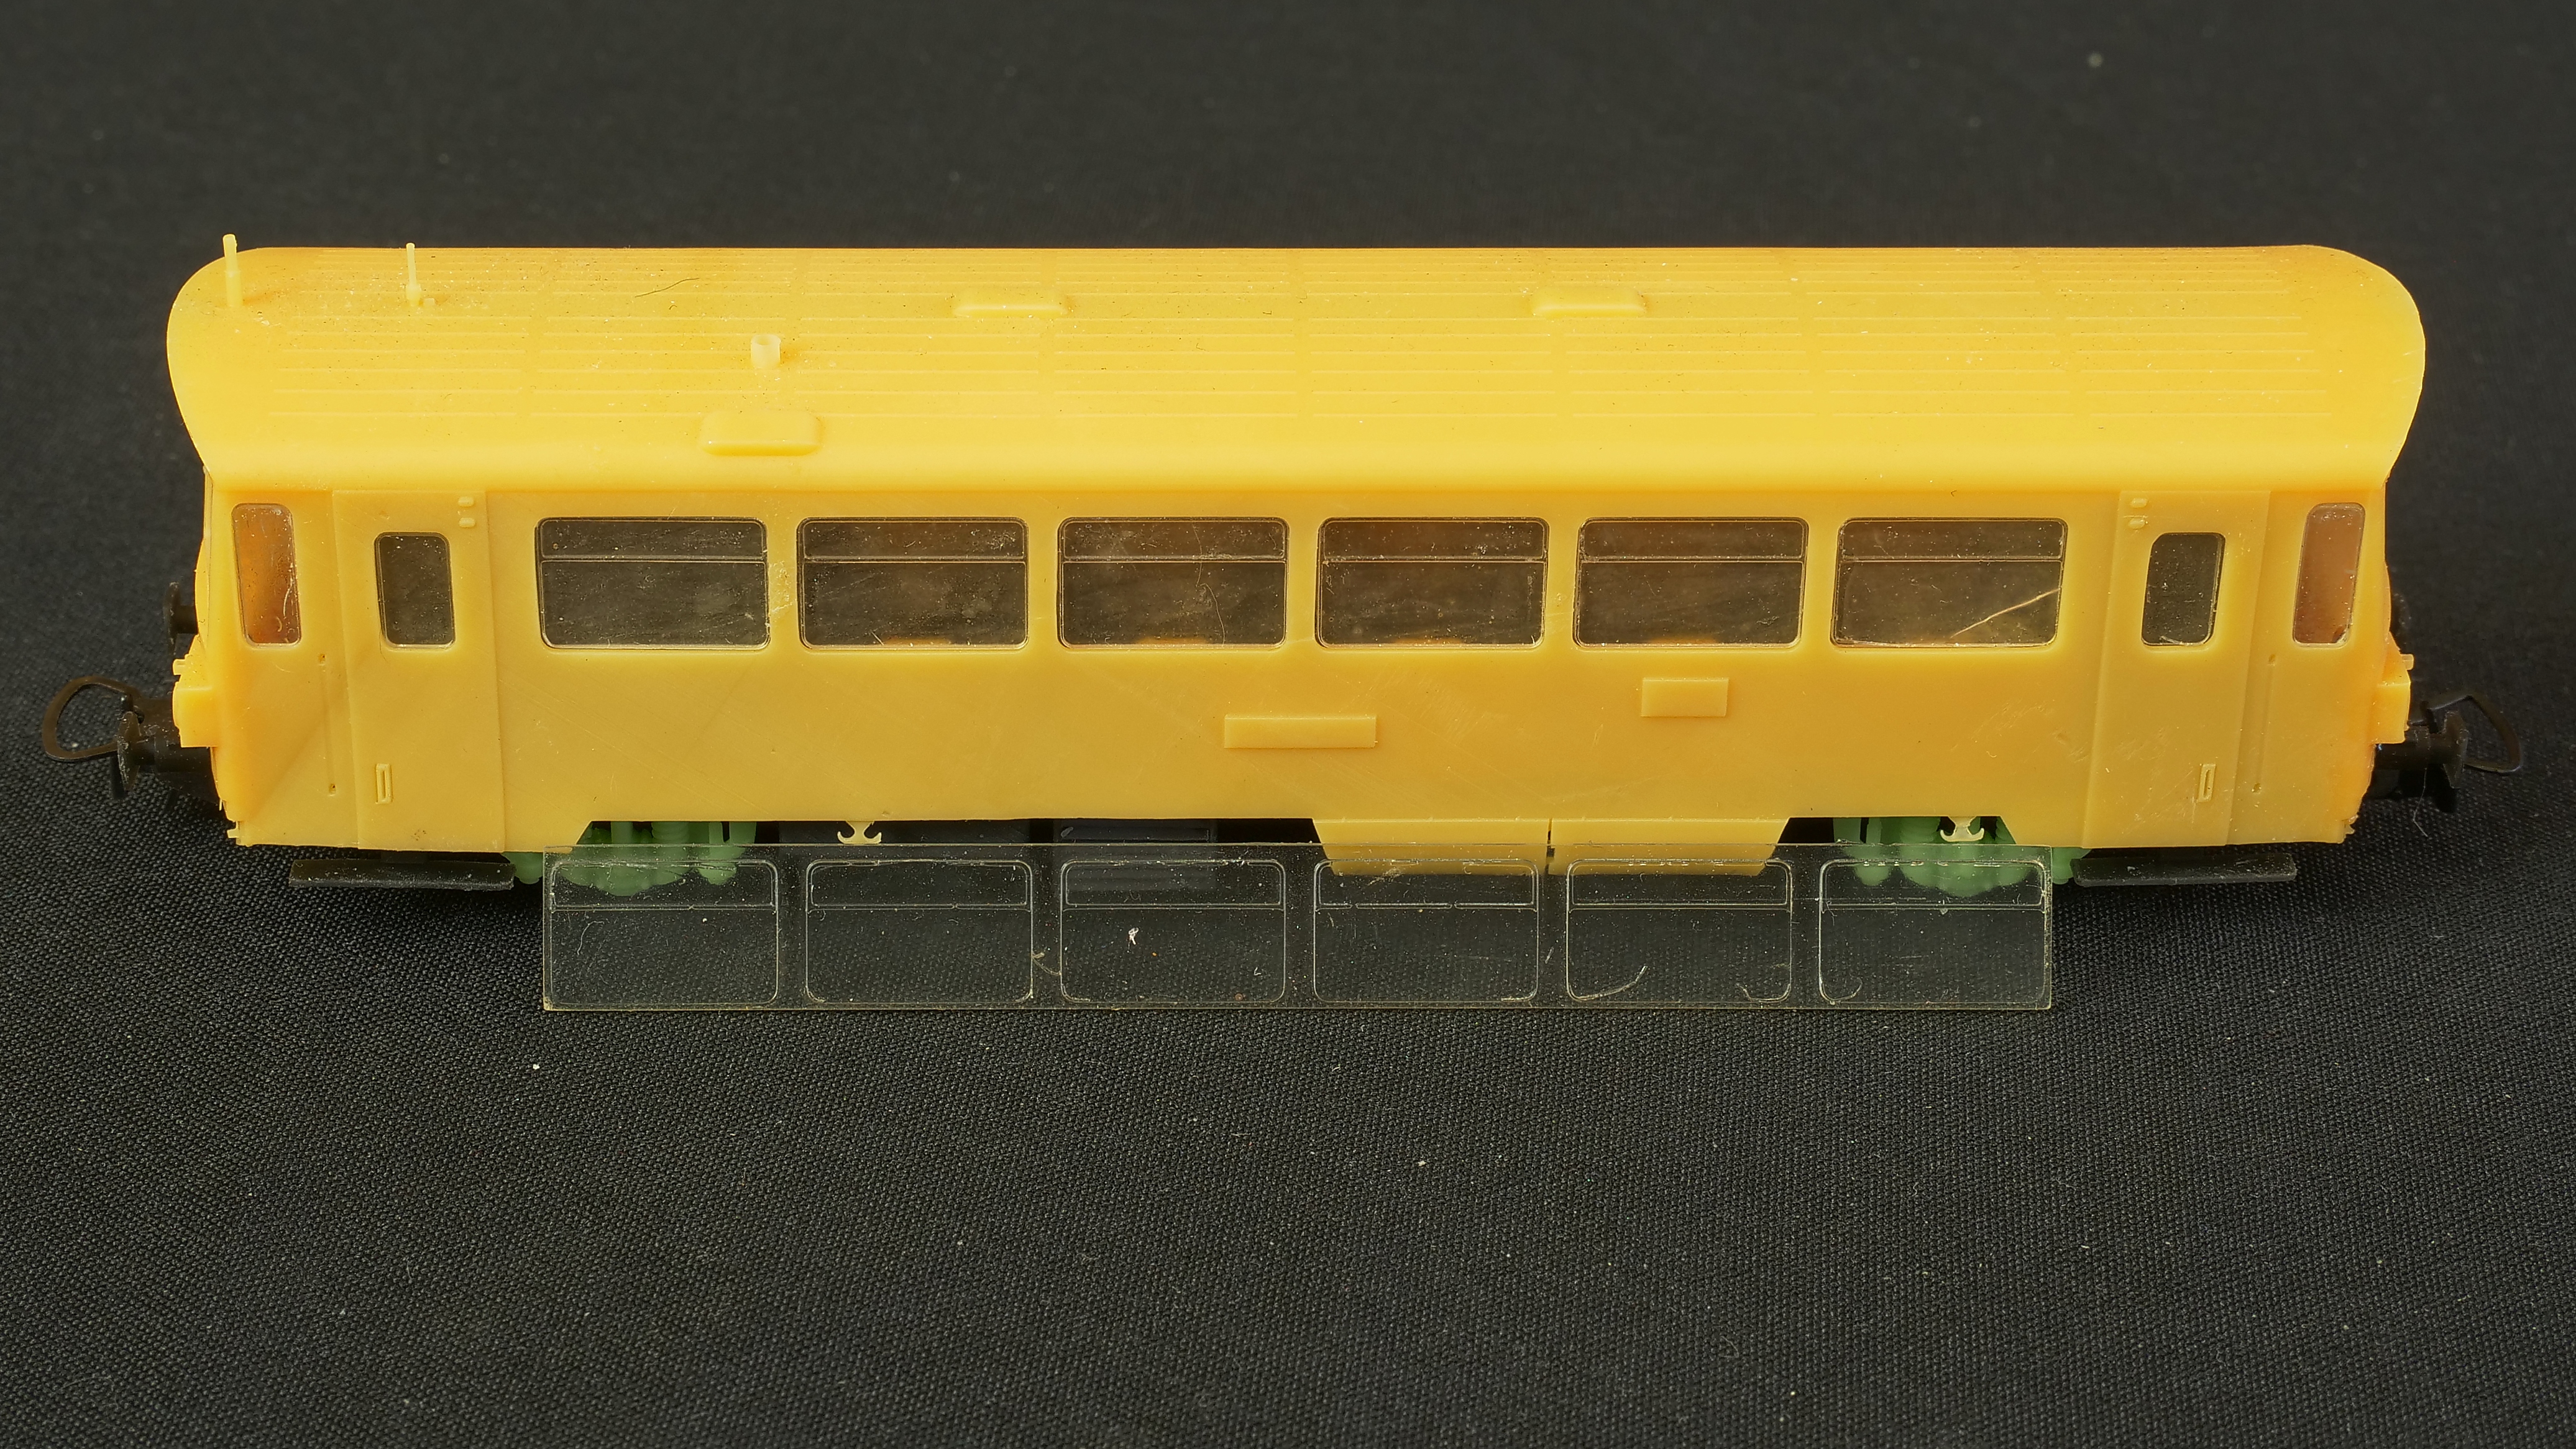
Motorized carriage 810 with SL1-printed transparent windows
Post-processing
However, 3D printing alone is not enough to achieve optimal results. Objects printed on the MK3S with the settings described above will have some excess residue on the surface, while objects printed on the SL1 (with photosensitive resins) have visible layers. Usually, most of the printed objects will be translucent, not transparent. How do we address that?
Some extra work is required. So roll up your sleeves and get ready for some sanding and polishing 🙂 For prints from the MK3s, it is necessary to remove any excess material with a knife and sand the model as needed. Otherwise, the end result may appear rough or uneven. Bear in mind that a groove that appeared during printing could be visible later. When sanding, beging with a coarse-grained paper (e.g. 400) and gradually move to finer and finer sandpapers. We recommend wet sanding – simply dip the sandpaper into water regularly during the process. We went all the way to 1500-grit sandpaper. However, the results were still not perfect. So, what’s next?
Let’s polish model! There are two options: apply a colorless shiny acrylic lacquer, or go for the thorough process, which involves using a piece of cloth and a rubbing compoud. Using the lacquer is an elegant and quick solution that enables us to achieve very nice optical properties of the printed object. On the other hand, the lacquer is prone to scratching and can be easily become cloudy after being touched. And this where the more demanding method comes into play: proper polishing. As a result, the object will be more resistant to scratches and fingerprints. It’s a bit more time consuming. For filament-based prints, you need a piece of soft cloth (e.g. flannel, cotton), however, for resin prints, you also need a rubbing compound (a polishing paste).
Acetone smoothing
You may have heard, materials such as ASA or ABS can be smoothed by suspending the printed object over an acetone bath. However, we would like to warn you: while acetone can smooth out the surface of ASA or ABS-based objects and dichloromethane can smooth out PETG, the infill will remain unaffected. Fenneclabs achieved the same result.

Acetone smoothed models
Temperature changes and filament humidity
In light of our recent article on annealing of plastics, we started to wonder whether a change in the temperature of the printed object could potentially change the transparency of the infill. It’s actually possible, however, rather high temperatures were required, which also caused the object to warp and lose its original shape.
Another interesting thing is how cooling the object changes the opacity. ABS always has a milky/cloudy look when being printed. However, once it cools down, it becomes transparent. And a quick word of warning: if you decide to use an old spool of PLA filament that absorbed some humidity from the environment, it will become cloudy after cooling, despite the fact it was transparent during the print process. Re-heating has no effect.
Give it a try!
Once you learn how to setup your 3D printer for the use transparent materials, a new range of opportunities will open up for you. You can start printing lamp shades, diverging lenses and much more. And if you manage to polish the objects really well, you will find out they can have some really good optical properties. 3D printed lenses can be used to focus light from an LED, or SLA-made windows for scale models can be used to make them look more realistic – take a look at our scale models of trains. You can also go to the very beginning of the model creation process and use software such as Blender to achieve unusual results – such as this inverted model of a penguin skull inside an otherwise solid block (see above).
To sum up the advantages and disadvantages of transparent materials, our conclusion is that SLA-based printing is the most attractive and appealing option. Sticking to classic FFF 3D printing can still achieve very nice results, however, more work may be required. Some extra fine-tuning, slower printing, a lot of time spent with post-processing. But even with the little extra effort required, you can produce truly excellent results and you will be probably surprised, what you can accomplish with a 3D printer!
Have you tried printing a transparent object yourself? Share it with the rest of us! 🙂
Very interesting – I might try this !
In PrusaSlicer v 2.2.0+ i do not see “Print Settings – Advanced – Infill/perimeters overlap”. I see “Perimeters” and “Infill”, neither of which appears to be about overlap, and neither of which suggests 5-6% as a reasonable setting. What am i missing?
OK, found it. It is an Expert setting, normally hidden.
Any settings set for Prusament PETG Clear (https://shop.prusa3d.com/en/prusament/1216-prusament-petg-clear-1kg.html) ?
Using this advice, I am working on printing a case cover with Filamentum PLA on a Mk3S, smooth sheet. I noticed that the first layer did not have full consolidation in some areas, leaving the surface rough. The areas where the print lines fail to merge are the long paths, where the surface of the adjacent path has had time to cool. Even on the long paths, the consolidation is good near the ends where the nozzle quickly passes back by the recently placed material. This is similar to painting, where you have to keep a “wet edge.” I think I can get better results if I control the infill of the surface so that the nozzle paths are short.
I am trying to print clear parts using Prusa PETG Clear filament. I am unclear on the instructions about the fan settings. Under Filament Settings > Cooling > Keep fan always on, should the box be checked or unchecked? The instructions for PETG above say something about decreasing the temperature by 5 degrees ‘allows you to turn the print cooling fan off completely’ but I’m not familiar enough with the settings for where / how to do that. Is that something you also do on the printer itself, for example?
Thanks in advance.
How did you get the skull in the SLA print with 3DM transparent tough resin (inverted model of an emperor penguin skull)?
I am using petg, and followed the setting and instructions. However, when I do what they said, it’s clear, but not clear enough to achieve nice optical properties.
Any advice?
It’s also blurry
Thanks for the write-up! The article mentioned yellowing of one of the PETG filaments. Thus is often due to moisture in the filament causing hydrolysis when heated. PETG can pick up moisture quite easily. I learned this the hard way years back – printed a Minecraft inspired flashlight one evening, which came out great, and then the same g-code produced a yellow-brown tinged cloudy result the next night. Totally mystified me at the time, since no amount of settings tweaking would fix it.
I would like to do some printing with transparent PETG. What kind of rubbing compound (a polishing paste) exactly should be used? There exist so many different kind of polishing pastes.