


The final version of PrusaSlicer 2.3 with Paint-on supports, Monotonic infill and Ironing is out! Big thanks to all of you who tested alpha, beta and release candidate versions and shared feedback with us. PrusaSlicer releases bring major changes and improvements and version 2.3 is no exception. Let’s take a look!
What’s new in PrusaSlicer 2.3
Before we jump into a detailed description of new features, here’s a quick overview of the biggest additions:
- Paint-on supports
- Ironing
- Monotonic infill
- Seam painting
- Adaptive cubic infills
- Print time per feature analysis
- Standalone G-code Viewer application
- Better auto-arrange with a customizable gap
- Search function for settings
- Reworked Avoid crossing perimeters function
- Physical printers (network settings)
- Many new 3rd party printer profiles
- …and much, much more!
On Windows, you can choose from two installers:
A new auto-updating lightweight PrusaSlicer installer – contains just PrusaSlicer, but you can choose the download sample objects during installation. This installer is in the beta-version, please, report any bugs to [email protected].
PrusaSlicer & Drivers installer – also includes sample objects and printer drivers. This is also the main installer for Mac & Linux distributions.
As the number of features and tools in PrusaSlicer keeps growing steadily, we also keep continuously expanding the PrusaSlicer documentation.
Paint-on supports
The community feedback is very important to us and for a while the most requested feature was a better way of manually placing supports. And to be able to easily adjust the auto-generated ones. In the past, we’ve added support blockers and enforcers – basic shapes that you could use for better control of support material placement. It was and still is a decent solution to customizing supports. However, the user experience of placing these shapes was, especially with organic-looking models, far from ideal.
The new Paint-on supports tool lets you paint directly on the object and select areas, where supports should be enforced or blocked. It is very intuitive and quick to use. You’ll find the tool in the left toolbar after you switch to the Advanced or Expert mode. After selecting an object and clicking the toolbar icon, all other objects will be hidden so they do not obscure the view. You can adjust the cursor size and paint enforcers/blockers using the left/right mouse button respectively (shift+left mouse button erases painting). You can even visualize overhangs and automatically paint the model based on a set overhang angle. Paint-on supports are also saved in the 3MF project file. So if you share the 3MF with others, they can take advantage of your custom supports. You can see the tool and all its features in our dedicated YouTube video:
Ironing
The top surface of 3D prints is typically not perfectly smooth. As the nozzle draws the perimeters and solid infill, small gaps and ridges remain visible between the toolpath lines. However, if your model has flat areas parallel to the print bed, you can use Ironing to smooth them. It works best with nameplates, logos, badges, boxes, lids, etc. It has little to no effect on figures and organic shapes in general, but it does increase the print time. So keep it off for such models.
How does ironing work? Ironing smooths flat top surfaces by running a special second infill phase in the same layer. As the hot nozzle travels over the just printed top layer, it flattens any plastic that might have curled up. The nozzle also extrudes a small amount of filament to fill in any holes in the top surface. We have a dedicated article and video about Ironing:
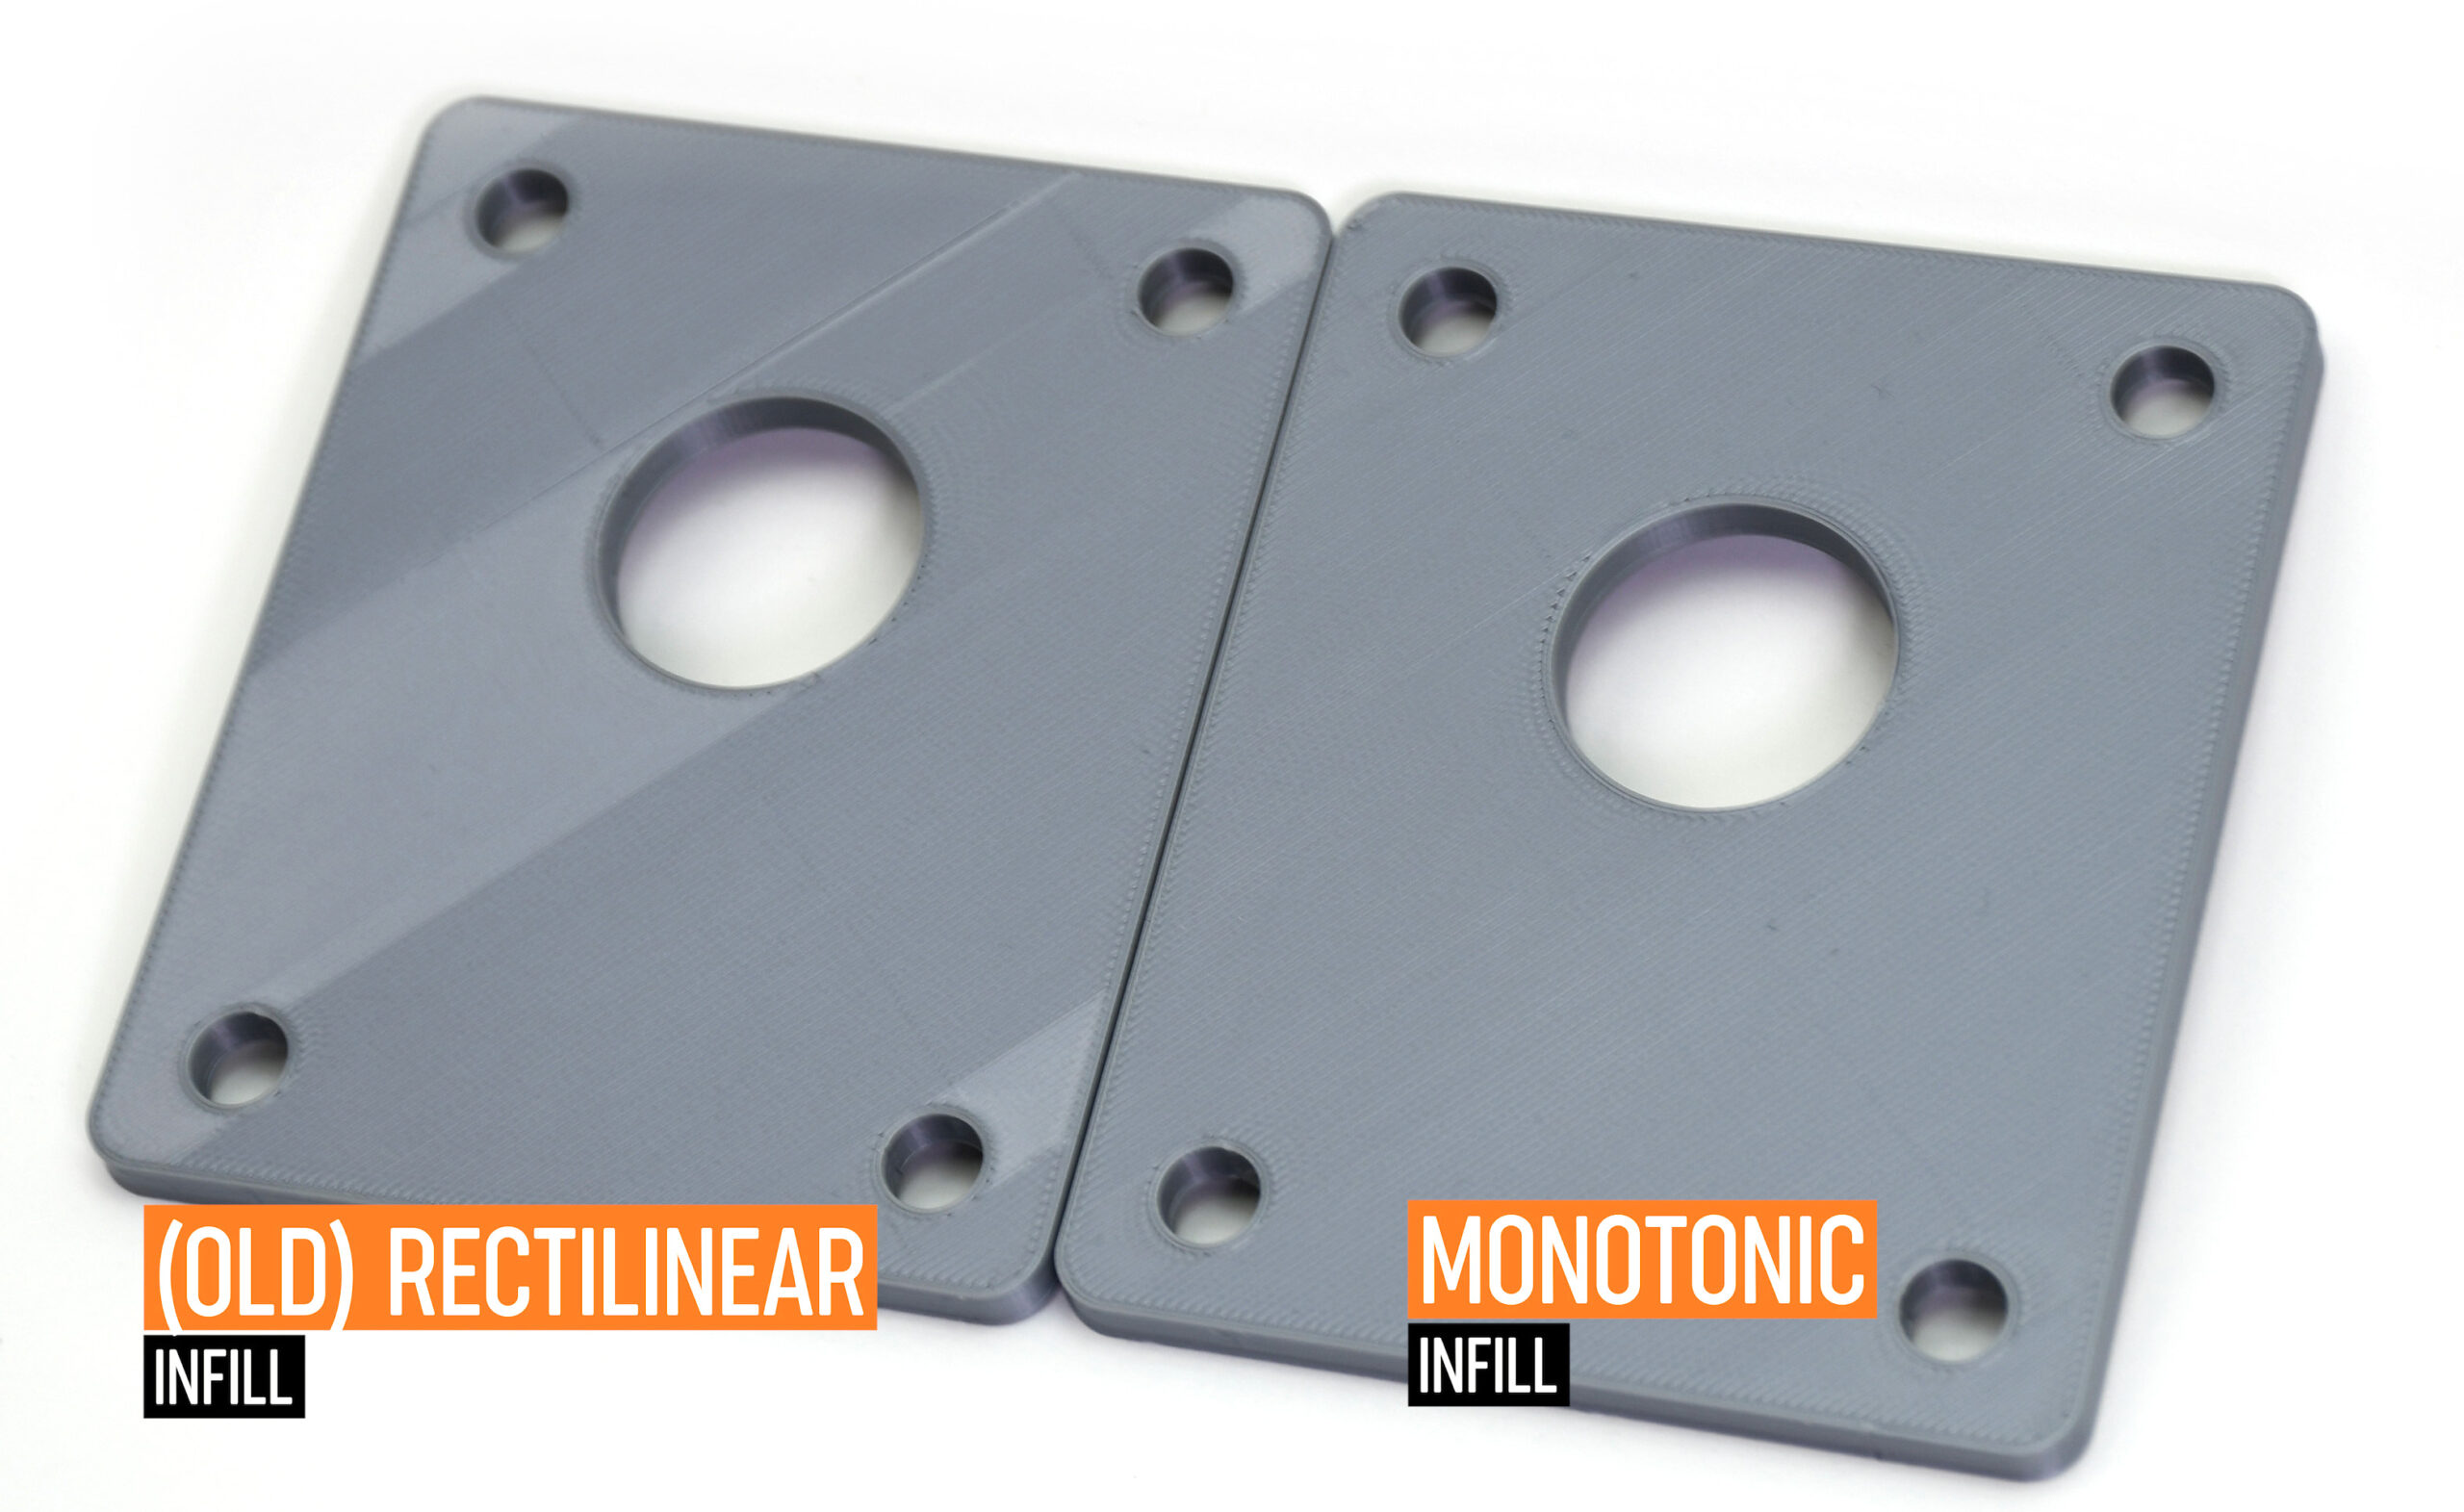
Monotonic infill
Remember those lines or scars on the top surface when there’s a hole or a text nearby? With our new default infill pattern for both top and bottom layers, these artefacts are greatly suppressed. The “monotonic” infill is essentially a good old rectilinear infill with modified path planning. The infill lines are extruded always in the same direction, left to right monotonically. This strikingly simple strategy leads to a homogenous texture without ridges.
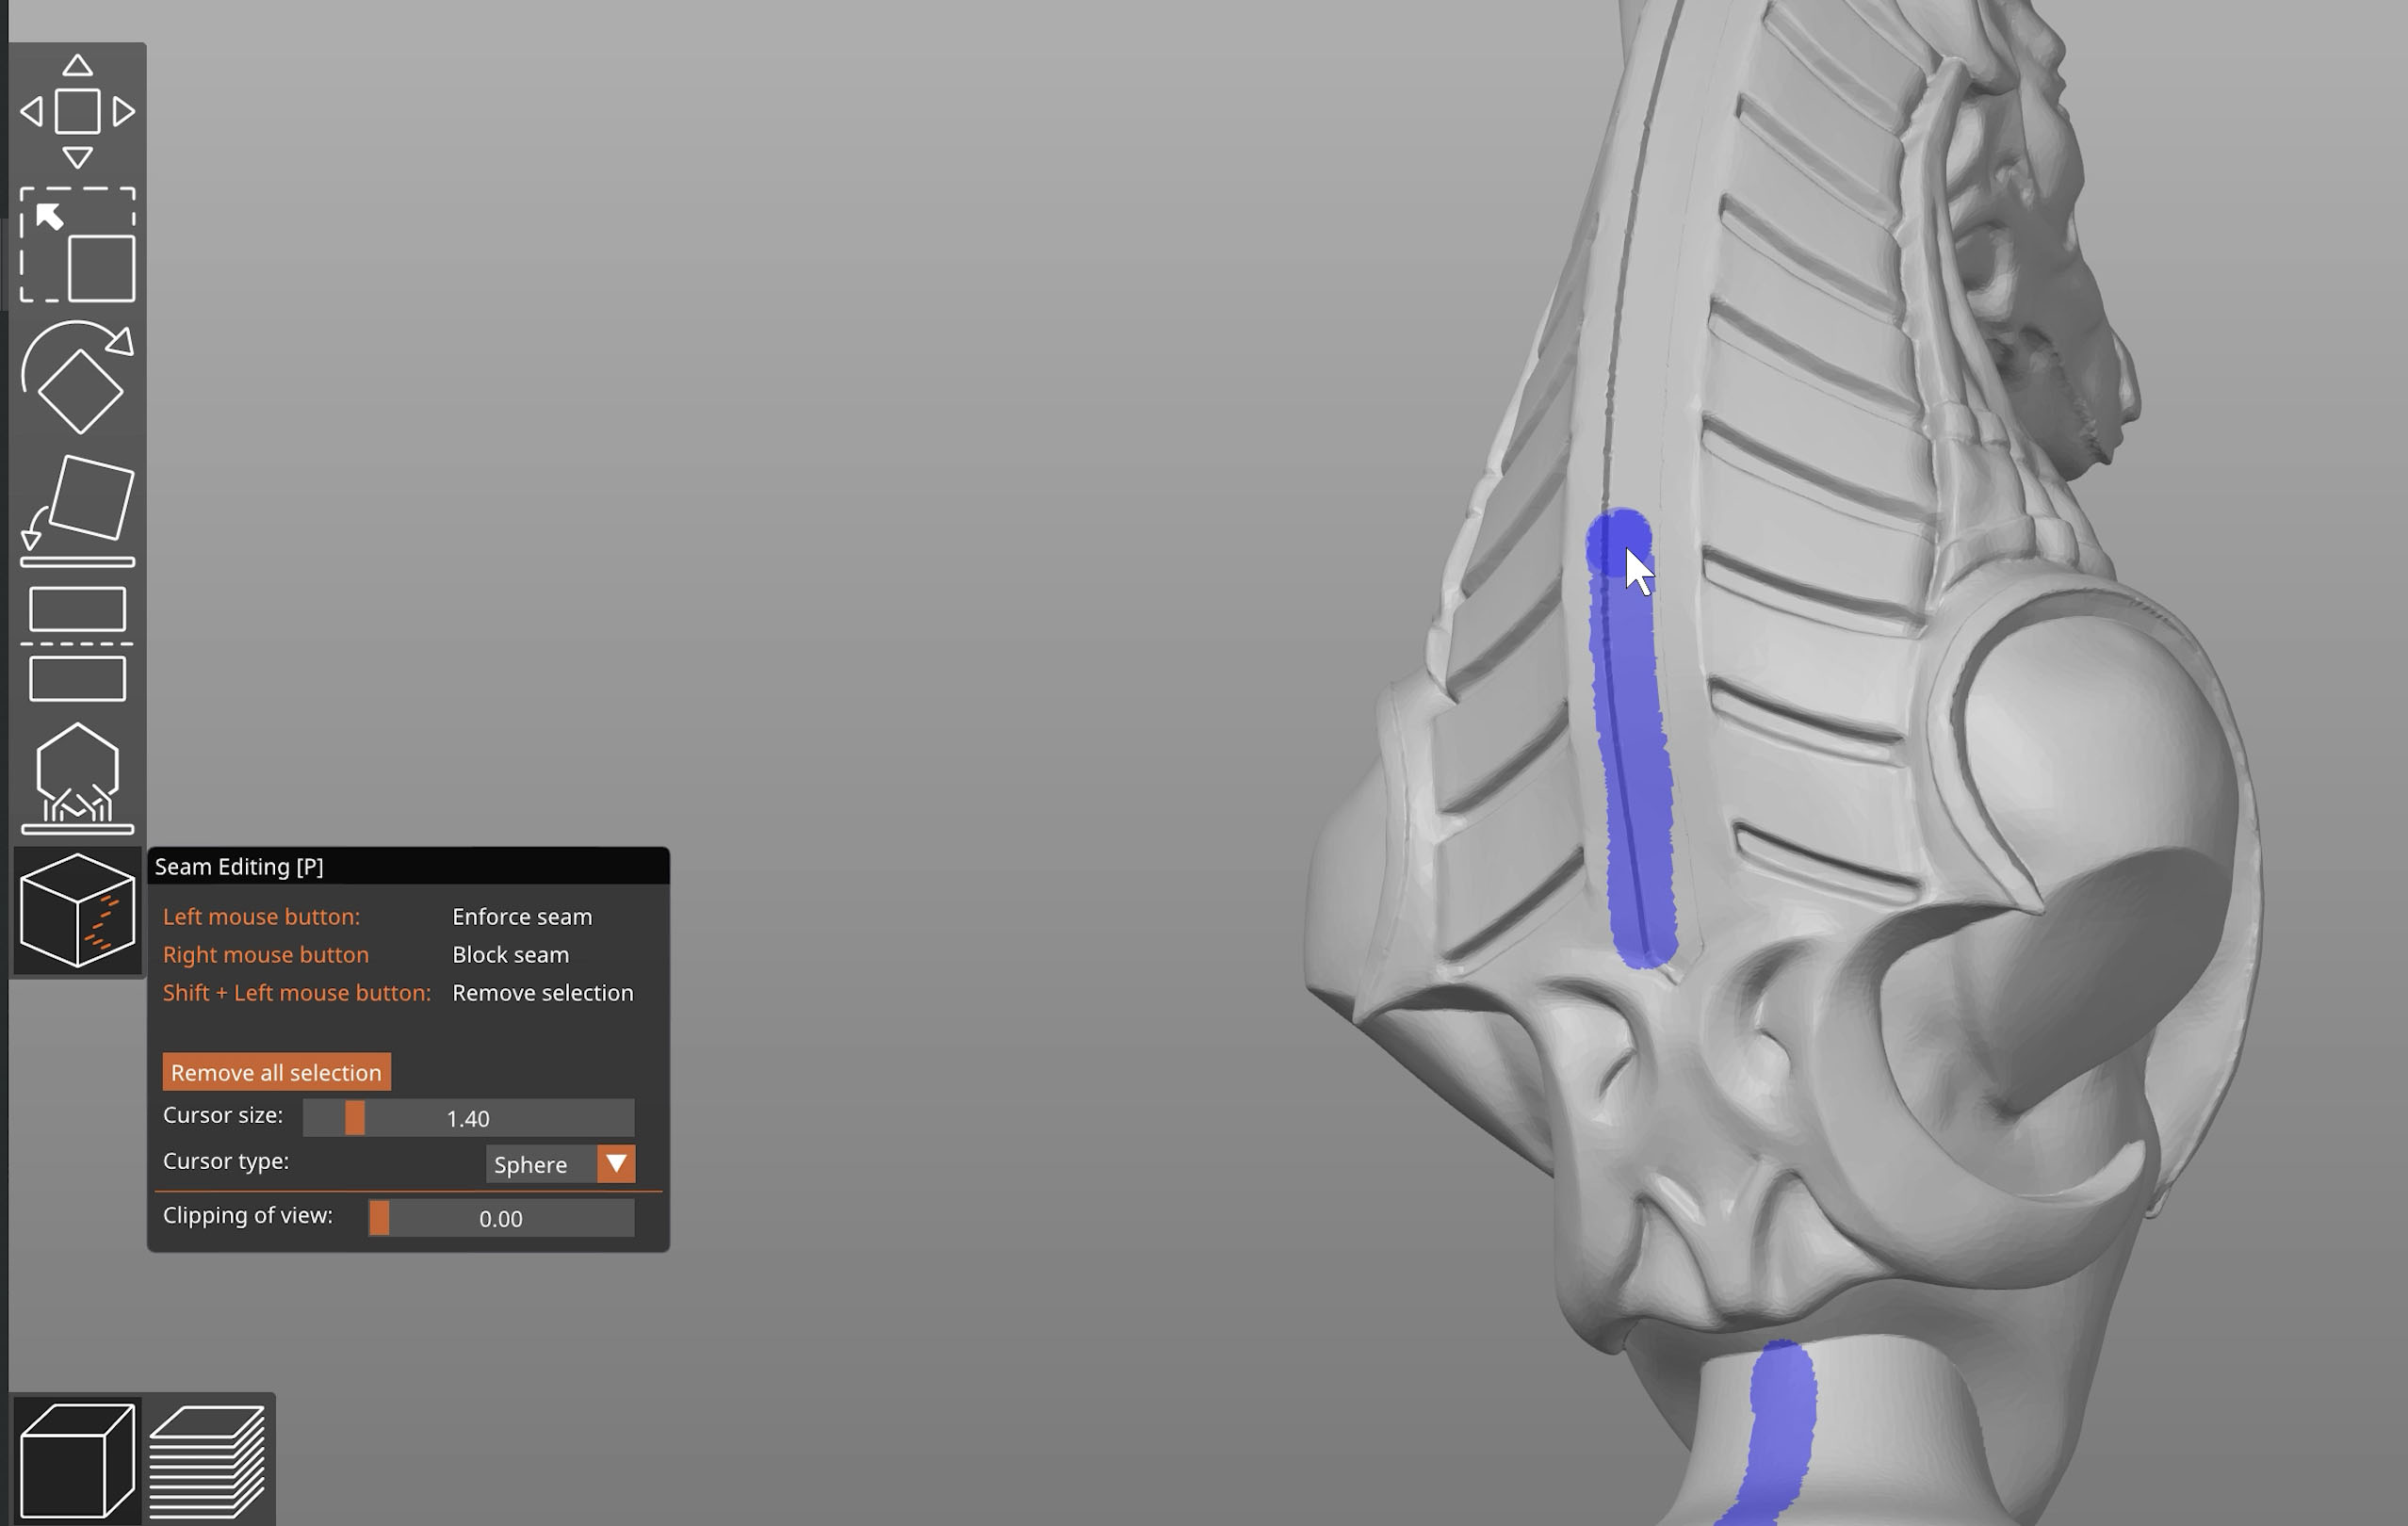
Seam painting
Unless you’re printing in the Spiral vase mode, each perimeter loop has to start and end somewhere. Furthermore, the printer has to stop extruding for a brief moment when the print head moves up to the next layer. This start/endpoint creates a potentially visible vertical seam on the side of the object. It’s also commonly referred to as zits, layer seams or scars. PrusaSlicer does its best to hide these artifacts in a corner of a model. Alternatively, you can set the seam position in the Print Settings to randomize the seam position or align it with the back of the model.
The new seam painting tool provides more detailed control over the seam placement. The tool works almost exactly like Paint-on supports. Except you’ll be choosing where the enforce/block the seam position, rather than supports. It is accessible from the left toolbar and it is only shown in Advanced and Expert modes. Check the documentation for more details.
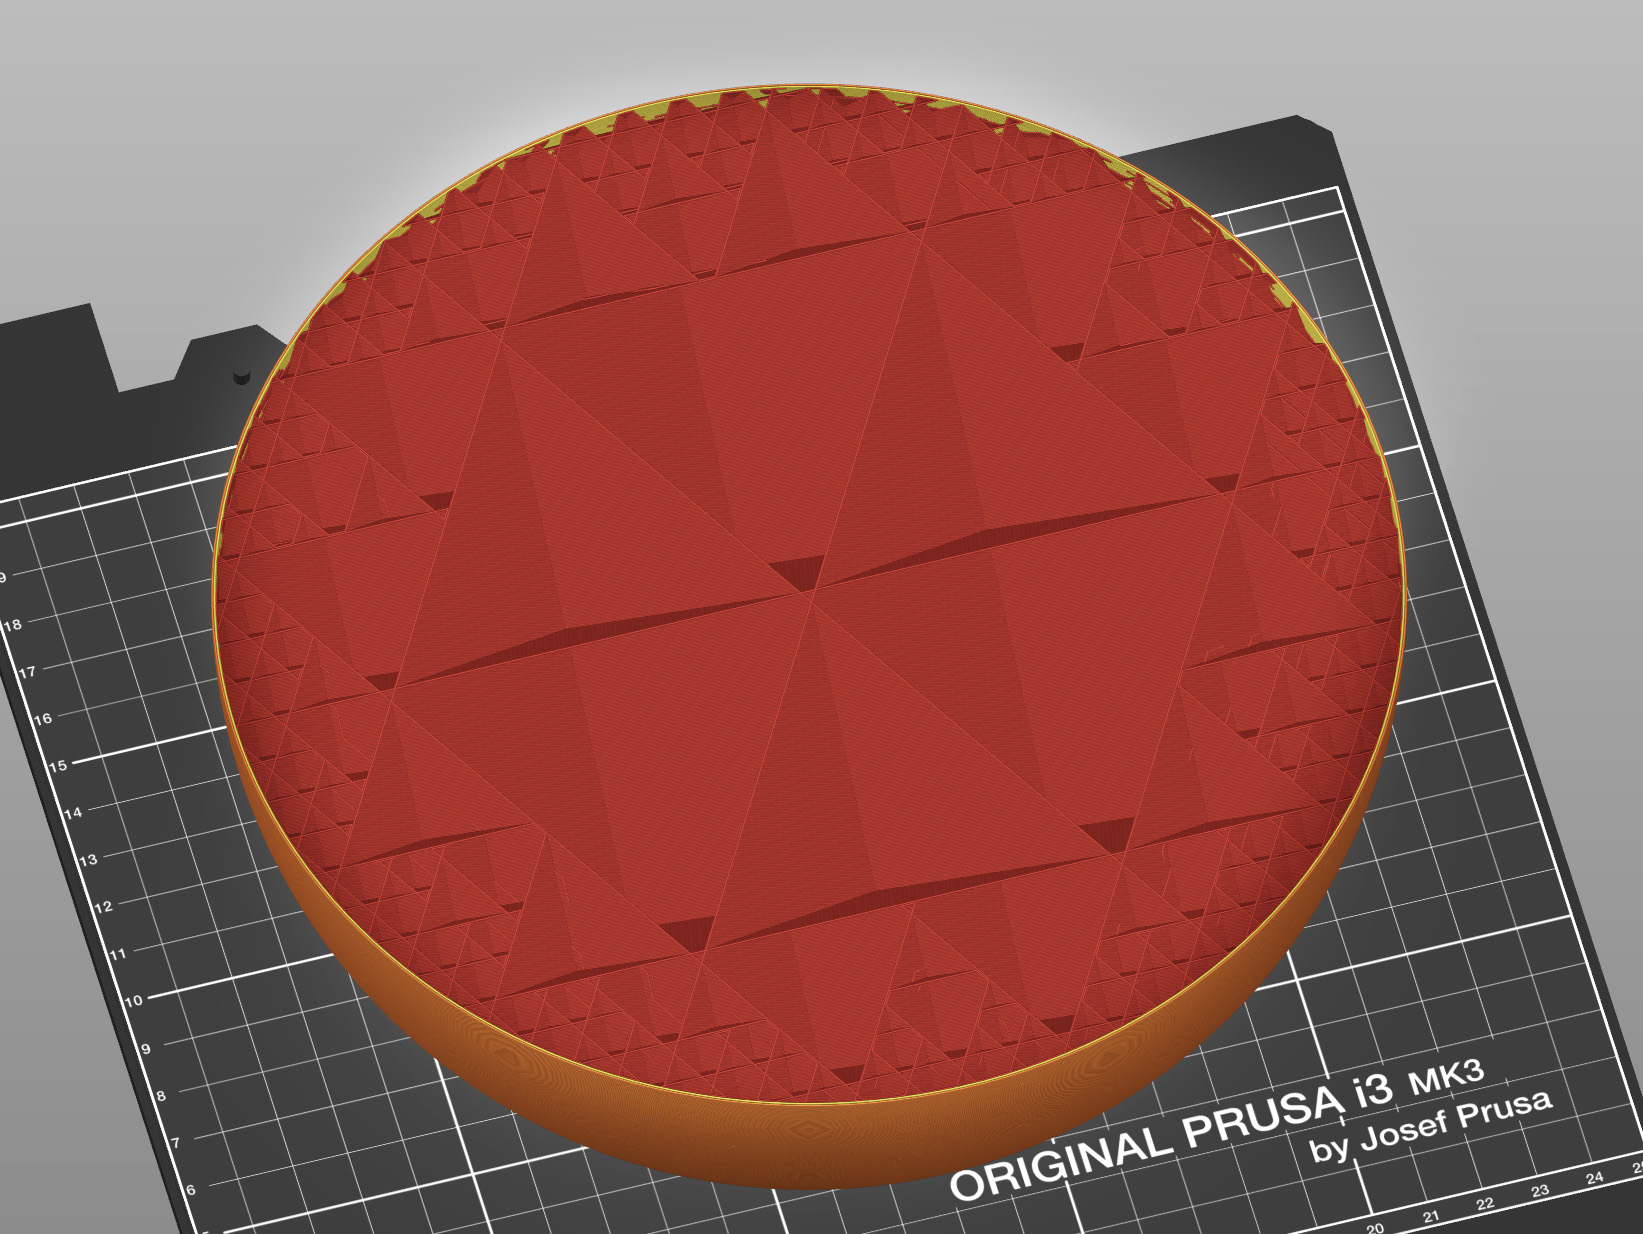
Adaptive cubic infill
This infill gets automatically more or less dense, depending on the distance to the nearest wall. This is especially useful for large prints with a big internal volume. The result is shorter print time and lower filament consumption while maintaining great support for top layers and similar mechanical properties.
The Support cubic infill gets automatically denser depending only the distance to the nearest top layer. The result is even shorter print time and lower filament consumption while maintaining great support for top layers. The mechanical properties will be affected though, the bottom of the print will be nearly hollow in this case.
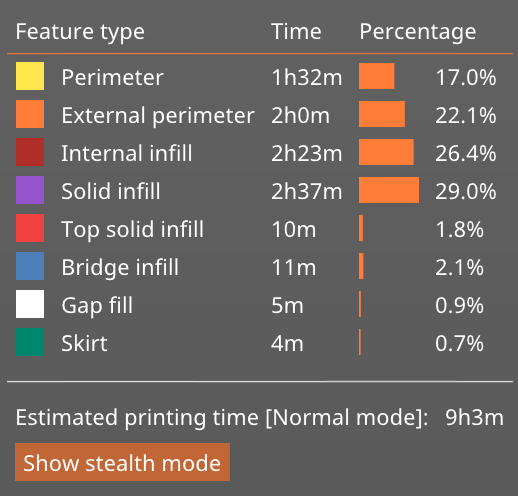
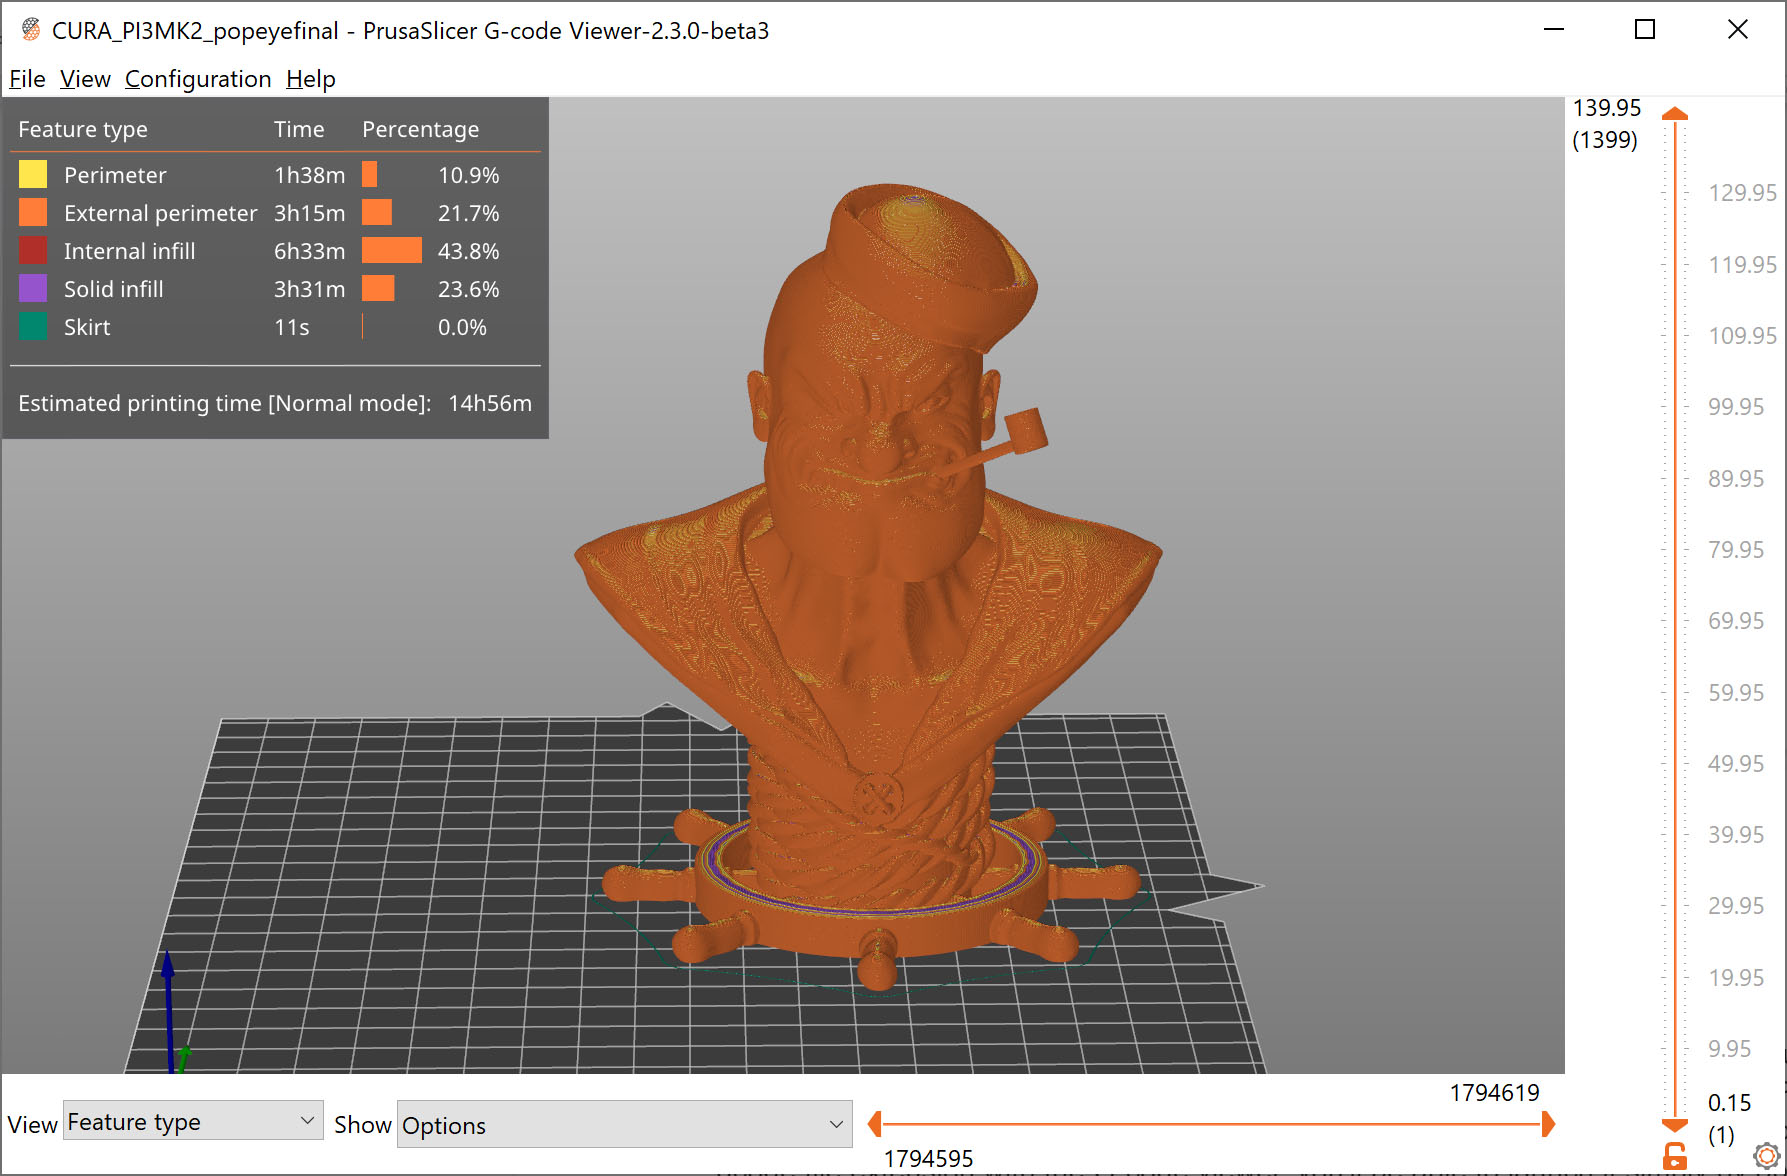
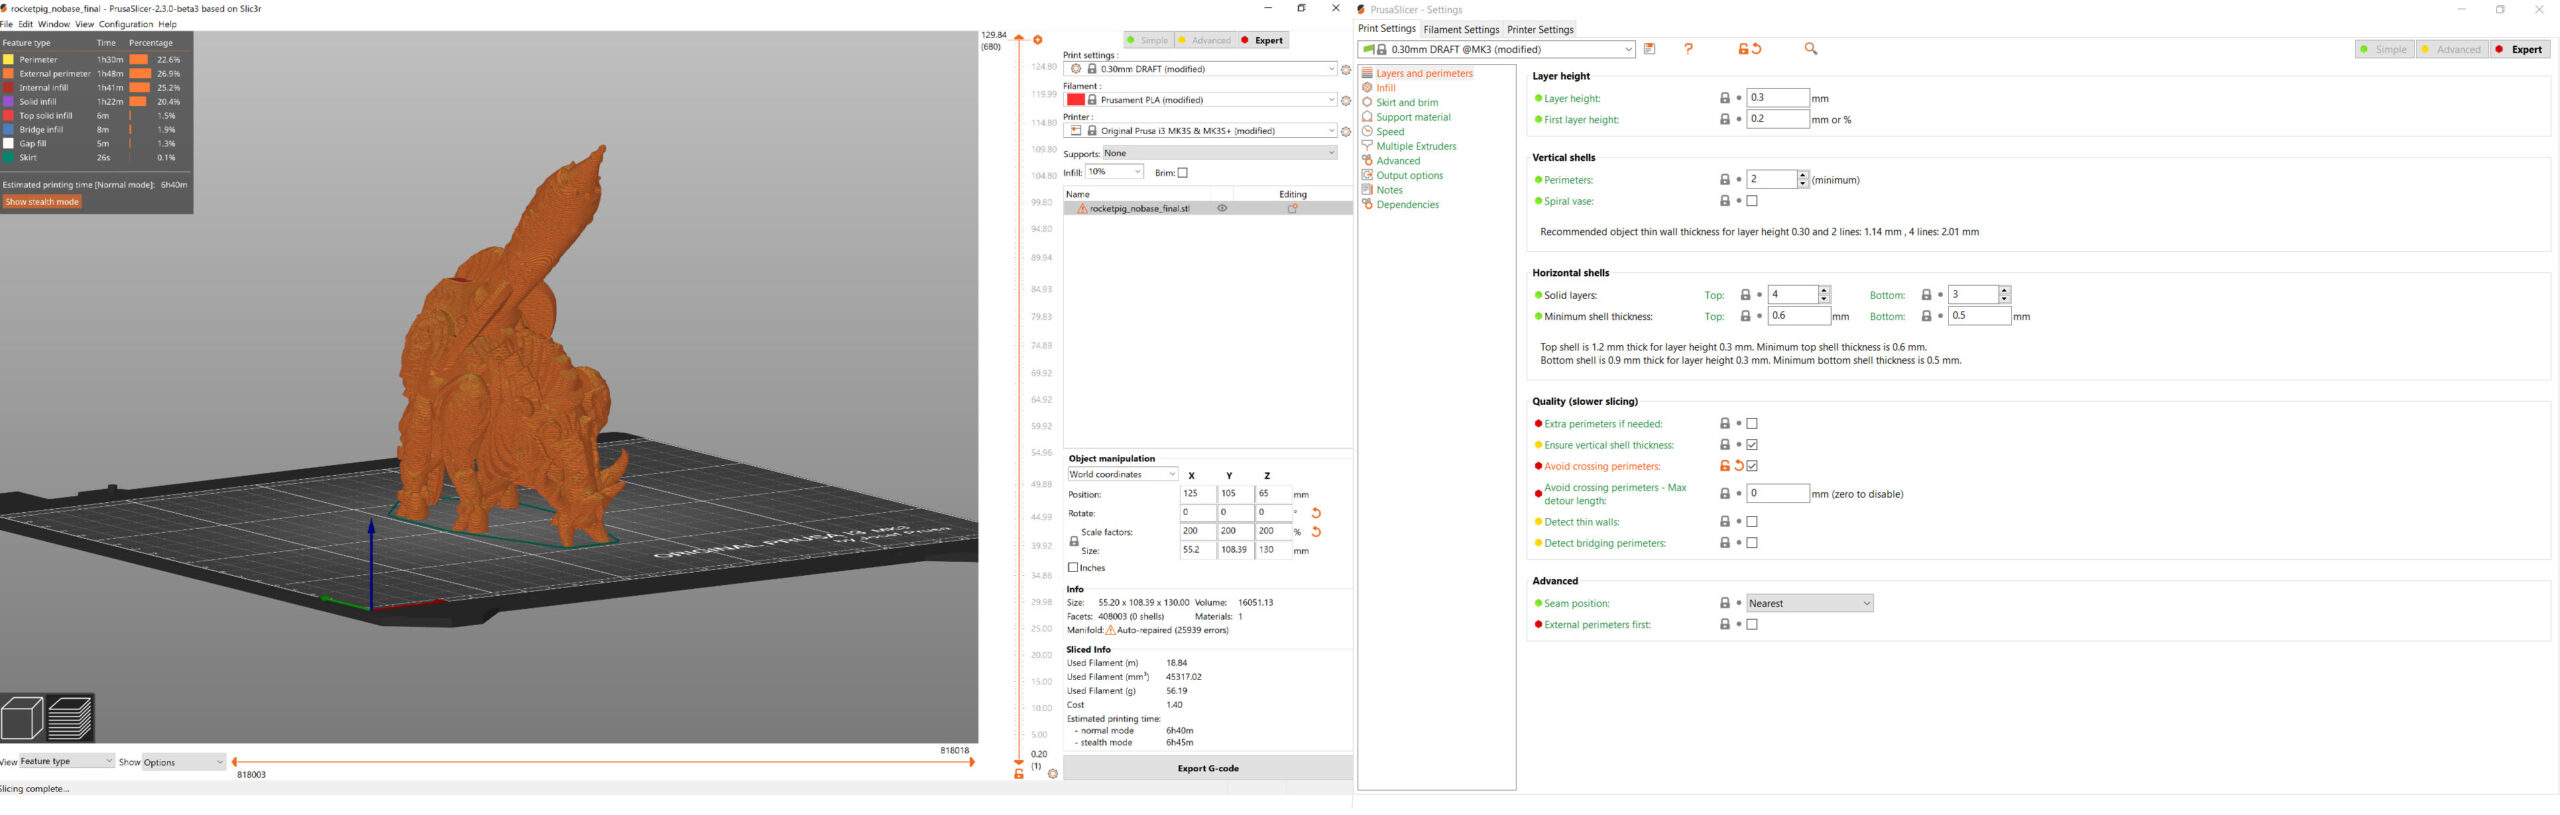
Print time per feature analysis
The legend in the preview now shows a breakdown of print time by feature. This can be extremely useful when trying to speed up a print. You’ll see where the most time is spent, you can adjust the settings and watch how the estimate changes. You can also click any of the features to hide them in the preview.
Standalone G-code Viewer application
The PrusaSlicer G-code Viewer is a lightweight application, which you can use to quickly preview G-codes from all popular slicers. Its behavior is identical to the preview in PrusaSlicer (the same code is used), however, you can load an external G-code file. If you associate the .gcode file extension with the G-code viewer, you’ll be able to launch it simply by opening the file (double-clicking on it or pressing Enter).
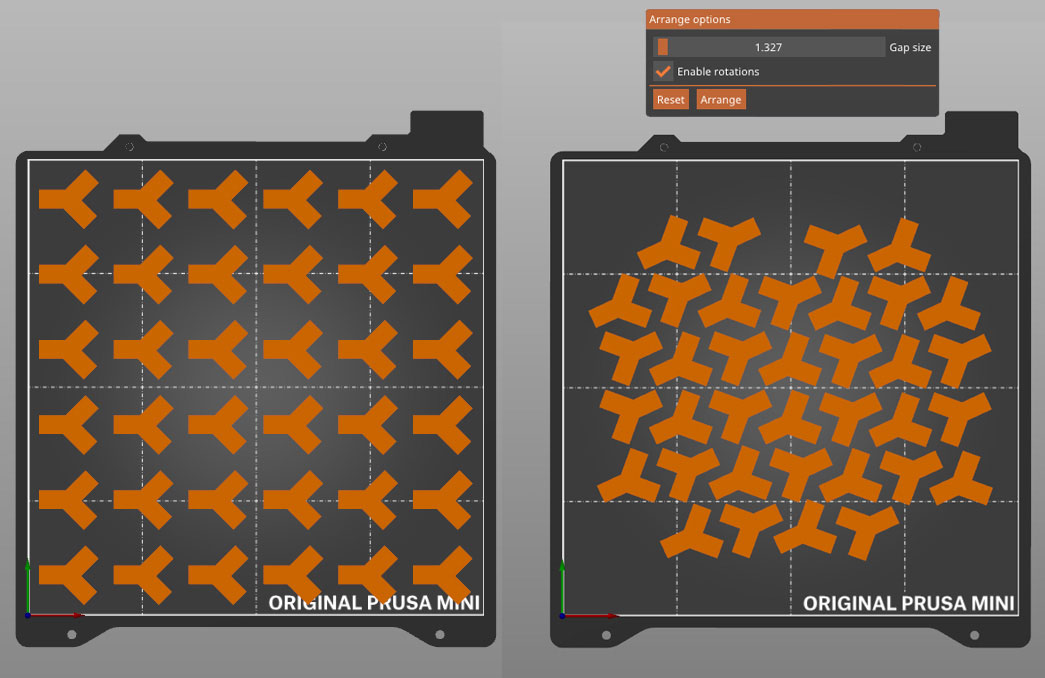
Better auto-arrange with a customizable gap
The Arrange function is newly customizable. Right-clicking the ‘Arrange’ icon at the top toolbar opens a dialog to tune distance between objects and to allow rotation of objects around their Z-axis during the arrangement. As a result, you’ll be able to fit more parts on the build plate.
Transfer settings / Unsaved changes
If you make any changes to settings and then decide to choose a different print profile, you’ll be offered to transfer your changes to the new profile. E.g. if you turn on supports, they will stay turned on even when you switch to a different print profile.
![]()
Search function for settings
Not sure where a specific setting is located? Use the new search function and it will take you directly to the correct settings page.

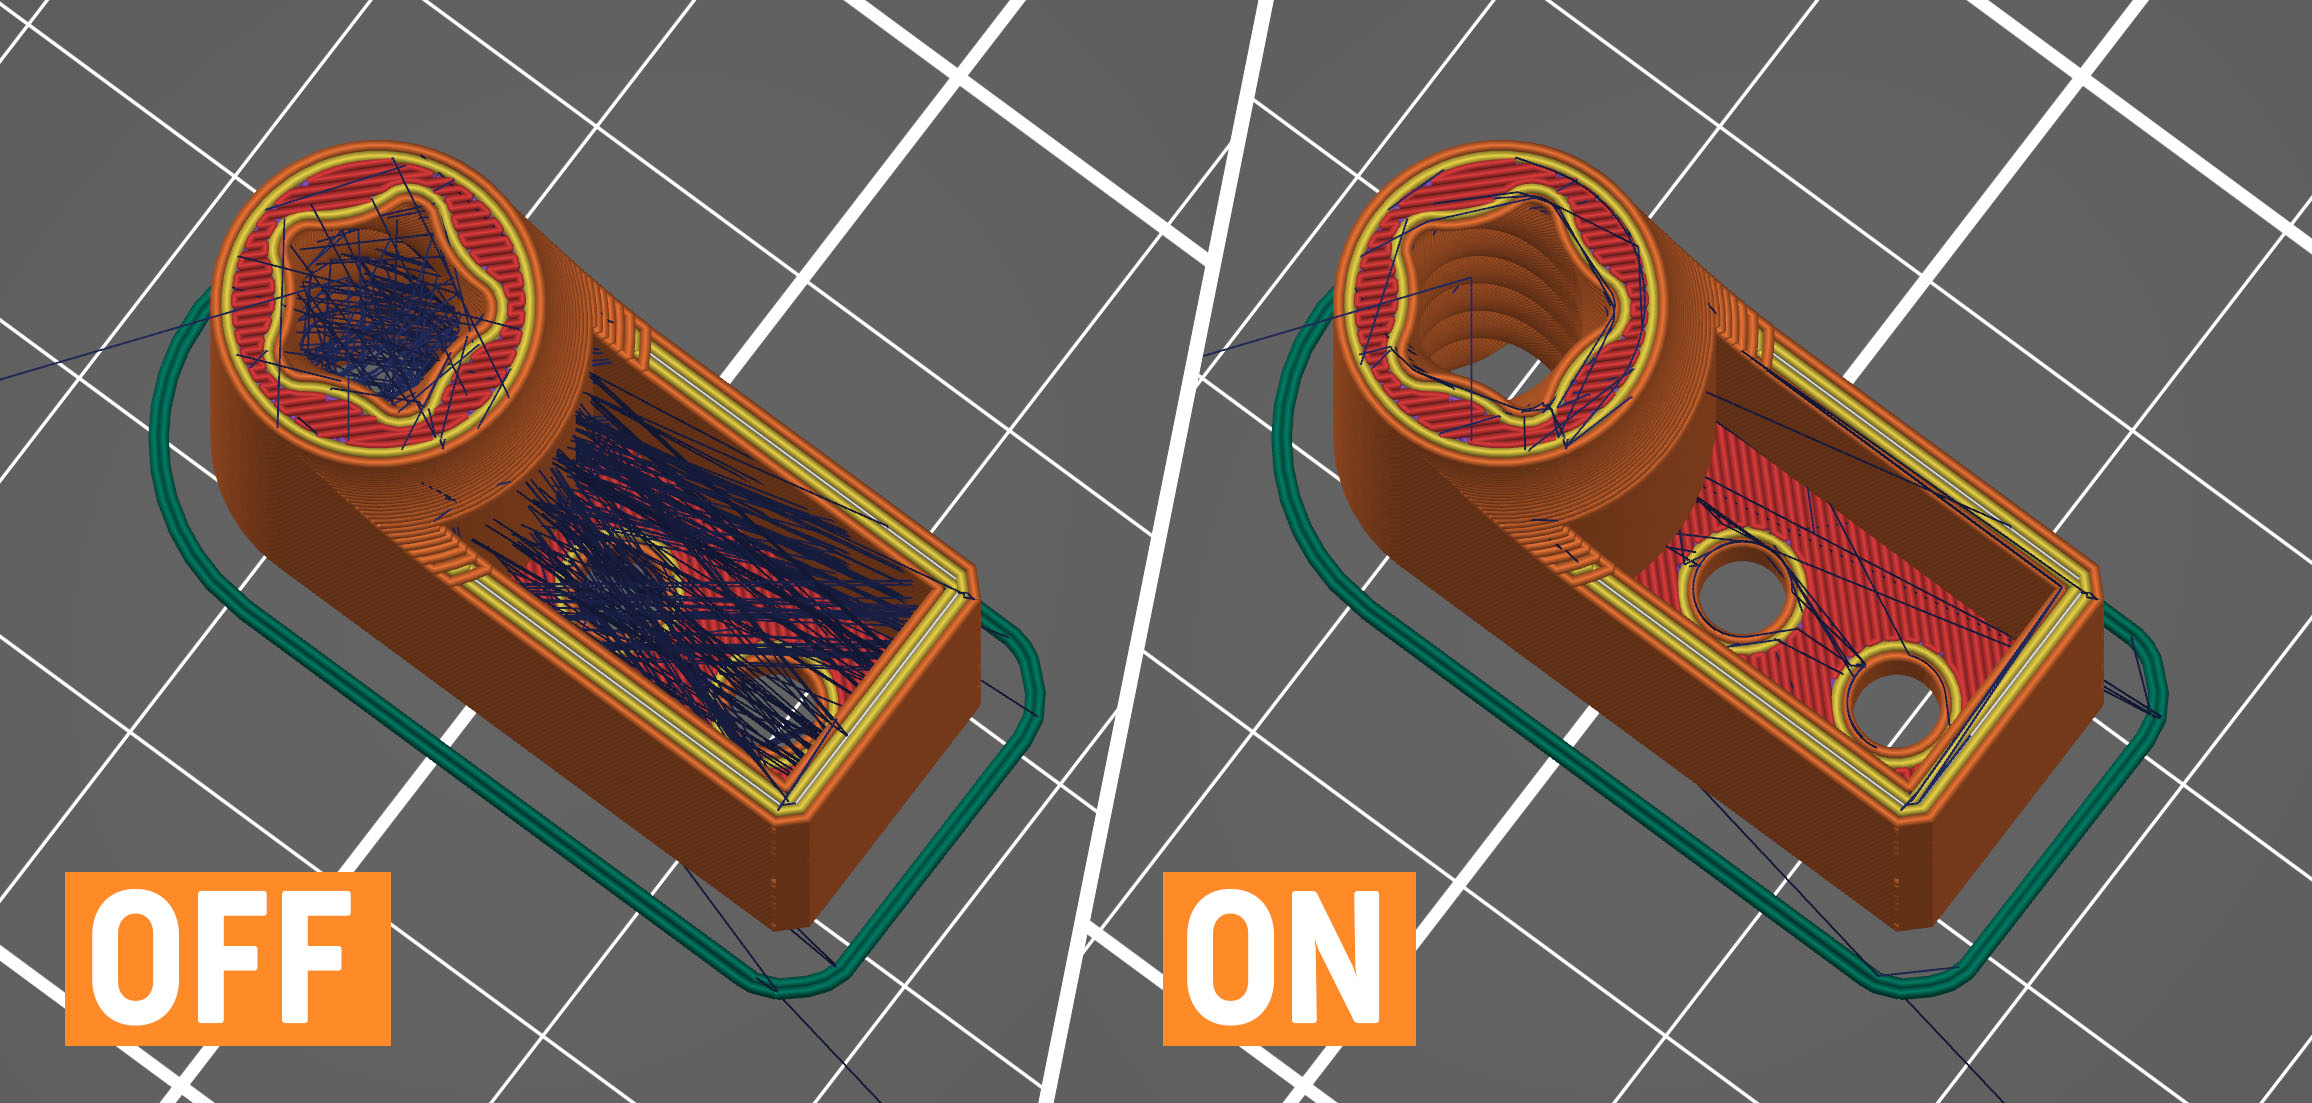
Reworked Avoid crossing perimeters function
Avoid crossing perimeters is an algorithm to minimize crossings of external perimeters during travels, which reduces stringing and improves overall print quality. The new algorithm is much more accurate and significantly faster.
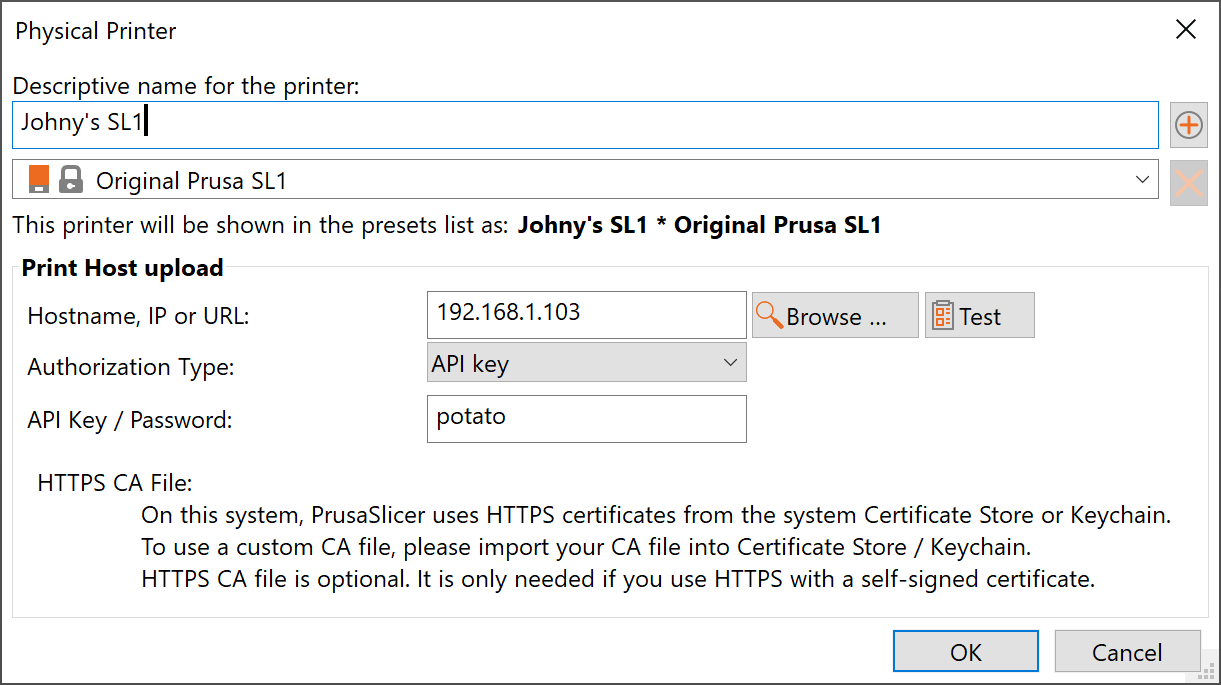
Physical printers (network settings)
PrusaSlicer used to store the printer network connection settings into the Printer profile. This became inconvenient in various scenarios (owning multiple printers that use the same profile). Starting with this version, PrusaSlicer separates the physical printer connection settings from the Printer profile into new Physical Printer profiles.
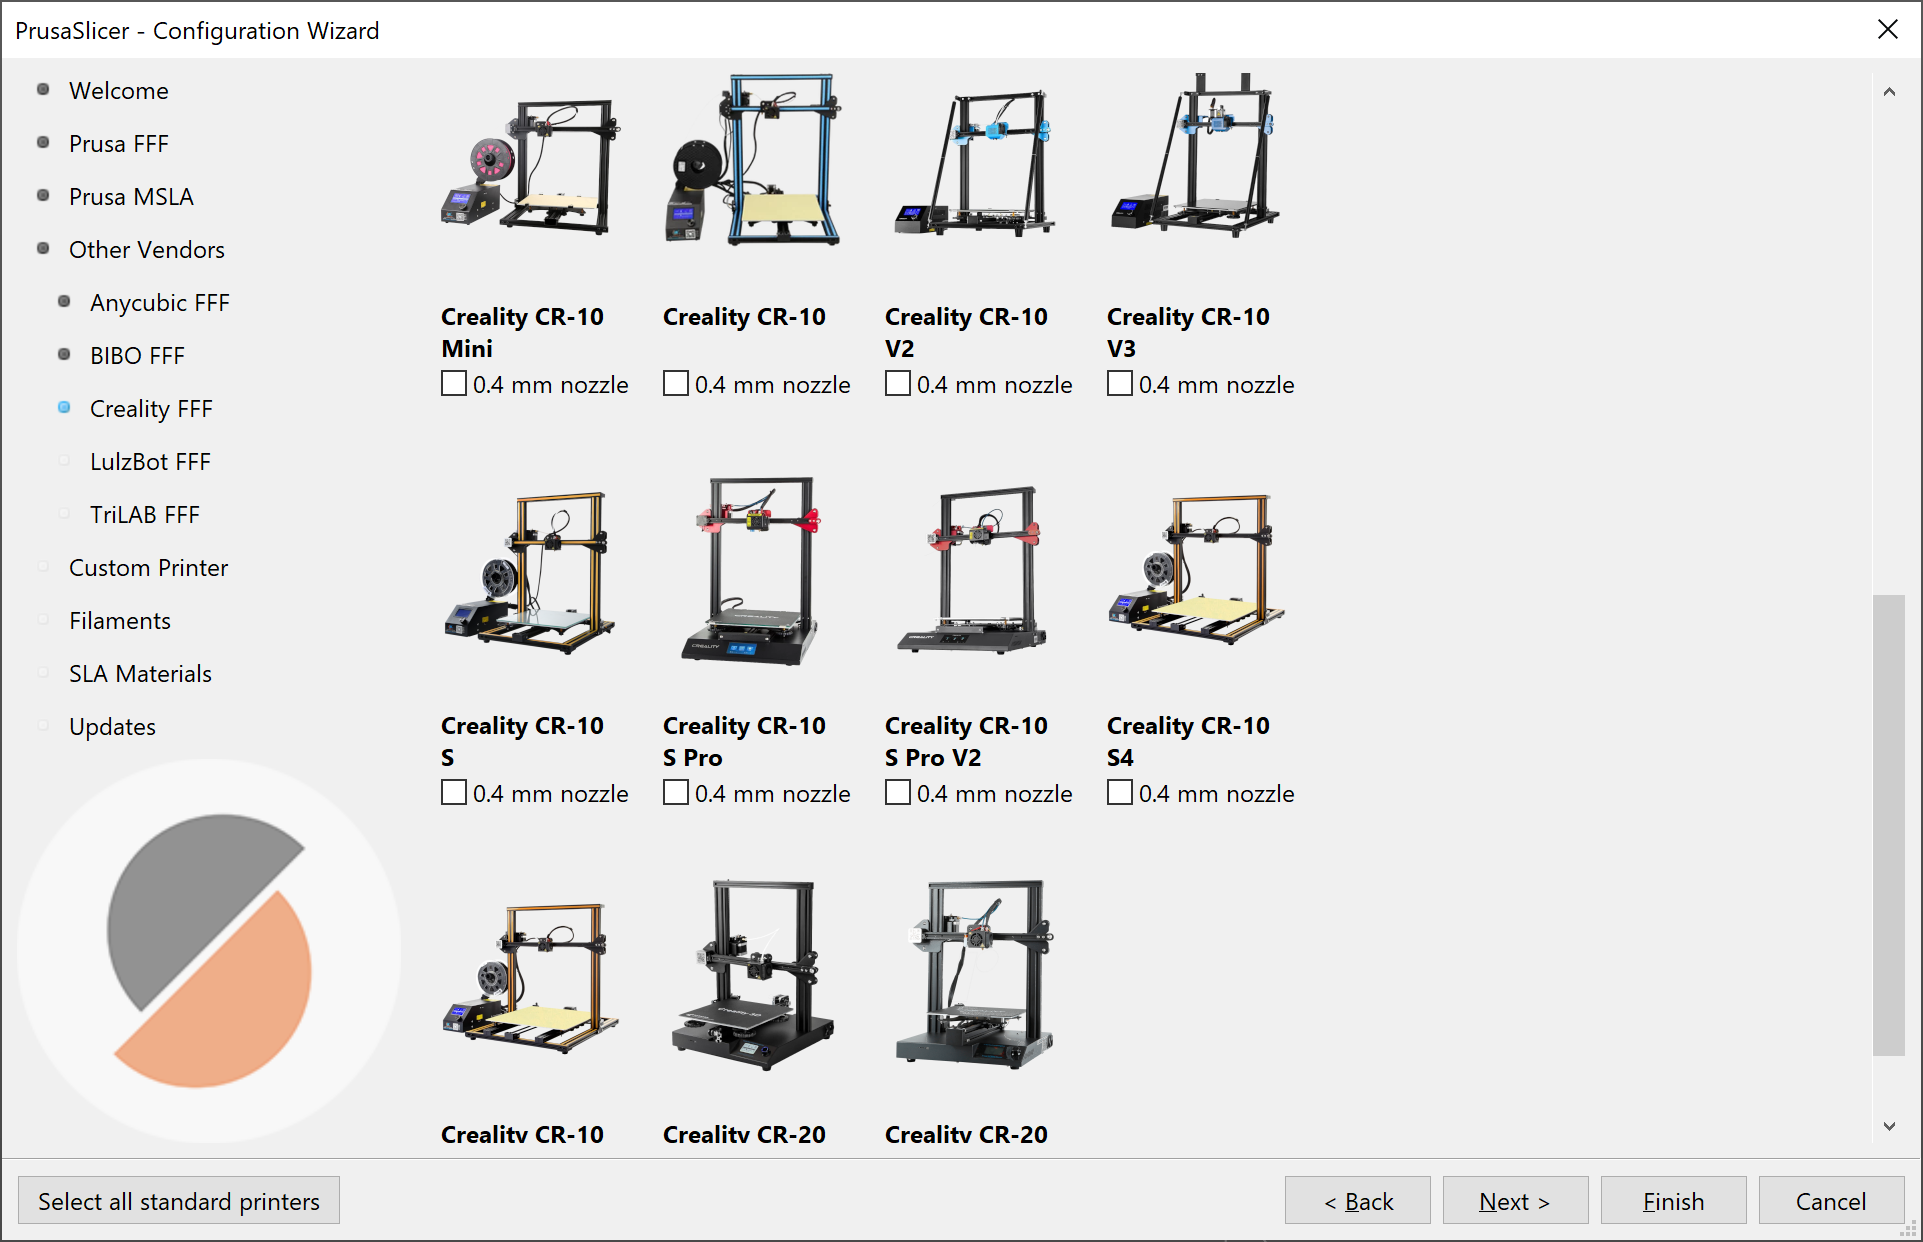
Many new 3rd party printer profiles
Big thanks to all the community contributors for the 3rd party printer profiles! The collection is growing nicely. If you’d like to learn more about how to submit a 3d party printer profile, check our guide.
SLA improvements
SLA slicing got many improvements, including:
- Importing both the model and its print profile from an existing .SL1 archive
- SLA mini supports in regions where the normal supports would not fit.
- Improved supports of overhangs created by hollowing.
- Improved hollowing of meshes with intersecting or overlapping watertight parts.
Floating settings window, collapsible sidebar
You can now choose to display settings in a non-modal window. This is especially useful in a multi-monitor setup. You can edit settings on one screen and see the preview update on the other one. You’ll find this option in the Configuration – Preferences – GUI menu. On the other hand, laptop users will appreciate the collapsible sidebar (Shift+Tab).
And even more news!
The list of new features is nearly endless. New notification system replaces some of the old pop-up windows. You can copy and paste custom settings and modifiers in the object list. PrusaSlicer now starts much faster and has a splash screen. PrusaSlicer can now convert to/from imperial units. New ‘Fill bed with instances’ feature fills the print bed with the maximum number of copies of a selected object. Infill now has a customizable anchoring to perimeters.
And that’s still not all. If you want to read the full changelog, check PrusaSlicer’s GitHub releases page.
What should we add next?
Do you have a feature in mind that you’d love to see in PrusaSlicer? Let us know in the comments, tag us (@Prusa3D) in a tweet or create a new GitHub issue. We have plenty of ideas on the to-do list already, but we shift our priorities based on your feedback!
We are very proud of our PrusaSlicer team and the incredible work they’ve done. After a while of using version 2.3, it’s hard to imagine not having these great new features. And we’re looking forward to push PrusaSlicer even further in 2021! 🙂
Plan to support the 3th party resin printers? Such as.: Phrozen, Anycubic etc
2 words: Tree supports =D
Yes, please!
Oh yes!! Tree Supports are the only reason, why I have to switch to Cura from Time to Time. I would love to see this feature in PS 🙂
+1
Please upvote this GitHub issue: https://github.com/prusa3d/PrusaSlicer/issues/1514
+1 for tree supports, or even support-at-an-angle. In the support paint video, the egyptian moder used there would greatly benefit from support at a 30deg angle so you would not have to clean-up the place where support would rest on the model.
support at an angle is a great idea.
sometimes a model has to have supports all over it, when just a small support slant would remove that issue entirely
Almost nothing to add … yes, please … tree support.
+1 but only after color paint on model
tree supports.
yes please for tree supports
im suprised they arent added yet.
i really love prusa slic3r but when i see people post designs using tree supports in cura, i feel a bit sad that we dont have them yet.
there has been many a time ive visualised a tree support on one of my projects but had to make do without
I was told that per item brims were in the works. Is this true?
It is! 🙂
Paint on brims? Would be great to put tags of brim around things like print-in-place joints so they don’t fall over during the print but break in easily during post-processing.
I’d like paint-on brims for just the places on the part which like to warp. I’d use it right now if it was available!
Couple ideas I would love to see! One, a way to use the paint tool with the MMU2S!! 😀 The paint tool would allow a user to select a polygon or multiple polygons and then associate an “extruder” to that selection. That would be an incredibly powerful tool.
Second, a random color option! If a person has the MMU allow them to input a layer count or physical height (IE mm, or in) and click randomize. Prusa Silcer will randomly organize the 5 colors in different orders every time randomize is clicked. Love what you guys are doing! Also 2.3 fixed the issue with running really poorly on my windows 10! Keep up the excellent work!
Yes please! This feature for MMU2S will be excellent! Also now with the paint tool already done it should be more easy to implement!
Yes please!! This was the very first thing I thought of when I saw the paint on supports.
+10 for color paint on model. Tired of using meshmixers for my job original prints!
paint on supports is awesome. Still not as good as purposely design supports (3dsets does an amazing job with these).
Seam support was a life saved for my project. THANK YOU SO MUCH!
Only improvement I can think of would the ability to “snap a line” on the model. Click a spot on or near the model…click another spot and a line is drawn. You could add some constraints to lock the line to an angle. The ability to rotate the projected line around the line to help refine the placement would be neat as well.
Again…still love the seam tool as it is!
Awesome work! Can you add a feature that allows objects to be printed to completion in groups based on color? That way there can be a couple color swaps in total instead of a couple color swaps per layer. The value provided for acceptable print situations is huge in terms of print time!
Custom Boxes World offers a vast range of packaging and printing solutions for all types of businesses. We provide all sorts of customization options including all sizes and shapes.
so this is why I see “post removed” here.
carry on.
Implement very simple yet useful command as stock – set extruder temp 160C before mesh bed leveling, to avoid preprint nozzle contamination.
You can already do this in the custom Gcode settings. I guess they can’t implement it as stock as they don’t know what sort of bed level you’ll use.
Prusaslicer has really come a long way since the slic3r days. What i would like to see is something similar to the dribbling method from @antimix for mmu2s. Something that will improve on those tips. The blade functionality helped but didnt solve the problem in its entirety. Maybe just the ability to be able to print in higher temperatures and drop the temp before unloading. Also profiles for mmu2s + 0.25 nozzles.
It’s a really great release I’ve been using.
Things I want still:
1) Better ability to work with large part count models. It would be helpful if there was some way to help sort the models when there are dozens of them. (Such as creating a group of them while probably keeping them as separate parts).
2) Better ability to change certain settings. e.g. perimeters and infill create bad model transition seams. There are also many settings that cannot be adjusted per model/part still. Extrusion multiplier would be very helpful.
3) Monotonic applying to more than the topmost/bottommost layer.
4) Modifiers that work like actual boolean operators (not approximating it through settings)
5) Monotonic versions of the existing infill patterns (for example concentric only drawing clock-wise)
6) Using a SVG path as a layer template (e.g. I draw a path as an SVG and am able to import it, this then becomes the infill for the target layers/models)
Thank you so much for all the development that’s been put into this software, it’s really world class and continues to get better.
Variable Extrusion Width,
say you have a wall with different thickness and you could have settings for min and max extrusion width and the slicer will automatically adjust the width for the different model widths. This could also reduce the amount you have gap fill.
I‘d love you to add tree support to your next release. It would certainly be a great addition to your already great slicer 👍😎🤞🙏
I’d like to see 2X layer resolution for outer shell. For instance, outer shell prints at 0.1mm, interior shells and infill print at 0.2mm. Or 0.2 and 0.4mm, respectively.
0.1 mm resolution at nearly 0.2mm print time.
Would likely also make prints with domes more uniform. I’ve used the variable layer height feature a few times, but it gives such a different print look to the rest of the model that I’d rather have the stepping of the consistent layer height, I think. Giving 2X outer shell layer height would make it better, at a lesser time penalty, that variable layer height.
Check the documentation of the “Combine infill” function 🙂 It does basically what you describe, you can print walls at fraction of the layer height of infill.
https://help.prusa3d.com/en/article/infill_42#combine-infill-every-x-layers
I would love to use a paint on multicolour for the mmu2s
3rd party resin printers would be nice (photon etc.). I would love to use only one slicer for all my printers. And a painting option for multicolor prints would be amazing like the painting feature from mosaic.
Is it me or is exporting to octoprint broken? Octoprint settings have moved and is accessible by clicking on “gear” icon in printer settings tab. I enter the information, test successfully & click OK. Click OK at bottom of dialog box and slicer crashes.
I am using PrusaSlicer on Mac OS 10.14.6
My workaround is to export code to a file, then drag that file onto octoprint window (chrome browser) which copies file to octopi and starts the print.
All worked well under previous version of PrusaSlicer
My bad. Do not use “system preset” printer which has a lock icon next to it. Use “user preset” printer. I will test after my current print job finishes. Slicer not crashing is a good sign. Ugh – There is a lot going on here for us noobs to learn.
I just saw that the sequential printing could be optimised. I wanted to print 2 parts with more than 20mm height on my mk3s and I was not able to slice them because of the height and the possibility that the smooth rods could crash into the first print. But the first print would be positioned in the front and the second is positioned in the back of the build plate, it would be possible to print the one in the front first and the one in the back afterwards as long as the don’t overlapp and have enoght space between the parts.
New features are nice, but the old problems like the catastrophic support are still not fixed.
Don’t know what I mean?
Look at the 1st layer at object of your choise above support in the -preview view-. There is a huge gap between the lines at this layer. The next 2nd layer is like it should. Support does not make object surface unuseable and ugly! Its the 1st layer after the support with that idiotic huge gaps.
The funny thing is that users scratch off the support and are happy, but they peel of the 1st object layer and did not notice that…
@Prusa3D
Hello, it is possible to integrate profile for SLA elegoo Mars 2 pro ?
thanks
@Prusa3D
Thank you for the feature rich update.
I was wondering if you are looking into non planar slicing as a possible future feature?
Also would it be possible to add vase mode as a height modifiers parameter? That is very useful when creating lamp type of objects, where the base is meant to be proper functional 3dprint and the top side is meant to be a thin layer.
Alignment registration marks when you cut a model up, a few holes on both sides of the cut in a defined size would allow for alignment pins (metal or 3d printed) and make the process of gluing a cut piece much simpler.
These improvements to PrusaSlicer continue to display what a high quality and dedicated company Prusa is! So many good improvements. Thank You.
Also, tree supports would be awesome.
What happened to the color change feature? I don’t see the (+) sign near the slider in preview window.
2.3 is great news! I’m afraid to say I’ve been so impressed by the betas that I’ve only just noticed the formal has been released. Nice work slicer guys, and Mikolas for the manuals:-)
I’ll add my one, minor, comment to the Tree Support list though; please?
I mean, Meshmixer does it well, but you folks have proven time and time again that you can do stuff better. And it really is needed to compliment the ‘regular’ supports…
Cheers!
After updating, printer bed model and texture is wiped out for all my installed default Prusa printer presets.
The files are still in the installation directory, but they are not configured in the default printer profiles. Since they’re “default” profiles, I also can’t simply overwrite them after manually fixing – the software would force me to save the modified profile under a different name and create a duplicate. 🙁
Selectable UI styles would be great. The UI is a big reason some stick to the paid slicer.
An updating feature within PrusaSlicer could be an improvement, so you don’t have to download it each time. Instead one could just click on “install” when a new version comes out, pretty much the same as when new profiles are released.
The Prusa Slicer – it also is mentioned somewhere as a capability – can be used to do some basic Modelling.
I’d like to see the option to “evaluate” ab object and its Modifier into a RESULT object … easier to see and to handel rather then the muliple forms ( Object + Modifiers) => e.g. subtract.
EASY example: have a “plate” and want some wholes in in it – withoit finally looking at infill.
ALSO .. some more forms than just sphere, box, cylinder. a paramtrizable pipe” ( one cylinder subtracted from another), same for cone, pyramid, triangle.
Finally when ading a part, a funktion to dirigate suface contact points for two object to combine … and the ADDITION to turn them into one.
Adaptive Cubic Infill is an awesome feature. Major props to you guys for adding that sort of functionality in!
One thing I would absolutely love to see (and maybe I’ll contribute on github if I have the time) is Dynamic Extrusion Width. I’ve upgraded my MK3 with an E3D Volcano, and I can easily extrude at 1.2mm out of a 0.4mm nozzle. I would love to have an option where I can input minimum and maximum extrusion width, and have the slicer figure out how to best utilize those capabilities to speed up prints. I’m sure this kind of functionality can also benefit regular MK3 users with the stock V6 hotend too.
Question regarding Ironing, the combination of 15% flowrate and 0.1mm “spacing between ironing passes” will probably sum up to 60% extra material added to the top layer, is this correct? (on a 0.4mm Nozzle)
I am so thrilled to see all of these changes that are being rolled out! Answers to issues that have plagued many a maker. Great work Prusa team!
I have looked around but cannot find a way tp print a part on a raft. It that possible with the new release of the Prusa Slicer?
I would love to see the ability to iron a support interface layer to provide the same quality of supported faces as all others. Is this something that will be coming to prusaslicer soon?
Did anyone one mention color painting on 3d models?
Ironing and monotonic infill. Yes! Thank you!
Can you work on a feature where you can write the G-code from the slicer to an SD card that is in the printer rather than having to keep removing the card from the printer and inserting it in the computer?
Being able to cover curved surfaces as say a wing surface with a continuous final pass (or few passes, moving truly in 3 directions) would be an awesome option. This way stepped surfaces could be reduced (within certain angle limitations off course).
Used to use the services of one outsourcing service. But I was not satisfied with it anymore. My business was not as many clients as I would have liked. And the profits did not suit me either. I decided to change the outsourcing service, for better performance. After reading the reviews on the Internet I decided to use a virtual administrative assistant. Thanks to this service my business now has a large number of satisfied customers, which led to increased sales and income. This team has been providing outsourcing services for a long time, so the quality of their product is of the highest level. They also use advanced technology which allows them to respond with great speed. I boldly recommend it!
I’d like the Colour Change to be a full Filament Change so you could switch from PLA to Flexible and back to PLA, for example. I’ve done this manually by creating gcode for each filament and then combining the appropriate portions in a text editor, so I know it can work. I used the colour change feature to put markers in the gcode so I knew where to switch (also inserted changes to cooling and temps). A colour change is already really a filament change, so why not make it fully so? Could even be useful for changing PLA colours if the two are from different manufacturers and have different settings.
Wow you have opened up Pandora’s Box for me. Just set up my i3MK3s+ and now I am learning all I can! Thanks
Great new version… I think I’m just about ready to make this my main slicer.
One thing I miss from S3D is configurable solid layer angles. I usually use 45, -4, 0, 90 deg angles on my solid layers which gives me much better coverage over low density infill. It also makes the checker board pattern less visible on the top layer. I know there are other things PS can do to mitigate that, but it would be great to configure those angles.
Cosmetic organizations create excellence arrangements of uniquely shaped bath bomb boxes.
Essential Oil Boxesand cosmetics products maker would like to acquire essential oils mailer that may contain all the items quickly.
Custom Boxes World would be the soap packaging makers offering customized decorative soap boxes packaging. Wholesale Soap Packaging Boxes
I’ve found that ironing anything other than the topmost layer (“Topmost surface only”) has an adverse effect on layer adhesion / fusion. That is, using “All top surfaces” makes for poor layer adhesion / fusion in lower layers which have a “top surface.” For example, a simple box without a top – the base of the box and rim of the box are considered “top surfaces.” The time spent ironing the base of the box means the edge layer cools down so when regular printing resumes, it doesn’t fuse well and it is easy for it to break off. I would recommend using only “Topmost surface only” unless someone has a fix.