Our 3D printers have been known as highly reliable machines for a long time. We did our best to pack the MK3S+ full of important safety features that can save you a lot of headaches. There’s power loss recovery, crash detection and a whole lot of thermal safety routines – Mintemp/Maxtemp, Thermal runaway, fan monitoring and preheat checks just to name a few. They are designed to quickly recognize possible issues with your machine and stop operation to prevent damage.
For the past several months, we’ve been hard at work to bring all these thermal-related safety features to a whole new level. The recent 3.12-BETA firmware (only for the MK3/S/+) is the first public release of the new Thermal model protection. This is a great opportunity to give you a really deep dive into the entire system that keeps your 3D printer safe.
It also offers better operation in case of false alarms – for instance, previously, a sudden draft of cold air could stop your print with a MINTEMP error without any chance to recover. The new protection system always allows you to inspect the printer and attempt to finish the print (however, increased user attention is strongly recommended).
We discussed the new firmware in our Prusa Live podcast:
Detection of thermal anomalies
With the new Thermal model protection, we’re aiming to detect unexpected heating issues of any sort and stop heating quickly (in 10-12 seconds) to avoid potential damage to your 3D printer. This encompasses cabling issues, an incorrectly working heater block, thermistor faults and external factors too (draft, blobs forming on the extruder, etc.).
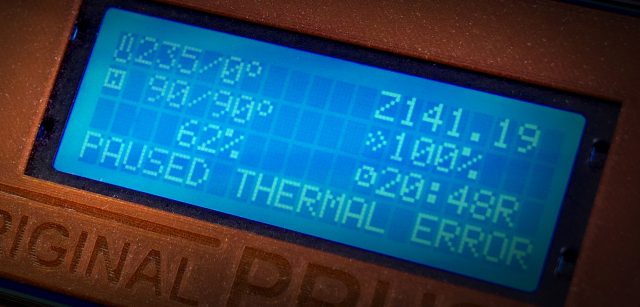
This is all based on an internal simulation of the hotend, meaning that the firmware constantly checks whether the thermistor readings are following a specific pattern in the thermal model. In case anything seems off, the printer reacts within seconds and displays a THERMAL ANOMALY warning which goes away in case the readings go back to expected numbers within 5 seconds. In case the anomaly stays, the printer turns off the heating and activates a warning sound to notify the user. In other words, this is a great addition to already existing thermal protection systems that have been in the printer from the start.
Please keep in mind that the printer knows only that something is wrong, i.e., when the system is not performing as expected. It is up to the user to inspect the printer and check for issues.
Works on all MK3/S/+ 3D printers
So, the firmware can compare the values from the internal thermal model with real values and when a conflict between these values is detected, the printer is stopped and an error is displayed.
Now, some of you might ask: what if my MK3S+ is located inside an enclosure or is modded/customized? This surely impacts the thermal model, right? The answer is simple: thermal model protection is not universal. It’s based on average default numbers from our production, but it is custom-tuned for each individual printer after the firmware is installed. So even if you have an older printer, the routine can still recognize potential issues immediately because it doesn’t take your current machine’s values as the default (=perfect) state.
A newly implemented automatic routine needs to fine-tune the values of your machine to complete the configuration. It takes about 15 minutes and the printer is thoroughly checked by running heat-up and cooldown cycles. Then, your printer profile is saved into the EEPROM memory and is ready to use. And yes, this is great news for anyone who already modified the MK3/S/+ by installing third-party components: the thermal protection model will work on your machine, too, although there may be some exceptions – especially since this is a beta release. Keep in mind that if you often switch components in your machine (heater blocks, hotends, fans, silicone socks), the Thermal Anomaly error may appear more often because replacing these parts will change the thermal characteristics of your printer and you may need to recalibrate the numbers.
Under the hood
Needless to say, the beta firmware releases are always meant for advanced users. To test the new functions, you will need to connect your printer to your PC via a USB cable and use Pronterface to initiate the calibration sequence by sending the correct G-Codes. Right now, the procedure can be started by sending a new M310 A F0 instruction. After calibration, M310 S1 is used to enable the model checking and the new calibration settings can be saved using M500. For full instructions, please see the changelog. Full integration into the LCD Menu will come in later releases. You can test the functionality of the calibrated model by setting the nozzle temperature to 210 °C and then putting a wet q-tip directly onto the nozzle – within 10 seconds, a warning message should appear on the display.
One thing to keep in mind: we’re using the temperature sensor on the Einsy board as a proxy – so if you place the electronics outside an enclosure and keep the printer inside, the thermal model may not work as expected. For these scenarios, a special M310 T G-Code has been implemented, allowing you to adjust the temperature difference. Before you start the thermal calibration process, though, it is recommended to perform the PID calibration to ensure everything is working well.
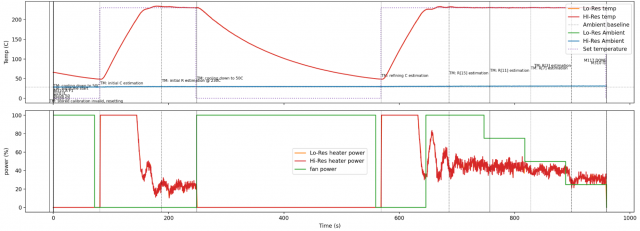
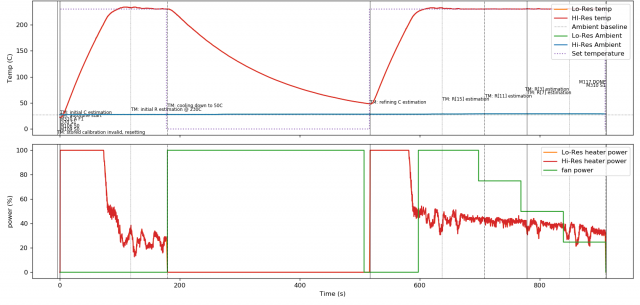
And here’s a bit of interesting trivia. When we ran internal tests and measurements during the development of the new firmware, we noticed some curious things. In the pictures below, you can see the difference between a standard nozzle and heater block (upper picture) and a heater block with a silicone sock (lower picture). Check the right side of the graph – you can see that PID regulation is smoother on the machine with a silicone sock. We’re not saying you should immediately install a silicone sock on the hotend because everything works perfectly well even without it. This is just to show what our measurements revealed.
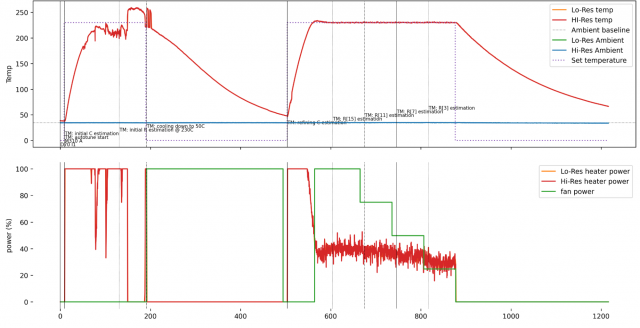
Now, when you know how the correct thermal characteristics should look on an MK3S+, you can take a look at another reading – and you will clearly see that something is wrong here. See the picture below:
See the janky reading on the left? The power is almost constantly at 100 percent, yet the nozzle struggles to reach a steady 230 °C. At one point, the temperature suddenly shoots to over 250 °C with the PID immediately killing power. The sudden jump from 210 to 250 degrees Celsius is suspicious because it’s hardly possible that a standard heater block could heat up by 40 degrees so quickly – hence the issue lies most likely in the thermistor. This behavior is exactly what the new thermal model protection is designed to catch.
Theoretically, if you had an EINSY board that is very specifically damaged (like intermittent electrical contact issues due to thermal and mechanical stress, including very subtle issues such as cracked solder pads or cracked ferrite beads) and it would still behave in a seemingly normal way, not triggering any Mintemp/Maxtemp errors, the new thermal protection would still catch it – even though it’s one in a million chance.
By the way, this entire code takes up 5 kB in the RAM and we had to move stuff around quite a bit to fit it in the very limited space!
Reduced danger of blobs
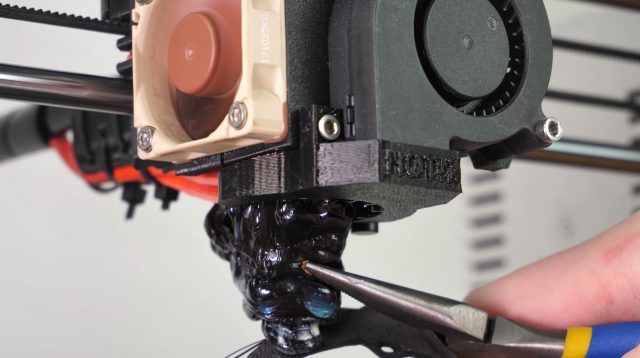
The new firmware can do another useful thing: because it constantly monitors the heat block and compares the values with the internal thermal model, it can quickly detect anomalies in cooling as well. So, when your print detaches from the heatbed and starts melting around the nozzle, it can trigger the THERMAL ANOMALY error, too. If the situation persists for several seconds, heating is disabled and the print is stopped. This way, the firmware can stop the printer before a large blob forms around the nozzle. And this is no theory – we witnessed this exact situation as it happened on our print farm.
Of course, it doesn’t mean that blobs will be completely eliminated from now on. What we’re saying is that we can quickly detect blobs shortly after they begin to grow – which is usually early enough to spare you a lot of work with removing the plastic monstrosity wrapped around the extruder.
Beta is out now
We have just released the 3.12-BETA version of the new firmware after intensive internal testing (see the changelog) and we would be really happy if you decide to try the beta and share your experience with us.
As usual, we don’t recommend installing the beta version in a production environment, as some small bugs may still be present. However, the thermal model protection is performing well in our testing environment and we’ll be ready to release the final version soon. So stay tuned for more updates!


I assume that it doesnt work on older printers like the prusa mk2.5s?
This is great! When will we see support for different nozzle sizes in first layer calibration?
They say that “we’re using the temperature sensor on the Einsy board as a proxy – so if you place the electronics outside an enclosure and keep the printer inside, the thermal model may not work as expected. ” So for the MK2.5s(which doesn’t use the Einsy board), I wonder if an additional thermistor could be added to the mini Rambo in the empty slot then included in the firmware upgrade with some sort of indicator that an additional thermistor exists. Also for the MK3 if the electronics were outside an enclosure if you could also add an external thermistor? I would think that the parameters for the thermistor would need to be defined and limited as I would think it’s calculations are part of the firmware.
I hope this solves my “winter issue”. My MK3 is in the garage and in winter I often power up in the morning and get a mintemp error. Nothing I can do within the current firmware allows me to proceed, so I heat the nozzle and bed with a heat gun and after a while reboot. Takes between 5 and 10 minutes each morning. Please say this will change will fix this!
@clw I’ve solved this “winter issue” by using an enclosure box (a upcycled big cardboard-box) and a small fan heater to preheat. (I suppose a small heating blanket would be a safer option.)
I hope this new “Thermal model protection” will not give false alarms in my setup.
I likewise really hope this enables them to workaround the mintemp issue when the printer’s simply very cold in the winter, as it’s very frustrating to spend several minutes standing around manually heating up the printer. An obvious solution would be to enable the heaters for a short time and see if the temperature increases as expected according to their model or not, and thus determining whether the thermistor is indeed present or not.
I have exactly the same issue, you would of thought that they would allow a button press to acknowledge this error and allow the users to turn on heating. Having a min temp error without a way out is flawed logic.
I installed the beta and my hotend is a Revo Six. After the PID for the hotend I tried to start M310. After 2 seconds it runs in a thermal error and the MK3S+ stops.
I experienced the same…
You can provide logs here https://github.com/prusa3d/Prusa-Firmware/issues/3636
I believe this is now solved for Revo Six here and with the V3.12.2 firmware: https://github.com/prusa3d/Prusa-Firmware/issues/4105
I like the enhanced software thermal safety features but in the end a true redundant hardware solution would be most robust. A secondary thermistor on the hot end and temp monitoring circuit with alarm shutdown is not very expensive and could simply cut the system in a thermal runaway. I recently experienced a thermal runaway on my MK3 after installing a bad thermistor that was intermittent. The entire hot end block melted in a matter of minutes. Its a good thing I was there to shut everything down. I ended up getting a basic temp controller from amazon and wiring it into the heater control circuit to shutdown in over temp. Parts cost about 30 bucks and could easily be integrated into your next generation controllers.
Do you see this making it to the Mini in the near future? Or does the Mini’s controller does not have the capability to monitor this?
I installed the beta version on my stock MK3s+, kit build. It sure keeps the temp closer to the set temp. With the old software version I couldn’t print pc carbon fiber, as I would get the max temp err somewhere in the first half of the print. I replaced the hotend thermistor and the heater, and it didn’t fix it, but with the new software it seems to work with the pc carbon fiber.
This is an example of how the developers should be expending their energy. Making Prusa products better than the rest!
Hey Prusa. The directions on github say to use M310 A F1 for calibration. This article says to use M310 A F0. Maybe one of these should be updated. Thanks.
I had an issue with the cable causing bed mintemp error. Is the new model smart enough not to overreact to that issue? As in momentary wrong reading from heatbed termistor will stop the print entirely while continuing print for few more seconds would bring correct readings and if not only then issue the error otherwise just a warning without a pause?
Also is there a way to interact with the warnings/errors via GCODE. I have multiple cameras observing the unit to see if there’s a blob and ir thermometer pointed at the bed with visible readout. Would it be possible to acknowledge the warning and continue the print remotely with GCODE sent via Octoprint?