The core of FDM technology is extruding melted plastic, where each layer is laid on top of the previous, already cooled down and solidified layer. There has to be something to lay the new layer on, otherwise the plastic just drips down and sticks to whatever it hits on the way.
A 3d printer is capable of successfully printing without any additional support structure up to a certain angle. This angle varies depending on the material and printer used, but a good rule of thumb is to try to keep the overhang below 45°. If there are larger overhangs or even sections starting in mid-air (for example hands of a standing human figure), you have to generate supports. Supports will work as scaffolding under these problematic sections and will ensure that each layer has something to be placed upon. This is usually done with a single click in your favorite slicer by selecting “Generate supports“.
There are two types of supports often being used in 3D printing:
- grid supports
- tree supports
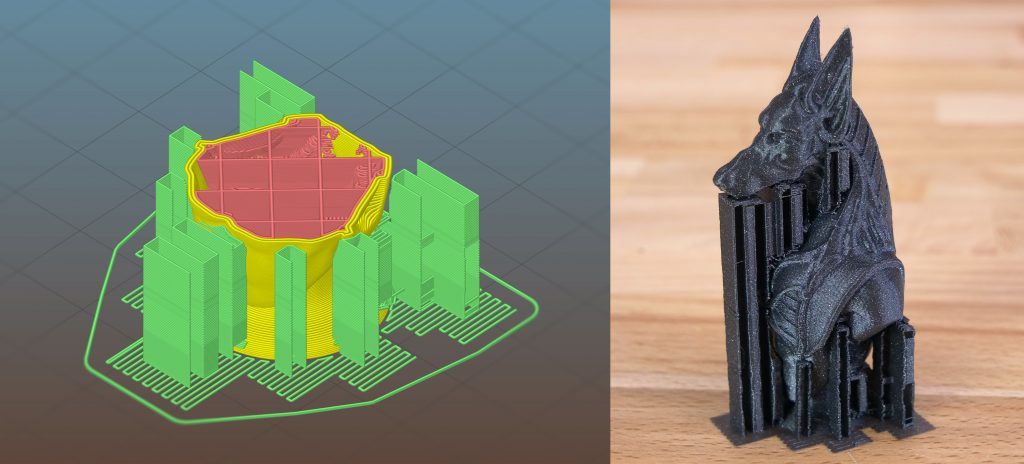
Lattice supports
Most slicers used for FDM 3D printing use lattice supports and Slic3r and PrusaControl are no exception. In Slic3r you can further specify where supports should be generated by adjusting the overhang threshold or selecting to create supports using the “on build plate only” option. These options are quick and easy to set. We are planning to further expand these settings and allow for adding manual supports directly in Slic3r. You can expect to see these changes in Slic3r 1.41 and later releases.
There is a very good reason why almost all slicers use lattice supports – they are universal. It doesn’t matter what type of overhang the model has, lattice supports will be able to support it. Yes, they might waste a bit more of filament than is necessary, but that is a small price to pay for a successful print.
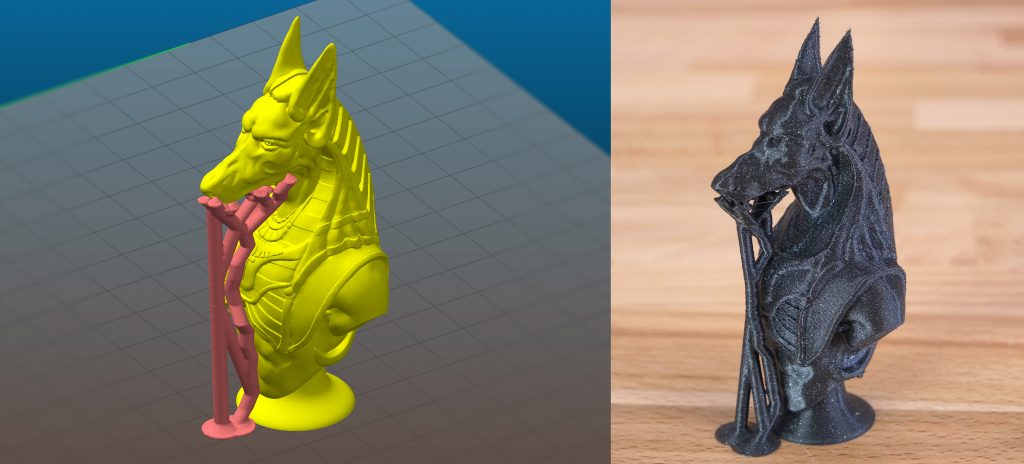
Tree supports
But what about tree supports? They are most commonly used in SLA and DLP 3D printing, when almost every print needs supports. But you can use them for FDM printing as well. Here are a couple of the potential advantages of tree supports:
- Ability to manually adjust supports
- Set which areas should be supported
- Freely add or delete any part of the support structure
- Possible shorter printing times
- But not always – heavily depends on your model
- Waste less filament
When should you use tree supports
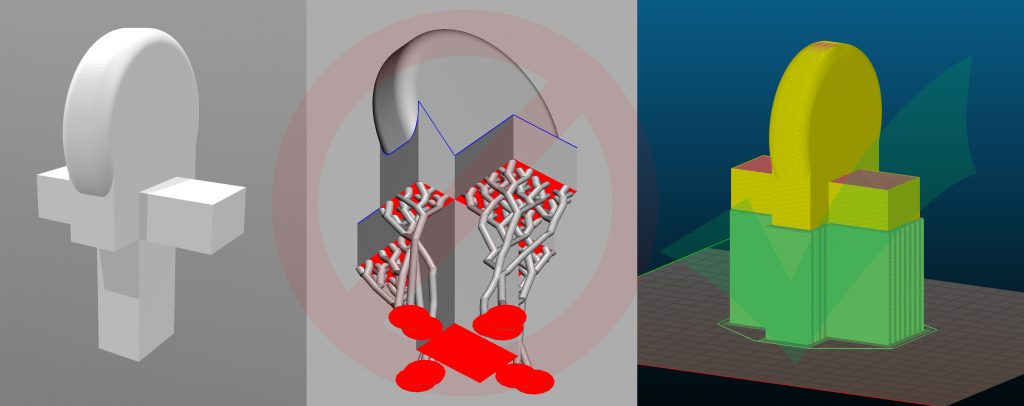
The tree supports come with one major disadvantage when supporting overhanging, flat areas. Each arm of the growing tree structure always supports only one point of the overhanging surface. But if the overhanging area isn’t flat, but is pointy instead, this disadvantage turns into an advantage. Now the support will have a smaller contact area with the model and leave a less noticeable mark on the surface finish.
The slicer tends to generate an excessive amount of supports. This is when opting for tree supports is great, because you know that you need to support only one or two overhangs of your model. They are also really handy when the model has no flat areas to be placed on the bed and therefore no obvious print orientation. In this case, traditional supports would create a huge grid underneath the whole model, but tree supports will organically grow and only increase in the area where they’re needed.
An example where using tree supports is a poor choice
How to generate tree supports
We’ll use Meshmixer to create tree supports and then we’ll export the model with the newly created supports. You can then import the model with supports to your favorite slicer and generate gcode normally.
- Open your model in Meshmixer
- From the top menu select View – Show Printer Bed
- Select Edit – Transform and move the model to the middle of the print bed
- This step is important because Meshmixer won’t generate any supports outside of the print area
- If you want to print the model on a different scale, scale the model now, again by using the Edit – Transform. It’s better to scale the model now, because an additional change of scale later in slicer would also affect the generated supports, resulting in either too thin and weak supports or too thick and hard to remove supports.
- Change the Scale X (Scale Y and Scale Z) to the desired value (1 = 100%, 1.5 = 150% etc.)
- Select Analysis – Overhangs
- Click on Generate Support to see a preview of the support structure
- Every time you make changes to the support settings you’ll have to click on Remove Support and Generate Support to refresh the view
- Adding and removing supports manually
- You can create a new support by left-clicking and dragging from an overhang to the ground or from an existing support to the ground
- Hold down the Shift key to ignore intersections of the support strut or any other warning and force Meshmixer to generate the new support (use wisely)
- You can also click on an existing support to generate a new strut going down to the build plate
- CTRL + Left click on an existing support to remove it
- When you’re happy with the support structure you can export the model and the support structure together as STL by simply clicking Done and clicking on the Export button in the left menu
- Alternatively, you can select Convert to Solid to create a separate mesh from the support structure. This will let you set different settings in Slic3r for the supports and for the model itself
- After choosing Convert to Solid choose Edit – Separate shells
- Export both the model and the supports as individual STL files
- In Slic3r first load the STL with the model
- Double-click on the model and choose Load part…, select the supports STL file
- When the STL loads, you can overwrite some of the settings by clicking on the green plus icon
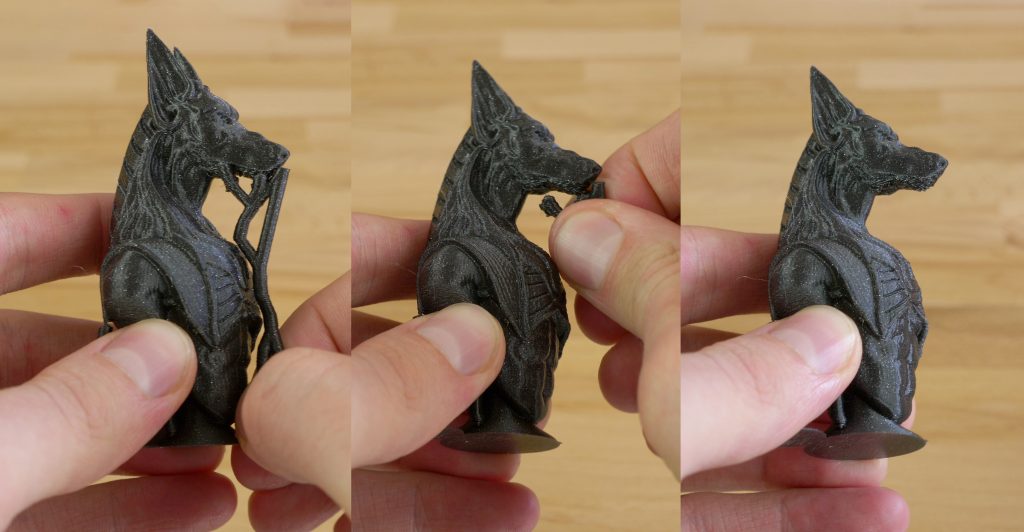
 Removal of tree supports should be quick and easy
Summary
Tree supports will be a good addition to your 3D printing skill set. You will find a good use for them probably just from time to time. But, if used properly, they can save you print time, filament and even time to clean the print from supports. If you’re unsure about when to use them, just stick with good old slic3r supports. Or try the water-soluble supports with our Multi Material 2.0 Upgrade!


I follow Joseph many years
AWESOME tutorial!!!
I will definitely give another go on some statues that I did set aside until the MMU2 has arrived… 🙂
Please keep up this good work!
Cheers from switzerland,
Daniel
This is great. Thanks guys!
Very interesting. Are you aware of any open-source program allowing to create tree supports?
how do you add a “Prusa” brand machine (specifically the MK3) to Meshmixer settings when selecting your printer?
You know, all you have to do is go to preferences, click “printers,” and go down and click on prusa to add. 🙂