
We did everything we could to ship as many printers as possible before Christmas, so you could find your own new 3D printer under the Christmas tree. Now is the time when many of you have an assembled printer and you are experimenting with your first 3D prints. And perhaps you’re wondering whether you have built the printer correctly and whether your prints are as good as possible. On social networks, you often ask others whether your print looks good and what could possibly be improved. In this article, you’ll learn what affects print quality, what mistakes you could have made during the assembly, how these issues affect the print, and how to fix them. The resulting quality is affected by a number of aspects that can be divided into three main groups based on possible causes.
- The mechanical condition of the printer
Typical problems: layer shifting, ghosting, under-extruded print, skipped layers - Print setting and slicer parameters
Typical problems: stringing, bad overhang areas, under-extruded print, skipped layers - Type and quality of the filament
Typical problems: under-extruded print, bad layer adhesion, inconsistent extrusion
As you have probably noticed, some of the possible issues may be present throughout all three groups. Right now, let’s focus on the first point and check whether you have the printer properly assembled and everything is fine on the mechanical side. It’s quite easy to overlook something during assembly. The second and third points are related to the slicing process and it’s actually quite easy to avoid printing problems resulting from unsuitable temperatures, retractions, print speeds, filament quality, and other software settings.
To eliminate slicing mistakes, we will use an already sliced model: 3DBenchy (MK3_PLA_3DBenchy_150um_2H.gcode). This is called a benchmark model. In this case, it’s sliced using a 0.15 mm layer height and PLA filament settings. The main advantage is that the print time is less than two hours, so you can get the results quite quickly. You can find this gcode and many others after installing the Drivers & Apps package on the Windows desktop in the “3D Objects” folder, or in the C:\Users\Public\Documents\Prusa3D\ Samples\Sample Gcodes\MK3 path. MacOS users should look in /Applications/Original Prusa Drivers/Objects/Sample Gcodes/.
To achieve good results, we strongly suggest using a high-quality PLA filament – the sample spool you received along with your printer is great for this test. If you have already run out of this filament, we can wholeheartedly recommend our own in-house manufactured Prusament with the manufacturing precision of ± 0.02mm and a digital “birth certificate” that allows you to inspect every inch of every purchased spool. Protip: Printing defects are particularly noticeable in silver color filament.
If using proven print settings and a high-quality filament, we can fully focus on printing defects caused by mechanical problems.
Why should you use Gcodes instead of STLs for testing?
The .gcode file is generated by a process called slicing. The slicing process takes a 3D model (STL file), analyzes it and applies various parameters to it – such as temperature settings, print speed, cooling, infill, retraction, and many others. The result is a .gcode file, essentially a set of movement instructions for 3D printers plus additional information such as nozzle temperature etc. All of these parameters affect print quality. For testing, it’s best to use a gcode file instead of STL, because the file has fixed parameters and it comes pre-sliced with the best settings.
What is a benchmark?
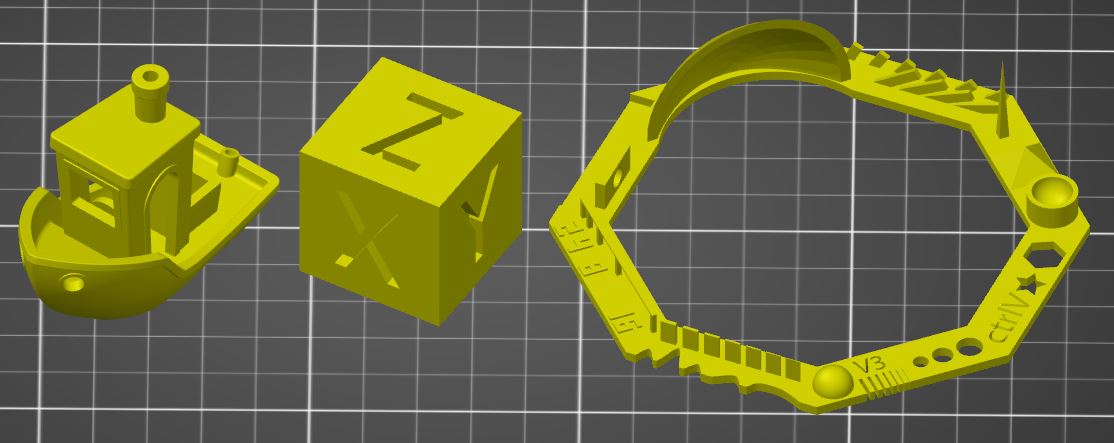
A benchmark is generally a method for comparing tracked indicators. 3D models for benchmarking are specially designed to offer a large array of challenging geometrical features that will put the abilities of a 3D printer to the test. There are a number of popular test models. The most well-known are:
3DBenchy – A small model that covers the basic tests of printing holes, overhangs, bridges, planar horizontal faces, and so on.
Download STL | G-code for MK3 is part of Driver & Application package
XYZ Calibration Cube – It is used primarily to calibrate and compare the dimensions of a 3D model and a physical print. Also, it can be used to test for ghosting.
Download STL
Test your 3D printer! v3 – This model contains the incredible amount of 21 different print tests in a single print. You can see how well the printer deals with overhangs, bridges, holes, spherical surfaces and other shapes.
Download STL
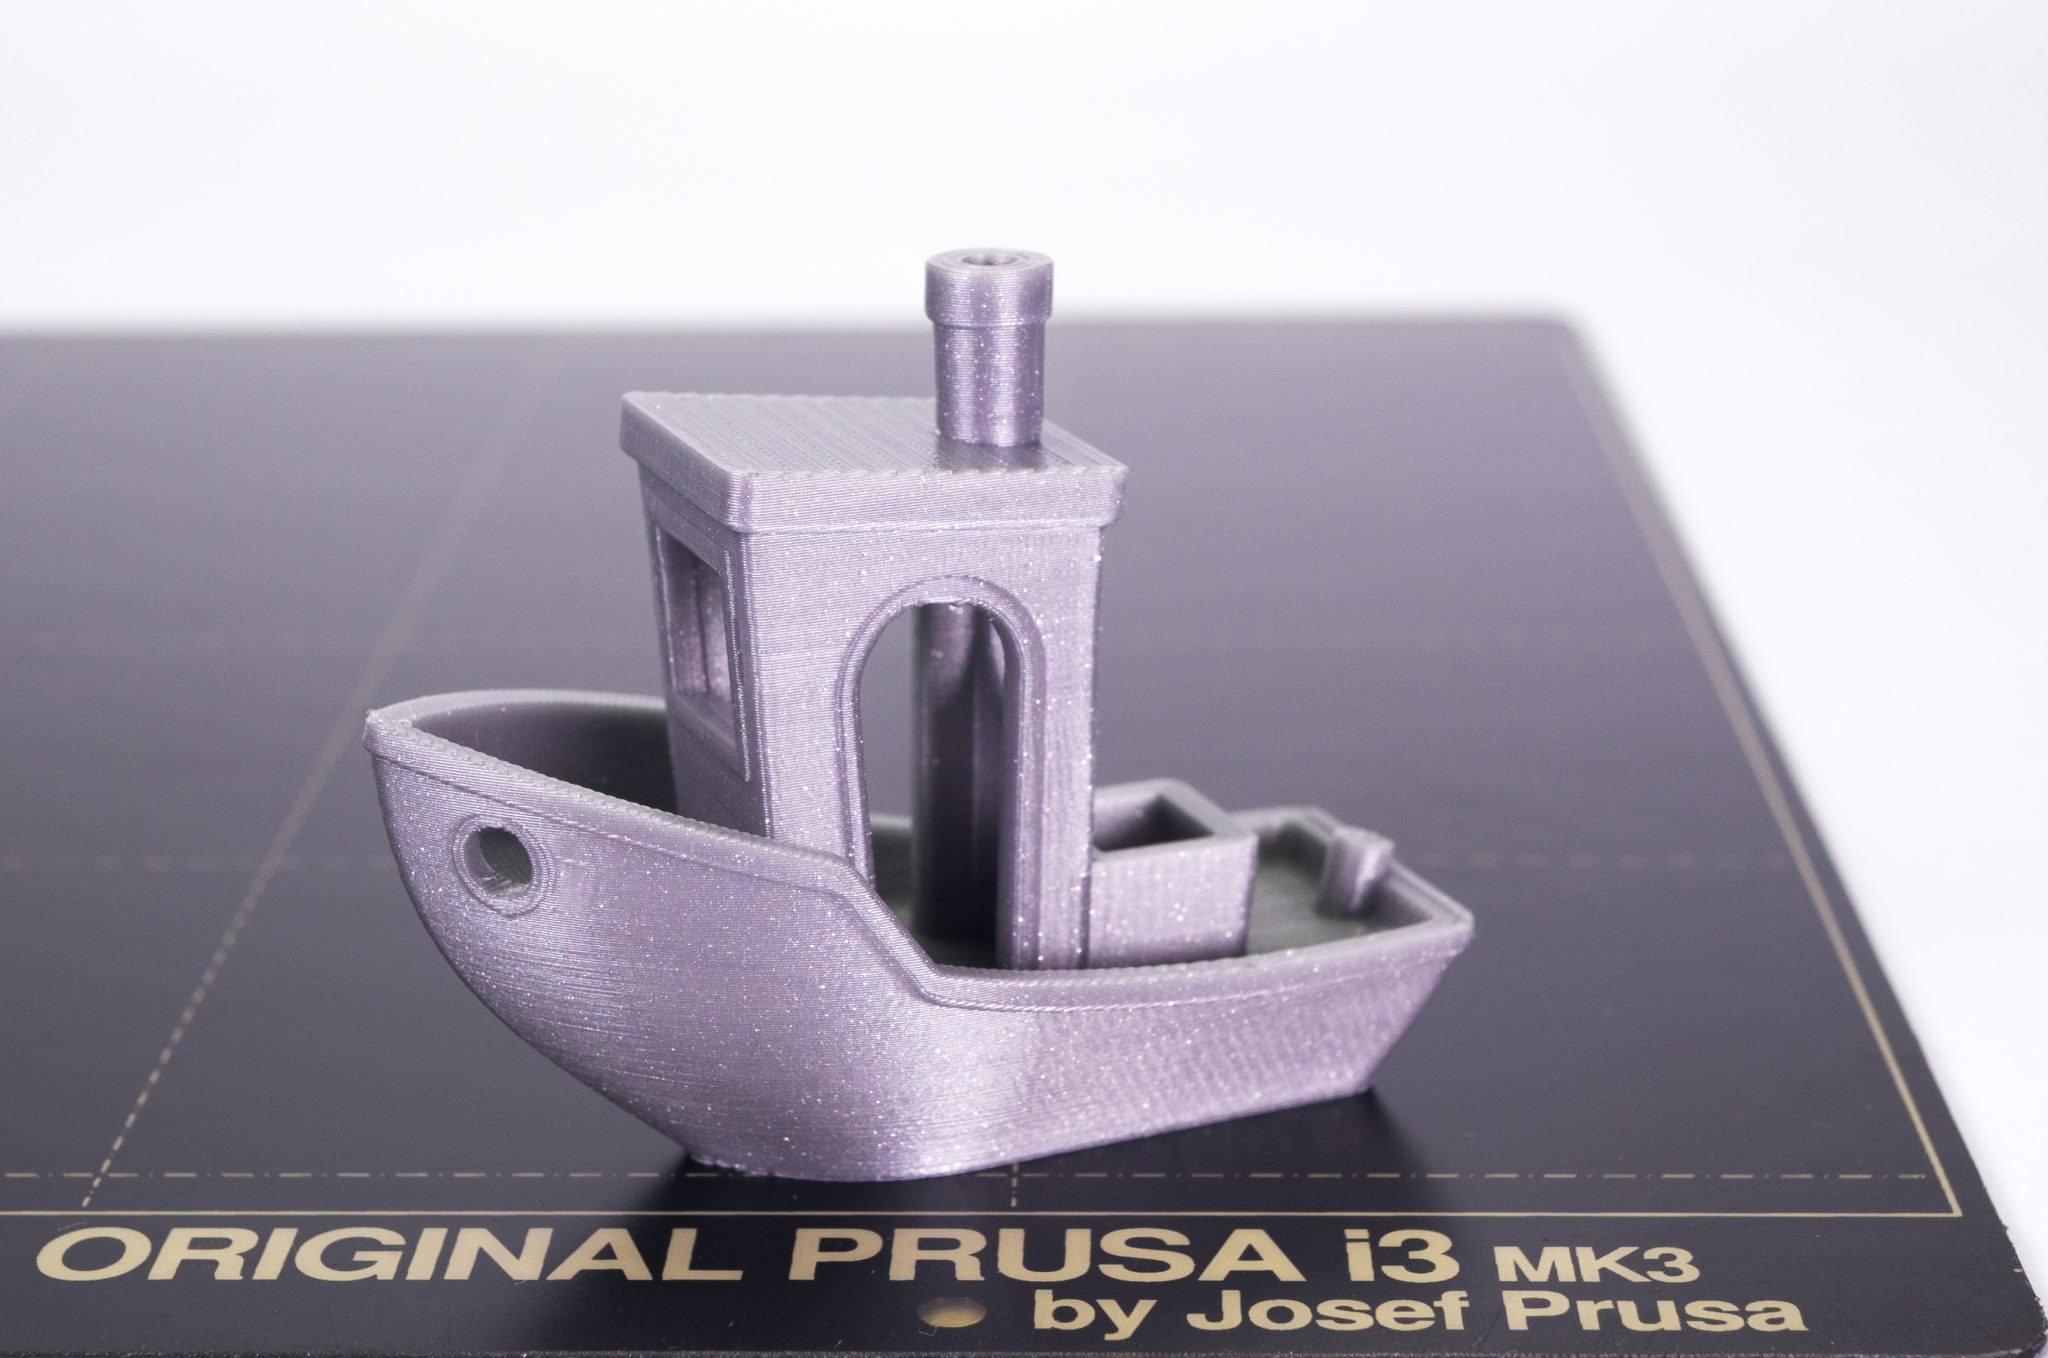
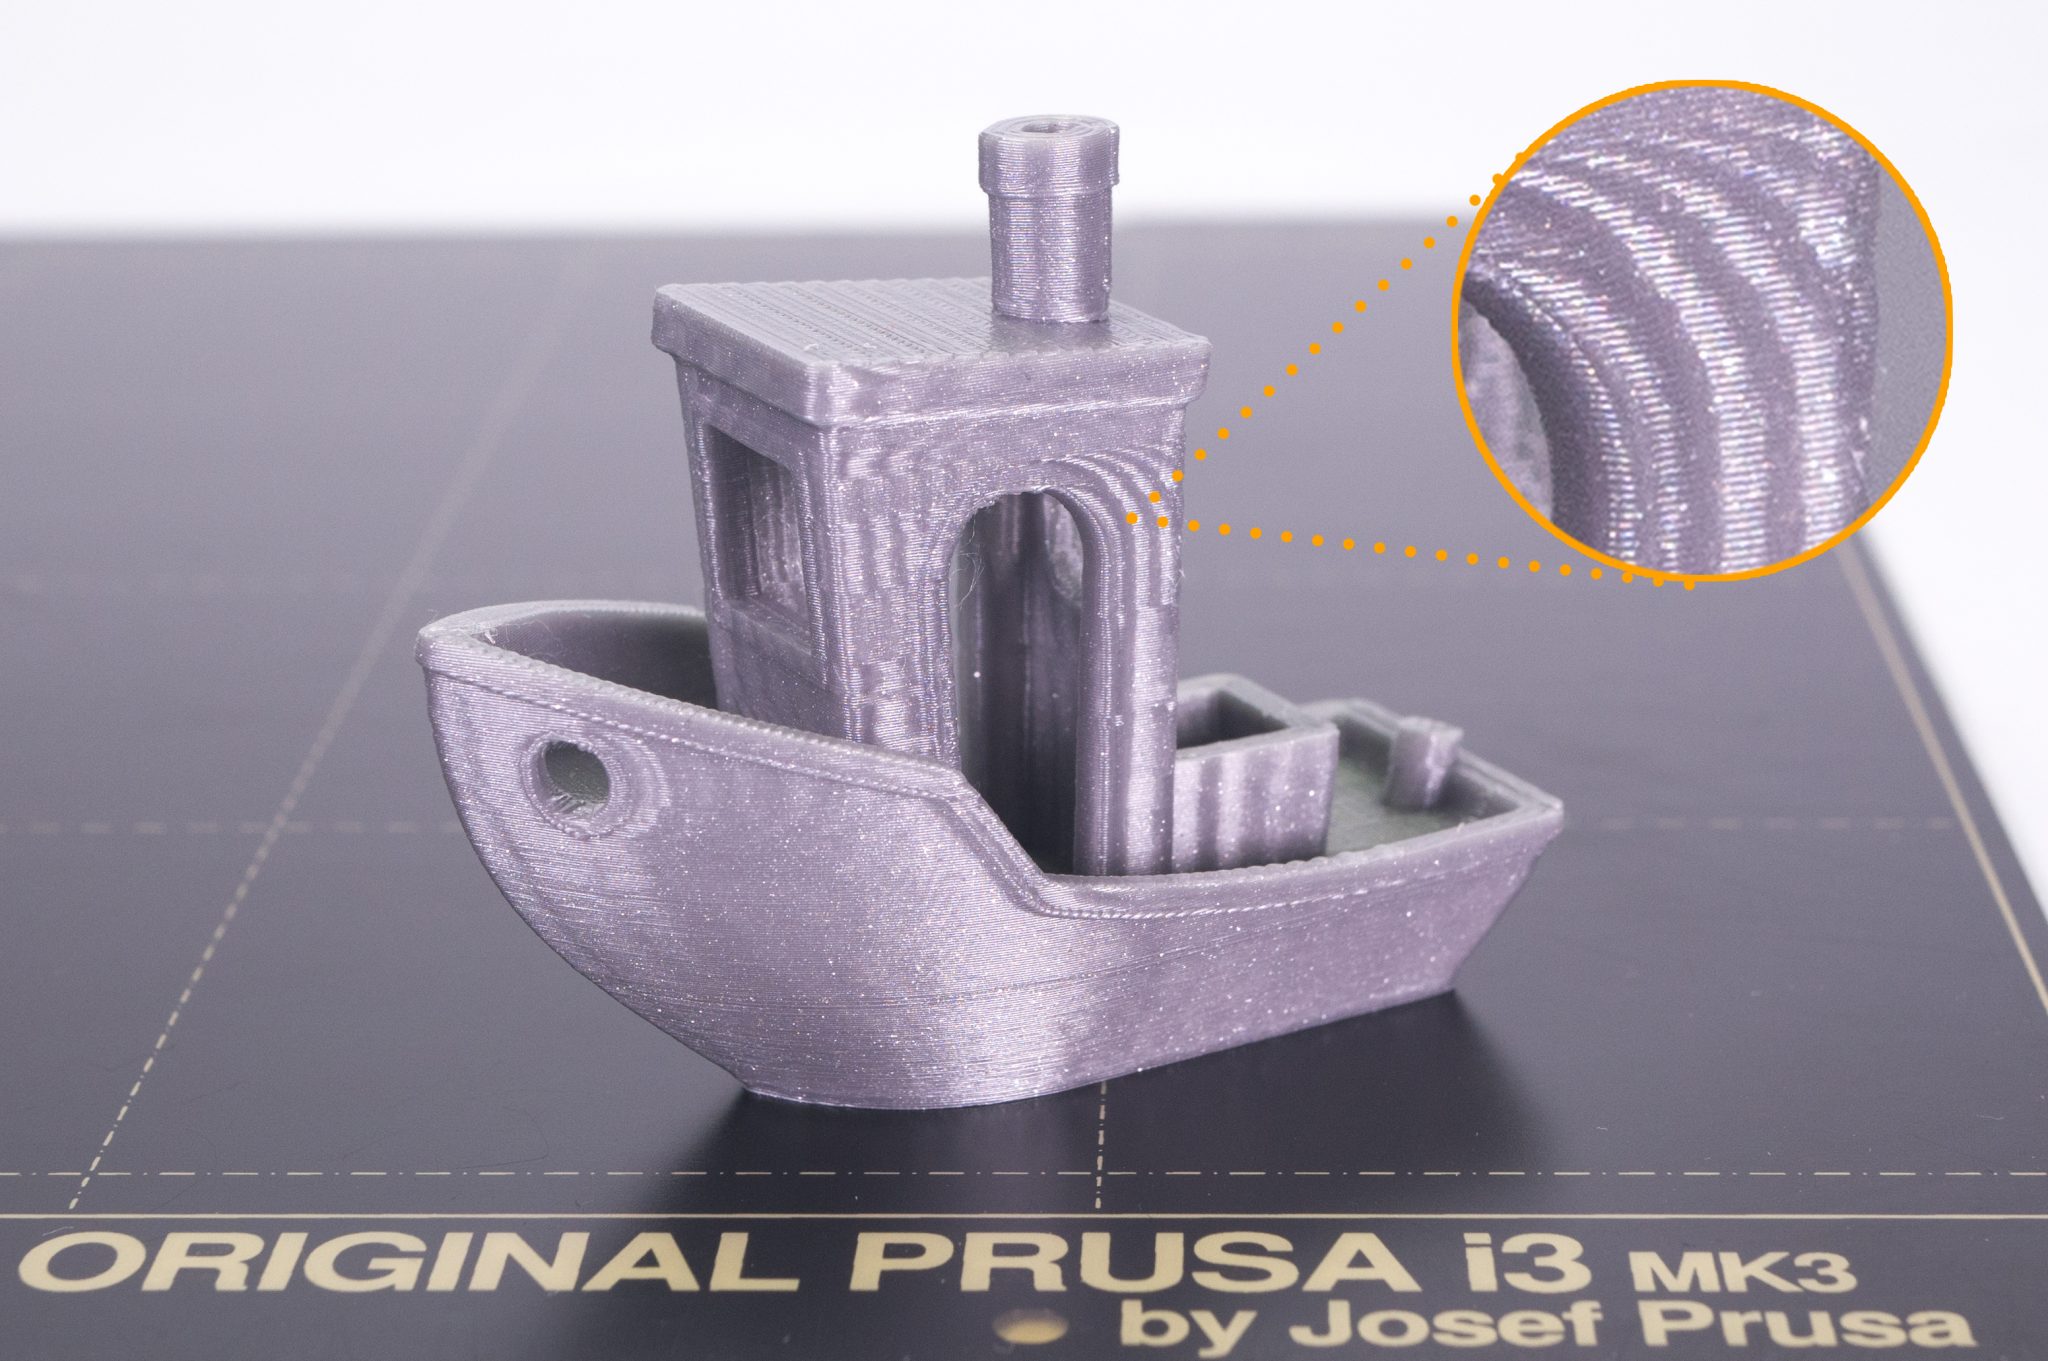
The 3DBenchy print should look like the one in the picture below. Its surfaces should be smooth, without visible layer shifts, without stringing or ghosting around the sharp edges of the model. If your benchy looks different, we have prepared a list of proven tips, tricks, and fixes based on the type of issue you could be facing.
All the following procedures are focused on mechanical causes that negatively affect print quality. Some of the problems may look very similar, so it is impossible to determine the exact cause. The best way is to check all the following points. Possible causes are sorted from the most common to the least common ones. Keep in mind, that mechanical slack (resulting from loose screws etc.) in the printer’s frame/body and any sort of excessive resistance affecting the printer’s axes will negatively affect the print quality.
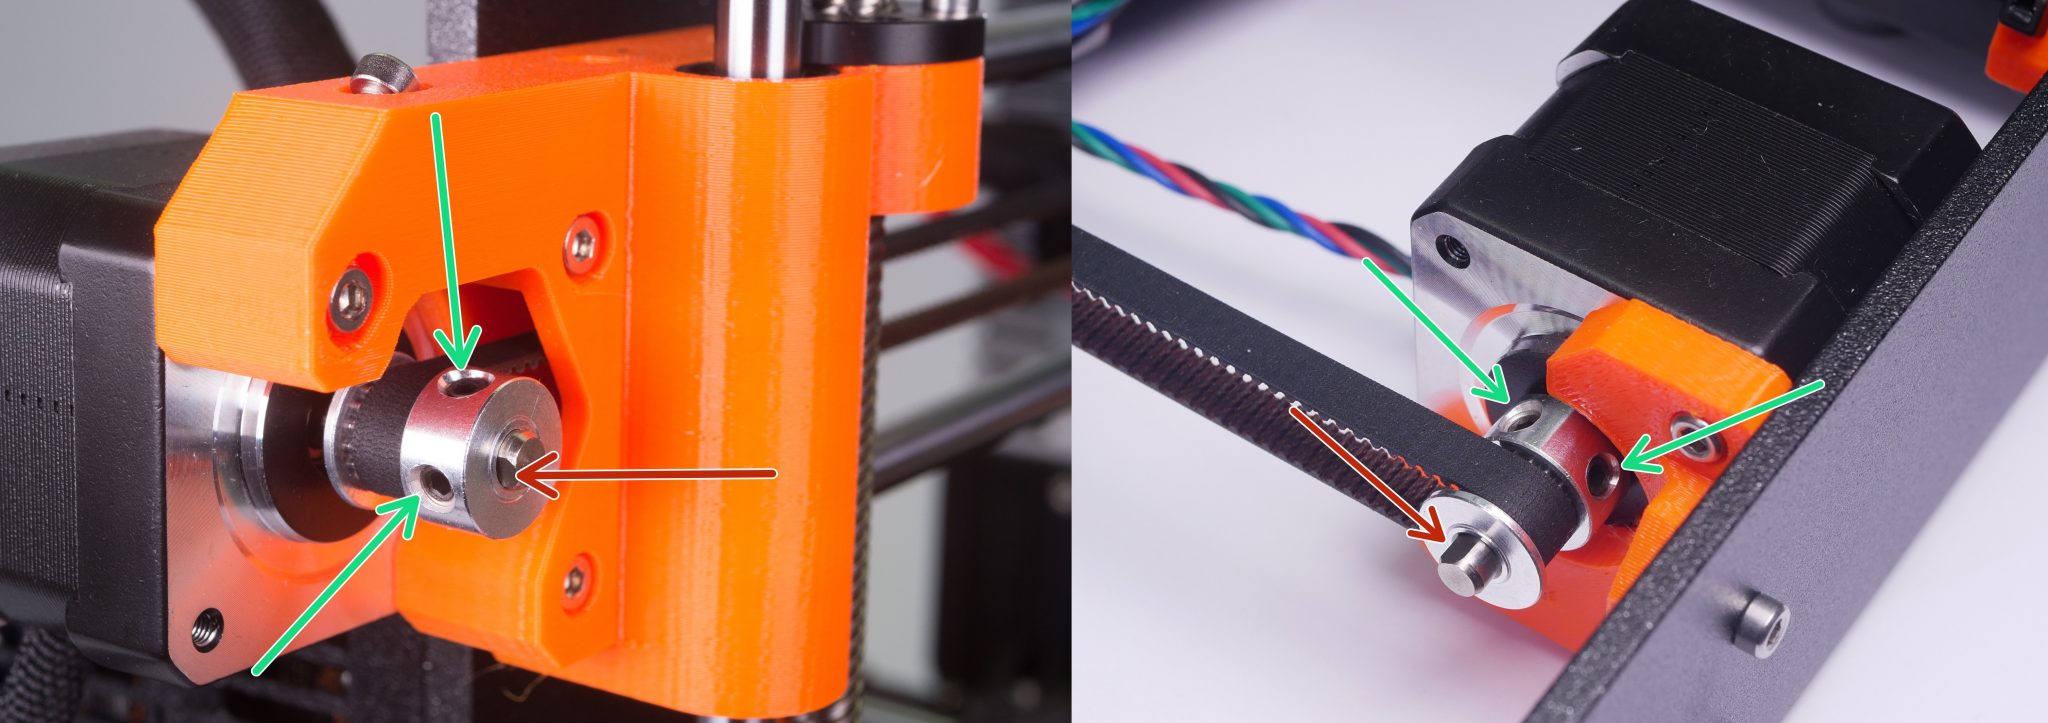
1. Loose belt pulley on X and/or Y motor shaft
If you find layer shifts on your prints, they are probably caused by a loose belt pulley on the X and/or Y motor shaft. Layer shifts typically occur on the whole model. When the pulley is very loose, the effect is stronger, because it doesn’t hold on the motor shaft properly and can rotate almost freely.
Solution:
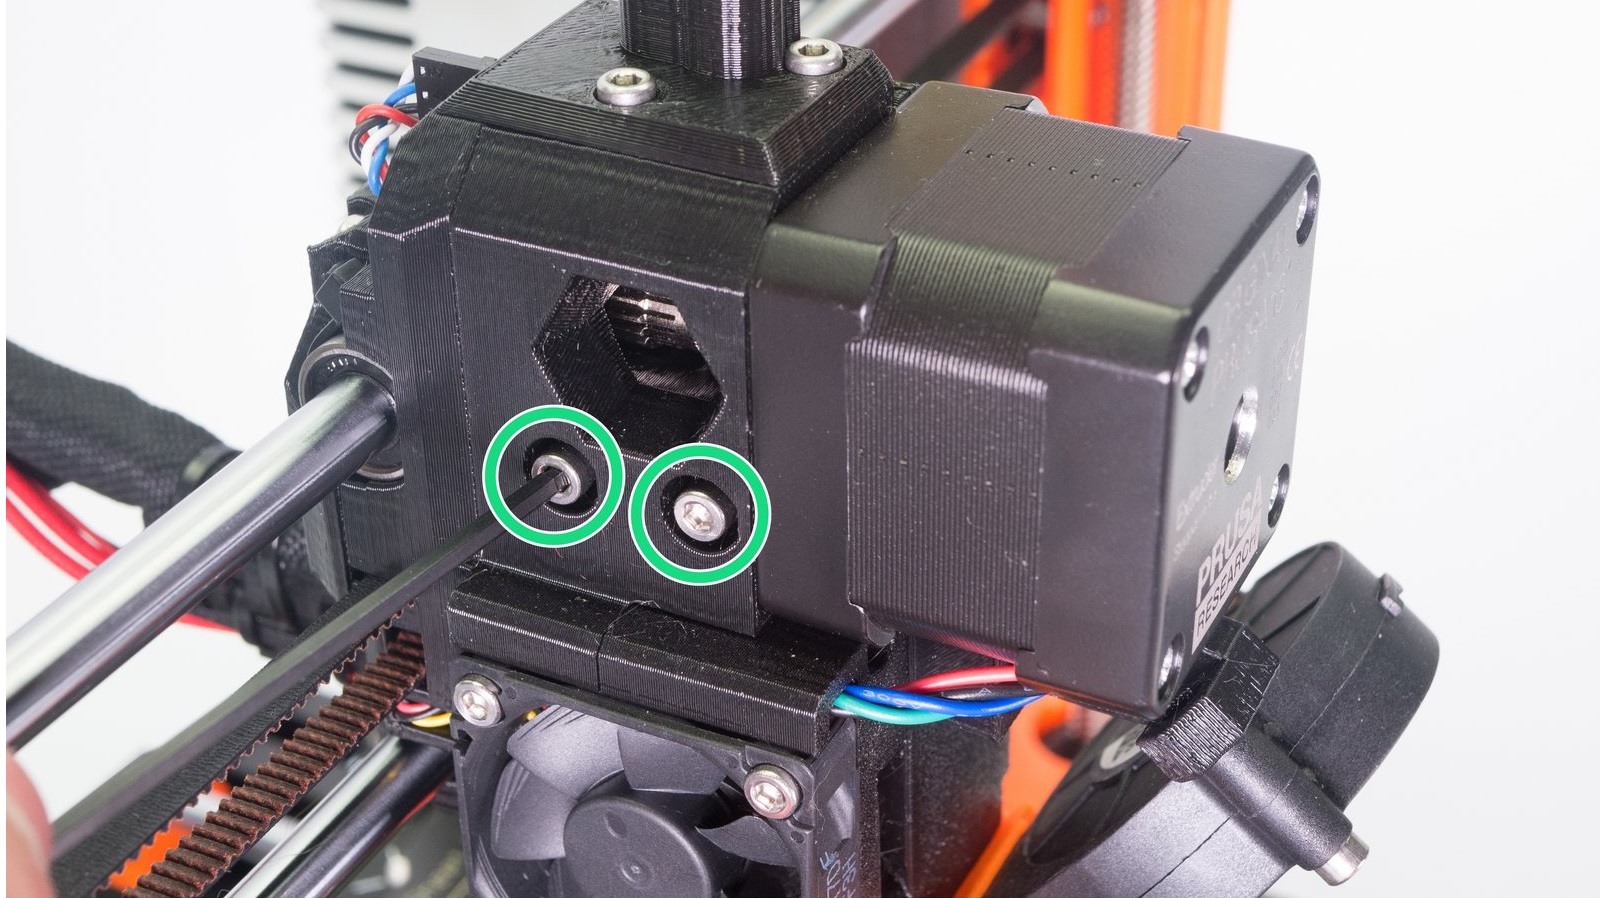
Check that both screws on the pulley are properly tightened – this applies to both X and Y axis pulleys. Ensure that one of the screws is tightened exactly against the flat part of the shaft (indicated by the red arrow in the photo). Then tighten the second screw.
2. Loose belts on X and/or Y axis
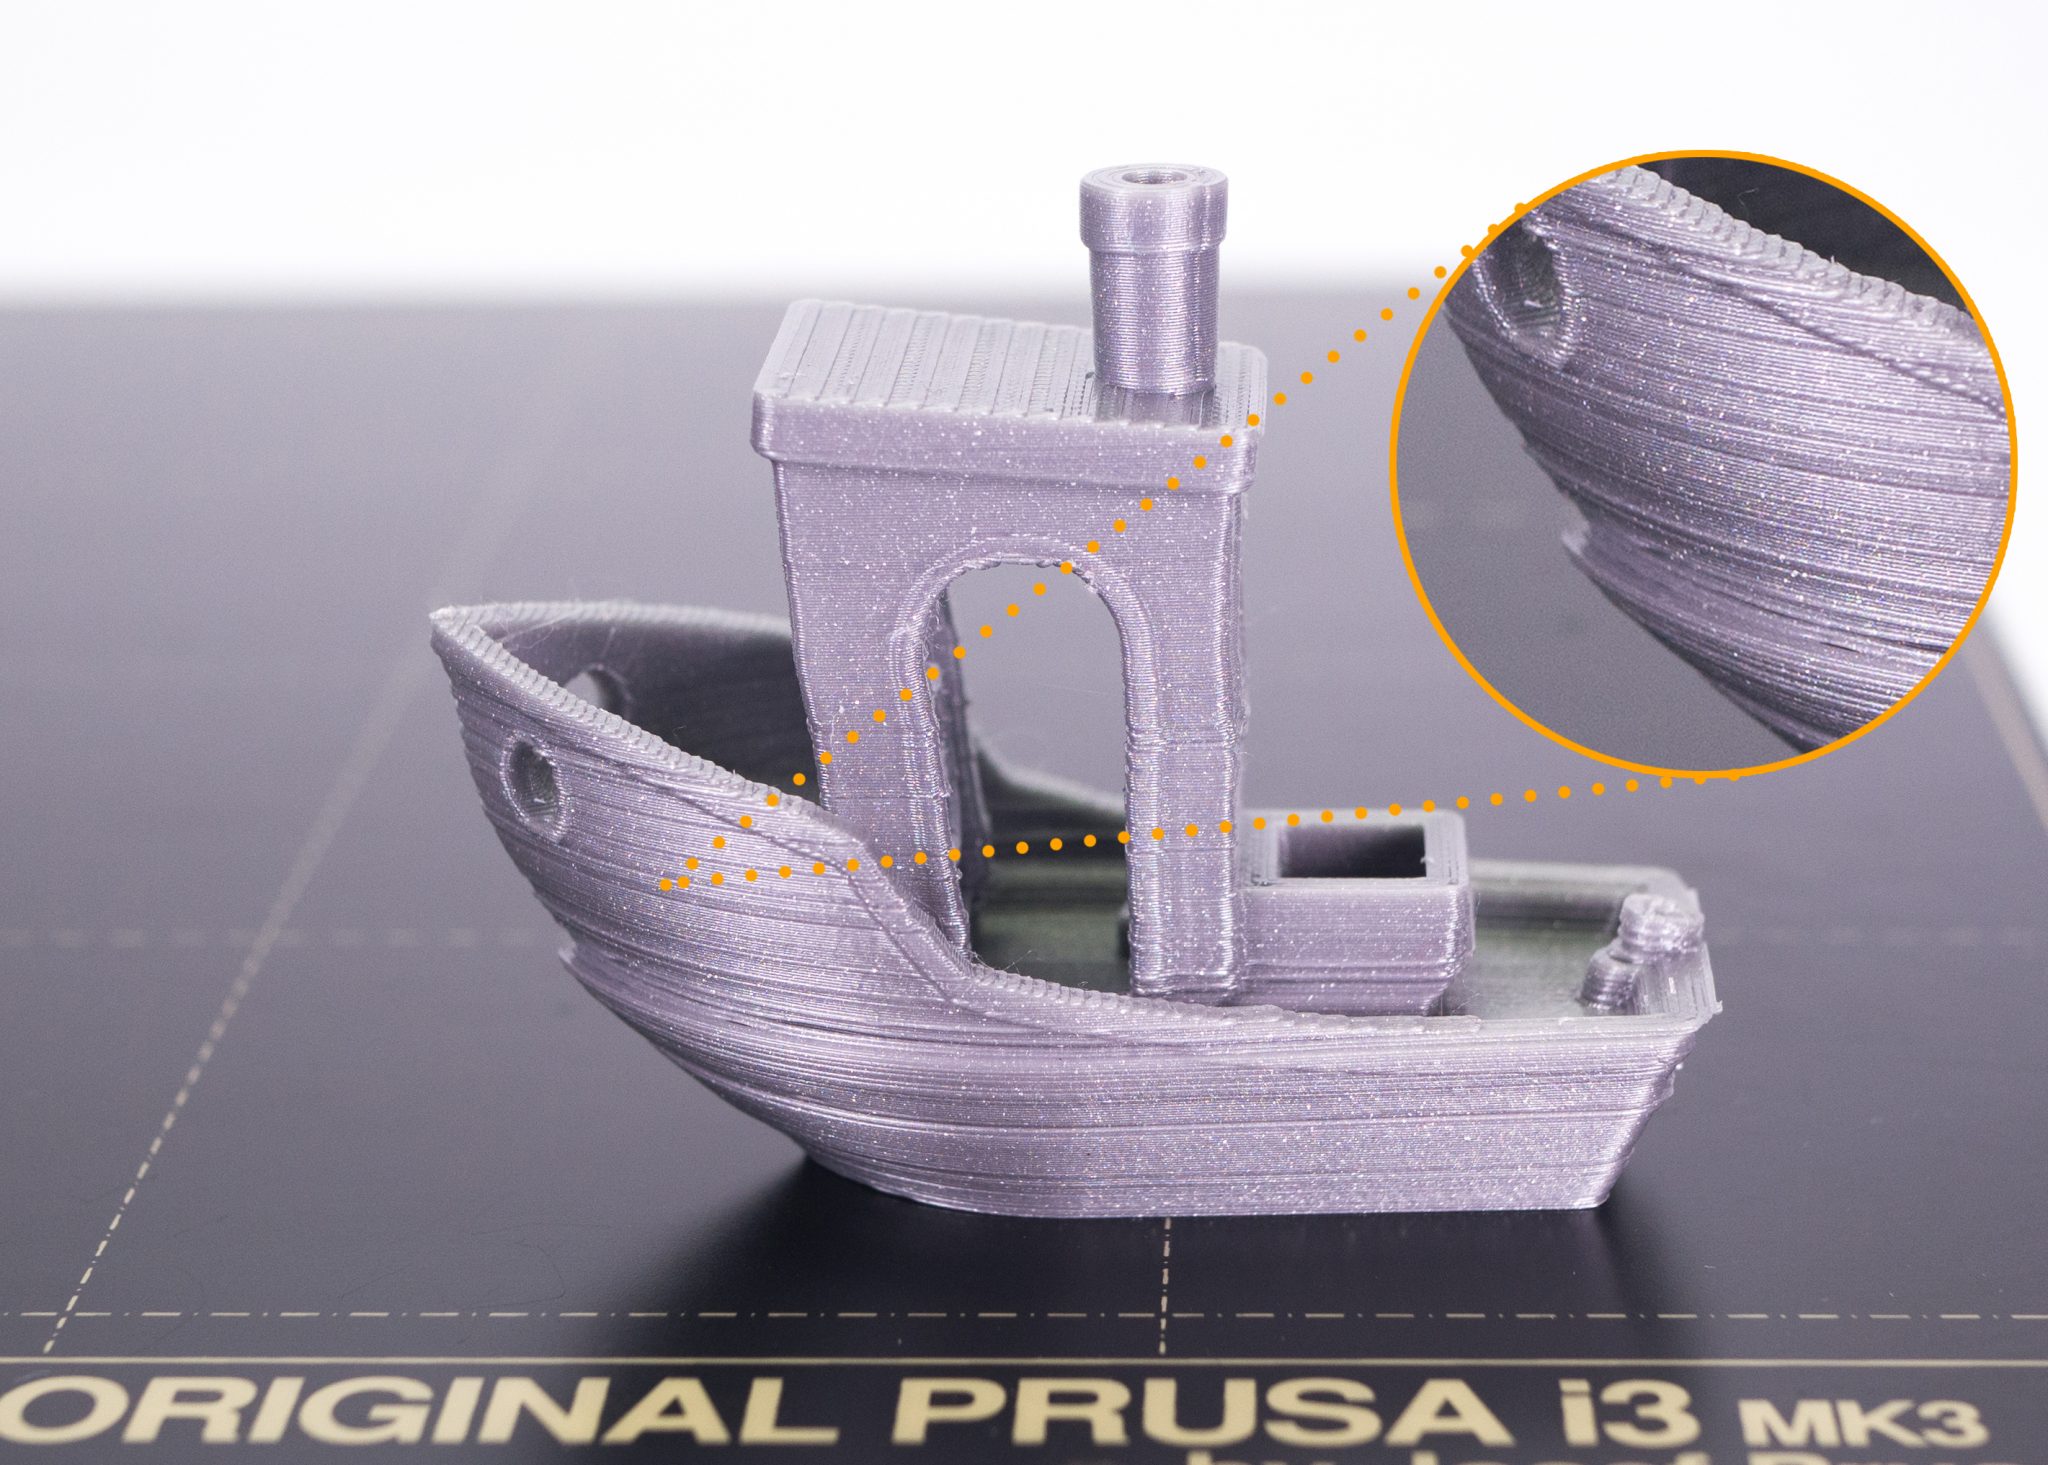
Belt tension can significantly influence an effect called ghosting or also ringing. Ghosting can be typically recognized by several waves that follow after a sharp edge on a model. An example can be seen in the photograph of 3DBenchy at the marked spot (below).
Solution:
Adjust belt tension on X and/or Y axes. It may take a bit of time to find the perfect belt tension. We can offer the following tip: try plucking the belt like a guitar string. You should hear a deep bass tone. A belt that has been tightened more will emit a higher tone. A less tightened belt will result in a lower tone.
You can also check the Belt Status values which can be found in the printer’s LCD menu. Go to Support -> Belt Status and check the measured values. The values should not be under 240 and above 300, but there is no single ideal value. The number does not represent any quantity. These values are updated each time you run the Selftest (LCD menu -> Calibration -> Selftest). A lower value means more belt tension, a higher value means a looser belt.
The problem of ghosting can be visible also when the belts are properly tightened. Ghosting is caused by vibrations that increase with print speed. To reduce ghosting, try to reduce the printing speed and see if the problem goes away. It’s always better to place the printer on a stable surface.
3. Incorrect tension on extruder idler (Bondtech gears)
If the filament has trouble moving into the extruder, the print can be under-extruded. This means that the printed objects will have parts in which the layers are randomly missing and thus the prints are soft and fragile in these areas.
Solution:
The idler tension bolt heads should be loosely aligned with the plastic part surface. This tension is optimal as a starting point. For other materials than PLA, especially flexible materials, the pressure will need to be adjusted slightly.
Probably you have seen our older video: How to improve the quality of your 3D prints on the Original Prusa i3 MK3? Although we said, that tension is sufficient, when the melted filament starts to extrude, it is actually better to tighten the two screws a little bit more.
Insufficient tension causes the filament to slip, which results in under-extruded and missing layers in the printed object.
On the opposite side is an excessive tightening of the tension bolts. The extruder motor has to exert excessive force when rotating. You may hear loud clicking accompanying the skipping of the extruder motor steps. This results in irregular extrusion of the filament, which again causes an under-extruded print.
Adjusting the tension of the Bondtech gears is not particularly sensitive. Print defects are visible only in extreme cases of very loose or over-tightened bolts.
4. Incorrect alignment of Bondtech gears
The Bondtech gears must be correctly aligned. The filament must pass precisely through the center of the grooved Bondtech gear area. Incorrect alignment will result in an irregular feed of the filament and it will manifest in the form of under-extrusion in the printed object.
Solution:
Loosen both idler bolts and open the idler door on the extruder. Loosen the screw in the Bondtech gear with an Allen key. Insert a string of filament into the extruder. Precisely align the Bondtech gear as you can see in the picture. Tighten the screw on the Bondtech gear and screw the idler door back.

5. The bundle of extruder cables hitting the frame
During the homing routine, the printer automatically detects the end position by detecting the moment when the plastic parts hit the end position. In case there’s a messy bundle of cables leading from your printer’s extruder, there is a probability that the printer will detect an inaccurate end position as the cables hit the frame. This in itself would have no impact on print quality. But if the crash detection feature is activated and the printer starts re-homing, then there is a risk of layer shifting.

Solution:
Make sure that the extruder cables are not touching the printer frame in end positions. In the end positions, there should always be a small gap between the frame and the cables. Check out the assembly manual for detailed instructions.
6. Incorrect tightening of the U-bolts on the Y-carriage
Insufficient tightening
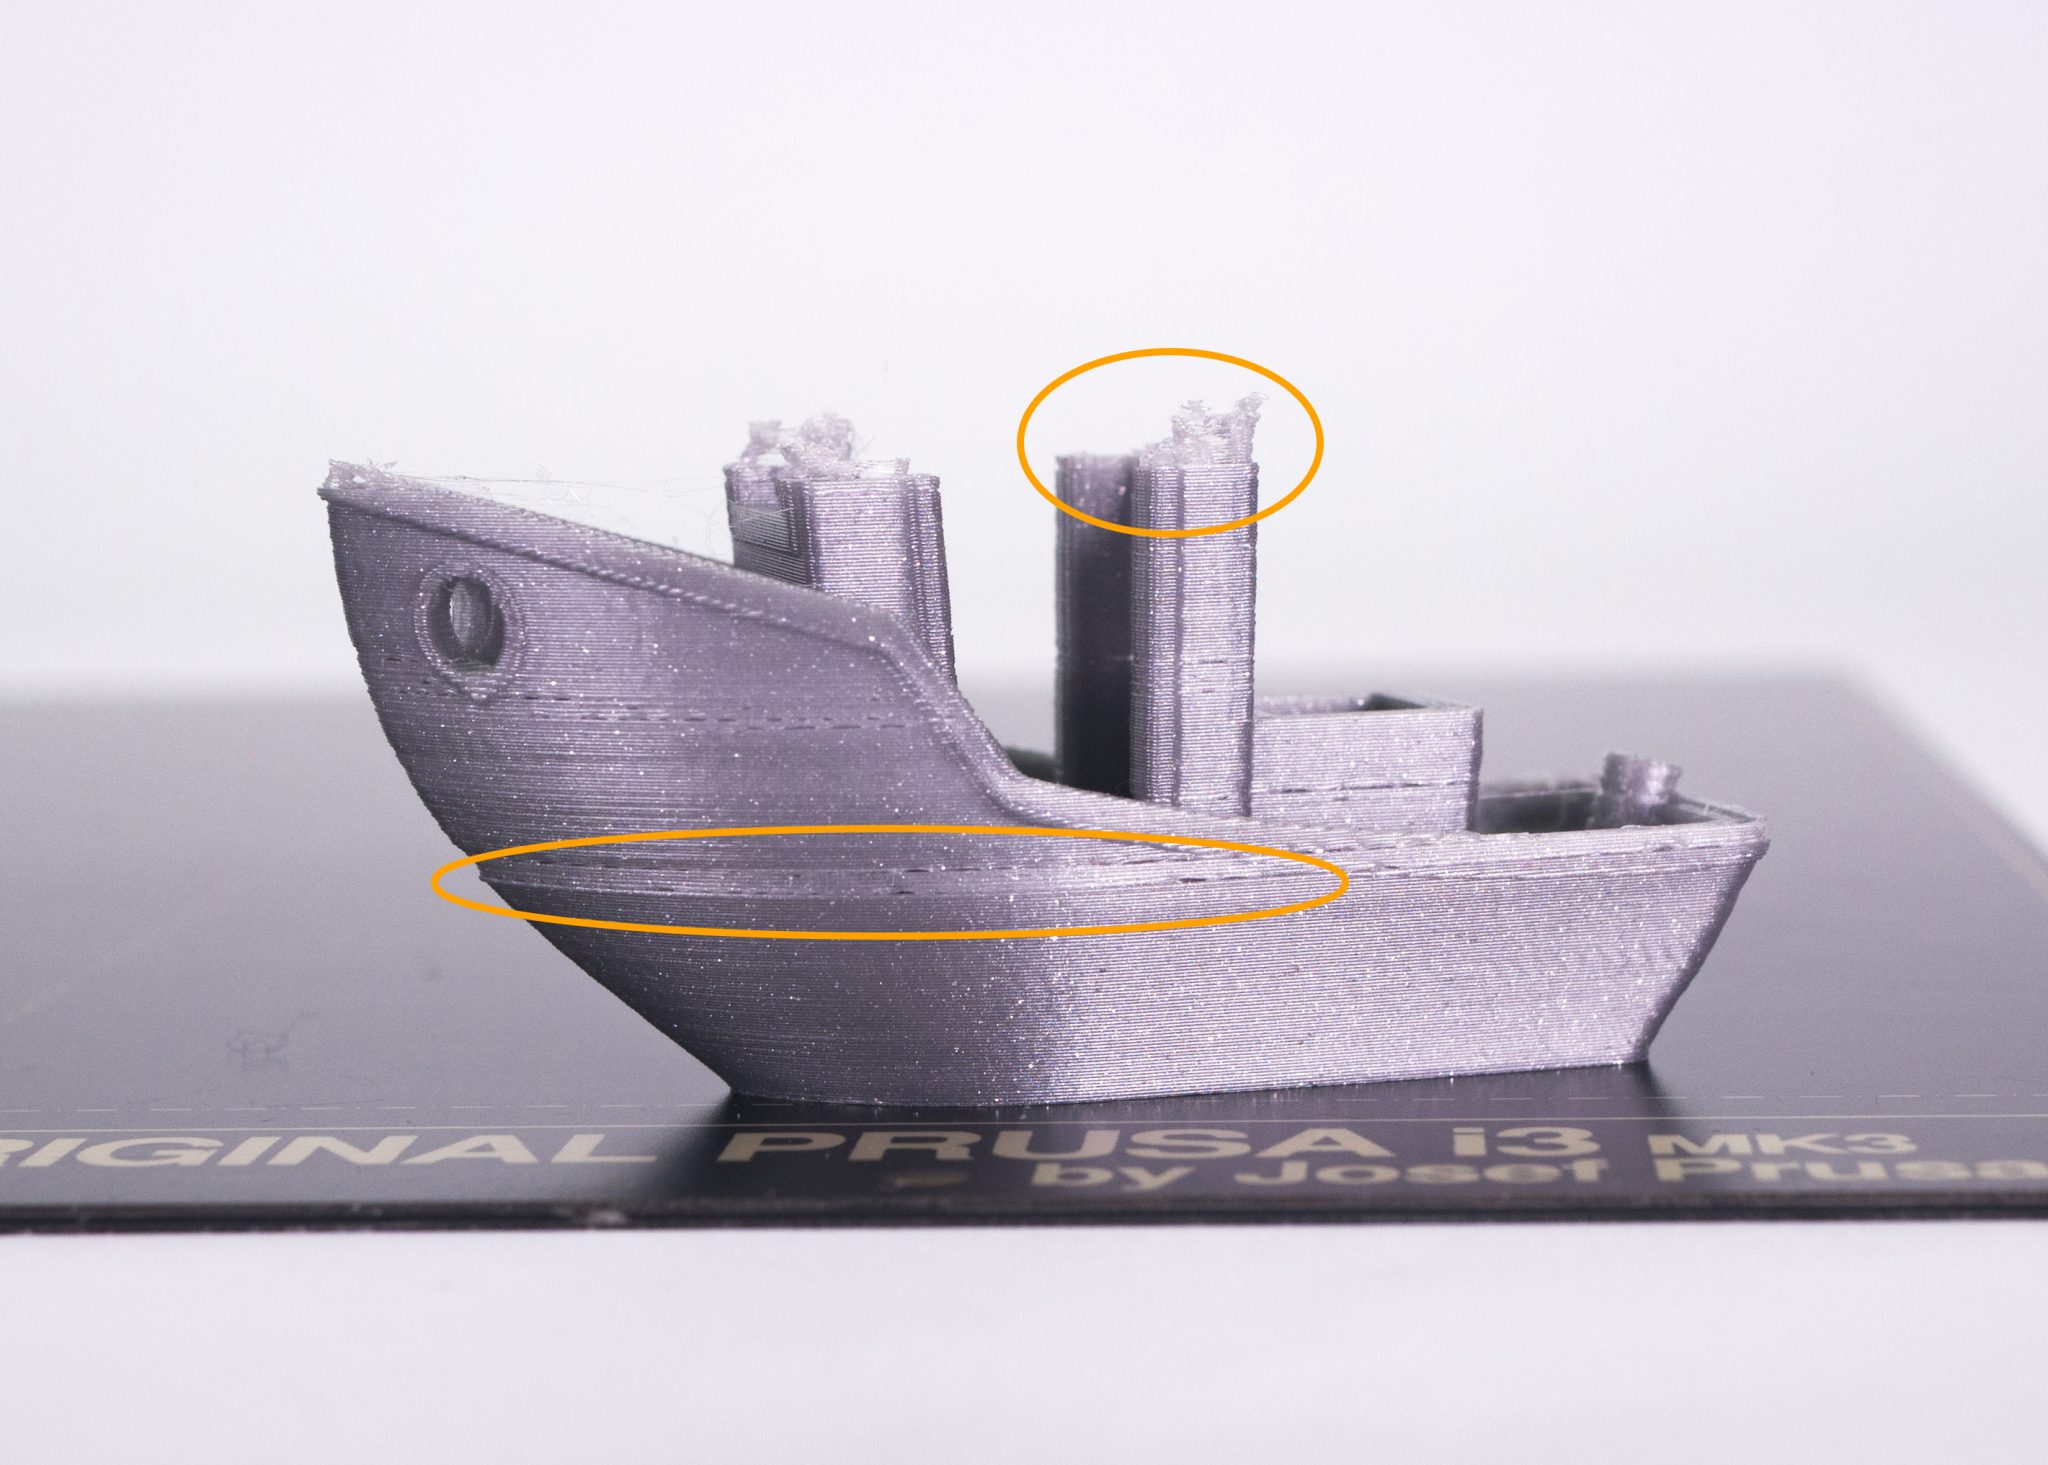
If the print bed is loose in the U-bolts, the prints will have visible defects. Typically, it results in a slight wrinkling of vertical walls, especially walls of taller objects. You can recognize the loose bed by turning it in the direction of the Z-axis. The moves in this direction should be absolutely minimal.
Excessive tightening
Excessive tightening of the U-bolts can result in rapid wear and damage of linear bearings and rods. Overtightening can cause irreversible deformation of the linear bearing. Also, the Y-axis won’t move smoothly.
Solution:
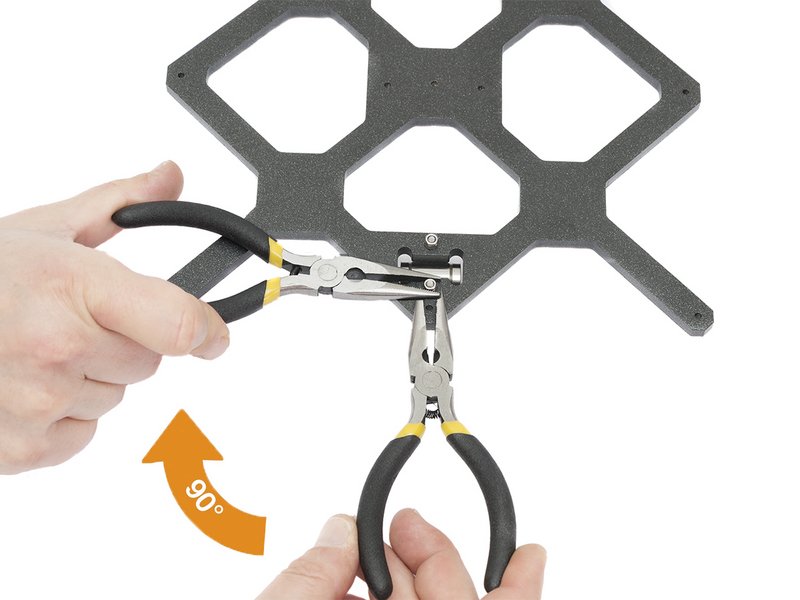
Check how tight the U-bolts are. Tighten both nuts, so they touch the Y-carriage surface. Then tighten both nuts a bit more by rotating them by an additional 90°. For detailed instructions, please check the manual.
All connections (such as screws, zip ties) on the printer should be properly tightened and firm. Any overlooked mechanical slack (such as loose screws) adds up to others issues, and eventually, everything combined can cause visible print problems. Once in a while, we recommend tightening all bolted connections. Vibration during printing can result in screws loosening over time.
If you have followed all of our advice, printing the 3DBenchy test model from the prepared gcode should be fine now. If your 3DBenchy does not look the same as ours, make sure that the X and Y belts are correctly aligned. Also, check if the extruder and heatbed are moving freely. In case of an under-extrusion, make sure the nozzle is not clogged. Check out our article 7 Problems affecting the quality of your 3D prints to learn more about this issue.
At this point, you can start slicing and printing your own models. If you detect any of the problems we just described (under-extruded prints, shifted layers, stringing…), but the 3DBenchy from a pre-sliced Gcode looked fine, you can rule out mechanical problems with the printer. The source of the trouble will probably be in the slicing settings. Roll back to default values and try re-slicing the model. We recommend using our pre-made and tested profiles in Slic3r PE in combination with Prusament to achieve optimal results!
Check out our brand new site focused on 3D print quality troubleshooting. We have assembled a list of the most common issues related to 3D printing and we’re offering properly tested solutions. This includes instructions for software settings and even best practices for specific prints and materials.
If you are a new 3D printer user, you will also appreciate other tips and solutions for all sorts of issues. Check out our Knowledge Base. You can also get valuable advice from the community on our forum. Make sure you properly perform first layer height calibration, which is the most crucial part for a successful print.
The only issue I ran into was “Prints not sticking”. This was solved by lowering the print head using the test print (included on the SD card). The goal was to make the rectangle be: flat, smooth and uniform so that it could bend without breaking when pulled off the printer.
The build went flawlessly, However I cheated by having cats help me build my printer.
Daisy May “Destroyer of Worlds” aka. Itty Bitty Kitty was extremely helpful by carrying off part bags that were not in immediate use so I would not accidently use improper parts. As in a Calico’s nature she would hide the part bags to a make extra sure I would only get them when needed.
Rose and Ranger Cats were also a big help by selecting screws which should be used. They would anticipate build steps and bat the proper screw, along with the appropriate allen key to me. If I was not ready they would put them on the floor for later use. Daisy May had carried off the spare bag so there would be no confusion on what to use.
I would strongly recommend the use of cats and if you can get them kittens when building your Prusha. Now onto the Ikea Lack enclosure … the cats have said they would help and have asked Kira their large German Shepherd dog to make sure the build goes smoothly.
Nice article! I’ve had my MK3 since August 2018 but it’s still good to brush up on improvements. Someone should make an article for using bed level correct or something. That would be a nice touch for the chance that live adjust z doesn’t work perfectly.
Thanks for the article.
Where can I get the .gcodes as a linux user?
There is no Driver & Application at prusa3d.com/downloads/ and they’re not under https://www.prusa3d.com/downloads/g-codes/ either.
The .exe file in prusa3d.com/downloads/drivers offers is unextractable.
The download page mentions that Linux users should “Use Slic3r config bundle and sample objects from MacOS Package”, but when I unpack the .dmg file, there’s nothing. You switched from dmg to zip after July 18.
It would be nice if you could proved a package with all 3 objects sliced for all nozzle sizes you sell.
you can surely download the mac version of the driver and exact from the package the sample objects and gcodes
“We can offer the following tip: try plucking the belt like a guitar string. You should hear a deep bass tone.”
Anyone ever try using a guitar tuner to figure out what note this should actually be? Seems like this would be pretty easy to quantify and replicate the proper tension this way using a guitar/bass tuning app.
Hi It is a very good idea to revisit the print of benchy. It is proposed to use the benchy sample gcode of the prusa driver ! I have looked at that and I observe that this gcode has strange layers. Take for instance the layer 3, it should have an homogeneous slicing for the complete surface. It is not the case. Now taking the sample stl provided does not improve the case in fact ! Here I refer to the last driver 2.2.2 package in mac version. Have a good day
Nice article! Is there anything that is different in the causes and solutions for the MK3s (e.g. when it comes to belt tension with suggested values, and extruder tension)?
I believe that in many ways various types of therapy can be constructed. A quarantine is currently available and an online therapist has to be looked for. Because people can be nuts for months if they stay at home. So I recommend looking and seeing text therapy The therapists were helping me with a video call, for which I am grateful. Just look and get acquainted with you. I hope it’s good for you too. Good luck and prosperity for everyone now. Happiness
By looking at potential errors made during assembly and how they can affect print quality, the article empowers readers to identify and correct problems they may encounter. In addition, by classifying the aspects that affect print quality into three main groups, the article offers a structured approach to understanding and solving these problems.
I especially delved into the theoretical knowledge of developing 3D printers from https://studyfy.com/service/take-my-classes-for-me. There I was able to pay someone to take my online class.
Overall, this article is a comprehensive guide for beginners in the 3D printing community, offering useful tips and information to help them optimize their printing experience and achieve better results. Whether readers are looking to validate their prints or find solutions to common problems, this article will provide them with the knowledge they need to improve their 3D printing skills.
Great article! It's fascinating how many factors can affect 3D print quality. Speaking of testing, have you ever considered the <a href="https://ricepurity-test.org/">rice purity test</a>? Just like ensuring your printer is calibrated, it's a fun way to gauge one's life experiences!