


We’re happy to announce the stable release of PrusaSlicer 2.9.1! Don’t be fooled by the version number; it is a big update packed with some great new features!

Sequential printing just got way more exciting!
The PrusaSlicer team is proud to be the first to introduce Smart Sequential Printing Arrange, an advanced solver-based approach that pushes the limits of 3D printing. Our unique algorithm intelligently arranges objects to prevent collisions, making sequential printing more efficient and reliable than ever. This feature enables your printer to complete individual objects one after another rather than printing everything at once from the bottom layer up.
Sequential printing drastically reduces nozzle travel and is especially useful when you need to eliminate stringing and oozing between individual objects. It also helps maintain consistent layer adhesion, reducing issues like delamination (layer separation) or poor bonding between layers. Moreover, it could also prevent losing multiple half-finished prints if one of the objects detaches from the print bed. Finally, you can sequentially print multiple objects in vase mode, which is impossible with normal printing!
Additionally, a 3D extruder model is rendered while browsing through the Preview with the horizontal slider (as seen above). This little “time-lapse” speaks volumes—for successful sequential printing, no part of the extruder (or axis rods and cables) can bump into any of the objects already on the plate. The calculation requires detailed information about the extruder geometry, which is why the feature is now only available for Prusa printers (except the MK2). We might add support for third-party printers later.
Note that you have to uncheck “Sequential slider applied only to top layer” by clicking the cogwheel in the bottom right corner to enable this preview.
To try out sequential printing, just enable Complete individual objects (in Print Settings → Output options) and then use the Arrange tool (or press “A”) in the Plater view. Then, you can press “E” to display the printing sequence.
Cooperation with academia
We implemented this feature in cooperation with Professor Pavel Surynek from the Czech Technical University in Prague, who created the advanced printing algorithm, which will soon be published in a scientific paper. This is one of the excellent outcomes of our long-term collaboration with academia. After all, we are Prusa Research!
Bond any filaments with multi-material interlocking!
PrusaSlicer can now interlock neighboring parts made from different materials, creating a cross-hatching boundary between them. This creates a bond for filaments that don’t usually stick together, such as PLA, PETG, and FLEX, greatly simplifying the process of printing on multi-extruder printers like Prusa XL. Before this interlocking feature, you would need cleverly designed models with anchors to lock the materials together physically.
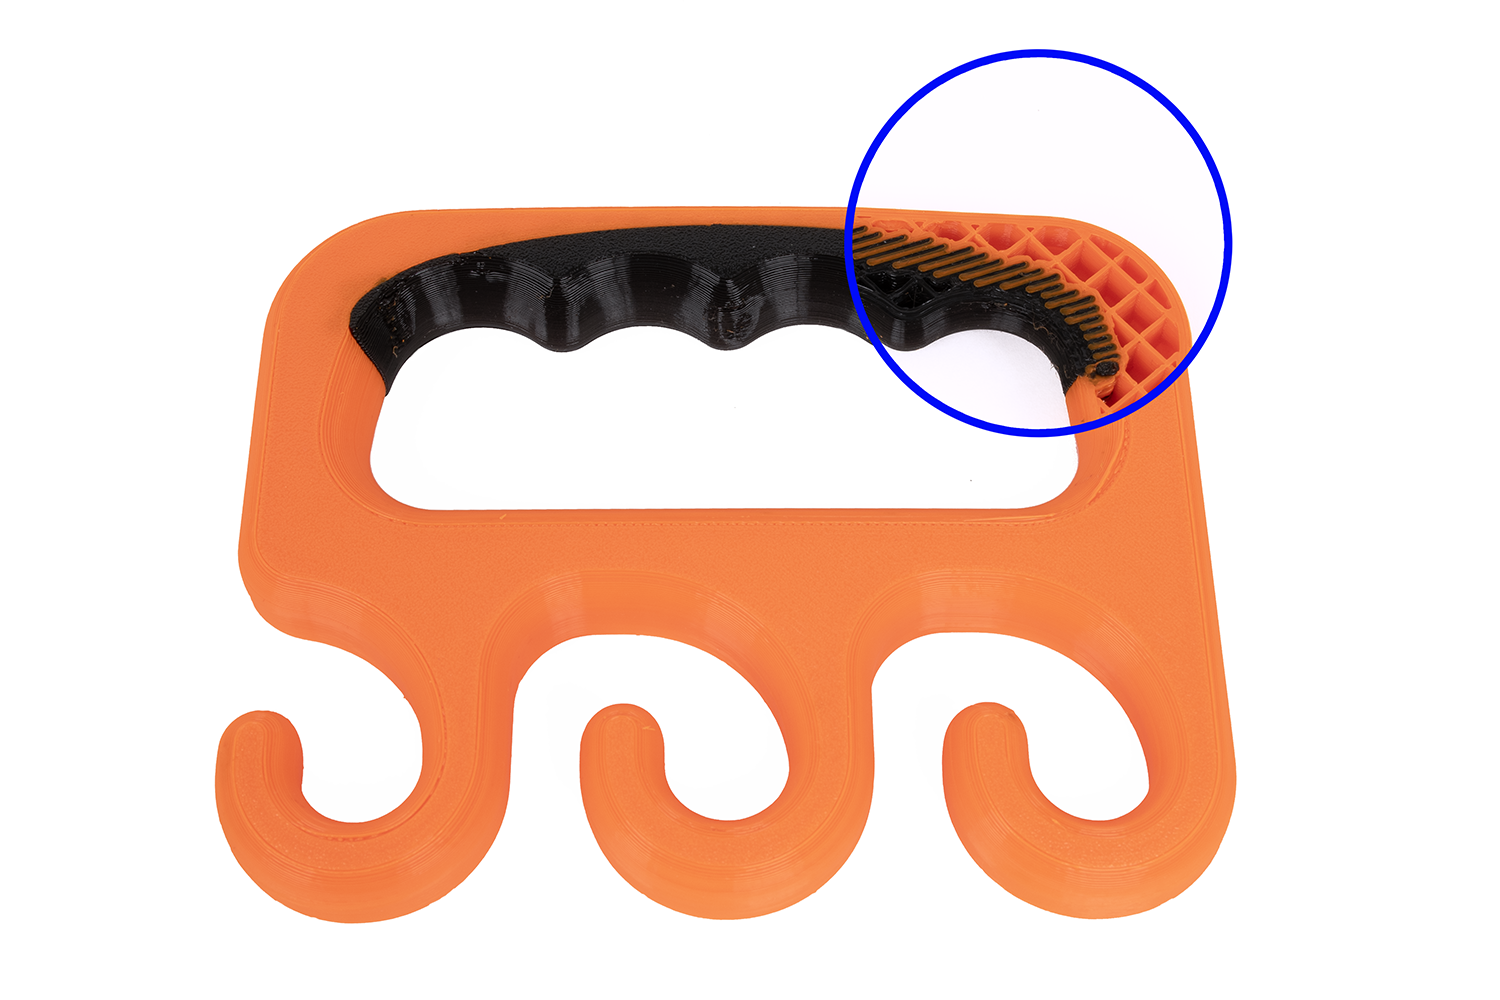
A shopping bag carrier with a partially flexible handle for a more comfortable grip. The cross-hatching texture between the materials is hidden inside the print, while the outside remains nice and clean.
Interlocking works both for specifically designed models with separate meshes and for materials assigned with painting tools and modifiers within PrusaSlicer. This simplifies the design process and can quickly turn a regular model into a multi-material one.
A cable passthrough grommet with a flexible cable tunnel and rigid outer structure.
To try this feature, enable “Use beam interlocking” in the Multiple Extruders settings. The slicer will handle the rest. Of course, you can fine-tune the result with various settings.
The feature was initially developed in Ultimaker Cura and subsequently ported to OrcaSlicer. With only minor modifications, it was derived and implemented in PrusaSlicer. We are grateful to everyone involved in developing this feature!
Automatically generate reliable supports for SLA
We are introducing a completely new SLA support spot generator that replaces the current solution and provides more accurate and predictable support placement. The new algorithm better identifies the areas that need support and adjusts the support strategy accordingly. It is also non-randomized, consistently producing the same results when given the same input. Overall, this represents a significant improvement over the previous algorithm, which often failed spectacularly, even in very simple cases.

Comparison of automatically generated supports in version 2.9.0 and 2.9.1
Additional changes make it easier to manage supports and enhance visual feedback:
- Support density can now be adjusted using a single slider—moving it instantly updates the preview, allowing for smooth and quick adjustments and fine-tuning.
- A new toggle for displaying the support structure allows users to hide or show the entire support construction for better model visibility.
- Manually added points are no longer ignored – when the user presses Automatic Support Generation, the algorithm considers them and adjusts the surrounding support density accordingly.
- Support types are color-coded, distinguishing islands, manual edits, and overhang supports.
Simplified printing with different materials
PrusaSlicer will now prompt you to use a new setting called Bed temperature by extruder when printing with multiple materials. This setting helps you choose the appropriate temperature that would work best for all materials.
We also released an updated configuration profile for Prusa XL that includes the Breakaway presets. These are specifically designed for printing the main object and supports with different filaments, such as PLA and PETG. As mentioned above, these materials don’t stick together well, which is ideal for creating easily removable supports.
Other improvements
We added new parameters handy for fine-tuning, which can be found in the Speed section of Print Settings. You can now separately set the First layer solid infill speed, and also the speed of infill over bridges – useful if you want to slow down only on these tricky areas specifically.
In the SLA Material printing profiles, you can now click one of the new buttons to quickly set all tilt-related fields to predefined values corresponding to the legacy profiles: Fast, Slow, and High Viscosity.
As always, there are many more improvements and bug fixes that couldn’t fit into our blog post. Please see the Github release page for detailed information about all the changes!
Happy slicing!
Flathub still contains version 2.9.0
I swear to Dog (I love my dog) that I was sitting here yesterday (March 10th) thinking about the advantages of sequential printing (just upgraded my MK3S to an MK4S and was printing out the MMU upgrade) when I see this release.
I’d like to ask for a couple things to add to this.
First, could you make it so that the grid infill is no longer the “standard” infill on Prusa Slicer? There are many better infills that are available, even from Prusa slicer, that are more efficient AND stronger. Please, at least make grid a nonstarter.
Second, could you print your 3D printer handbooks with all the handbooks for “upgrades” that are available to the model? Example, make a “3D Printing Handbook for the MK4S” that includes the MMU printing handbook. It would only make the handbook a few pages longer, becomes a advertisement for the MMU (and any other “upgrades” like nozzles), educates the customer as to what is available and why…
And makes it so you only have to send out one book with the 3D printer in question. Then I have one book that shows everything I need to know about that device including upgrades. Include assembly instructions, upgrade instructions from previous models, and if you can get ahold of Sean Aranda, author of 3D printing failures, include the information in their book, but use only Prusa models in the pictures…
This would create a Prusa Bible that you could sell separately that I know at least I would buy, and I suspect many other people would too. As an example the ARRL makes an Amateur Radio Operators Handbook every year that is every bit as big and thick as a Bible that sells very well. It’s a terrific reference as I’m sure your Prusa 3D Printing Handbook would be. I’m not always where there is internet even when I’m working with/on Prusa’s at print farms. When you create this book, put it on Apple Books too. Then I could have a physical copy AND a digital copy (backups and all that).
Third, I see that Prusa is working hard to make things work with Orca. I’m hoping that you are considering keeping parity with anything you do to Prusa Slicer to Orca as well. I ask that because I’d REALLY REALLY like to see Orca Slicer on an iPad. I used Shapr3D as my CAD program. I’d REALLY like to see direct export from it to Prusa Connect. Yes, I am bothering them too. I guess I’m asking for you to continue making things work well so that I can start with an idea, model it and have it called out in the model what material I’m using, so that it can be estimated and deducted from what I have on hand and ordered if needed, sliced, printed, and when you put a “treadmill” on the Core Two (and servos in the door hinges), it can be automatically collected (dropped into a shipping box on a shelf in front of and below the treadmill)), packed, sealed, and delivered to the address ordering it…
Last, I wanted to thank you for the two packages of gummy bears that came with my MMU3/3S to MMU3/4S upgrade. It’s like you knew I have two daughters…
Siete meravigliosi grazie per il lavoro fantastico che fate..chiedo gentilmente se è possibile creare postazioni di taglio figure più dettagliate..per esempio io che creo action figure sarebbe il top poter tagliare lungo linee ben precise della figura..tipo tagliare in giunture a mia scelta e non a mezzo un intera figura grazie mille
It would be great if it could be adapted to Wipe Tower's `No Sparse layers`.
I have a new MK4s, and the 2.9.1 Slicer update has caused many of my prints to fail due to layer shifts, ruining multiple prints. To resolve the issue, I uninstalled the update and reinstalled an older version of the slicer. I hope this is something Prusa fixes soon.
I too have been suffer from layer shift failures after upgrading to 2.9.1 Beta. It happens on both my Mk4s usually about 10mm off the bed. This has never happened before in the last 3 years.
It would be nice if there was also the option to enable wipe tower for non soluble prints (i.e. needing 0.2 Z separation ) and with layers heights other than 0.2.
I am printing a PLA/TPU bag handle right now, and it's pretty exciting! Feels like the future. Next, the sequential trial run, and something to test out the new SLA supports, too.
The kids in our engineering lab are excited, because I'm excited. You just keep getting better. I need to go home and update my own machine!
Future fix request – When a multicolour print pauses due to stuck filament and is not attended to after a while, the heaters shut down. This can cause the print to come off the bed. In my case I could have easily saved the print if the heated bed remained on and only the hotend shut off. Could we add a fix to keep bed on and only shut down hotend please.
"PrusaSlicer will now prompt you to use a new setting called Bed temperature by extruder when printing with multiple materials. "
Yes. I love it. I print with PLA/PETG often, and whenever I set the bed temp on the PLA extruder and then select the PETG extruder it asks if I want to Transfer/Discard/Save/Cancel. And I'm like…I want to do none of these things, I don't know what I'm transferring to, what I'd be overwriting, and if the value I just set will be tossed out. I just wanted to look at the other extrude without making some decision.
With a "Bed Extruder" setting, I don't have to deal with it! Changing a setting in an extruder, then looking at another extruder still brings up an incomprehensible choice that I'm scared to answer, but now it's basically out of sight, out of mind.
Hello, the the new arrangement for individual objects looks in a first view chaotic, after a closer look it looks interesting.
Regarding the information quoted below, it would be great, to have a option to adjust geometry in a simple way, espaciallly if using a coustom Fan Shroud, which is mostly an volume arround the nozzle, that differs to the original geometry:
"The calculation requires detailed information about the extruder geometry, which is why the feature is now only available for Prusa printers (except the MK2). We might add support for third-party printers later."
It's great that you recognize the value of sequential printing. Maybe you are finally ready to fix a related bug that people requested since 2017: https://github.com/prusa3d/PrusaSlicer/issues/292 ?
"Smart Sequential Printing" AKA turn your prints into undercooled lump button. Just why.
Pourquoi PrusaSlicer n'est-il plus compatible avec macOS 10.12.8 ?
Qu'est-ce qui justifie que pour cette nouvelle version macOS 10.12.8 soit abandonné ?
Les nouvelles fonctionnalités de l'impression séquentielle m'intéressaient beaucoup mais aujourd'hui impossible d'en bénéficier.
Is infill taking notably longer to slice? Or is it just me?
Sequential printing is somehow broken. The automated placing on the bed is completely wrong and the area around the objects that formerly marked the space that needs to be between objects is gone. I can do it better myself with try and error and be right when the slicer says it is not possible. Feature was better before 2.9.1
Hello Prusa Team, im a big fan of the new sequential printing mode. Unfortunately i had some crashes during printing. I have the impression that the geometry of the model is bypassed by the extruder, but in the outer line of the support, the slicer creates a path that causes collisions. Especially the guides of the extruder touch the model in my prints and lead to errors. Maybe you can adjust this in the slicer, then the feature would be great.
<a href="https://chatnederlands.nl/ "> Ervaar de nieuwste AI-technologie</a> and step into the future of innovation. With cutting-edge advancements, AI is transforming the way we interact, learn, and create. Explore how this technology is revolutionizing industries and making everyday tasks smarter and more efficient!