How do you 3D print something? Well, that’s easy: get an STL model, load it into a slicer app, generate a G-code, upload it to a 3D printer and that’s it! But what if you can’t find the desired STL file in an online repository. What if you need a custom-made model? Today, we’ll look at how to tackle a quite common problem: creating a spare part from scratch.
However, this time we won’t be using Fusion360 or similar software. Instead, we’ll put OpenSCAD to use. This freeware application might seem a bit frightening to new users because it takes a different approach to 3D modeling – it allows you to create 3D objects by programming. What’s so great about this? One of the biggest benefits is that OpenSCAD allows you to parameterize items. For instance, you can create a general shape, like a gear, and then you can easily change its size or number of its teeth just by changing a variable. And don’t worry, it’s not that difficult!
The problem
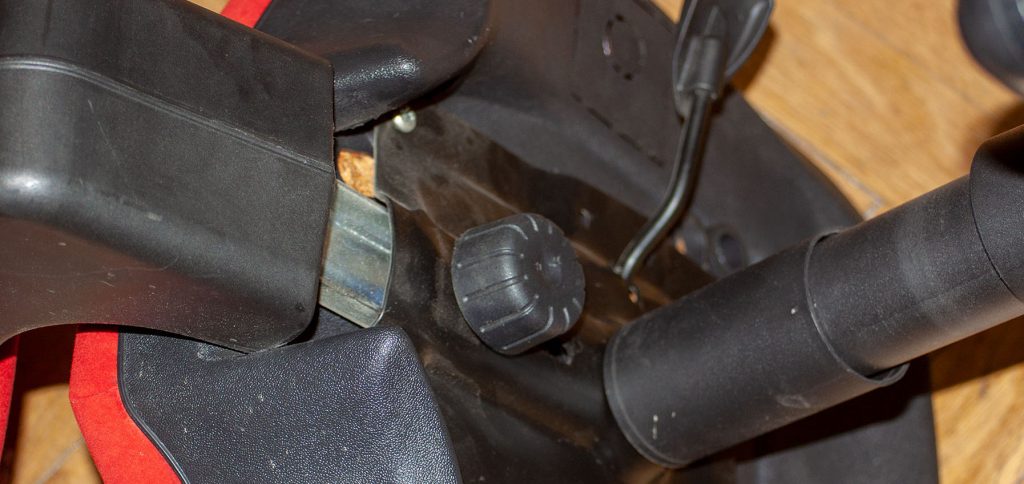
The underside of a cheap office chair usually looks like this:
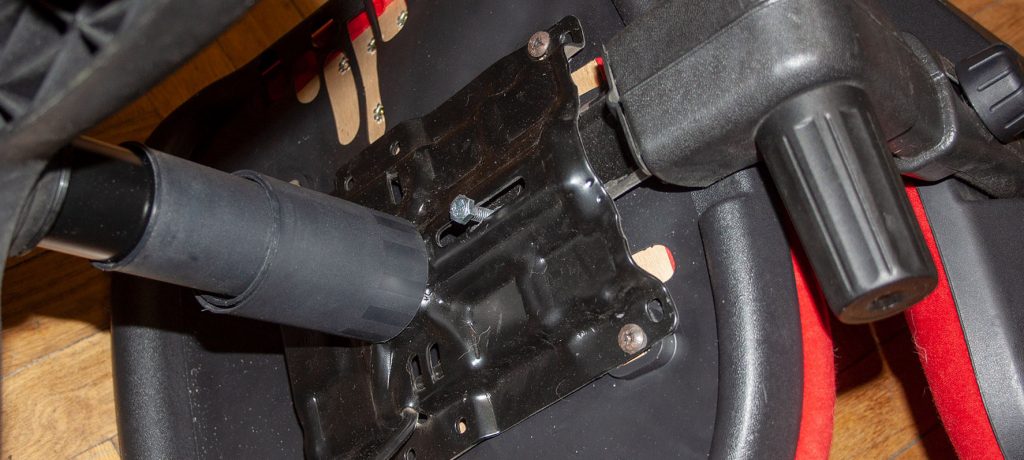
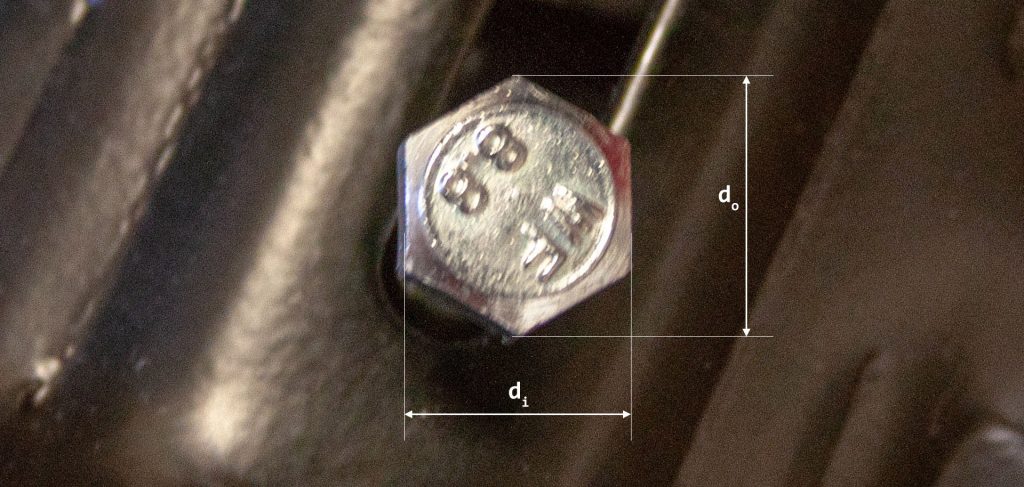
The plastic knob on the underside of one of our office chairs broke in half, so now only a bare screw remains:
To be honest, I don’t really care about visual aesthetics, because you can’t usually see the underside of the chair anyway. But the screw itself is too thin and doesn’t hold the back of the chair properly. I decided to fix this problem, quickly and efficiently.
Fast forward about two years, and here I am, coming up with a plan!
The plan
We need to create a spare part for the chair, a knob that will hold the screw in place, plus it will enable me to tighten the screw by hand. We have no idea how the part looked before. Therefore, we will not create a 1:1 replica, but simply a part that will have the same function. A 3D printed part which is easy to print and it’s sturdy at the same time.
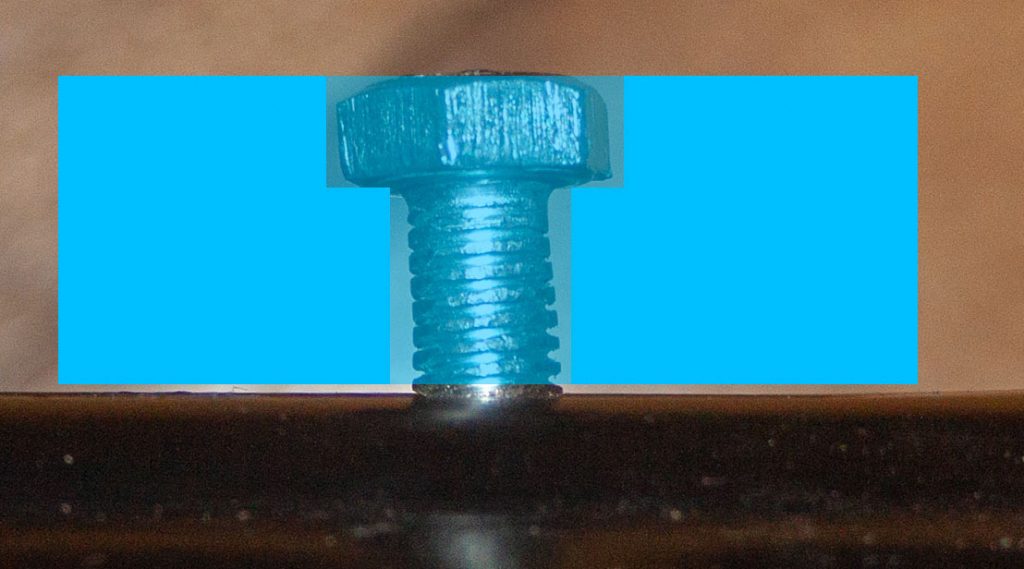
The object itself will be quite simple. Here’s how it should look from the side in a cross-section:
The blue shape represents a side view of a cylinder with a hole for the screw in the middle. By tightening the screw, we can regulate the force used to hold the back of the chair in place. The printed part will be subjected to compression, which is something that 3D printed objects can withstand very well. The most stressed part will be directly under the screw’s head and between the printed part and the metal part of the chair.
We can place a metal washer between the chair and the printed part, which will help to distribute the force more evenly. We cannot place anything under the screw’s head, because the screw head should fit the hexagonal opening perfectly. However, many office chairs have this part made of plastic, so we can safely assume that the forces applied to these parts aren’t extreme.
Measurements
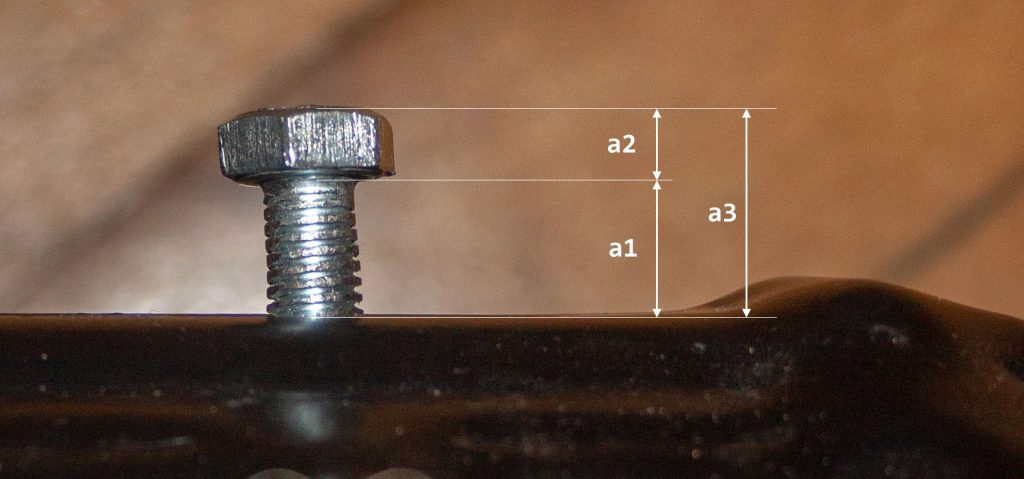
The preparation of a new spare part usually starts with measuring. We use a standard digital caliper and we need to know a few numbers as marked in the picture below.
First, let’s measure the distance marked as a1 in the picture. This is the distance between the bottom of the chair and the bottom of the screw head. Actually, we need to know the minimal distance (when the screw is tightened) and the maximal distance (when the screw is almost completely unscrewed). Our 3D printed part’s thickness needs to be somewhere between these two values. If the part is too small, it won’t hold the screw head in place. If it’s too big, we won’t be able to tighten the screw.
It’s not quite possible to take exact measurements because there are various parts of the chair obstructing the access to the screw. But, what we can do, is to take measurements of a3 and subtract a2, which will leave us with a fairly accurate a1 distance.
The last two numbers we need to know are related to the screw head. We need to know the diameter of the screw and the diameter of the circle circumscribed about the screw head (do, not di). Why a circumscribed circle? It will come in handy once we start writing the code in OpenSCAD.
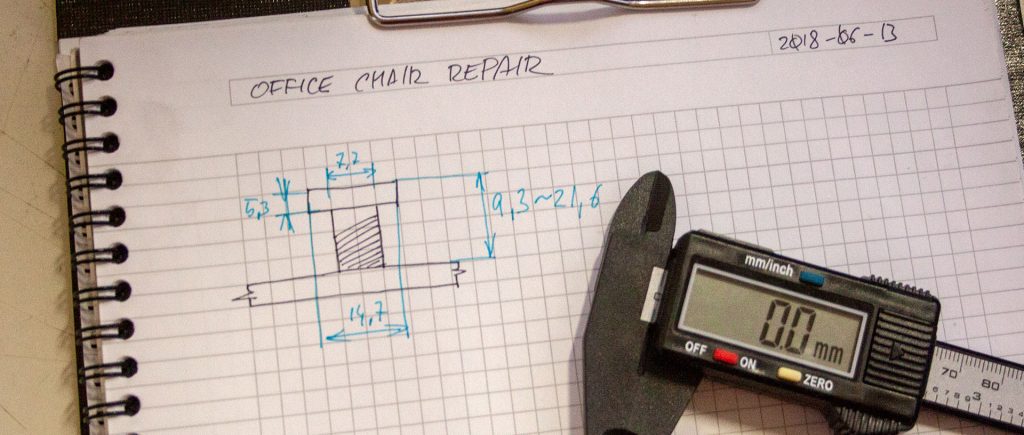
Another thing we need is a good old notepad and a pen.
I admit, this sketch is far from a proper blueprint, but it’s more than enough for us. It gives us following information:
- It’s an M8 screw, so it has the standardized diameter of 8 mm (we measured 7,7 mm and the explanation is simple: the thread is always a bit smaller and is already a bit worn, plus our digital caliper is made of plastic, so there’s a bit of wiggle room)
- The circumscribed circle diameter (around the screw head) is 15 mm, or 14,7 mm as measured by us)
- The thickness of the “active” part (around the screw-thread) must be between 4 and 17 mm. 10 mm should be a good value
- The thickness of the top part of the model (around the screw head) needs to be at least 5 mm to completely encompass the screw head. An increased thickness will provide a better grip, so let’s go with 30 mm
- To prepare a part which is sturdy and has a good grip, we’ll choose a 50mm diameter
Modeling in OpenSCAD
Once we know the dimensions, we can start programming. You can, of course, use any 3D modeling software you want, but we decided to show you OpenSCAD for a change. Let’s start with defining the variables which will allow us to create the basic cylinder.
screw_diameter = 8screw_head_diameter = 15;
bottom_height = 10;
total_height = 30;
outer_diameter = 50;
difference() {
cylinder(d = outer_diameter, h = total_height);
cylinder(d = screw_diameter, h = total_height);
}
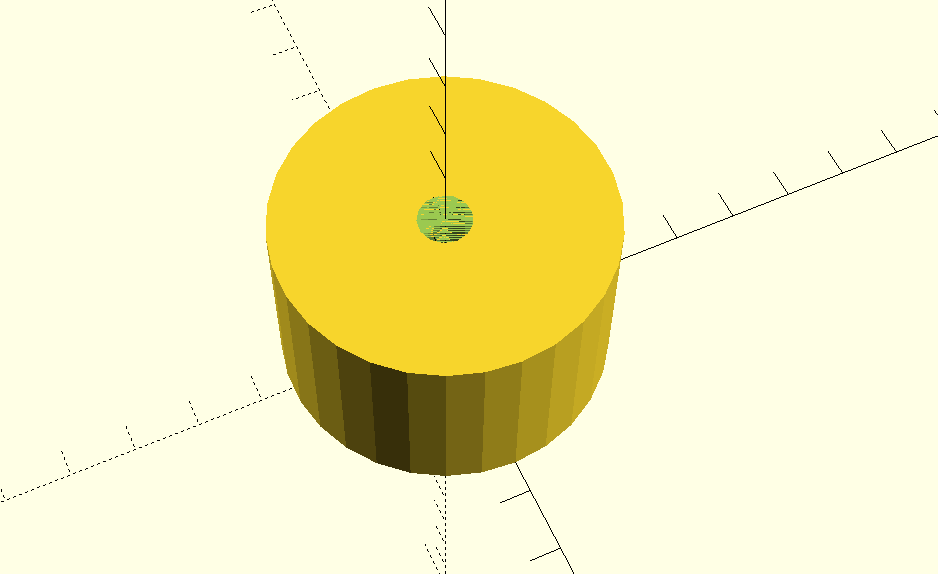
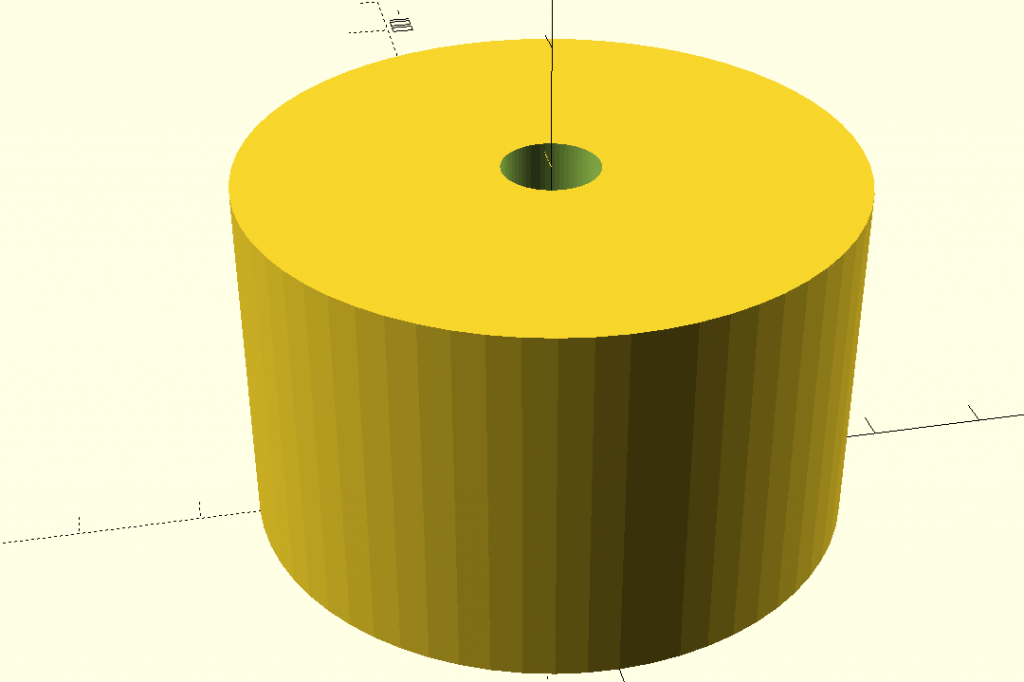
This code will generate the following model in OpenSCAD:
However, you can see that the hole is covered by some sort of a membrane, which we don’t want in our model. Actually, this is how OpenSCAD displays a wall with a zero thickness. The top and bottom parts of the hole have a zero thickness because we were subtracting exact values. To eliminate this effect, we will slightly increase the size of the hole and move it, so there’s a proper overlap. Here’s the updated code:
screw_diameter = 8;screw_head_diameter = 15;
bottom_height = 10;
total_height = 30;
outer_diameter = 50;
difference() {
cylinder(d = outer_diameter, h = total_height);
translate([0, 0, -1]) cylinder(d = screw_diameter, h = total_height + 2);
}
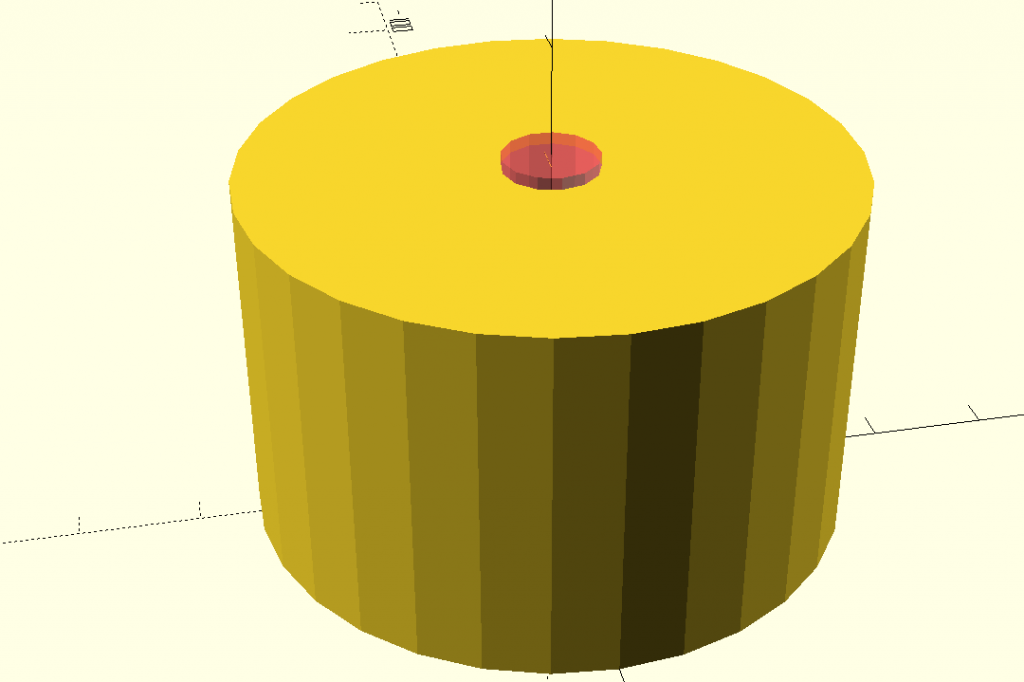
You can see the result in the picture below. For demonstration purposes, the modified hole is highlighted using transparent red color.
You can tell from the picture that OpenSCAD can’t draw a smooth curved surface. The surface of the cylinder is separated into many segments, so it’s essentially a regular polygon. You can increase the number of segments using the global variable $fn. Keep in mind that higher numbers will result in a smoother surface, but also longer rendering time. We can set the $fn parameter globally, for the model, or only as an argument for the cylinder method. Let’s set it globally to 64:
screw_diameter = 8;screw_head_diameter = 15;
bottom_height = 10;
total_height = 30;
outer_diameter = 50;
$fn = 64;
difference() {
cylinder(d = outer_diameter, h = total_height);
translate([0, 0, -1]) cylinder(d = screw_diameter, h = total_height + 2);
}
The cylinder is now much smoother:
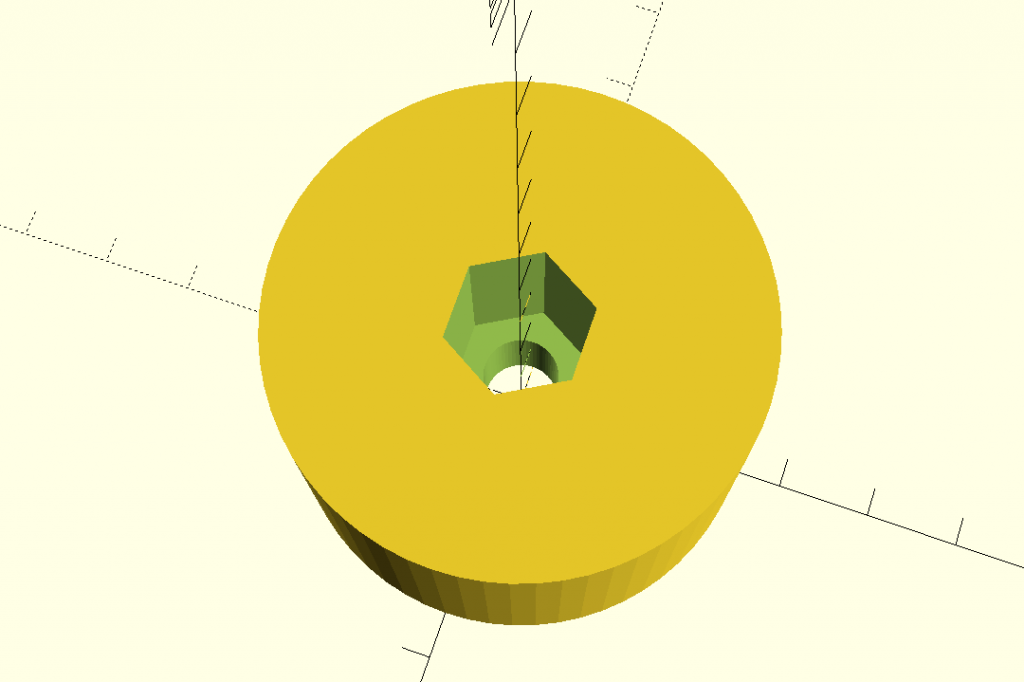
Now for the screw head. A bit of theory first: the diameter of a cylinder is entered as the size of a circle circumscribed around a polygon. The number of its sides is determined by the $fn parameter. That’s why we measured the dimension of the screw head. By setting $fn = 6, we can easily create a hex-shaped hole. Simply put: we’ll create a cylinder with a diameter of 15 mm and give it only 6 sides.
screw_diameter = 8;screw_head_diameter = 15;
bottom_height = 10;
total_height = 30;
outer_diameter = 50;
$fn = 64;
difference() {
cylinder(d = outer_diameter, h = total_height);
translate([0, 0, -1]) cylinder(d = screw_diameter, h = total_height + 2);
translate([0, 0, bottom_height]) cylinder(d = screw_head_diameter, h = total_height – bottom_height + 1, $fn = 6);
}
Getting close…
When creating holes, keep in mind that in reality, they will be a bit smaller due to how FDM printing works.
It’s better to adjust the code and add some tolerance to our object’s dimensions. A good value should be +0.5 mm. It’s a value that works for most of my prints.
screw_diameter = 8;screw_head_diameter = 15;
bottom_height = 10;
total_height = 30;
outer_diameter = 50;
tolerance = .5;
$fn = 64;
difference() {
cylinder(d = outer_diameter, h = total_height);
translate([0, 0, -1]) cylinder(d = screw_diameter + tolerance, h = total_height + 2);
translate([0, 0, bottom_height]) cylinder(d = screw_head_diameter + tolerance, h = total_height – bottom_height + 1, $fn = 6);
}
The model is now pretty much complete. However, it’s completely smooth. We need to add some structure for a better grip. Let’s create some creases. The easiest way how to do that is to add some knurling to the button – we’ll place small cylinders around the object, which will be half-way embedded in the body of the object. We will start by defining the small cylinder diameter (knurl_diameter). The diameter is calculated by dividing the circumference of the circle by the number of segments ($fn). From my experience, it’s better to create these cylinders slightly larger, so let’s add a 1.5 multiplier:
Next, we need to calculate the placement of these cylinders. We can divide 360° by the number of $fn segments and this time we’ll multiply the number by 2, so there’s a space between the cylinders.
Now comes the most difficult part of the code, not only because we need to use a ‚for‘ cycle. We will also need some elementary school math! To calculate the absolute position of the cylinders (dx and dy variables), we use sin and cos functions.
A quick explanation: the cylinders look better when they are embedded into the main body of the object, that is why we are subtracting ‚-1‘ (-1 mm). We’re moving each step by one third (knurl_step / 3) because the shape of the body is not a completely smooth circle. There are edges on each of its sides and by moving the cylinders over the edges, we can mask the imperfections of the object. However, it’s good enough to keep the sides of small cylinders to 16 ($fn = 16).
And here’s the final code!
screw_diameter = 8;screw_head_diameter = 15;
bottom_height = 10;
total_height = 30;
outer_diameter = 50;
tolerance = .5;
$fn = 64;
difference() {
cylinder(d = outer_diameter, h = total_height);
translate([0, 0, -1]) cylinder(d = screw_diameter + tolerance, h = total_height + 2);
translate([0, 0, bottom_height]) cylinder(d = screw_head_diameter + tolerance, h = total_height – bottom_height + 1, $fn = 6);
}
knurl_diameter = 3.14 * outer_diameter / $fn * 1.5;
knurl_step = 360 / $fn * 2;
for (a = [0 : knurl_step : 359]) {
dx = (outer_diameter / 2 – 1) * sin(a + knurl_step / 3);
dy = (outer_diameter / 2 – 1) * cos(a + knurl_step / 3);
translate([dx, dy, 0]) cylinder(d = knurl_diameter, h = total_height, $fn = 16);
}
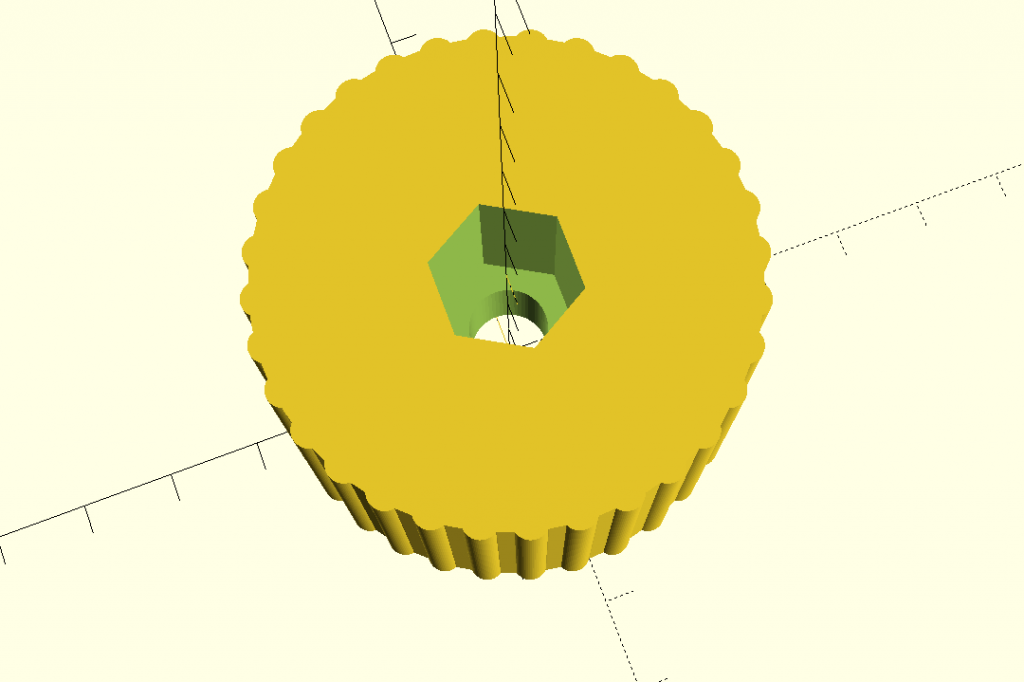
The final render reveals the finished look of the model. It’s functional, but it also looks quite nice, even though the looks weren‘t our primary goal.
Printing the object
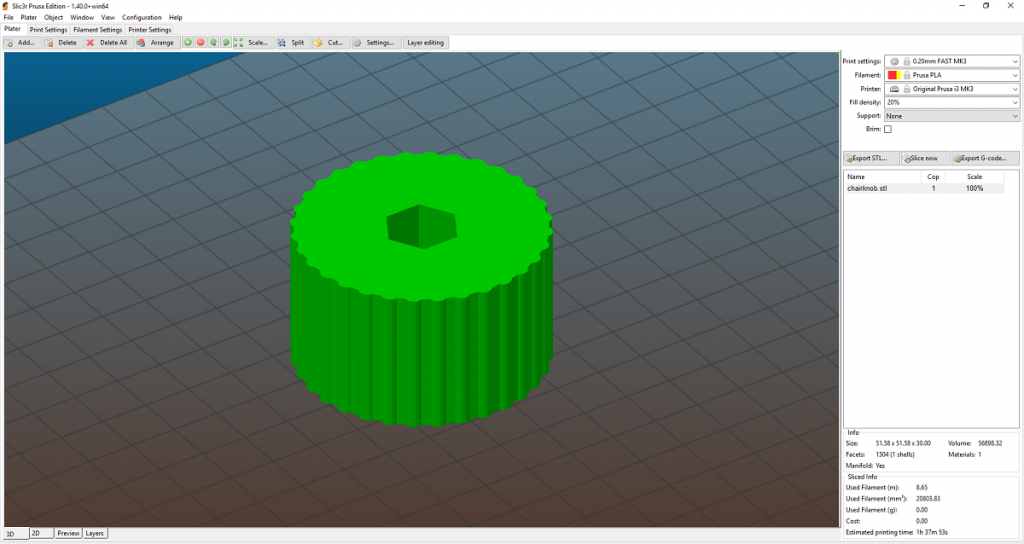
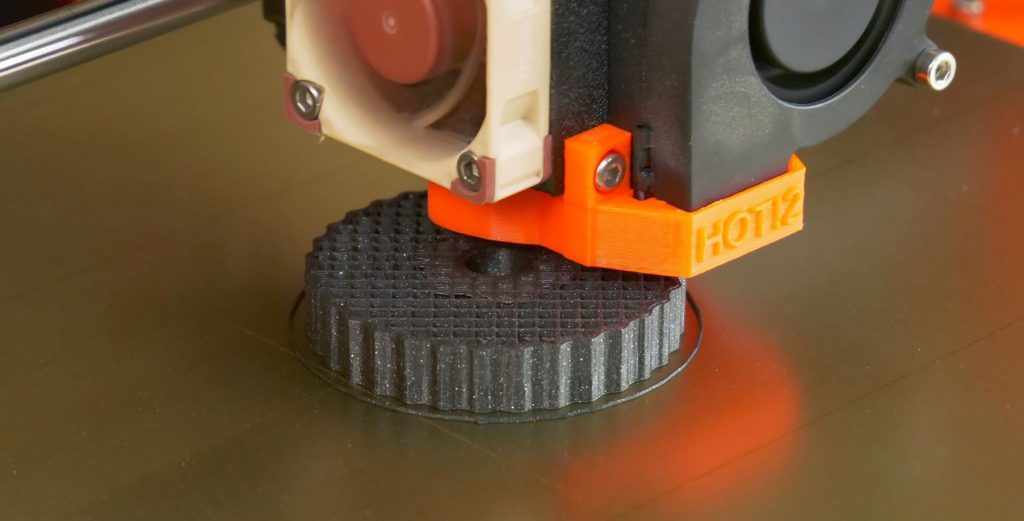
The final model should be exported from OpenSCAD as the usual .stl file format. The rest is a no-brainer. Import the STL file to Slic3r, select the desired quality and export it as a G-code. We have used a standard PLA filament with 20% infill and 0.20mm layer height. We don’t expect that the resulting object will need to withstand high temperatures, so PLA is completely fine. However, you can use ABS or PETG, if you want.
All you need now is about 90 minutes of print time and the knob is done!
Testing
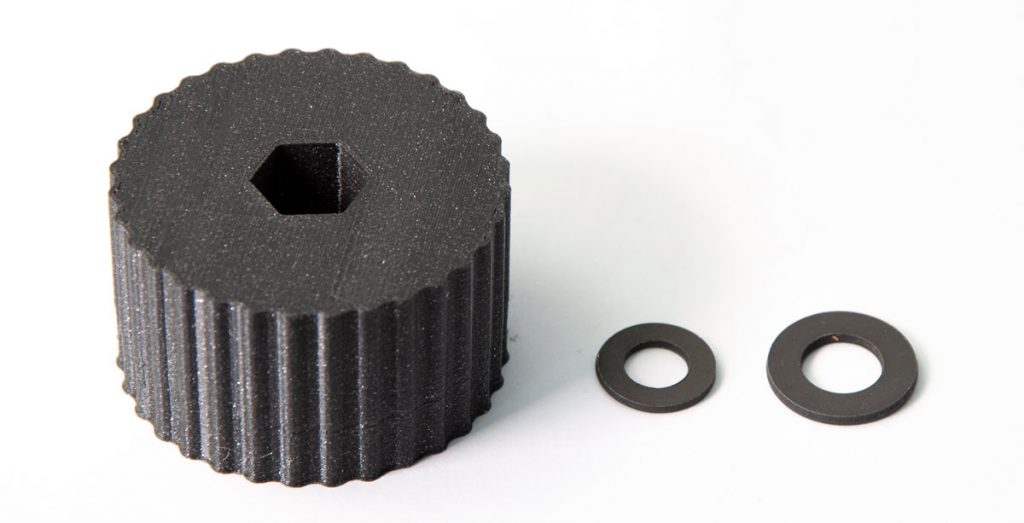
It’s better to add a washer under the knob to distribute the pressure more evenly. Try a wider washer, not just a regular M8, because it might be a bit small for this purpose.
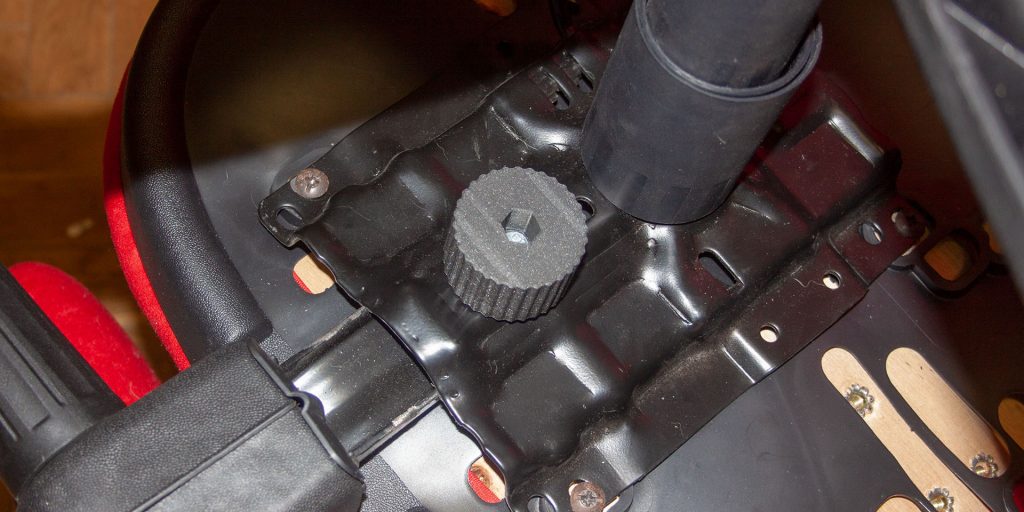
Now, we just unscrew the screw, place it in the printed part, add the washer and screw it back in. Since it’s more robust than usual knobs, it will probably last much longer.
Conclusion
When it comes to 3D printing, the most commonly mentioned software is Fusion 360, TinkerCad, Blender, 3D Studio Max, various CAD programs and simply „visual modelers“ in general. OpenSCAD can look a bit scary because you need to know the theory behind geometry. But in this example, we have (hopefully) demonstrated that starting with OpenSCAD is not so difficult. You are of course welcome to modify the numbers in our code and see what that does. This is definitely not the last time you hear about OpenSCAD from us. We’ll take a look at something a bit more complex next time.
Sample .STL file can be downloaded from Thingiverse.
OpenSCAD is free to download from the official homepage

Agreed, pretty much every 3D programme these days has these kinds of parametric features, if I was using a CAD app, C4D or even Blender I’d very easily be able to set up a gear with a tooth count that I could change whenever I liked by simply entering a new value.
I really would advise people new to 3D modelling and design to start with a ‘normal’ (visual) 3D design programme – the ones the professionals use – and avoid the – in my opinion – pointless removal of a standard UI.
The point of OpenSCAD isn’t to remove the UI, it’s that it’s completely FOSS (not some cloud service, crippled demo or a ‘non-commercial use only’ version of something) and uses structures and work-flows familiar to academics and programmers. Until FreeCAD started getting usable, it was basically the only 3D CAD package available for people who don’t use closed-source software. (because of this, it became a sort of unofficial standard for RepRap projects from a certain time period) Another good thing about OpenSCAD is that it allows use of the traditional include/compile work-flow well-known to programmers. You can structure a complex project into modules and libraries much like a software project and build different targets that include these functions (see the Mendel90 source for a very complicated example of this).
I personally use FreeCAD, but I’ve been looking into getting some familiarity with OpenSCAD too.
I think that it’s easy to end up unable to do without the first tool you learn in any given field, so you shouldn’t bother teaching yourself a new skill using software you can’t keep with you for life when there are alternatives available. Don’t fall victim to vendor lock-in! (Though I personally would recommend FreeCAD to newbies rather than OpenSCAD, unless they had a strong programming background already.)
” I personally would recommend FreeCAD to newbies rather than OpenSCAD, unless they had a strong programming background already”
If someone has a strong programming background, OpenSCAD and its “quite strange” handling of variables and loops will give him big headaches for the first few times… 🙂
But, as a Fusion360 user (since the very first version) I use OpenSCAD for almost everything that is gear or toothed belt related… way simpler than using parameters in Fusion.
Better for beginners: use Fusion360 – it is free for private use!
In 3 minutes you get a better result.
and by the way, if you have any changes on measurement, you can quick change….
Best create tool for 3D… Printing
One point $fn is number of segments in the circle. Since the circle has 360 degrees it makes sence to have $fn values that divide equally into 360. Your example yeilds a knurl every 2.8 degrees. a $fn of 60 would yield a knurl every three degrees and no wierd spacing at the start/finish. It also renders faster.
Surely it results in a complete number of knurls, with no weird spacing, because the whole circumference is divided by $fn and gets whatever it gets. Computer doesn’t care that 2.8125 has more decimal places than 3 does – it doesn’t work in decimal anyway, and as soon as it has done the sin or cos it’s not integer arithmetic – the result of sin(3) is not inherently faster nor more accurate than the result of sin(2.8125).
Agreed you’d get a weird spacing if you did use a 5.6 degree spacing, but not when you use a 360/64 degree spacing, as is done here.
The strong point of OpenSCAD are its modularity, its parametric approach (re-usability) and its robustness against user error.
If you find you need some weaking of dimensions you can simply change some parameters rather than redo the manual work.
A huge number of modules is available, which could make the job as simple as calling a 'knob' module and substract a 'hexagon head bolt' module.