


If you’re a maker, you know the situation: countless ongoing projects that require many components, parts, and tools. You quickly need a pair of pliers, so you open a drawer only to find a chaotic mess, with the tool you’re looking for buried under a tangled pile of wires, LEDs, and miscellaneous items. We’ve all been there!
Fortunately, with a 3D printer, you can easily put an end to this chaos. In this article, we’ll show you several methods and tools to help you get your workspace in order.

Bento Boxes
One of the quickest and easiest ways to organize your workspace, whether it’s your desk or that chaotic drawer, is with Bento–style trays. This popular, grid-based design is inspired by traditional Japanese bento food storage boxes, known for their neatly separated compartments. To create one for the workshop, we’ll use a fantastic online tool for creating custom layouts, Bento3D.

Using the tool is very straightforward. You create a box and then adjust its outer dimensions simply by dragging the sliders or entering the exact values. You can also set the wall thickness, fillet radius, and choose whether the box should be stackable. Depending on your needs, you can also choose whether to generate just the tray itself or combine it with a matching outer box and lid—perfect for creating a whole toolbox instead of just a drawer insert.
The real magic happens in the next step: creating the grid layout. To add a vertical or horizontal divider, click the “+” button on the corresponding side of the box. An inner divider will be created, and all other sections will adapt to the new layout. You can continue adding dividers and adjust their spacing ratio to create compartments of any size. To remove a divider, simply click the trash can icon within that section. For example, your final design could look something like this:
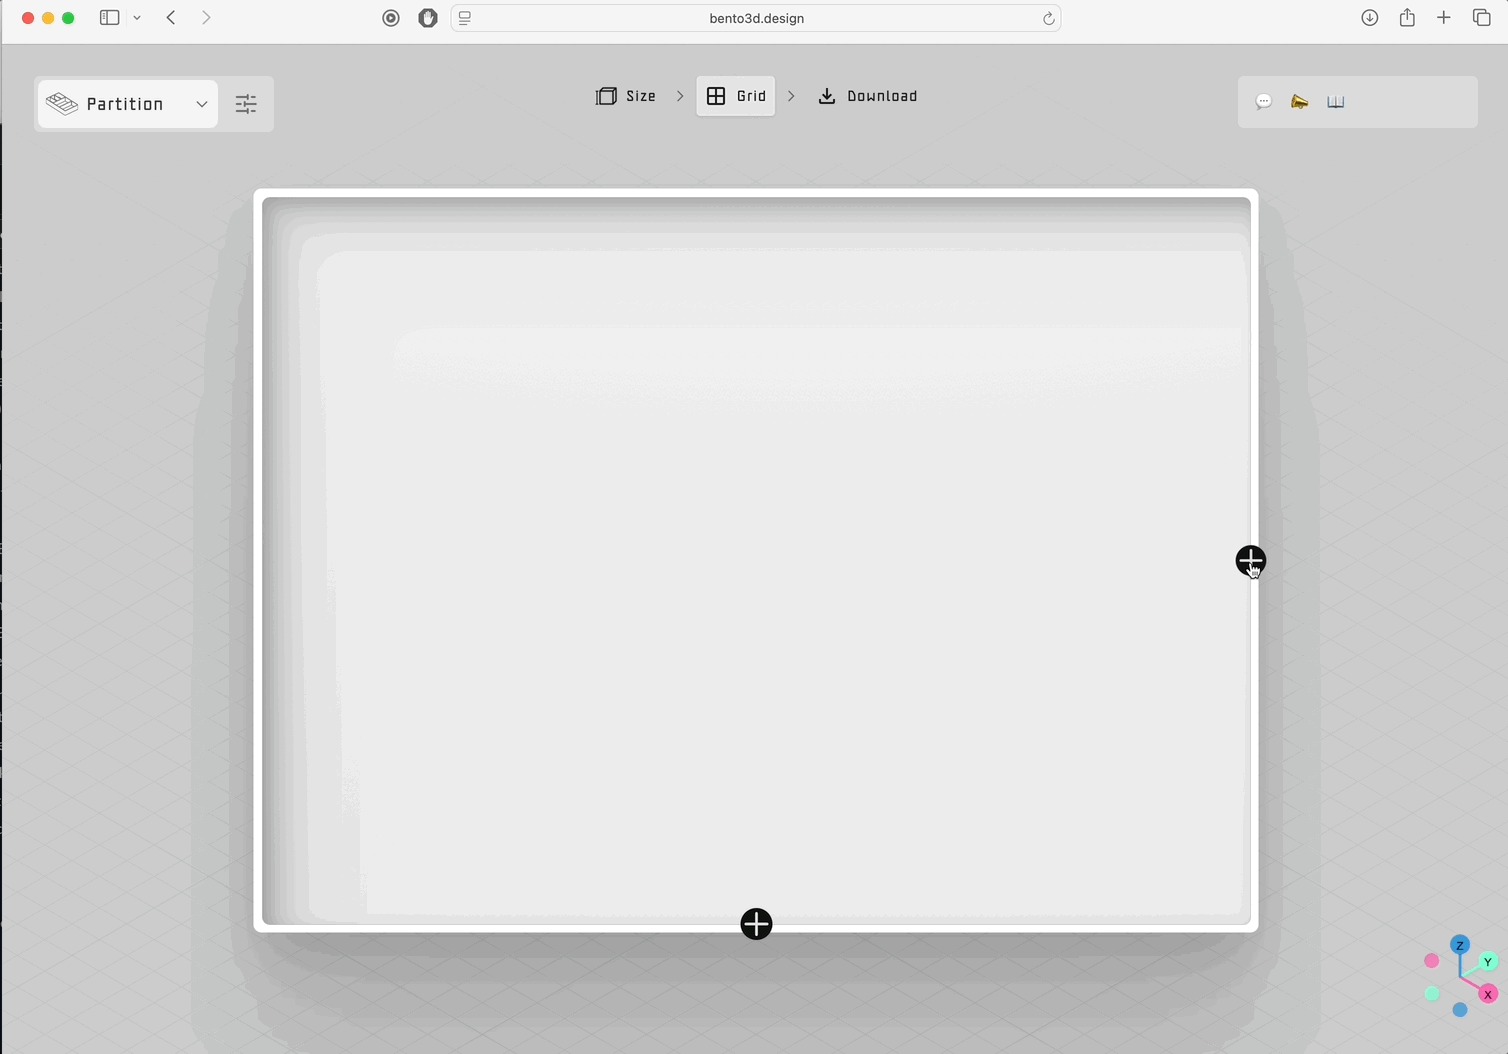
Once you’re satisfied with the layout, click the “Download” button. The tool will generate the STL file(s) for you to download. There’s also a slider at the bottom of the page that allows you to see an exploded view of your model, if it has multiple parts. After downloading, simply load the STL files into PrusaSlicer and send them to your printer.

Given the popularity of the bento box design, you can find countless community-made projects to download and print on Printables. There, you can see that these versatile designs are used for much more than just simple organization.
Shadowboards
For those who want to organize their tools even more precisely, shadowboards are a popular and effective solution. The concept is simple: a custom insert, traditionally made from foam, features a silhouette of each tool carved into it. This creates custom-fit slots for each tool, which allows for efficient storage and makes it immediately obvious if something is missing.
With a 3D printer, you can take this concept to the next level. Instead of carving foam, you can design and print a perfect, durable shadowboard using an excellent online tool called Tooltrace (note: currently only supported in the Google Chrome browser).

To create your shadowboard, you’ll need two things: a standard A4 sheet of paper and a smartphone/camera. Arrange your tools on the paper in the desired layout and then take a clear, top-down photo. On the Tooltrace main page, click “Get Started” and upload your image. The app will analyze the photo and show a menu for selecting the paper and tools. Before you select anything, click the “Settings” button (a gear icon on the bottom bar) and switch the material from “Foam” to “Gridfinity”. You can also adjust the units and the pocket depth for the insert. Click “OK” to save your settings.
In the right-hand menu, select the A4 paper size. Next, click on the paper area in your image – it should become highlighted. Now, begin selecting your tools. Click the “Add Tool” button, and then keep clicking on the first tool until it’s fully highlighted. To trace the next one, click “Add Tool” again and repeat the process. Once everything is selected correctly, the paper and all the tools should be highlighted in green.

Next, click “Configure Layout” in the top menu. Here, you can fine-tune the position of each tool silhouette by dragging it around the paper. When you’re happy with the arrangement, click “View Design” to inspect the final 3D model. In this view, you can change the preview color and adjust the offset around each silhouette. Finally, click the “CAD” button and select either the STL or 3MF format to download your model. If you choose the STL, the files will download as a .ZIP archive, so you’ll need to unzip it before loading the models into PrusaSlicer. All that’s left is to slice the model and send it to your printer. That’s it!

Pro-Tip: If you own a multi-material printer (like the Original Prusa XL or the MMU), you can assign a different color to the bottom of the pockets. This makes the tool silhouettes stand out even more.
Custom Organizers for IKEA SKÅDIS
You’ve probably heard of the popular SKÅDIS pegboard system from IKEA. You’ll often see it in workshops and maker spaces worldwide, and for good reason. It’s a versatile board with standardized anchor points, designed to be mounted on a wall or placed on a desk using stands. This allows you to attach various official or community-made hooks, shelves, and holders, making it an incredibly flexible organization system.
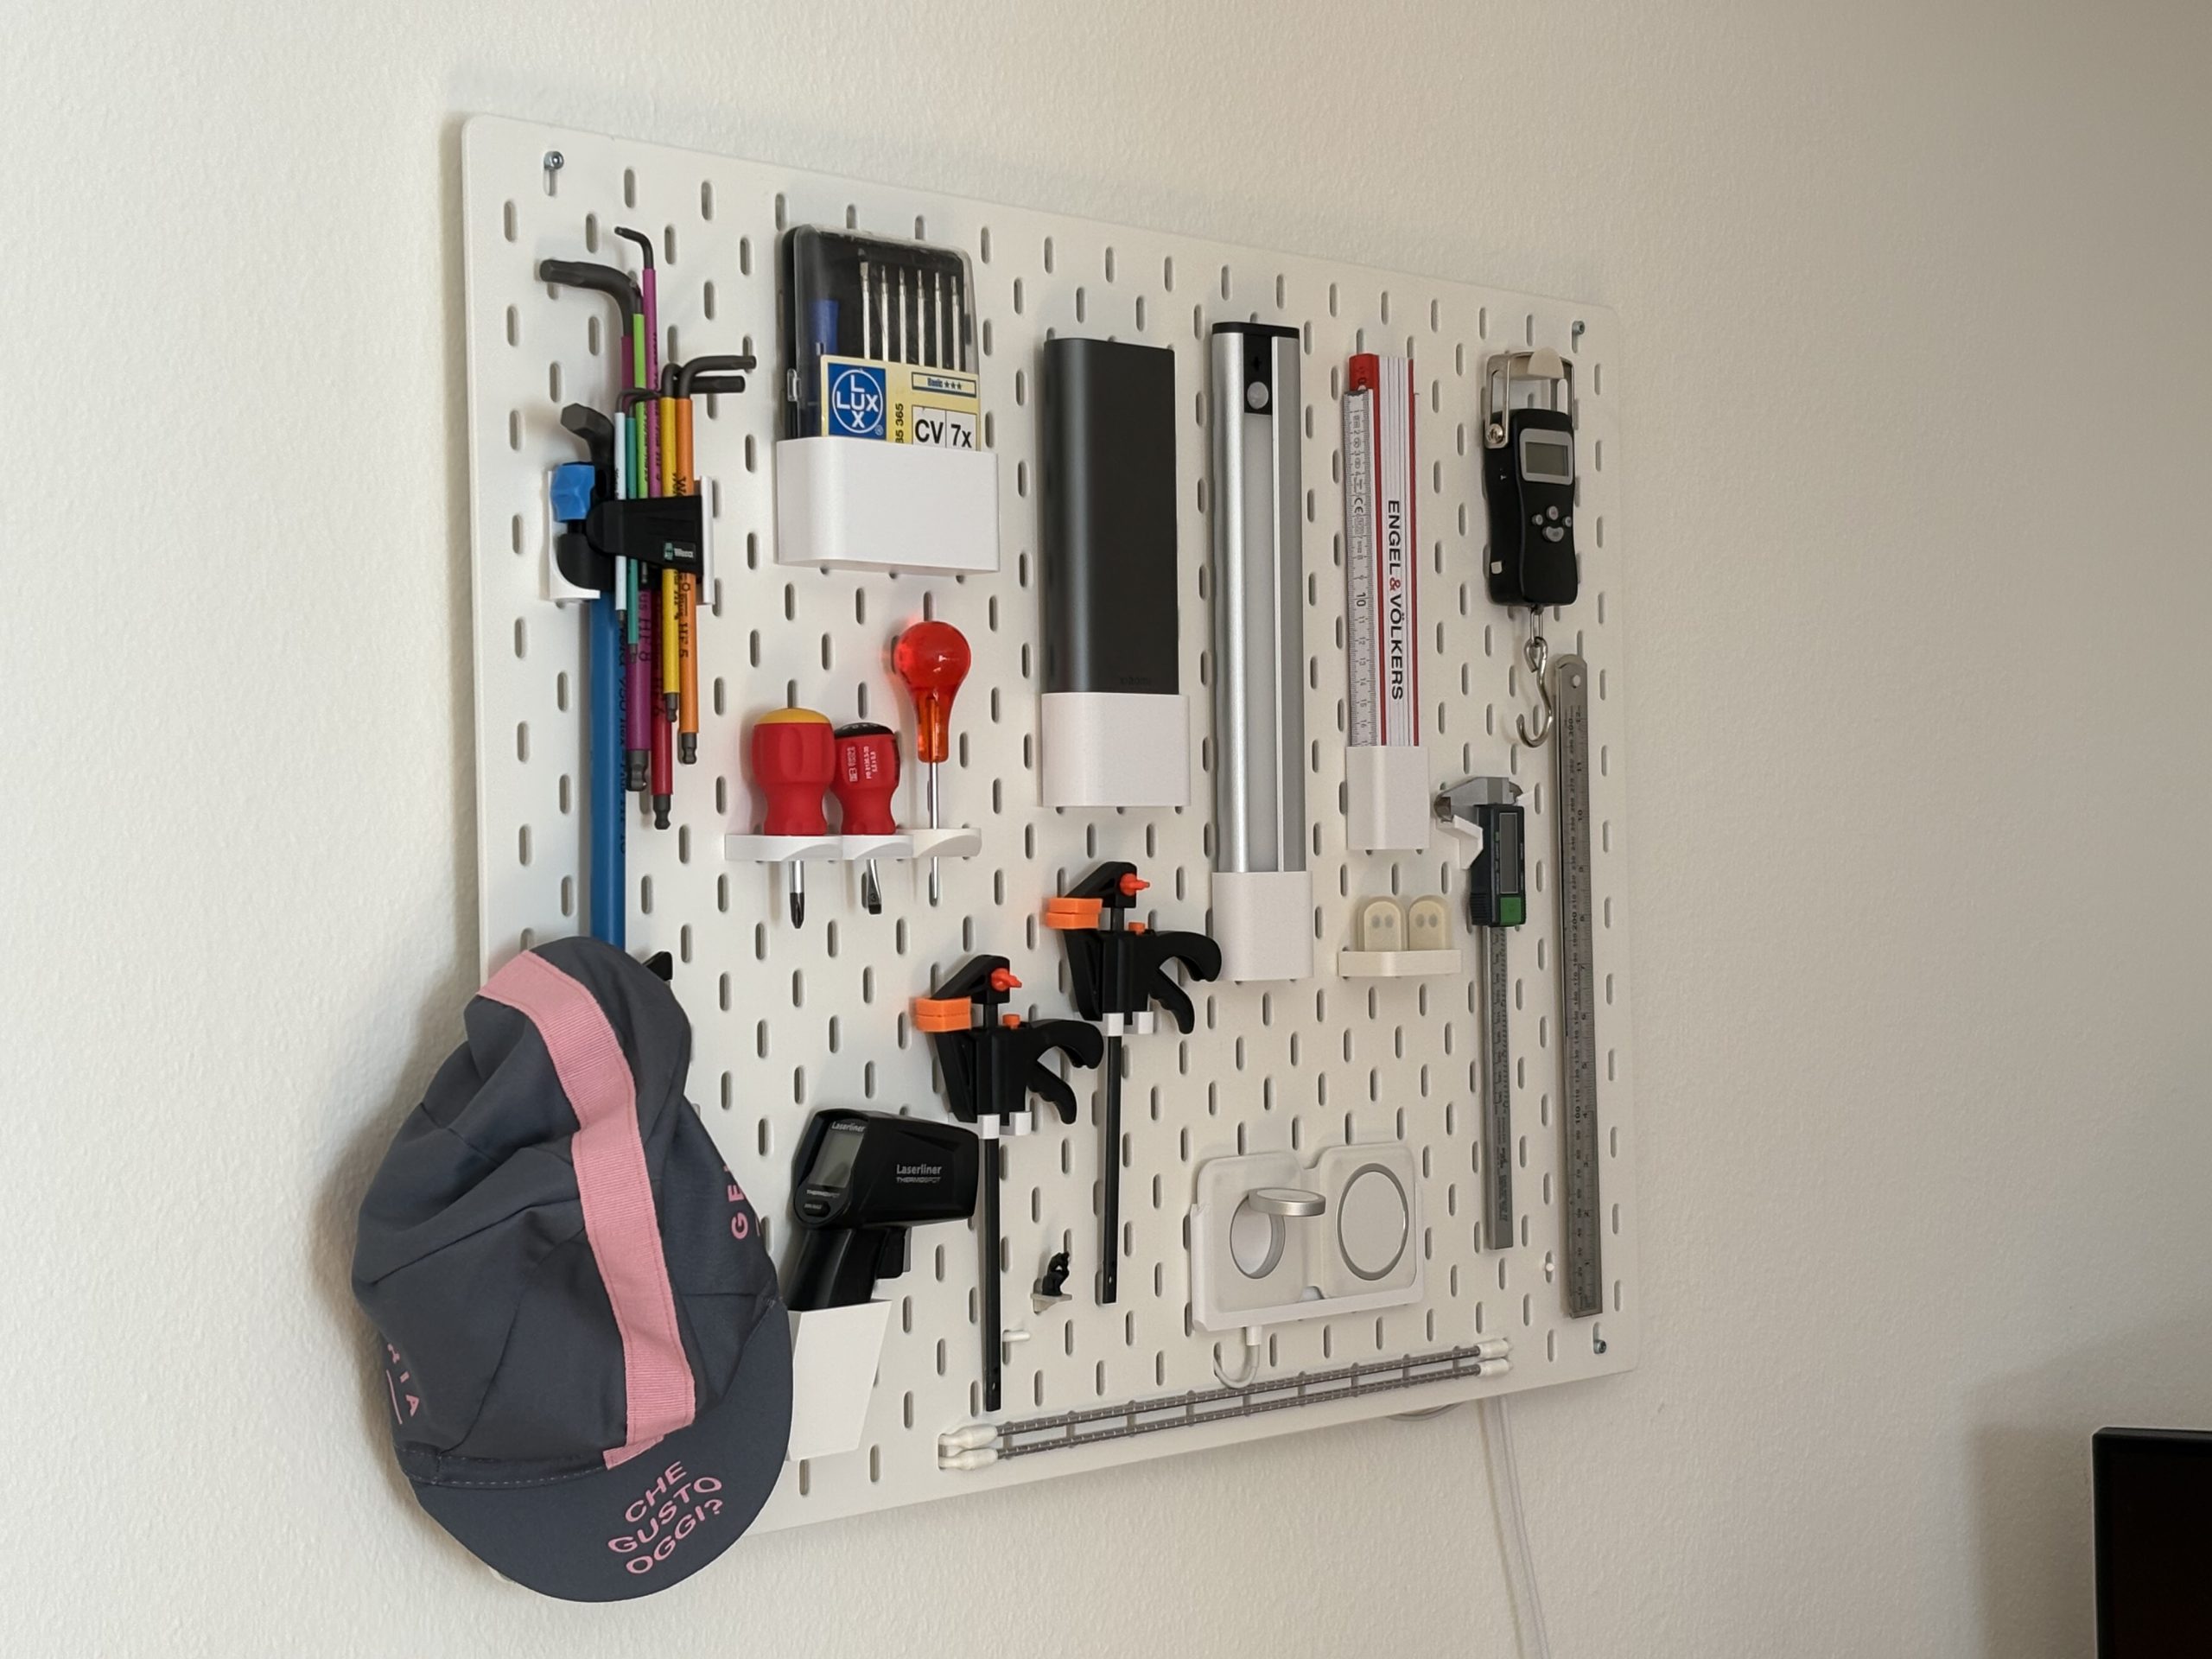
IKEA SKÅDIS with organizers made by Nicolas Mattia and his online tool SKÅPA
But what happens when you need a container with specific dimensions that IKEA doesn’t offer? This is a perfect scenario for 3D printing. A great tool for this task is SKÅPA, a handy online tool for generating custom SKÅDIS-compatible organizers.
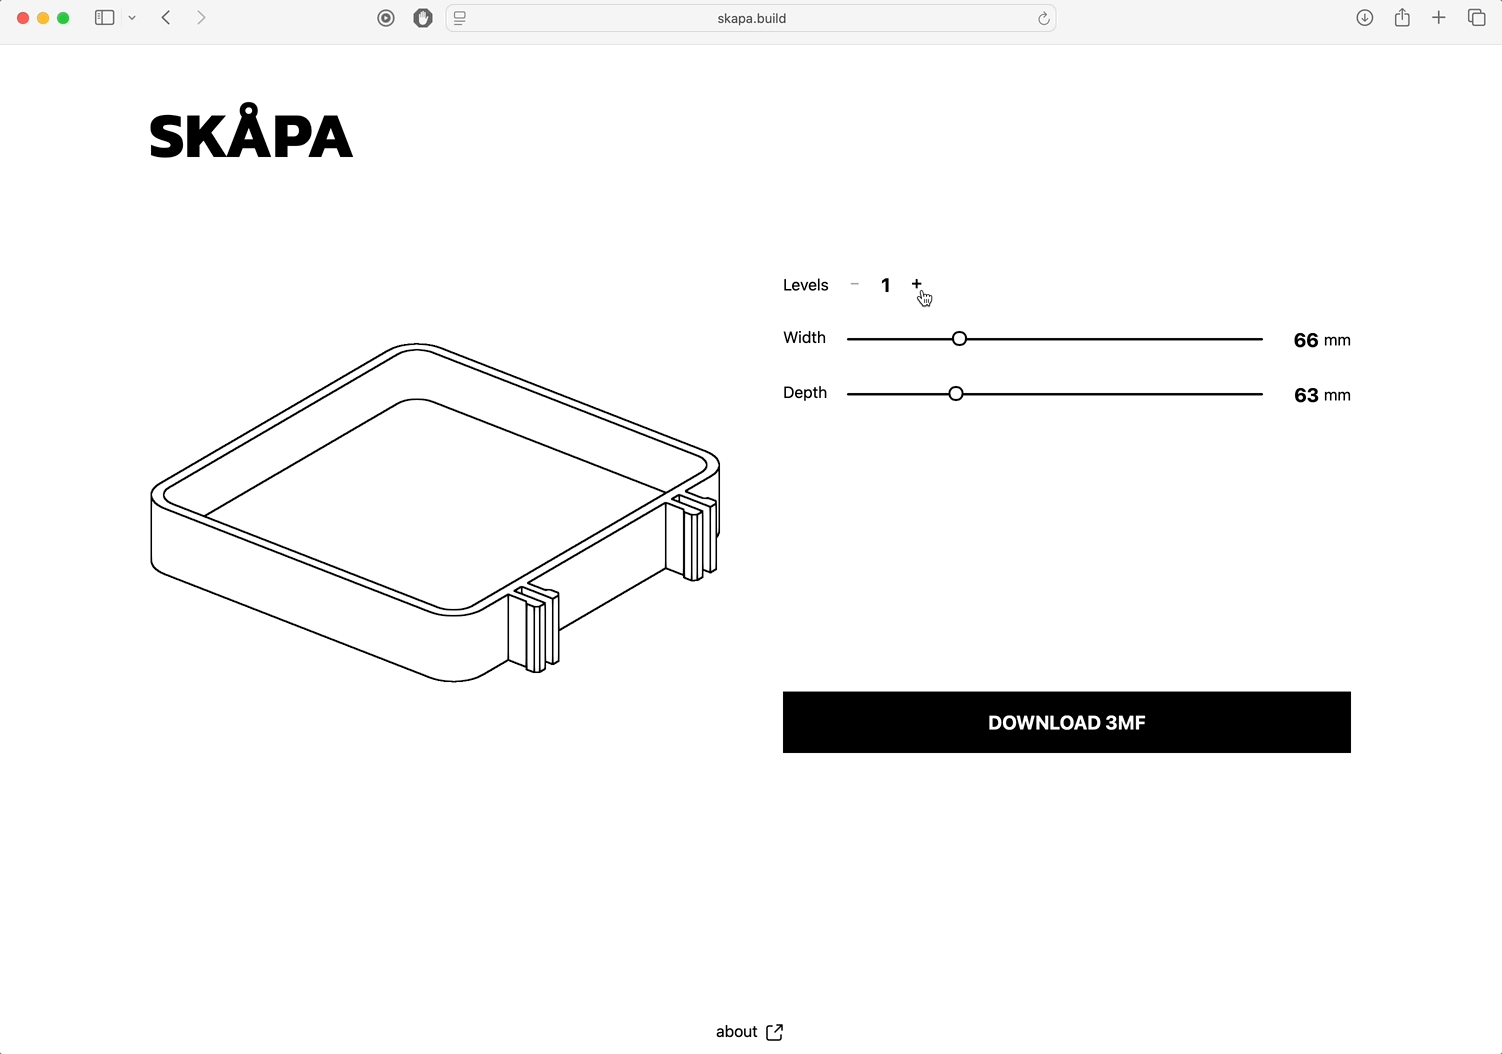
As you can see, the user interface is very straightforward and similar to Bento3D. You can set the desired width, depth, and levels (which adjust the height of the box and automatically add the required number of anchors) by dragging the sliders, clicking the increment/decrement buttons, or by entering exact values. Check the 3D preview and, if you’re satisfied with the model, hit the Download 3MF button. In a matter of seconds, you have created a custom, perfectly sized holder/box for your SKÅDIS board. For even better organization, you can add a label with descriptive text to the model in PrusaSlicer.

The creator of the SKÅPA tool, Nicolas Mattia, has written a detailed blog post about its development, and you can find many of his other useful 3D models on his Printables profile. Beyond his work, the world of SKÅDIS accessories is massive. On Printables, you can find countless other community projects, like a popular filament spool holder or an extensive collection of various mounts.
Your Workshop, Your Rules
No matter which method you choose, the modularity of Bento Boxes, the precision of Shadowboards, or the versatility of the SKÅDIS system, you now have the tools to create a perfectly organized space tailored to your needs. Create and combine any of them, start up your 3D printer, and enjoy your new, tidy workshop.
Happy printing!
I went through the same cycle of digging for tools, reprinting parts, losing screws, until I started using simple bento trays and later a small shadowboard, and the mental load honestly dropped overnight. What clicked for me here is how accessible these tools are — no heavy CAD, just smart web apps that turn real needs into printable solutions. I’ve even started printing organizers alongside small 3d printed gifts for friends, often pairing functional prints with character models on https://www.gambody.com/ which keeps the printer busy but purposeful. Organization isn’t about perfection; it’s about designing your space so projects flow instead of stall, and this approach makes that feel realistic, not aspirational.