You’d be surprised how many 3D models you can find on the internet are broken in some way. Modern slicers are pretty good at repairing the models without you even noticing. Nevertheless, sooner or later you’ll encounter a model with problems. The symptoms may vary. You might notice random top/bottom layers in the middle of the model, where it clearly should be just infill. Or missing features of the model. Sometimes the slicer will skip a few layers of your model. Sometimes just give up and produce a mess of seemingly random infills and perimeters. You may also encounter these problems when you try to edit the models (check our tutorial on how to stylize 3D models).
As an example, we’ll be using the Waving Groot model by Byambaa. The model looks wonderful. However, it has a dozen of errors. And in this case, the author decided to license the model under Creative Commons Attribution-NonCommercial-NoDerivs, so anybody who repairs the model is not allowed to re-upload the fixed version. This is the perfect example where the only solution is to repair to model by yourself.
Waving Groot model with lots of errors resulting in a missing layer on one of the arms
There are several ways to repair a 3D model. You’ll find that where sometimes one works and the other doesn’t, with a different model, different tools will successfully repair it. We’ll only focus on solutions that are free and easy to use:
- Microsoft STL repair – online service
- Meshmixer
- Auto-repair – easy to use, but doesn’t always work
- Make solid – that almost always works, but has its downsides
- 3D Builder – really easy to use and great tool, but only for Windows
Microsoft STL repair (formerly Netfabb)
Microsoft’s online solution to STL repairing. Uploading a file to a site and downloading back the repaired version? Can’t get much easier than that, right? Here’s the catch:
- You need a Microsoft account to be able to log-in to the service
- When you upload your STL to Microsoft STL repair service, you agree that Microsoft and it’s partners may use, modify or display your model. The definition in Terms of use is pretty vague, and it’s up to you to consider whether this matters or not.
- Your repaired file will not be in .STL format, but in .3MF
Converting .3MF file to .STL is easy. But the programs used for that conversion can repair models as well. And at that point, it’s questionable what’s the point of using Microsoft repair service in the first place. Well, whether you like it or not, Microsoft’s repair service can sometimes fix a model that other programs struggle with. The easiest way to co convert .3MF to .STL is probably in Meshmixer. Just drag and drop your file inside the Meshmixer window, select File -> Export (CTRL+E) and pick STL as the file format (STL binary or STL ASCII).
Meshmixer Auto-repair
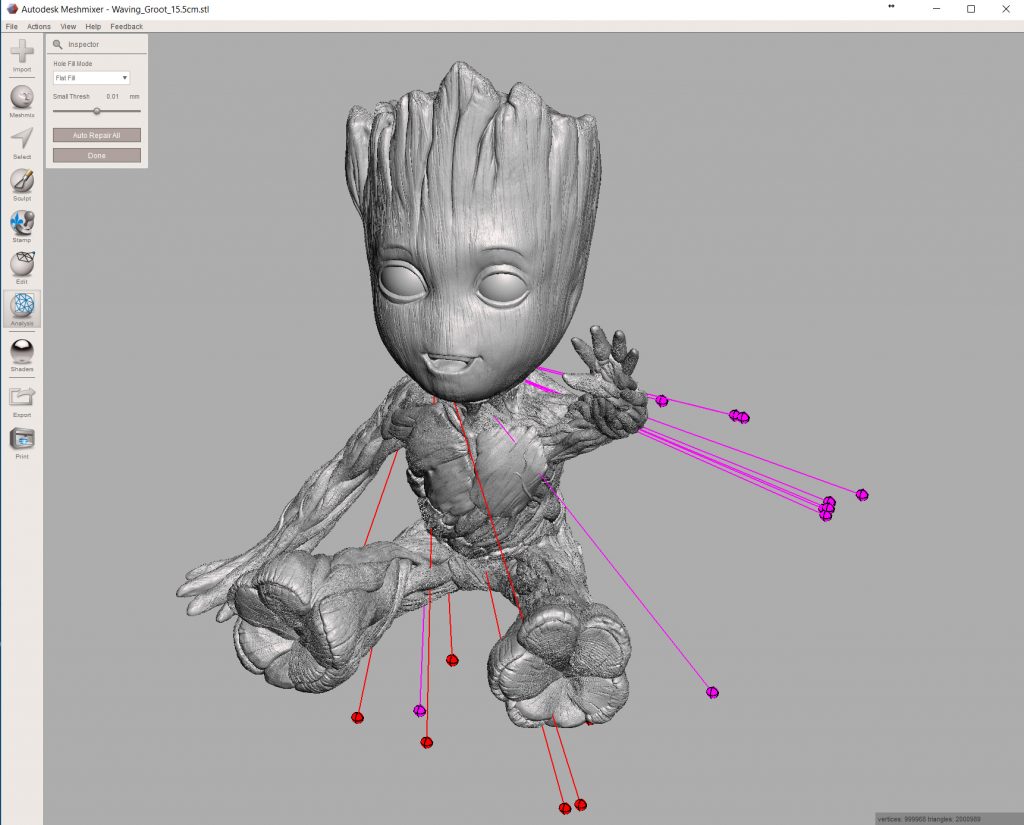
There are (at least) two ways to try and repair models in Meshmixer. The first one is by selecting Analysis -> Inspector. If your model contains holes, a blue marker will point at it. From the drop-down menu on the left side, you can select three different hole filling methods. Their names a fairly self-explanatory (Minimal fill, Flat fill, Smooth fill) and you’ll have to experiment with them. Different methods will work better with different models. Magenta markers point at disconnected or very small parts of the model, these will simply be deleted. And red markers show “non-manifold” geometry that cannot exist in real world. Which is obviously a problem since we want to 3D print the model. If you click on one of the markers, Meshmixer will try to fix the problem. However, if the marker turns black, it did not succeed and the problem persists. By click Auto Repair All Meshmixer will attempt to fix all of the problems. However, this does not always work. And so it’s time to use a bigger hammer!
Meshmixer Auto-repair
Meshmixer Make solid
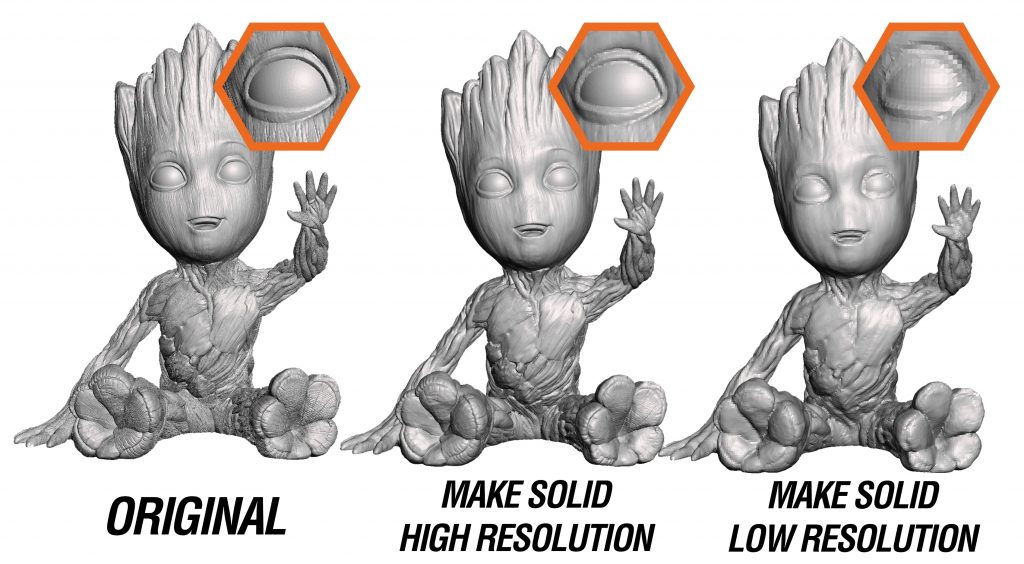
You’ll find this option under Edit -> Make Solid. In our previous article we used Make solid to create blocky or low poly versions of your model. This should give you a good idea of how destructive it is. Meshmixer will completely recalculate all triangles of the model, problematic or not. This will always repair any problems that the model might have had. But it degrades the quality of the model and increases the file size (quite a bit actually). The trick is to use high enough resolution that the quality decrease won’t be visible on the 3D print.
- From the drop-down menu choose Accurate as Solid Type. You may also choose Sharp Edge Preserving if you really want to keep edges really sharp. Again, Autodesk is pretty good at choosing self-explanatory names 🙂
- Use the Solid accuracy and Mesh density sliders to make the new re-meshed model look as close to the original as possible (usually, you’ll have to increase the default values).
- Hit Update to see the changes. Depending on the complexity of your model, this may take some time.
- Keep in mind the scale of your model. You might not like the small triangles on the edges of the model, but if they’re small enough and well beyond the resolution of any FDM 3D printer, you don’t have to worry about them.
- When you’re done, Accept the edit
- Choose File -> Export. Choose STL as the file format.
3D Builder
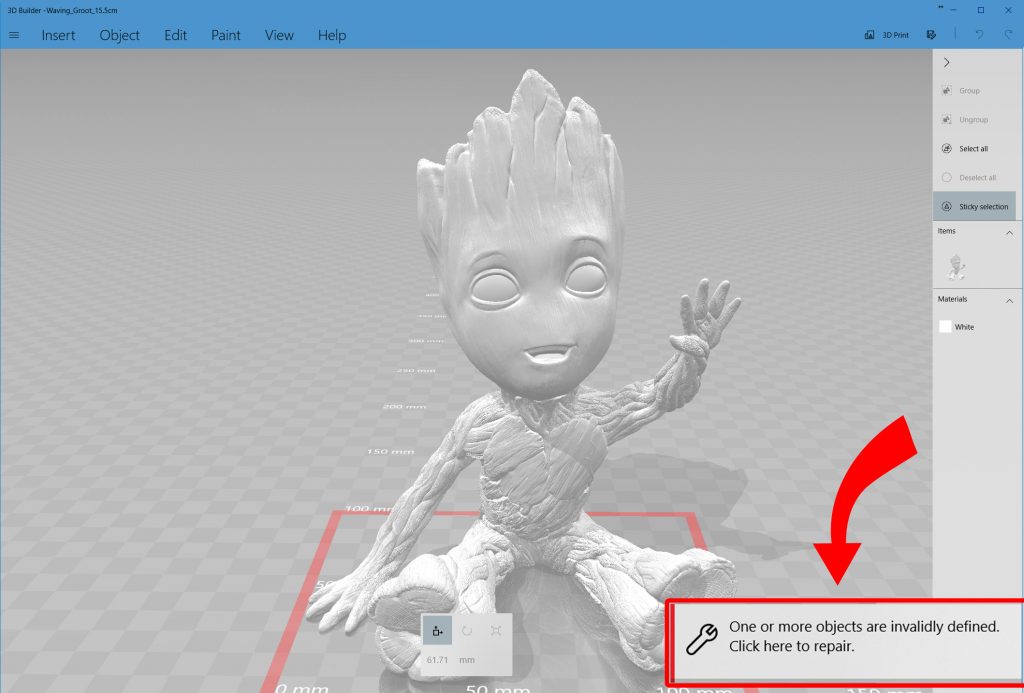
If you’re using Windows 10 (or 8) you’re in luck (at least in this case ;-)! Microsoft added an excellent app for editing models for 3D printing to the Microsoft Store called 3D Builder. Sadly, but for obvious reasons, it’s available only for Windows. When you open a model in 3D builder you first have to choose import units (typically millimeters). After that, if your model has any errors, the 3D Builder will put a red frame on the bottom of the model and offer you a one-click solution with a pop-up in the lower right corner. Just click on the repair box and that’s it. You can now save the model as STL. 3D builder has .3MF set as default output file format, so don’t forget to change it.
After you successfully repair your STL, the workflow is the same as if the model wasn’t broken in the first place. Import it to your favorite slicer, export gcode, upload it to the SD card, and you are ready to print.
Finished repaired Groot print on the Original Prusa i3 MK3


Thanks for sharing this. I am imprinting business I have to face such problem regularly.
It would be nice to see more love for us Linux users, especially those who aren’t going to give the models we’re printing to online services, particularly ones run by Microsoft.
Maybe an ‘advanced’ tutorial for using MeshLab? I’m pretty sure all the required functionality to repair any sort of common .stl defect is in there… somewhere…
The interface is just daunting to newbies (and I guess that includes me), being originally designed by and for scientists.
One thing I noticed with MS 3D builder’s repair. Sometimes it shows a repair complete and when you reopen the item, it shows need repair again…multiple times and long times for repair. Have had this happen with items I downloaded, some developed in 3D builder and some designed in Tinklercad. Some times I have just given up and redone the item from scratch.
Thank you for sharing this with us. A bim model is an amazing thing for every project. Building information modeling could be a handle bolstered by different devices, advances, and contracts including the era and administration of advanced representations of physical and useful characteristics of places. Quality bim model Denver, Colorado
do you have an update for this article, as I haven’t been able to find and/or fix flies with the tools mentioned
Reading through this article, and since I use Linux, I wanted to see if the tools that I already use for 3D drawings could work. FreeCAD, 20.2 has a Mesh analyze and repair tool in the Mesh Design workbench. I found an example on how to repair meshes for 3D printing and tested it with the Waving Groot model.
The basic scan looks like it found all the points that were indicated in the images above.
When I did a full scan of the model, I found many more errors than listed in this article. How it would affect the 3D printing, I don’t know. I will have to do more tests.
If you search for FreeCAD and Mesh Design Workbench, you can learn more about it.
Sometimes a repair is marked as finished, but when you open the product again, it still needs fixing.often and extensively for repair. This has happened with items I’ve downloaded, some of which were created in Tinkercad and others in 3D Builder basketball stars
A tool for Linux is the Blender's extension "Mesh Repair Tools".
Here the link
https://extensions.blender.org/add-ons/mesh-repair-tools/