If you don’t like juggling SD cards and consider Raspberry Pi with Octoprint too difficult to set up, then we might have the right solution for you: Toshiba FlashAir SD cards. There are already various posts about these Wi-Fi enabled cards in the discussion forums and Facebook groups. However, we wanted to share our own comprehensive guide on how to get this thing running without any issues. The whole process is very straightforward, and you will be able to upload G-codes wirelessly to your printer in just a few minutes!
Requirements
This tutorial expects that you have several things ready:
- Prusa i3 MK2 (or newer) 3D printer with the latest firmware. This method can be used for basically any hardware that accepts SD cards, but we’ll focus on our printers for obvious reasons 🙂
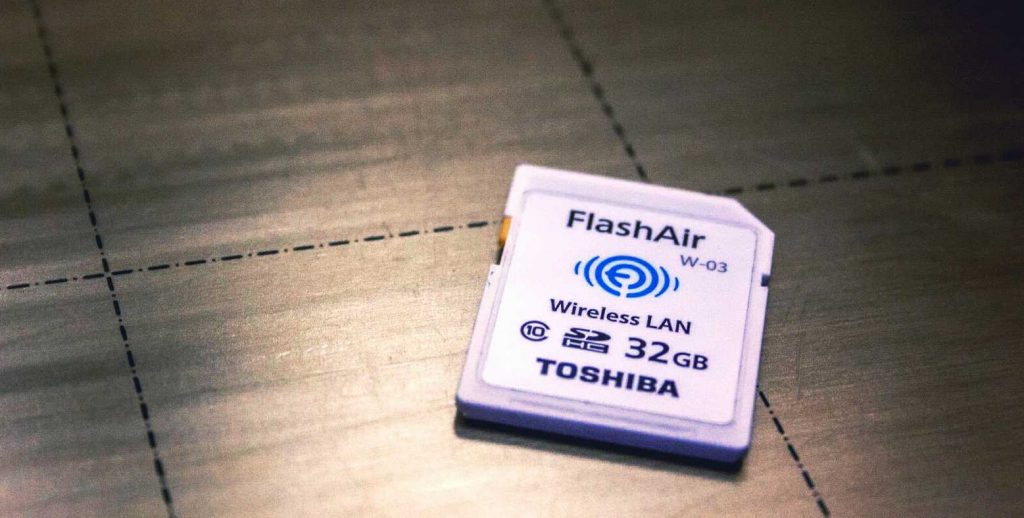
- Toshiba FlashAir SD card with Wi-Fi – any capacity, version W-03. This method would not work with W-01 and W-02, because they lack the capability to be mounted as a drive in Windows. Users reported version W-04 does not work either.
- A computer with an internal or external SD card reader.
- An existing Wi-Fi network
What is Toshiba FlashAir
Toshiba FlashAir looks like a regular SD card and works like one, too. But in addition to the standard SD card functionality, it has wireless LAN capability embedded, it can be programmed in LUA and it can also control its GPIO pins. Plus, it can publish its contents via the WebDAV protocol, which is exactly what we need.
To have everything working properly, you’ll need FlashAir version W-03. Older versions do not support WebDAV and can’t be used for our purpose.
You can get your FlashAir card for roughly 20-40 USD from Amazon, eBay, and even AliExpress. You can also check your local electronics and photo equipment retailers but always double-check the version of the card. From my experience, they often have old stock of W-02 or even the original FlashAir (W-01, although it’s not written on the card). So beware!
Configuring the FlashAir card
The card’s configuration is done using a text file. This file is named CONFIG (it does not have any extension) and it resides in the SD_WLAN folder. The folder and the file are hidden, so you’ll have to turn on the Show Hidden Files and Folders function in Windows Explorer.
Create a backup of your CONFIG file and name it “CONFIG.old”, for example.
Then replace the contents of the CONFIG file with the following:
[Vendor]
APPSSID=your-wifi-name
APPNETWORKKEY=your-wifi-password
CID=02544d535733324740e35b5979010b01
VERSION=FA9CAW3AW3.00.01
APPMODE=5
APPNAME=3D_printer
LOCK=1
PRODUCT=FlashAir
STA_RETRY_CT=0
UPDIR=/G-Code
UPLOAD=1
VENDOR=TOSHIBA
WEBDAV=2
You will have to modify the first four values:
- APPSSID and APPNETWORKKEY are the name and password of your wireless network.
- CID is your SD Card ID. It’s a long hexadecimal number and there is no need to change it. Copy the value from your old CONFIG file, because the value in the code above is just an example.
- VERSION corresponds to the firmware version of your card. Copy the value from your old CONFIG file, because the value in the code above is just an example.
The original file can contain more parameters, but they are not important for us at this point. If you would like to know more about FlashAir’s function, you can check the official documentation. Next, there are some optional parameters you might want to tweak, but it’s not required.
- APPMODE is Wi-Fi operation mode. In our case, we say that the wireless functionality should be enabled and that the card must be in Station Mode (client).
- APPNAME is the logical name of our card, I named it 3D_printer.
- STA_RETRY_CT sets how many times the card will try reconnecting to a wireless network upon failure. Zero will set an unlimited number of retries.
- UPDIR is the path to a folder on the card that allows remote uploads.
- UPLOAD set to 1 enables actual uploads to the given folder.
- VENDOR is the vendor of your SD card.
- WEBDAV set to the value of 2 turns on the WebDAV functionality in read and write mode.
The settings above will enable anyone who is connected to your network to manipulate files on your SD card. If this is not what you want, you need to set up authentication using the HTTPDMODE, HTTPDUSER and HTTPDPASS values. See the documentation for more information on how to configure it.
Also, you don’t need to worry about saving your Wi-Fi password in a plaintext file. Once the card connects to the Wi-Fi network for the first time, the password is then securely stored and it is replaced by asterisks in the text file.
As the last step, create the G-code directory in the root of your SD card. You can now safely remove the card from your computer and insert it into your printer.
Configuring the printer
You basically don’t need to configure anything on the printer. You’ll only have to find out your card’s IP address. Prusa i3 MK2 and newer have support for FlashAir SD Cards and can tell you the assigned IP address if you activate this functionality.
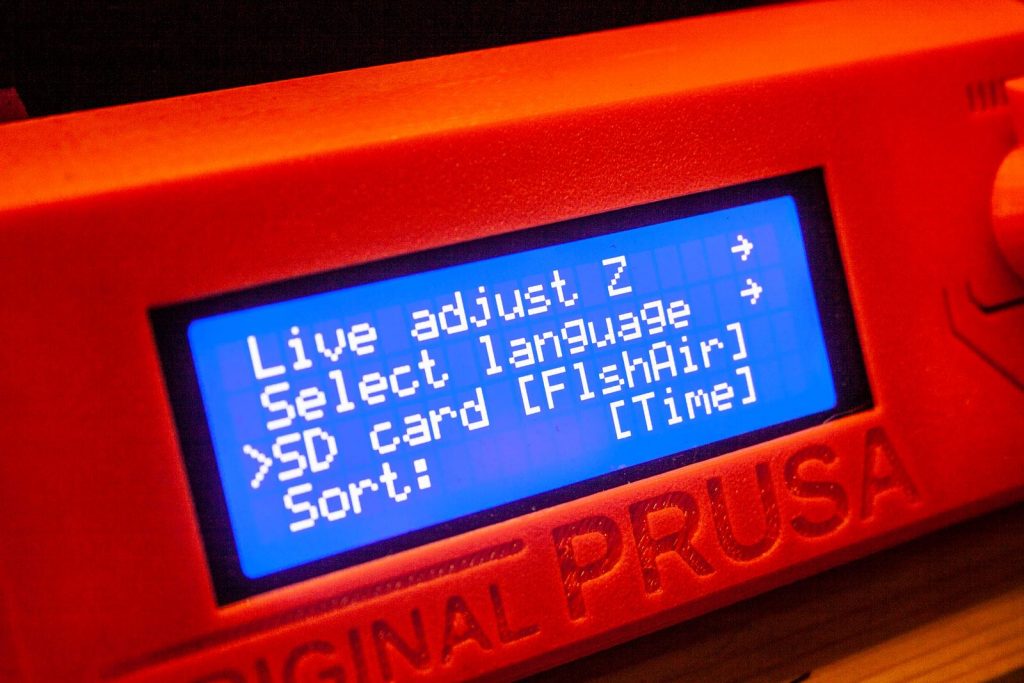
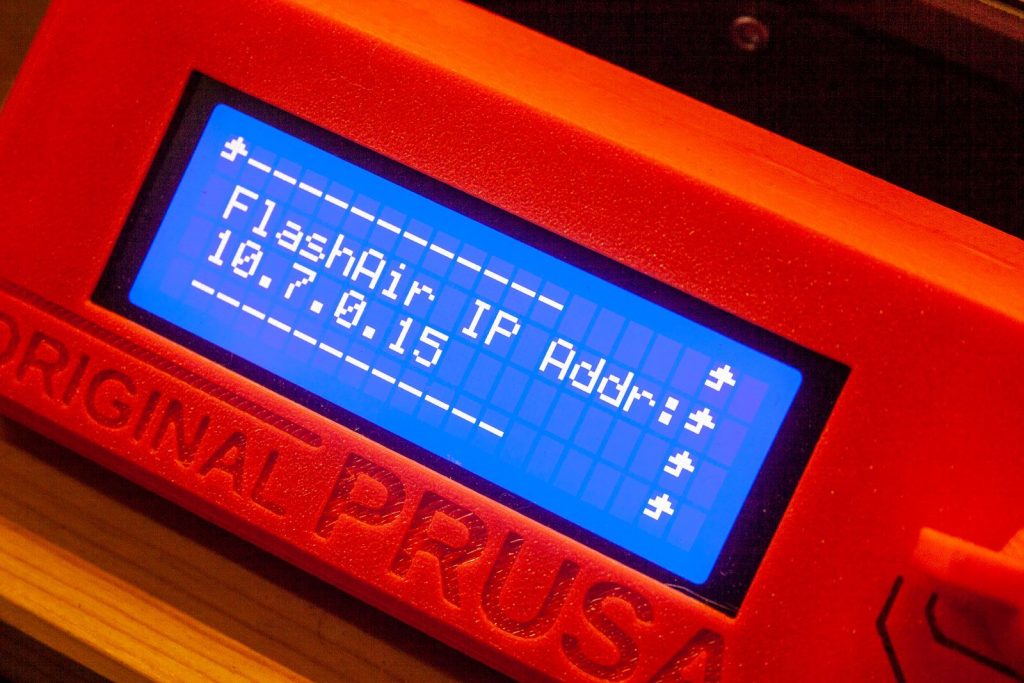
To enable FlashAir support on your printer, go to Menu -> Settings -> SD Card and select FlshAir. Once you do this, you will see your FlashAir IP address in Menu -> Support as “FlashAir IP addr.” Write it down.
The IP address can change based upon your network configuration and connected devices. We recommend using the DHCP reservations function of your router, which will assign always the same IP address to the same device (MAC address). Also, it’s good to set a DNS name for your card/printer if you can. Again, the process is different for each router model and type.
Configuring the computer
You can map the card’s WebDAV storage as a network drive in any supported version of Windows and in other operating systems as well. The following instructions describe how to do it in the current version of Windows 10. FlashAir should be compatible with MacOS as well, however, some users are reporting compatibility issues in newer versions of the OS. Check the manufacturer’s website to see whether your system is compatible.
Windows 10 instructions:
- Open Windows Explorer.
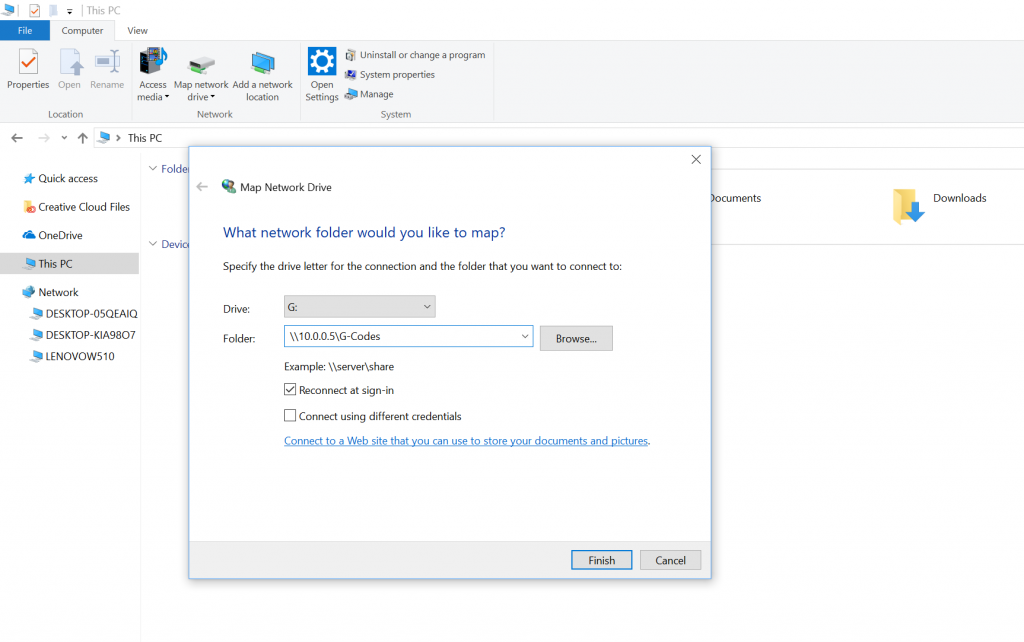
- Right-click the Network node in the left folder tree and choose Map Network Drive from the context menu. Alternatively, use the Computer tab in the Explorer’s toolbar and then select the Map Network Drive
- It will open the same wizard, where you can choose your drive letter (I use G: as in G-Code) and Folder. The folder path is \\10.0.0.15\G-Code (replace 10.0.0.15 with the IP address of your card). Also, check Reconnect at sign-in, so the mapping will survive a reboot of the computer. Then click Finish.
After a few seconds, the new network drive will be added to your computer and anything you’ll save there will be saved to the G-Code folder on your SD card.
Please note that your printer will not show all files in the printing menu, only files with G-Code extensions like .gcode, .gc or .g.
Conclusion
The FlashAir solution is definitely less powerful than the full-fledged OctoPrint or Repetier-Server installation because it enables you to only transfer files. You can’t start or monitor your print remotely etc. On the other hand, it’s a quick, easy and cheap way how to transfer G-Codes to your printer wirelessly, which makes using our printers even more comfortable. So if you don’t need advanced functions of OctoPrint, this might be just the perfect solution for you.


What about other Wireless SD Cards? ezShare, Transcend (TS32GWSDHC10 ) and EyeFi?
I use this setup for connection of my MK3 and my iMac. The data transfer rate ist pretty low and the connection is sometimes erroneous. Maybe this is because it uses http instead of smb.
Very helpful!
I actually bought one of these with my MK3, and I couldn’t figure out how to set it up as a wireless client, so it was mostly useless and I tossed it on the shelf until I read this.
Since I’m a Linux guy, I wrote command-line scripts to move files between the PC and the card. I put them on GitHub at https://github.com/CrashCash/FlashAirScripts if anyone else is interested.
I use this setup for connecting my MK3 with my iMac. Mostly it works, but sometimes it does not work. And it is slow. I same the reason behind it is the protocol, the card uses http instead of smb.
The Flashair W-03 16GB SD card worked well for me on the MK3 with Windows7 OS. The Flashair shows up in Window File Exporer as the mapped drive I selected “P”. I can the send files from Simplify3D right out to the Flashair SD card in a few seconds.
It was an effort to get all the configuration information and process from all over the internet and the forum but this article should help clarify the process of setup.
It is a great option as I did not want the Optiprint option just to transfer files.
The Flashair W-03 16GB SD card worked well for me on the MK3 with Windows7 OS. The Flashair shows up in Window File Exporer as the mapped drive I selected “P”. I can then send files from Simplify3D right out to the Flashair SD card in a few seconds.
It was an effort to get all the configuration information and process from all over the internet and the forum but this article should help clarify the process of setup.
It is a great option as I did not want the Optiprint option just to transfer files.
Got this to work using the 11G network. Would not connect using 11N network.
I am unable to get the Toshiba FlashAir W-04 card set up to work with the Prusa Mk3 3D Printer on my desktop iMac running High Sierra and am wondering if anyone here has done it.
More specifically, the IP address does not show up under Support in the printer.
Thanks Michal. Setup was a piece of cake thanks to your article. 5mins up and running. Wifi throughput is not stellar, but enough for day to day use.
I found this parameter to improve performance:
WLANAPMODE=0x82
which sets WLAN standard to 802.11ng (default is 802.11bg)
Also, I ran into trouble uploading a gcode file larger than ~7MB which was fixed by upgrading Flashair firmware to its latest release 4.0.3
https://jp.toshiba-memory.com/ww/support/download/flashair/w04/update02.htm
Now, its down to 20min setting it all up and doing some research.
Add this GUI by Dr.Lex into your FlashAir. https://github.com/DrLex0/FlashAirUI and you can do rename, delete.
Thanks for your post.
Fact is that the overall user experience is ridicuusly bad.
Despite following the instuctions (using a W.-04), I got a “exceeding size allowed”, then after figuring that out, I got an erro (while SD card was plugged) that upload is denied / oversized again blablablabla.
Honestly, I wrote off my 30$ and keep on un-/plugging my SDCard just as often as ever. Disappointed.
AND NO, I figured out the right config for sure….some part of Toshiba Firmware (latest 4.0.003, FAT32) does not work. No blame on Prusa here, but still, KEEP YOUR HANDS OFF imho.
Addendum:
Upon trying to exporting a gcode file to the WEBDAV folder, I get a “not accesîble, paramter is incorrect” error. Boring.
Many thanks Michal.
I tried to set up Flashair over a year ago and gave up. 15 minutes following your article and files transferring rapidly and flawlessly. Really chuffed!
The Flashair W-03 16GB SD card worked well for me on the MK3 with Windows7 OS. The Flashair shows up in Window File Exporer as the mapped drive I selected “P”. I can then send files from Simplify3D right out to the Flashair SD card in a few seconds. for the more tech related help do visit https://www.printererrorrepair.com/blog/connect-hp-printer-wifi-router/ and get the assistance.
I can confirm that the W-04 32GB works great on the MK3S. I suspect people are having problems with >32GB cards because of FAT32 limitations.
Transfer speeds are surprisingly good, I get a stable 1-1.5 MB/s with two thick walls between the Prusa and my access point – about the same I get with my OctoPi. WebDAV access from Linux works flawlessly. Largest file I’ve uploaded is the Moon City G-code (~180MB). No problems.
It’s nice to have the option to do large prints directly from SD (power loss recovery) without losing the convenience of WiFi. Plus, an entire computer in SD card format… I just had to own it 🙂
Upgrading the AirFlash firmware to 4.0.3 was the biggest hassle. Toshiba’s utility tells you to “safely remove” the device between the 3 steps, however if you do, it won’t detect it again when plugging it back in. The trick is to simply just unplug the device instead, obviously waiting 10 seconds or so for any buffers to hopefully get flushed…
Has anyone tried any other brand cards? Or is the Toshiba ones the only ones supported by Prusa?
I just installed the W-04 card and got it working, but your instructions are incorrect on one point: My Prusa mk3S with firmware 3.7.2 (latest available as of 2019-07-09) does NOT display the IP address in the Settings Menu. I had to log into my ASUS router and look in the Network Map>>List section, where I saw a “Toshib” (sic) device, and the associated IP address G-Code folder mapped as a network drive, lettered P. I was able to download gCode to it, so I know it works.
Since the W-04 card is the only one available these days, the firmware needs to be updated to see that card. Or, at least, your instructions ought to be corrected. Lotta time wasted here.
One thing I noticed is that when the printer is turned off, then back on, my mk3S does not know there is a card in the SD slot. I have to remove it, then put it back in, sometimes multiple times, before it recognizes there is a card in the slot. Is there a fix for this? Sort of defeats the purpose of using the card to reduce the wear and tear of the card reader.
Super crappy on MacOS 10.12.6 drop-outs, reconnects, not finishing copy etc.
The modern age is the age of instant communication and to accomplish this need of instant communication various cable service provider companies are present across the globe. Cox communication is also one of the top-notch cable service provider companies. It was originated in 1962 and today it has established itself as the renowned cable service providers of the U. S.A. Different services that are provided by this brand are Cox cable T.V, wireless home network services, high-speed internet and many more. Despite the huge popularity of this brand, the clients can observe some glitches while using their services. This blog focuses on how to reset your Cox email account password. The password can be hacked by the unauthorized hackers, or it can be forgotten by you. Whatever may be the scenario, you can learn to do Cox password reset by scrolling below.
https://www.cuesinfo.com/blog/cox-password-reset/
I was able to make it work in a FlashAir W-04 64GB… Notes:
– IP address does NOT show in the printer’s support menu.
– I only used a 32gb partition.
– FAT32
– I upgraded its firmware to v4 using https://jp.toshiba-memory.com/ww/support/download/flashair/w04/update02.htm
– I used WLANAPMODE=0x82, otherwise it is SUPER slow!
– The flash drive MUST be inserted before turning on the printer, otherwise it will show “No SD Card”
I do not need more than 32gb so I did not try to make it work with 64gb/FAT32.
Hi
I am trying to get W04 working.
Any chance you could post your config file so I could copy it?
Regards
Ian
[Vendor]
VERSION=F15DBW3BW4.00.04
CID=XXXXXXXXXXXXXXXXXXXXXXX
APPSSID=XXXXXXXXXXXXXXXXXXXXXXX
APPNETWORKKEY=*************************
LOCK=1
WEBDAV=2
UPDIR=/G-Code
UPLOAD=1
TIMEZONE=-20
DNSMODE=1
APPMODE=5
WLANAPMODE=0x82
MASTERCODE=XXXXXXXXXXXXXXXXXXXXX
FlashAir should be compatible with MacOS as well, however, some users are reporting compatibility issues in newer versions of the OS. Check the manufacturer’s website to see whether your system is compatible.
Click here: https://www.klantenservicenummer.co/gmail-nederland/
My FlashAir had been working perfectly for me since my last post above (Aug., 2019). But in a struggle to get PrusaSlicer 2.2.0 to show the Orange Ball to change filaments, I managed to screw up the FlashAir, and I had to reinitialize it. Follow the instructions above, but make sure to keep the following line in the CONFIG file: VERSION=FA9CAW3AW3.00.01. If you change it to W4xxx as suggested, Windows 10 will not properly see the drive.
And yes, PrusaSlicer 2.2.0 has a bug in it that makes the Orange ball disappear. 2.1.1 works correctly, as does 2.3.0 alpha3, which I now use.
Finally found a way to delete some obsolete mapped drives in W10 that skunked up my installation:
I had to open the W10 Registry Editor app, and drill down to
HKEY_CURRENT_USER\Software\Microsoft\Windows\CurrentVersion\Explorer\MountPoints2\
in order to delete all the old mapped drives that Windows would not let me delete at the File Explorer level. Microsoft: gotta love ’em, gotta hate ’em.
Also, now using a static IP address which makes things very stable for me. final CONFIG file for my particular router/IP:
[Vendor]
APPSSID=
APPNETWORKKEY=
CID=02544d535733324755e3f7497b012301
VERSION=F15DBW3BW4.00.02
APPMODE=5
APPNAME=3D_printer
LOCK=1
PRODUCT=FlashAir
STA_RETRY_CT=0
UPDIR=/G-Code
UPLOAD=1
VENDOR=TOSHIBA
WEBDAV=2
DHCP_ENABLED=NO
IP_Address=192.168.1.233
Subnet_Mask=255.255.255.0
Default_Gateway=192.168.1.1
Preferred_DNS_Server=192.168.1.1
Just wanted to get a W-03 or W-04 Flash Air card, but it’s difficult to get an affordable one these days. I saw some Thoshiba 8 GB Flash Air cards on Ebay.de. They are specified as Class6 SDHC Cards, but no W-04 or similar marker. Will these kind of card work also in my Mk3s+? Or it’s a must to have a W-04 or W-03 card?
Cannot Connect to Printer 0x00003e3 occurs it happens when misplaced of Mscms.dll file, a defective Printer spooler, and an unsuitable printer driver.
https://www.printererrorsupport.com/blog/printer-error-0x00003e3-in-windows-10/ Follow the given steps that are mentioned in the blog.
The card you indicate in the tutorial is now difficult to find at a normal price. I would like to take another brand but I don’t know which one?
Do you have an updated list of WiFi SD cards compatible with Prusa?
I am not sure when the cost for the Toshiba FlashAir changed, but I have not found one online for less than $300 USD… (Feb. 12, 2022)
Supply chain/IC chip shortage related?
I have the W-04 card and it works just fine for me:
VERSION=F15DBW3BW4.00.04
Be aware though it appears this is only a 2.4Ghz card so if your router is set for 5Ghz only it may not work.